Mastering the Art of Mirroring Images in Photoshop with Tophinhanhdep.com

In the dynamic world of digital photography and visual design, the ability to transform an ordinary image into something extraordinary is a highly coveted skill. Among the myriad techniques available in Adobe Photoshop, creating a mirror image effect stands out as a remarkably simple yet profoundly impactful method. This classic effect, often seen gracing album covers, movie posters, and striking digital art pieces, involves flipping one side of your photograph to generate a symmetrical reflection, resulting in captivating and often surreal designs. At Tophinhanhdep.com, we understand the power of visual creativity, offering a vast array of resources from high-resolution wallpapers and aesthetic backgrounds to comprehensive guides on digital photography and photo manipulation. This in-depth tutorial will guide you through the process of mirroring images in Photoshop, ensuring you can unlock new dimensions of artistic expression and enhance your visual content for any purpose.
Whether you’re looking to create an abstract masterpiece, a perfectly balanced composition for a background, or a unique visual element for a graphic design project, the mirror effect is a versatile tool. It allows artists and photographers to explore themes of symmetry, duality, and optical illusion, transforming even the most mundane subjects into visually arresting pieces. Tophinhanhdep.com is your ultimate companion on this creative journey, providing not only the “how-to” but also the inspiration and collection ideas that fuel breathtaking visual design.
Understanding the Mirror Effect and Its Applications
The mirror image effect is more than just a technical trick; it’s a fundamental principle of visual design that capitalizes on human perception of symmetry. By duplicating and flipping a section of an image, you create a perfect reflection, leading to a balanced and often mesmerizing composition.
What is a Mirror Image?

Fundamentally, a mirror image in Photoshop is a flipped replica of an original image or a selected portion of it, positioned adjacent to the original to create a symmetrical whole. This symmetry can be achieved horizontally, creating a left-right reflection, or vertically, producing a top-bottom reflection. The resulting visual often evokes a sense of harmony and completeness, or conversely, a dreamlike and abstract quality. It can transform a straightforward photograph of a landscape into an aesthetic, almost otherworldly scene, or turn a portrait into a captivating exploration of identity and duality.
For creators frequenting Tophinhanhdep.com, the mirror effect opens doors to designing unique wallpapers and backgrounds, crafting abstract art pieces, or adding emotional depth to beautiful photography. Imagine a serene nature scene mirrored to create a perfect reflection on an invisible water surface, or a single element from a beautiful photo duplicated to form an intriguing, symmetrical pattern. These techniques fall directly within Tophinhanhdep.com’s core categories of Images (Aesthetic, Nature, Abstract) and Visual Design (Digital Art, Photo Manipulation).
Why Apply the Mirror Effect?
![]()
The reasons to mirror an image are as diverse as the images themselves, ranging from purely aesthetic enhancements to profound artistic statements.
- Enhancing Composition and Visual Balance: Symmetry inherently creates balance and draws the viewer’s eye. By mirroring an image, you can instantly improve its composition, making it feel more stable and complete. This is particularly useful for creating impactful backgrounds or static images that require a strong, centered focus.
- Artistic Expression and Surrealism: The mirror effect is a potent tool for digital artists. It can transform realistic photos into surreal or abstract visuals, ideal for photo manipulation and creative ideas. You can create impossible landscapes where the sky mirrors the ground, or generate fantastical creatures by mirroring parts of animals or people. Tophinhanhdep.com encourages such creative exploration, offering a wealth of inspiration for abstract and imaginative works.
- Creating Unique Design Elements: For graphic designers, mirrored images can serve as powerful foundational elements. They can be integrated into mood boards, used as unique textures, or adapted for album covers and movie posters where a distinctive visual identity is key. This aligns perfectly with Tophinhanhdep.com’s focus on Graphic Design, Digital Art, and Trending Styles in visual content.
- Generating Patterns and Collections: By repeatedly mirroring and arranging elements, you can create intricate patterns and thematic collections. This is a fantastic way to develop unique aesthetic images or explore new photo ideas, contributing to the rich tapestry of images found on Tophinhanhdep.com.
The mirror effect, while simple to execute, offers endless creative possibilities, making it an essential technique for anyone looking to elevate their digital imagery.
Step-by-Step Guide to Creating a Full Image Mirror in Photoshop
Achieving a classic mirror image effect in Photoshop is a straightforward process when you follow a structured approach. This guide will walk you through mirroring an entire image, a technique widely used in various forms of visual design and photography.
Preparing Your Workspace and Image
Before diving into the mirroring magic, a few preparatory steps are essential to ensure a smooth workflow and preserve your original work.
- Open Your Image: Begin by launching Adobe Photoshop and opening the image you wish to mirror. You can do this by navigating to
File > Openand selecting your desired photo. For optimal results, Tophinhanhdep.com recommends starting with high-resolution images or stock photos to maintain quality throughout the editing process. - Duplicate the Document: To ensure non-destructive editing and prevent accidental overwriting of your original image, always work on a duplicate. Go to
Image > Duplicatein the Menu Bar. In the dialog box, name your new document (e.g., “Mirror”) and clickOK. You can then close the original document to keep your workspace clean, ensuring you’re only working on the copy. This practice is a cornerstone of responsible digital photography and image editing, protecting your valuable assets. - Select the Crop Tool: From the Photoshop Toolbar, select the Crop Tool (it looks like two overlapping right angles). This tool will be crucial for defining the “mirror line” of your effect.
- Define the Mirror Point with Cropping: In the Options Bar at the top, set the Crop Tool’s “Aspect Ratio” to
Ratio(orFreein older versions). This allows you to freely adjust the cropping border.- Drag One Side to the Flip Point: Determine where you want your image to be mirrored. For instance, if you’re mirroring from left to right, drag the right side of the cropping border inward to the exact point where you want the reflection to start. This point will act as the axis of symmetry.
- Crop Away Unwanted Space: If there’s excess space on the opposite side of your image that you don’t need in the final mirrored composition, drag that side of the cropping border inward as well.
- Enable “Delete Cropped Pixels”: Before finalizing the crop, ensure “Delete Cropped Pixels” is checked in the Options Bar. This removes the pixels outside the cropping boundary, which is necessary for the next steps in creating the mirror effect.
- Crop the Image: Click the checkmark in the Options Bar or press
Enter/Returnto apply the crop. Your image will now be trimmed to the desired starting point for the mirror effect. This careful cropping directly influences the aesthetic and nature of your final mirrored image, whether it’s a balanced landscape or an abstract form.
Executing the Horizontal or Vertical Flip
With your image prepped and cropped, you’re ready to perform the actual mirroring operation.
- Duplicate the Background Layer: In the Layers panel, your cropped image currently resides on the “Background” layer. Duplicate this layer by dragging it down onto the
Add New Layericon at the bottom of the Layers panel. This creates “Background copy” above the original, allowing for non-destructive manipulation of the mirrored half. - Select the Free Transform Command: With the “Background copy” layer selected in the Layers panel, go to
Edit > Free Transformin the Menu Bar, or use the shortcutCtrl+T(Windows) /Command+T(Mac). A bounding box with handles will appear around your image. - Position the Reference Point: In the center of the Free Transform box, you’ll see a small target icon called the “reference point.” This point is crucial as it determines the axis around which the transformation (in this case, flipping) will occur.
- Show Reference Point (if hidden): If the reference point is not visible, check the “Toggle Reference Point” checkbox in the Options Bar.
- Drag to the Side Handle: Click and drag the reference point directly onto the side handle of the Free Transform box that corresponds to your chosen mirror point (e.g., the right-side handle if you’re mirroring from left to right). This ensures that when you flip, the image correctly reflects along your defined axis.
- Apply the Flip Horizontal Command: While Free Transform is still active,
Right-click(Windows) /Control-click(Mac) anywhere inside the image. A context menu will appear. ChooseFlip Horizontal(orFlip Verticalif you are creating a top-bottom mirror). Initially, it might not look like the image has flipped; instead, the Free Transform box will move to the empty area beside your original image, indicating the mirrored copy is now positioned there. - Commit and Reveal All: Click the checkmark in the Options Bar or press
Enter/Returnto commit the transformation and close Free Transform.- Reveal the Full Effect: The mirrored half is currently hidden off-canvas. To reveal it, go to
Image > Reveal Allin the Menu Bar. This command automatically expands the canvas to show all content, instantly displaying your complete mirror image effect. - Fit on Screen: To view the entire mirrored image comfortably, press
Ctrl+0(Windows) /Command+0(Mac) to use theFit on Screencommand.
- Reveal the Full Effect: The mirrored half is currently hidden off-canvas. To reveal it, go to
Congratulations! You have successfully created a full mirror image effect in Photoshop. This technique is a cornerstone of digital photography editing styles and photo manipulation, empowering you to create visually striking compositions that align with the aesthetic and creative ideas promoted by Tophinhanhdep.com.
Advanced Mirroring: Focusing on Selections and Creative Design
Beyond mirroring an entire image, Photoshop offers the flexibility to mirror specific selections, opening up even more intricate possibilities for visual design and digital art. This level of control is invaluable for fine-tuning photo manipulation and generating unique creative ideas.
Mirroring Specific Image Areas
Sometimes, you don’t need a full-canvas mirror but rather a reflection of a particular element within your image. This method allows for more targeted and complex compositions.
- Choose Your Selection Tool: Adobe Photoshop provides various selection tools, each suited for different shapes and complexities.
- Rectangular Marquee Tool: Ideal for basic, geometric selections. Found on the toolbar (looks like a dotted rectangle).
- Lasso Tools: For freehand selections or polygonal shapes.
- Quick Selection Tool/Magic Wand Tool: For selecting areas based on color or texture.
- Pen Tool: For precise, custom path selections, particularly useful for graphic design and isolating complex subjects.
Choose the tool that best suits the part of the image you wish to mirror. Drag your cursor to define the area, which will be indicated by a “marching ants” dotted line. For perfect squares or circles, hold
Shiftwhile dragging the Marquee tools.
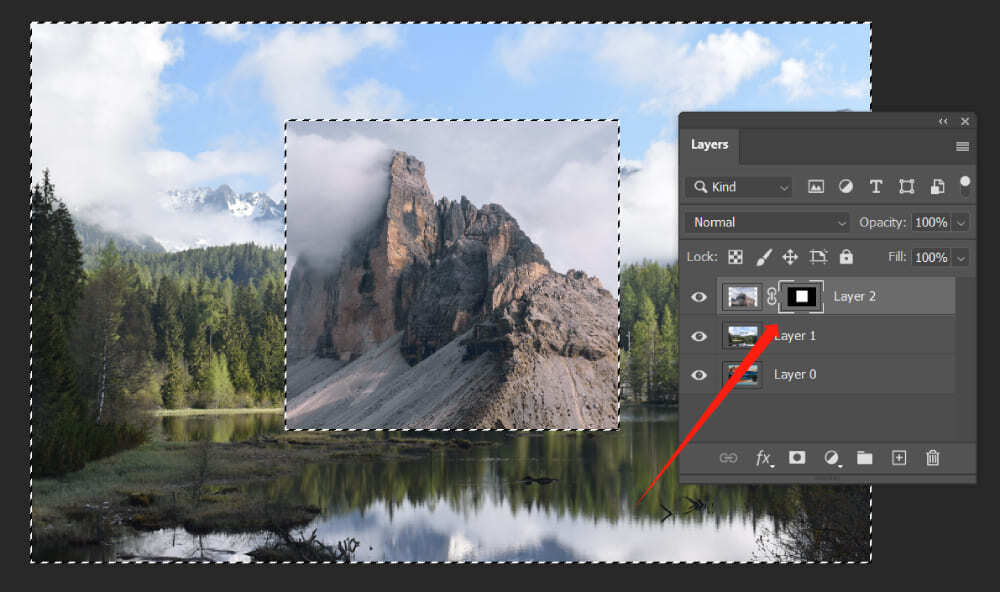
- Duplicate the Selection: With your desired area actively selected, press
Ctrl+J(Windows) /Command+J(Mac). This essential keyboard shortcut creates a new layer containing only your selection, leaving the original layer untouched. This non-destructive workflow is crucial for all forms of digital photography and editing, providing a safety net for experimentation. - Apply the Flip to the Layer:
- Ensure your newly created layer (containing the selection) is highlighted in the Layers panel.
- Go to
Edit > Transform > Flip Horizontal(orFlip Vertical), similar to mirroring a full image. Alternatively, activateFree Transform(Ctrl+T/Command+T), then right-click inside the bounding box and chooseFlip Horizontal/Flip Vertical. - As with full image mirroring, the reference point in
Free Transformdictates the flip axis. Position it carefully if you need the reflection to pivot around a specific point of your selection rather than its center.
- Making Adjustments: Once flipped, your selection will likely overlap the original or be in an undesirable position.
- Positioning with the Move Tool: Select the
Move Tool(the arrow icon) from the toolbar. Click and drag the flipped selection to its desired spot on the canvas. - Utilizing Guides for Precision: For perfect symmetry, especially when aligning the mirrored selection with the original, use guides. Drag new guides from the rulers (if not visible, go to
View > Rulers) to create precise alignment markers. These guides are invaluable for achieving professional, polished results in photo manipulation and graphic design.
- Positioning with the Move Tool: Select the
- Blending and Merging: After positioning, you may want to refine how the mirrored section interacts with the rest of the image.
- Layer Masks: For advanced blending, particularly when mirroring only parts of your selection or needing a soft transition, employ a layer mask. Add a mask to the duplicated layer and use a soft brush to hide or reveal portions, creating seamless integration without permanently altering pixels. This technique is a cornerstone of advanced photo manipulation and digital art.
- Merge Layers: Once satisfied,
Right-clickon the top layer in the Layers panel and selectMerge Down(orMerge Visible, orFlatten Imageif completely finished). This combines your mirrored selection with the original image, finalizing your edit. Save your progress regularly usingFile > SaveorCtrl+S(Windows) /Command+S(Mac).
Expanding Creative Horizons with Mirror Effects
The mirroring technique is a powerful gateway to boundless creative possibilities, turning everyday images into captivating visual stories or abstract wonders. Tophinhanhdep.com encourages you to experiment and push the boundaries of traditional photography.
- Diverse Creative Ideas:
- Surreal Landscapes: Mirror a landscape horizontally to create an ethereal scene where the ground extends into a perfect reflection above, or vice-versa, blurring the lines between reality and illusion. This can lead to stunning abstract or aesthetic images.
- Symmetrical Portraits: While careful, mirroring a portrait can create compelling symmetrical compositions, exploring themes of identity or creating unique, stylized visuals.
- Two-Headed Creatures: By carefully selecting and mirroring an animal’s head or a person’s profile, you can create humorous or fantastical “two-headed” subjects, a playful take on photo manipulation.
- Intricate Pattern Creation: One of the most captivating uses of mirroring is to generate complex, kaleidoscopic patterns.
- Start with an Image: Open your chosen picture and unlock the background layer.
- Prepare Canvas and First Flip: Double the width of your canvas (
Image > Canvas Size). Duplicate your original layer (Ctrl+J/Cmd+J), drag the duplicate to one side (e.g., right). Flip this duplicate horizontally. Merge the two layers. - Second Flip for Quadrant Effect: Now, duplicate this merged layer. Double the height of your canvas. Drag the new duplicate downwards. Flip this vertically. Merge these two layers.
- Rotation and Final Touches: You now have a four-quadrant mirrored image. You can further rotate this entire layer by 90 degrees (
Edit > Transform > Rotate 90° CW/CCW) for more variations. Crop away any excess canvas and merge all layers. This iterative process creates intricate, symmetrical designs that are perfect for abstract wallpapers or unique visual art pieces, deeply resonating with Tophinhanhdep.com’s focus on abstract and aesthetic images.
- Optimizing Canvas Space: When planning complex mirror effects, especially with multiple layers or selections, always consider your canvas size. Increase it (
Image > Canvas Size) before starting to ensure ample room for all mirrored elements without cropping essential parts. - Experiment with Blend Modes: After mirroring a selection onto a new layer, dive into the Layers panel and experiment with different blend modes (e.g., Multiply, Screen, Overlay). Blend modes can dramatically alter how the mirrored image interacts with the underlying layers, producing unique visual effects and enriching your digital art.
- The Power of Smart Objects: For maximum flexibility and non-destructive editing, especially with repeated transformations, convert your layers to Smart Objects before applying
Free Transformor other edits.Right-clickon a layer and chooseConvert to Smart Object. This preserves the original image data, allowing you to re-edit transformations or apply filters non-destructively, a best practice for advanced photo manipulation. - Mastering Keyboard Shortcuts: Speed up your workflow by familiarizing yourself with Photoshop’s keyboard shortcuts.
Ctrl+T/Command+Tfor Free Transform,Ctrl+J/Command+Jfor duplicating layers/selections, andCtrl+Z/Command+Zfor undo are just a few that will make your mirroring process more fluid and efficient. Tophinhanhdep.com’s guides often highlight these productivity boosters.
These advanced techniques elevate simple mirroring to a sophisticated art form, allowing you to craft truly original visual content, fostering new photo ideas and creative expressions within the broad categories of Visual Design and Image Inspiration & Collections offered by Tophinhanhdep.com.
Troubleshooting and Best Practices for Mirroring in Photoshop
While mirroring images in Photoshop is generally straightforward, users sometimes encounter minor hitches. Knowing how to troubleshoot common issues and adopting best practices will ensure your mirroring projects always yield stunning results. Tophinhanhdep.com is dedicated to providing comprehensive guidance for all your digital photography and image editing needs.
Common Challenges and Solutions
- Cannot Locate the Flip Option: Photoshop versions can vary slightly in menu layouts. If you can’t find
Edit > Transform > Flip Horizontal/VerticalorImage > Image Rotation > Flip Canvas Horizontal/Vertical, use Photoshop’s built-in help. Go toHelpin the top Menu Bar and search for “flip.” Photoshop will guide you directly to the feature, ensuring you can continue with your photo manipulation. - Unwanted Elements Flipped (Logo/Text): A common mistake is flipping the entire canvas (
Image > Image Rotation > Flip Canvas...) when you only intend to flip a specific part. If your image contains text, logos, or watermarks that become unreadable when the entire canvas is flipped, you need to apply the flip exclusively to a layer. Always ensure the specific layer containing the element you want to mirror is selected before usingEdit > Transform > Flip Horizontal/VerticalorFree Transform. This ensures that only the intended content undergoes the transformation. - Image Flipped the Wrong Way: It’s easy to confuse
Flip HorizontalwithFlip Vertical. A horizontal flip creates a left-right reflection, while a vertical flip creates a top-bottom reflection. Always consider the desired outcome and choose the appropriate flip command. If you make a mistake,Ctrl+Z(Windows) /Command+Z(Mac) will undo the last action. - Confusion with Rotation vs. Flipping: Flipping and rotating are distinct operations with different visual outcomes.
- Flipping: Creates a mirror image, like looking at your reflection.
- Rotating: Spins the image around a central point, like turning your head.
If you’re trying to achieve a mirror effect but the image is simply turning, you’ve likely used a rotation command (
Image > Image Rotation > 90° CW/CCW). Refer to the steps forFlip HorizontalorFlip Verticalto achieve the correct mirror effect. Tophinhanhdep.com offers separate tutorials on image rotation for when that is your specific goal.
- People Look Unnatural After Mirroring: Humans are incredibly sensitive to facial and bodily symmetry. While mathematically perfect symmetry might seem appealing, it can sometimes make people look unnatural or “weird” when mirrored, especially in close-up portraits. Our brains are accustomed to subtle asymmetries that give faces character. For sad/emotional or beautiful photography involving people, consider the impact carefully. Often, the best mirror effects for people involve subtle applications or focusing on environmental elements rather than direct facial mirroring. Tophinhanhdep.com provides insights into editing styles that maintain natural appearances in digital photography.
Tips for Achieving Flawless Mirror Images
To consistently produce high-quality mirrored images that enhance your visual design and creative ideas:
- Start with High-Quality Source Images: The final output quality heavily depends on the source. Utilize high-resolution images, beautiful photography, or stock photos from Tophinhanhdep.com to ensure clarity and detail in your mirrored creations.
- Always Work Non-Destructively: As emphasized throughout this guide, always duplicate your original document and work on duplicate layers. This preserves your initial work and allows for easy revisions without permanent damage, a core principle in professional image editing.
- Utilize Guides for Perfect Symmetry: For precision, especially when aligning mirrored selections or defining a central mirror axis, make extensive use of Photoshop’s guides. They are indispensable for achieving visually perfect symmetry in graphic design and photo manipulation.
- Experiment with Different Mirror Points: The point at which you crop and define your mirror axis dramatically affects the outcome. Play around with various mirror points to discover unique compositions and abstract effects.
- Consider the Subject Matter: Not every image lends itself well to mirroring. Subjects with inherent symmetry (like landscapes with reflections) often work beautifully, while complex, asymmetrical subjects might require more artistic interpretation.
- Leverage Tophinhanhdep.com’s Image Tools: Once your mirrored masterpiece is complete, don’t forget to optimize it. Utilize image tools like compressors and optimizers, available through resources on Tophinhanhdep.com, to prepare your high-resolution images for web use, wallpapers, or other digital platforms.
By mastering these techniques and adhering to best practices, you can confidently create stunning mirror images in Photoshop, adding a powerful tool to your visual design arsenal. Tophinhanhdep.com remains your dedicated resource for all things images, photography, and creative inspiration, helping you transform your photo ideas into breathtaking reality.
In conclusion, the ability to mirror an image in Photoshop is a fundamental yet incredibly versatile skill that opens up a world of creative possibilities. From crafting simple symmetrical compositions to generating complex kaleidoscopic patterns, this technique is a cornerstone of digital art, photo manipulation, and graphic design. With the step-by-step guidance provided by Tophinhanhdep.com, both beginners and seasoned professionals can confidently apply these methods to elevate their images. Embrace the power of reflection and transform your photographs into stunning works of visual design that captivate and inspire. Explore the vast resources on Tophinhanhdep.com for more photo ideas, editing styles, and tools to further enhance your creative journey.