Mastering Mirror Images and Text in Microsoft Word for Creative Visual Design

In the vast landscape of digital document creation, Microsoft Word remains an indispensable tool for millions. While often associated with simple text processing, Word possesses a surprising array of features that delve into the realm of visual design, allowing users to manipulate images and text in creative ways. One such fascinating capability is the ability to mirror, or reverse, images and text. This technique, though seemingly niche, unlocks a host of practical and aesthetic applications, from crafting custom iron-on transfers to designing unique graphic elements for presentations and publications. At Tophinhanhdep.com, we understand the power of compelling visuals, offering a rich repository of images, photography, and visual design tools to inspire your next project. This guide will walk you through the precise steps to achieve mirrored effects in Word, empowering you to add a distinct visual flair to your documents.

The Art and Utility of Mirroring: Why Flip Content in Word?
The concept of mirroring content might seem unconventional at first glance. However, its utility spans various creative and practical scenarios. For instance, those engaged in DIY crafting often need mirrored text or images for fabric iron-on transfers. When applied, the image flips to its correct orientation on the material, making mirroring a crucial preparatory step. Beyond practical applications, mirroring can also serve a purely aesthetic purpose. It can create symmetrical designs, mimic reflections in water, add a sense of intrigue to typography, or simply ensure an element faces the desired direction within a layout.
For designers and content creators who frequent Tophinhanhdep.com for their daily dose of visual inspiration – be it high-resolution photography, abstract wallpapers, or trending aesthetic collections – understanding how to manipulate basic elements like mirroring within common software like Word is a valuable skill. It bridges the gap between raw visual assets and their refined application in various digital and print media. This guide covers mirroring for both text and images, offering distinct approaches for each within the Microsoft Word environment.
Mirroring Text: A Deep Dive into Text Box and WordArt Techniques
Mirroring text in Microsoft Word is a slightly less straightforward process than flipping a standalone image, primarily because plain text directly typed into a document doesn’t have the same manipulation handles as graphic elements. To achieve a mirrored text effect, you must first place your text within a container that can be treated as an object: a text box or WordArt. Both methods leverage Word’s 3-D rotation capabilities to flip the content along an axis.
Method 1: Mirroring Text Using a Text Box (Windows & Mac)
The text box method is robust and works across various versions of Microsoft Word. It involves inserting your text into a text box and then applying a 3-D rotation.
Step-by-Step for Windows:
- Insert a Text Box: Open your Word document. Navigate to the
Inserttab on the Ribbon at the top. In theTextgroup, click onText Boxand then selectDraw Text Box. Click and drag your cursor on the document to create a text box of your desired size. - Enter and Format Text: Type the text you wish to mirror into the newly created text box. You can format it with your preferred font, size, and color using the standard text formatting options.
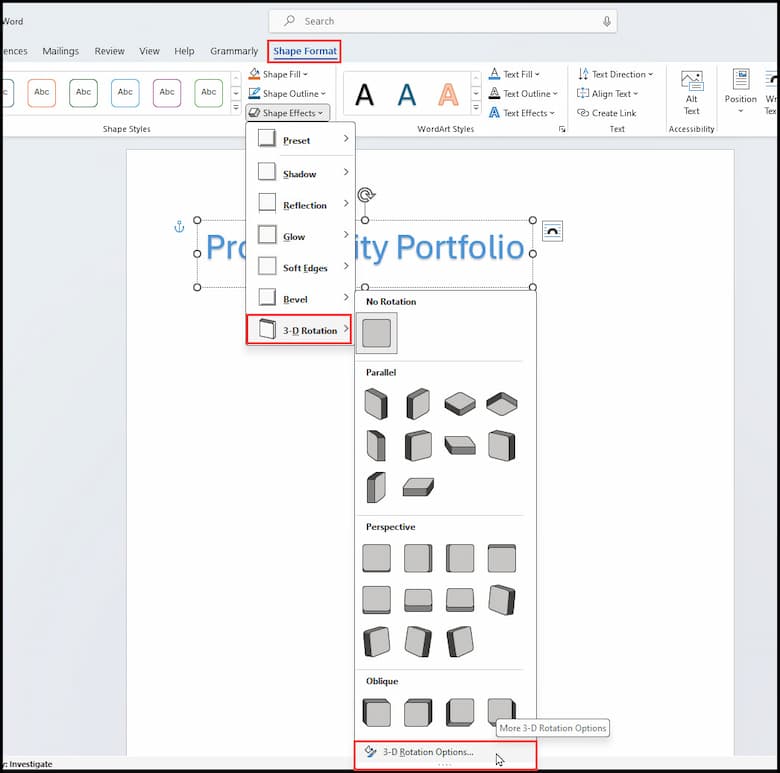
- Access Format Shape Options: Right-click on the border of the text box (ensure the entire box is selected, not just the text within it). From the context menu that appears, select
Format Shape. This will open theFormat Shapepane on the right side of your Word window. - Apply 3-D Rotation: In the
Format Shapepane, selectShape Options(often indicated by a pentagon or a small square with an arrow pointing out) and then click on theEffectsicon (it often looks like a pentagon, a shadow, or a 3D cube). - Set X Rotation: Expand the
3-D Rotationsection. Locate theX Rotationbox and enter180°. As you type, you’ll immediately see your text flip horizontally within the text box, creating a perfect mirror image. - Refine Appearance (Optional):
- Remove Fill Color: If your text box has a shaded background that you don’t want, go to the
Fill & Linetab (represented by a tipped-over paint can) in theFormat Shapepane. ExpandFilland selectNo fill. - Remove Outline: To make the text box itself invisible, right-click the text box, select
Outlinein the mini toolbar, and chooseNo Outline. This leaves only the mirrored text visible on your page, blending seamlessly with your document or ready for export.
- Remove Fill Color: If your text box has a shaded background that you don’t want, go to the
Step-by-Step for Mac:
- Insert a Text Box: In your Word document, go to the
Inserttab, then selectText Box, and chooseDraw Text Box(orDraw Vertical Text Boxif preferred). Draw the text box on your page. - Enter and Format Text: Type and format your text inside the text box. You can also insert images, shapes, or WordArt into this text box if you wish to mirror those elements.
- Access Format Shape Options: Right-click the text box (use a two-finger click on the trackpad if you don’t have a two-button mouse). Select
Format Shapefrom the menu. TheFormat Shapepane will appear on the right. - Apply 3-D Rotation: In the
Format Shapepane, ensureShape Optionsis selected, then click theEffectsicon. - Set X Rotation: Expand
3-D Rotation. In theX Rotationbox, enter180°. Your text will instantly transform into a mirror image. - Refine Appearance (Optional):
- Remove Fill Color: If your text box has an unwanted color fill, navigate to the
Fill & Linetab withinShape Options, expandFill, and selectNo fill. - Remove Outline: Select the text box, go to the
Shape Formattab in the Ribbon, clickShape Outline, and chooseNo Outline.
- Remove Fill Color: If your text box has an unwanted color fill, navigate to the
Method 2: Mirroring Text Using WordArt (Windows & Mac)
WordArt offers a more stylized approach to text and can also be mirrored using a similar 3-D rotation technique.
Step-by-Step for Windows:
- Insert WordArt: Go to the
Inserttab. In theTextgroup, clickWordArtand choose one of the available styles. A text box containing “Your text here” will appear. - Edit WordArt Text: Replace “Your text here” with your desired text and format it as needed.
- Access Text Effects Options: Select the WordArt object. Right-click on its border and select
Format Shape. In theFormat Shapepane, chooseText Options(often indicated by a large “A” or text symbol). - Apply 3-D Rotation: Select
Text Effects(usually a pentagon icon) and then expand3-D Rotation. - Set X Rotation: In the
X Rotationbox, enter180°. Your WordArt will be mirrored.
Step-by-Step for Mac:
- Insert WordArt: Go to the
Inserttab, selectWordArt, and pick a style. - Edit WordArt Text: Enter your text into the WordArt object.
- Access Text Effects Options: Select the WordArt. Go to the
Shape Formattab in the Ribbon. - Apply 3-D Rotation: Click
Text Effects>3D Rotation>3D Rotation Options. - Set X Rotation: In the
Format Shapepane, under3-D Rotation, setX Rotationto180°.
This 3-D rotation method effectively creates a horizontal mirror image. If you wanted an upside-down mirror image (flipped vertically), you would adjust the Y Rotation to 180° instead of X Rotation. Experimentation with both can lead to diverse visual outcomes.
Flipping Images for Dynamic Visual Impact
Unlike text, mirroring images in Word is a more intuitive process, directly utilizing built-in flip functionalities. This technique is perfect for creating visual symmetries, adjusting image orientation for better composition, or simply giving your document an artistic touch, much like the creative photo manipulation ideas you’d find on Tophinhanhdep.com.
Step-by-Step Image Flipping (Windows & Mac)
Whether you’re using Windows or macOS, the steps to flip an image horizontally or vertically are largely the same.
- Insert Your Image: Open your Word document. Go to the
Inserttab, clickPictures, and choose where to get your image from (e.g.,This Device,Stock Images,Online Pictures). Select your image and clickInsert. - Select the Image: Ensure the image is selected in your document. You’ll see handles around its border, and the
Picture Formattab (orShape Formattab in older versions) will appear in the Ribbon. - Access Rotate Options: In the
Picture Formattab, locate theArrangegroup. Click theRotatebutton (it usually looks like a square with a circular arrow). - Choose Flip Direction: A drop-down menu will appear with several rotation and flip options:
Flip Horizontal: This will mirror your image from left to right, creating a perfect horizontal reflection.Flip Vertical: This will mirror your image from top to bottom, ideal for creating reflection effects as if in water.
- Observe the Change: Select your desired flip option, and the image will instantly transform into its mirrored counterpart.
Fine-Tuning: Rotating Images for Precision
Beyond simple flips, the Rotate options also provide More Rotation Options.... Clicking this will open the Layout or Format Picture dialog box, where you can input precise rotation angles. While a horizontal flip is a specific 180-degree rotation along the Y-axis (or 0 degrees X, 180 degrees Y, 0 degrees Z if thought of in 3D space for an image object, but for text boxes, it’s X-rotation in Word), custom rotation offers full control. For an image, a true mirror effect is generally achieved with Flip Horizontal or Flip Vertical, but custom rotation can be used for more nuanced compositional adjustments.
Expanding Your Visual Horizons: Image Tools and Creative Ideas with Tophinhanhdep.com
The ability to mirror text and images in Word is just one facet of effective visual design. At Tophinhanhdep.com, we champion the entire spectrum of visual content, recognizing that every detail contributes to a powerful aesthetic. Our website is designed to be a holistic resource for anyone passionate about visual communication, complementing your Word skills with a wealth of inspiration and practical tools.
Consider how mirrored elements, particularly when combined with the right visuals, can elevate your projects. Our extensive Images collections, ranging from breathtaking Nature and captivating Abstract art to poignant Sad/Emotional and stunning Beautiful Photography, can be used as base elements for your mirrored designs. Imagine a symmetrically flipped landscape image creating an ethereal effect for a document background, drawing users deeper into your content. Or a mirrored abstract pattern used as a subtle aesthetic watermark.
Our Photography section, featuring High-Resolution and Stock Photos, provides the raw material you need to experiment with flipping and rotation. The mirroring techniques learned here become part of your Digital Photography and Editing Styles, allowing for unique Photo Manipulation effects directly within Word before exporting for other uses. If you’re designing a brochure or an informational graphic, flipping a product image to align with a new layout can significantly improve its visual flow.
Furthermore, Tophinhanhdep.com’s Image Tools offer functionalities like Converters, Compressors, and Optimizers, which are vital for preparing your images before inserting them into Word. An AI Upscaler can ensure that even a smaller image, once mirrored and placed, retains its clarity and impact. Our Image-to-Text tool might even help extract information from a source image that you then mirror within Word.
When it comes to Visual Design, the creative ideas are boundless. Graphic designers and digital artists often use mirroring for symmetry, pattern creation, and generating new visual narratives. Mirrored text can be a powerful typographic element for branding or artistic expression. Our Image Inspiration & Collections serve as a perfect starting point, providing Photo Ideas, Mood Boards, Thematic Collections, and Trending Styles that can spark ideas for how to integrate mirrored elements into your own creative endeavors. Whether you’re aiming for a calm, balanced look or a dynamic, abstract composition, mirroring is a versatile tool in your digital design arsenal.
Enhancing Mirrored Images with Additional Effects
After mirroring your image or text, Word provides further options to enhance its visual appeal:
- Combine Effects: In the
Picture FormatorShape Formattab, you can apply various artistic effects, borders, and shadows. A subtle shadow can give your mirrored image depth, while a border can frame it elegantly. - Use Transparency: For advanced layering or to create a more integrated look, adjust the transparency of your mirrored image. This is particularly useful when creating reflection effects or overlapping images without completely obscuring the background. You can find transparency options typically under
Format Picture/Shape(right-click the image/text box and choose this option) or within thePicture Formattab. - Cropping and Resizing: Don’t forget to crop and resize your mirrored content to fit your document layout perfectly. These fundamental image manipulation tools are crucial for a polished finish.
Common Challenges and Troubleshooting
While mirroring in Word is generally straightforward, users might encounter a few common issues.
The Rotate Option is Grayed Out
If you find that the Rotate or Flip options are unavailable (grayed out) for an image, it’s usually because:
- Image Grouping: The image might be part of a larger group of objects. Try selecting the image individually or ungrouping the elements (
Picture Format>Arrange>Group>Ungroup). - Specific Object Type: Some embedded objects or legacy formats might restrict direct manipulation. Try converting the object to a standard image format or placing it within a text box.
- Text Wrapping Issues: Occasionally, certain text wrapping settings can interfere. Experiment with different
Wrap Textoptions (e.g.,In Front of Text,Tight) in thePicture Formattab.
Differences Across Word Versions
While the core functionality remains consistent, the exact location of buttons and menu names can vary slightly between different versions of Microsoft Word (e.g., Word 2010, 2013, 2016, Microsoft 365). If you can’t find a specific option, try searching Word’s built-in “Tell me what you want to do” search bar (usually at the top of the Ribbon) for “Format Shape,” “3-D Rotation,” or “Rotate.” The general principles of using a text box for text and direct flip for images remain the same.
Conclusion
Mirroring images and text in Microsoft Word is a valuable skill for anyone looking to add a touch of creativity or practicality to their documents. Whether you’re preparing iron-on transfers, designing eye-catching invitations, or simply experimenting with visual balance, Word provides the tools to achieve these effects with relative ease. By utilizing text boxes for text manipulation and the dedicated flip functions for images, you can transform your ordinary documents into visually engaging pieces.
As you delve deeper into digital art and visual design, remember that platforms like Tophinhanhdep.com are here to support your journey. From providing a vast selection of high-quality Images and Photography to offering powerful Image Tools and endless Visual Design inspiration, Tophinhanhdep.com is your go-to resource. We encourage you to explore our collections, experiment with these mirroring techniques, and unleash your creative potential to craft truly unique and impactful visual content.