Mastering Image Resizing in Paint: A Guide for Optimal Visual Content from Tophinhanhdep.com

In today’s visually-driven digital landscape, the clarity, presentation, and performance of images are paramount. Whether you’re curating a stunning collection of wallpapers, crafting engaging social media backgrounds, or showcasing high-resolution photography, the ability to properly resize images is a foundational skill. While professional-grade editing software offers a vast array of features, sometimes a simple, accessible tool is all you need for quick adjustments. This is where Microsoft Paint, a staple on Windows platforms, shines. At Tophinhanhdep.com, we understand the importance of preparing your visual assets for any context, from vibrant aesthetic images to critical stock photos. This comprehensive guide will walk you through the process of resizing images using Paint, integrating these fundamental steps with broader insights into visual design, photography, and the advanced tools available at Tophinhanhdep.com to elevate your content further.
The necessity for image resizing arises in countless scenarios. A photograph taken with a modern digital camera might boast incredible detail, perfect for large prints, but utterly impractical for a website banner or an email attachment due to its massive file size. Conversely, a small image might need slight enlargement to fit a specific layout without compromising too much quality. Understanding how to manage these dimensions directly impacts everything from website load times and search engine optimization (SEO) to the aesthetic appeal and overall user experience. This guide empowers you to take control of your images, ensuring they are always perfectly tailored for their intended purpose, whether it’s for a mood board, a digital art piece, or a thematic collection.

The Essentials of Image Resizing in Paint: Shrinking and Enlarging with Aspect Ratio Control
Microsoft Paint offers an intuitive, straightforward approach to modifying image dimensions. It’s a tool that requires no special installation on a Windows PC, making it an ideal choice for quick, everyday image adjustments. Our focus here is on two primary resizing operations: shrinking (reducing size) and enlarging (increasing size), both while carefully managing the image’s aspect ratio to prevent distortion.

Getting Started: Launching Paint and Opening Your Image
Before diving into the resizing process, it’s always a good practice to work with a copy of your original image. This safeguards your high-resolution photography or carefully curated aesthetic images from irreversible changes. At Tophinhanhdep.com, we advocate for non-destructive editing workflows, and making a copy is your first step in this direction.
To begin:
- Locate Your Image: Navigate to the folder where your image is stored. Right-click on the image file you wish to resize.
- Create a Copy: From the drop-down menu, select “Copy.” Then, right-click on an empty space in the same folder or on your desktop and select “Paste.” You now have a duplicate to work with.
- Launch Paint: There are a couple of ways to open Paint:
- Through the Start Menu: Click the “Start” button, then navigate to “All Programs” (or just type “Paint” into the search bar), then “Accessories,” and finally, “Paint.”
- Directly from the Image: Right-click on your copied image file, select “Open with,” and then choose “Paint” from the pop-out menu. This will open your selected image directly within the Paint program, ready for editing.
Once your image is open in Paint, you’ll see it displayed on the canvas. Take a moment to observe the original pixel dimensions, often displayed near the bottom of the Paint window. This provides a baseline before you make any changes, an important consideration for high-resolution images or digital photography where precise measurements are key.
Mastering the Resize and Skew Tool for Proportionate Adjustments
The “Resize” function is the heart of Paint’s image dimension capabilities. It allows you to adjust the width and height of your image, crucial for adapting beautiful photography for different platforms or optimizing abstract art for specific display sizes.
Here’s how to use it effectively:
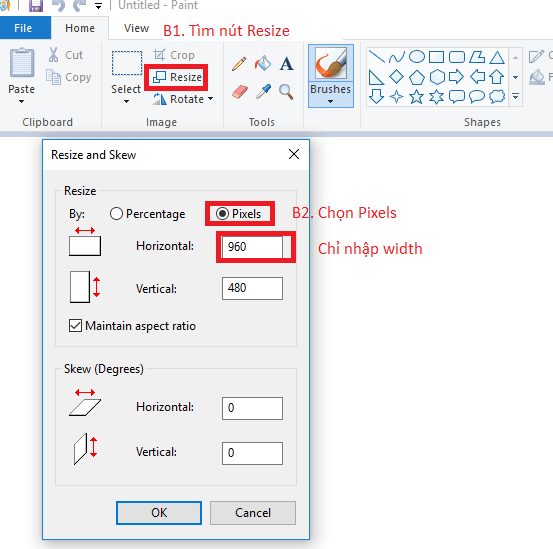
- Access the Resize Tool: In the “Home” tab of Paint, locate the “Image” section. Click on the “Resize” icon. This will open the “Resize and Skew” dialog box.
- Maintain Aspect Ratio: This is arguably the most critical step for preserving the visual integrity of your images. Ensure there is a check mark in the box next to “Maintain aspect ratio.” This option links the horizontal and vertical dimensions, so when you change one, the other automatically adjusts to keep the image in proportion. Failing to do this can lead to stretched or squashed images, severely detracting from their aesthetic or emotional impact. For nature photography, for instance, distortion can ruin the realism and beauty of the scene.
- Choose Your Measurement: In the “Resize” section of the dialog box, you have two options for specifying your new dimensions:
- Percentage: This is often the easiest method for quick adjustments. If your image is at 100% (its original size), entering “50” in the “Horizontal” box will reduce both dimensions by half. Entering “200” will double the size. This is particularly useful when you need to uniformly shrink a batch of stock photos or enlarge a background image slightly.
- Pixels: For more precise control, especially when working with web layouts or specific graphic design requirements (e.g., a website banner that needs to be exactly 825px wide, as recommended by some content management systems as found in our extensive documentation at Tophinhanhdep.com), choose “Pixels.” With “Maintain aspect ratio” checked, you only need to enter either the desired “Horizontal” or “Vertical” pixel value, and Paint will calculate the other.
- Enter Dimensions and Apply: Type your desired percentage or pixel value into the “Horizontal” (or “Vertical” if using pixels) text box. Then, click “OK.” Paint will instantly apply the changes to your image.
- Save Your Work: Once you are satisfied with the resized image:
- Click the “File” tab (or the main Paint button in older versions).
- Select “Save as.”
- Choose your preferred image format. For most digital photos and web use, JPEG is highly recommended. JPEG offers a good balance between image quality and file size, making it ideal for uploading to websites, sending via email, or sharing on social media. Enter a short, descriptive name for your file, ideally without spaces, and choose a destination folder. Click “Save.”
Your image is now optimally sized for its intended use, whether it’s for a website, an online registration form, or simply to reduce the file size for quicker sharing.
Beyond Basic Resizing: Cropping for Precision and Visual Impact
While resizing adjusts the overall dimensions of an image, cropping is a powerful technique for refining its composition and focusing on specific elements. This process removes unwanted portions of an image, creating a tighter, more impactful visual narrative. For graphic designers, digital artists, or anyone aiming for creative ideas in photo manipulation, understanding the difference between resizing and cropping is fundamental.
Understanding Crop vs. Resize: When to Use Each
It’s crucial to distinguish between resizing and cropping, as they serve different purposes:
- Resizing: Changes the overall width and height of the image. When you shrink an image, its file size generally decreases, and when you enlarge it, its file size often increases. However, enlarging an image in Paint (or any basic editor) will typically reduce its quality, making the pixels more visible and the image appear blurry. Conversely, shrinking an image usually preserves its quality well. This is useful for adjusting images for screen display, reducing storage needs, or optimizing web performance for your curated collections at Tophinhanhdep.com.
- Cropping: Selectively removes the outer areas of an image. The remaining section retains its original resolution and quality, assuming no subsequent resizing is performed. Cropping is ideal for improving composition, removing distracting elements, or fitting an image into a specific aspect ratio without distorting the subjects within it. For example, you might crop a wide landscape photo to a square format for an Instagram post, focusing on a particular feature of nature photography. It’s a key technique in visual design and for enhancing the aesthetic of images.
Step-by-Step Cropping for Enhanced Visual Design
Cropping in Paint is just as straightforward as resizing, allowing for quick compositional adjustments to your beautiful photography or abstract art.
- Open Your Image: As before, start by opening a copy of your image in Microsoft Paint.
- Select the “Select” Tool: In the “Image” section of the “Home” tab, click the “Select” button. A drop-down menu will appear.
- Choose Selection Type:
- Rectangular selection: This is the most common choice, allowing you to draw a rectangular box around the area you wish to keep.
- Free-form selection: If you need to select an irregularly shaped area, this option allows you to draw a custom boundary.
- Draw Your Selection: Click and drag your mouse over the part of the image you want to retain. A dotted line will appear, outlining your selection. Anything inside this dotted line will be kept; everything outside will be removed. Take care to precisely frame the subject or area you wish to highlight for optimal aesthetic and emotional impact. For photo manipulation, this precision is invaluable.
- Execute the Crop: Once your selection is perfect, click the “Crop” button, also located in the “Image” section of the “Home” tab (to the right of “Select”). Paint will immediately remove all areas outside your selection.
- Save Your Cropped Image: Press
Ctrl+S(or go to “File” > “Save”) to save your changes. Remember to “Save As” if you want to keep the original uncropped version or save it in a different format like JPEG.
Cropping can dramatically alter the focus and narrative of an image, making it an indispensable tool for any visual design or photography enthusiast seeking creative ideas or assembling thematic collections.
The Broader Impact: Why Optimal Image Sizing is Key for Your Visual Content Strategy
Understanding how to resize and crop images isn’t just about technical proficiency; it’s about strategic content creation. Every image you create, share, or upload contributes to your overall visual presence, and optimal sizing plays a critical role in its effectiveness. This extends beyond individual photographs to entire collections, mood boards, and all forms of digital art.
Optimizing for Web and Digital Platforms: Speed, SEO, and User Experience
In the digital realm, image dimensions and file sizes are directly linked to performance.
- Faster Load Times: Overly large image files are a primary culprit for slow-loading web pages. Visitors, especially those on mobile devices or with slower internet connections, are likely to abandon a site that takes too long to load. By resizing images to appropriate dimensions and then compressing them (a service Tophinhanhdep.com offers with its advanced Image Tools), you significantly improve page speed, retaining visitor engagement.
- Improved SEO: Search engines like Google prioritize fast-loading websites. Optimized images contribute positively to your site’s SEO, helping your content rank higher and reach a wider audience interested in high-resolution, aesthetic, or beautiful photography.
- Enhanced User Experience: Images that are correctly sized fit seamlessly into layouts, whether it’s a blog post, an e-commerce product page, or a personal portfolio displaying digital art. This professional presentation contributes to a smoother, more enjoyable user experience, making your wallpapers, backgrounds, and thematic collections more appealing. Improperly sized images can break layouts, appear pixelated or stretched, and detract from your brand’s professionalism.
- Efficient Sharing: Resizing images to smaller file sizes makes them easier and faster to email, share on messaging apps, or upload to cloud storage. This is particularly beneficial when distributing stock photos or collections of nature photography.
Preserving Quality in Photography and Digital Art: The Balance of Size and Clarity
The relationship between image size and quality is a delicate balance, particularly for digital photography and graphic design.
- Enlargement and Quality Degradation: As highlighted, enlarging an image in a basic editor like Paint can lead to a noticeable drop in quality, resulting in pixelation. This is because Paint is simply stretching existing pixels, not generating new image data. For critical applications where image quality is paramount, such as professional beautiful photography or intricate digital art, advanced tools are required to maintain fidelity or even enhance it.
- Quality Preservation During Reduction: Conversely, reducing the size of an image typically preserves its quality well, as Paint is essentially discarding unnecessary pixel data. This makes it an excellent choice for downsizing high-resolution images for web display, ensuring that the detail of your sad/emotional or abstract images remains sharp while file size is minimized.
- Resolution vs. Dimension: Understanding that resolution (DPI/PPI) is different from dimension (pixels) is key. Paint focuses on pixel dimensions. For print, resolution becomes crucial. For web, pixel dimensions and file size are usually the primary concerns. Optimal handling of these elements ensures that your images, whether they are aesthetic wallpapers or commercial stock photos, consistently meet performance and quality expectations.
Elevating Your Workflow: Tophinhanhdep.com’s Advanced Image Tools and Inspiration
While Microsoft Paint is a fantastic starting point for basic image resizing and cropping, the dynamic world of visual content often demands more sophisticated solutions. Tophinhanhdep.com is dedicated to empowering creators with a full suite of Image Tools and a wealth of Visual Design inspiration to take your images from simple edits to professional polish.
Seamless Integration: From Basic Paint Edits to Professional Polish
Think of Paint as your entry-level workshop. For more demanding tasks, Tophinhanhdep.com offers specialized tools that seamlessly extend your capabilities:
- Converters for Format Flexibility: After resizing or cropping in Paint, you might save your image as a BMP by default, which can be a large file. Tophinhanhdep.com’s Image Converters allow you to effortlessly transform images into various formats like JPEG, PNG, or WebP. This is crucial for web optimization, ensuring your images (be they vibrant backgrounds or subtle aesthetic pieces) are in the most efficient format for their purpose, balancing quality and file size.
- Compressors and Optimizers for Ultimate Web Readiness: After resizing, further reducing file size without visible quality loss is essential for web performance. Our Image Compressors and Optimizers go beyond what Paint can do, employing advanced algorithms to shrink files while maintaining visual fidelity. This is indispensable for handling vast collections of stock photos or high-resolution images destined for online galleries, significantly enhancing speed and SEO.
- AI Upscalers: Defying the Limitations of Enlargement: The biggest drawback of enlarging images in Paint is the immediate drop in quality. Tophinhanhdep.com’s AI Upscalers are game-changers in this regard. Utilizing artificial intelligence, these tools can intelligently add detail to enlarged images, mitigating pixelation and even enhancing the quality of older or lower-resolution abstract or nature photography. This capability opens new avenues for repurposing images that were once considered too small.
- Batch Image Resizers: Efficiency for Large Collections: Imagine needing to resize dozens or hundreds of images for a new thematic collection or a website update. Doing this one by one in Paint would be incredibly tedious and time-consuming. Tophinhanhdep.com provides advanced batch image resizers, allowing you to process multiple photos simultaneously. You can set a target percentage or pixel dimension, and our tools will apply the changes to all selected images, even smartly maintaining aspect ratios or correcting non-proportional inputs for you. This dramatically streamlines workflows for digital photography, image inspiration collections, and professional stock photos. Our tools offer the efficiency needed for today’s fast-paced digital creation.
- Image-to-Text Tools: While not directly related to resizing, Tophinhanhdep.com also offers Image-to-Text capabilities, further showcasing our comprehensive approach to all aspects of visual content management, blending the visual with the informational.
Cultivating Creativity: Resizing within Visual Design and Image Inspiration
Image resizing and manipulation are not just technical tasks; they are integral to the creative process itself.
- Graphic Design and Digital Art: For graphic designers and digital artists, resizing and cropping are fundamental to creating compelling layouts and compositions. Elements must fit precisely, and proportions must be correct to achieve the desired visual impact for banners, posters, or complex digital canvases. Tophinhanhdep.com provides resources and tools that support these intricate creative processes.
- Photo Manipulation and Creative Ideas: Resizing enables seamless integration of different elements in photo manipulation. Cropping can highlight specific features, creating new narratives or aesthetic appeals from existing beautiful photography. Our platform serves as a hub for creative ideas, offering a wealth of photo inspiration and trending styles that often require precise image preparation.
- Mood Boards and Thematic Collections: When compiling mood boards or thematic collections of images, consistent sizing and aspect ratios contribute to a polished, professional look. This uniformity helps to effectively convey the intended aesthetic or emotional tone, whether it’s a collection of sad/emotional images or vibrant abstract art. Tophinhanhdep.com’s tools ensure your curated collections always look their best.
In conclusion, while Microsoft Paint offers a surprisingly robust and accessible entry point for basic image resizing and cropping, it is just the beginning of your journey into optimal visual content management. At Tophinhanhdep.com, we provide the foundational knowledge and the advanced Image Tools – from powerful converters and compressors to intelligent AI upscalers and efficient batch processors – to meet every demand of modern digital imagery. Coupled with a rich source of Visual Design inspiration and diverse Image Inspiration & Collections, Tophinhanhdep.com is your ultimate partner for creating, optimizing, and sharing visually stunning content that performs as brilliantly as it looks. Ensure your images, whether for wallpapers, backgrounds, or high-resolution photography, are always perfectly prepared with Tophinhanhdep.com.