Mastering Image Resizing in Photoshop: A Comprehensive Guide for Tophinhanhdep.com Users

In the vibrant world of digital imagery, where stunning visuals reign supreme, the ability to manipulate and optimize images is an indispensable skill. For photographers, graphic designers, digital artists, and even casual users who simply want to set a perfect wallpaper, Adobe Photoshop stands as the undisputed champion of image editing. Among its myriad powerful features, one of the most fundamental and frequently used is the ability to resize images and individual layers.
At Tophinhanhdep.com, we understand the profound impact of high-quality visuals. Whether you’re seeking breathtaking “Nature” wallpapers, evocative “Sad/Emotional” backgrounds, intricate “Abstract” designs, or “Beautiful Photography” for your next creative project, the dimensions and resolution of your images are paramount. Resizing isn’t just about making something bigger or smaller; it’s about optimizing an image for its intended purpose – be it a social media post, a print advertisement, a web banner, or a “High Resolution” desktop background. Incorrect resizing can lead to pixelation, distortion, and a significant degradation of visual appeal, completely undermining the aesthetic value that Tophinhanhdep.com strives to deliver.
This comprehensive guide will delve deep into the art and science of image resizing in Photoshop, covering everything from basic layer transformations to advanced document adjustments and best practices. We’ll explore the tools and techniques that empower you to maintain image integrity, preserve quality, and unlock new creative possibilities, all while keeping the unique needs of Tophinhanhdep.com users in mind.
Resizing Layers with the Free Transform Tool

Working with layers is the cornerstone of non-destructive editing in Photoshop. When you’re composing an elaborate “Digital Art” piece or performing intricate “Photo Manipulation,” individual elements often need to be adjusted in size relative to other components. This is where the Free Transform tool becomes your best friend.
The Basics: Activating and Using Free Transform
The Free Transform tool offers the most intuitive and direct way to resize, rotate, skew, and even distort layers within your Photoshop document. It’s a versatile command that once mastered, will become second nature to your workflow.
To begin, ensure the specific layer you wish to resize is selected in the Layers panel. You cannot resize a layer that isn’t active. If your layer is currently a background layer, you might need to double-click it in the Layers panel to convert it into a regular layer (e.g., “Layer 0”) to enable full transformation capabilities.
Once your target layer is selected, there are two primary ways to activate Free Transform:
- Keyboard Shortcut: The quickest method is to press
Cmd + T(on a Mac) orCtrl + T(on Windows). This is the go-to shortcut for most Photoshop professionals due to its speed and efficiency. - Menu Navigation: Alternatively, you can go to
Editin the top menu bar, and then selectFree Transform.
Upon activation, your selected layer will be surrounded by a bounding box, complete with eight small square handles – one at each corner and one in the middle of each side. This bounding box indicates that the Free Transform tool is active and ready for manipulation.
To resize the layer:
- Click and Drag a Handle: Simply click on any of these handles and drag your mouse inward to shrink the layer, or outward to enlarge it.
- Corner Handles vs. Side Handles: Dragging a corner handle resizes both the width and height simultaneously. Dragging a side handle (top, bottom, left, or right) will only resize that specific dimension, either the width or the height, potentially leading to distortion if not handled correctly. We’ll discuss preserving proportions shortly.
- Rotation: To rotate the layer, move your mouse pointer slightly outside one of the corner handles. The cursor will change into a curved, double-headed arrow. Click and drag to rotate the layer around its central pivot point.
- Moving: To move the layer, simply click and drag anywhere inside the bounding box, but not on a handle, and reposition the layer to your desired location.
Once you are satisfied with the new size, position, or rotation of your layer, you must confirm the transformation. You can do this by:
- Pressing
Enter(orReturn) on your keyboard. - Clicking the checkmark icon in the Options bar at the top of the Photoshop interface.
If you decide you don’t like the changes you’ve made and wish to revert to the layer’s original state before the Free Transform was applied, you can cancel the operation by:
- Pressing the
Escapekey on your keyboard. - Clicking the “No” (circle with a slash) icon in the Options bar.
This basic understanding of Free Transform is fundamental for anyone working with “Wallpapers,” “Backgrounds,” or any element within a composite image, ensuring you can adjust individual parts without affecting the entire canvas.
Maintaining Proportions: The Shift Key Evolution
One of the most common pitfalls in resizing is unintentionally distorting an image. A perfectly captured “Beautiful Photography” shot, an “Aesthetic” design, or a brand “Logo” can quickly look unprofessional if stretched or squashed. Maintaining the aspect ratio – the proportional relationship between an image’s width and height – is critical.
Historically, in older versions of Photoshop (prior to CC 2019), you had to explicitly hold down the Shift key while dragging a corner handle with the Free Transform tool to resize a layer proportionally. If you didn’t hold Shift, the layer would resize freely in both dimensions, often leading to distortion.
However, Adobe introduced a significant change starting with Photoshop CC 2019 and newer versions. This change flipped the default behavior to be more intuitive for modern workflows:
- Photoshop CC 2019 and Newer: Now, when you drag a corner handle with the Free Transform tool without holding any key, the layer will resize proportionally by default. This means less accidental distortion and a smoother workflow for designers and photographers who prioritize maintaining aspect ratios for their “High Resolution” images and “Digital Art.”
- To resize non-proportionally in CC 2019+, you now hold down the
Shiftkey while dragging a corner handle. This allows you to intentionally stretch or squash the image, which can be useful for specific “Photo Manipulation” effects or “Graphic Design” elements where distortion is desired.
This “gotcha” can initially confuse users accustomed to older versions, but once learned, it often saves time as proportional scaling is the more frequent requirement. When working on images for Tophinhanhdep.com, such as perfectly sized “Nature” scenes or “Abstract” patterns, always ensure you’re resizing proportionally unless you have a clear artistic reason not to.
The summary of this behavior by version is crucial for Tophinhanhdep.com users who might work across different Photoshop installations or simply need a quick reference:
| Photoshop Version | Resize Proportionally by Default? | Do You Hold Shift for Proportional Resize? |
|---|---|---|
| CC 2019 and newer | Yes | ❌ No (holding Shift disables proportional) |
| Older than CC 2019 | No | ✅ Yes (hold Shift for proportional) |
Resizing from the Center (Alt/Option Key)
Another useful modifier key when using the Free Transform tool is the Alt (Windows) or Option (Mac) key. By default, when you resize a layer using a corner handle, the opposite corner handle remains fixed, and the layer expands or contracts from that fixed point. This can sometimes require you to reposition the layer after resizing to get it back to its original center alignment.
To resize a layer from its center point, hold down the Alt (Windows) or Option (Mac) key while dragging a corner handle. This ensures that the layer expands or shrinks symmetrically from its current center, making it incredibly useful for precisely centering elements or maintaining existing alignments within your composition. For instance, when perfectly placing a watermark or a central “Aesthetic” graphic, this trick saves an extra step of moving the layer afterward.
Combine this with the proportional resizing behavior (no Shift in CC 2019+, or Shift in older versions) for powerful, precise, and centered scaling. This attention to detail is essential for creating polished “Visual Design” and ensuring that your “Image Inspiration” translates flawlessly into your final work.
Optimizing Layer Resizing with Smart Objects
While the Free Transform tool is powerful, there’s a critical concept in Photoshop that can save your images from irreversible quality loss, especially when resizing: Smart Objects. This is particularly relevant for “High Resolution” images, “Stock Photos,” and any “Digital Photography” you intend to reuse or heavily edit.
The Pitfall of Raster Layers and Quality Loss
Photoshop primarily works with raster images, which are composed of a grid of individual pixels. When you resize a standard raster layer (e.g., a JPG or PNG opened directly) down, Photoshop discards pixel information that it deems unnecessary. It permanently throws away those pixels to fit the new, smaller dimensions.
The problem arises when you later decide to resize that same layer back up to its original or even larger size. Photoshop now has to “invent” those discarded pixels, a process called resampling. Because the original pixel data is gone, the program interpolates new pixels based on the surrounding ones. This often results in a soft, blurry, or pixelated image, suffering from noticeable quality degradation.
Imagine you’ve painstakingly edited a “Beautiful Photography” shot, and then you resize a key element down for a small web graphic. Later, you want to use that same element for a large print. If it was a standard raster layer, you’d likely end up with a blurry mess. This destructive resizing cycle can quickly ruin the pristine quality of your “High Resolution” assets and make your “Editing Styles” look amateurish.
The Smart Object Solution for Non-Destructive Scaling
Enter Smart Objects – Photoshop’s ingenious solution for non-destructive transformations. A Smart Object is a layer that contains raster or vector image data from Photoshop or other applications (like Illustrator) that keeps the original image properties intact, allowing you to perform non-destructive edits to the layer.
When you convert a layer into a Smart Object, Photoshop essentially embeds the original, full-resolution image data within that layer. So, when you resize a Smart Object, you’re not permanently altering the embedded data. Instead, you’re merely telling Photoshop to display the embedded image at a different scale.
The immense benefit of this approach is that you can resize a Smart Object down, and then scale it back up again multiple times, without any loss of its internal original quality. Photoshop always references the full-resolution data within the Smart Object for display and re-rendering.
To convert a layer to a Smart Object:
- Right-click (Windows) or Control-click (Mac) on the desired layer in the Layers panel.
- From the context menu, select
Convert to Smart Object. - You’ll notice a small icon appear in the corner of the layer thumbnail in the Layers panel, indicating it’s now a Smart Object.
Once converted, you can then use the Free Transform tool (Cmd+T / Ctrl+T) to resize, rotate, and manipulate the Smart Object as you normally would. Now, you can experiment freely with different sizes for your “Wallpapers,” “Backgrounds,” or “Creative Ideas” without fear of irreversible quality loss.
Important Caveat: While Smart Objects preserve the original quality, they cannot create quality where none existed. If you resize a Smart Object to be larger than its original pixel dimensions, Photoshop still has to resample and invent pixels. However, the advantage is that if you later resize it down again, it will revert to the quality of its original embedded data, unlike a raster layer that would have suffered permanent damage. This preservation of quality is vital for “Photo Manipulation” and creating versatile “Thematic Collections” that might be used at various scales.
Incorporating Smart Objects into your workflow is a best practice, especially when dealing with “Stock Photos” or any image that might undergo multiple resizing operations. It aligns perfectly with the goal of Tophinhanhdep.com to provide and enable the creation of high-quality visuals.
Resizing Entire Documents or Images
Beyond individual layers, you’ll often need to resize the entire canvas or image, adjusting its overall dimensions for a specific output. This is particularly relevant when preparing images for print, web, or when dealing with “High Resolution” “Wallpapers” that need to fit various screen sizes.
The Image Size Dialog Box
The primary command for resizing an entire document or image in Photoshop is found in the Image Size dialog box. This tool provides precise control over pixel dimensions, physical dimensions, and resolution, allowing for tailored adjustments based on your needs.
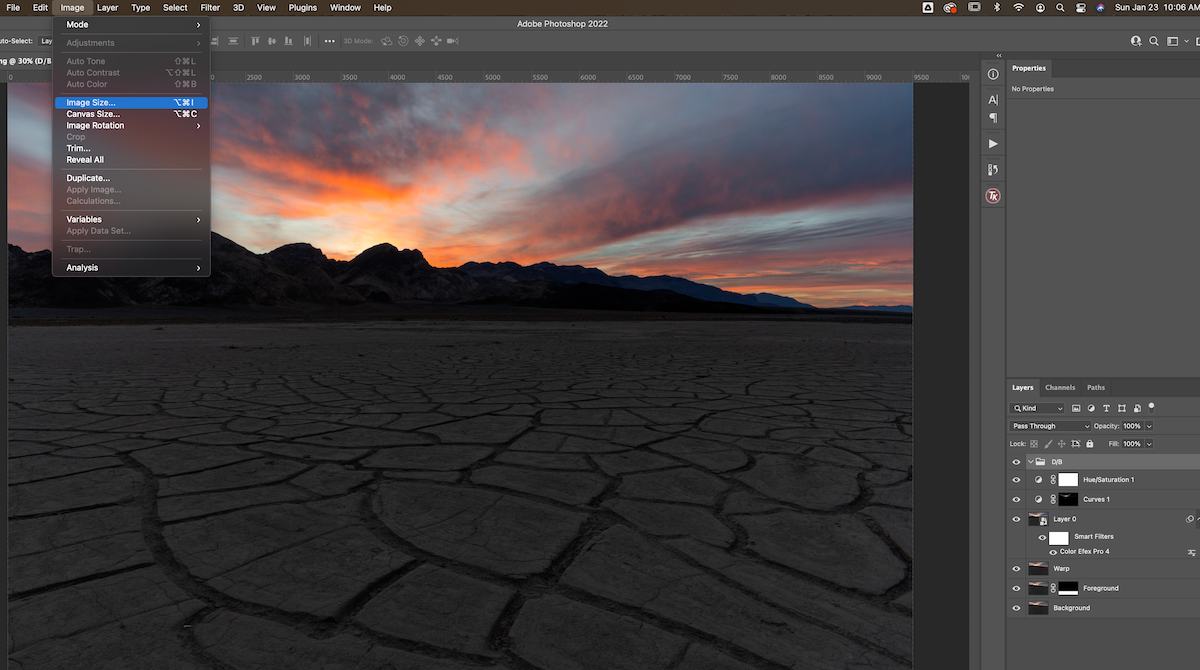
To access the Image Size dialog box:
- Open your image in Photoshop.
- Go to
Imagein the top menu bar. - Select
Image Size. - Alternatively, use the keyboard shortcut
Alt + Ctrl + I(Windows) orOption + Cmd + I(Mac).
A new dialog box will appear, packed with critical information and options:
- Pixel Dimensions: This section shows the current width and height of your image in pixels, along with the estimated file size. You can input new pixel values directly here. For “Web” applications, resizing by pixel dimensions is often the most straightforward approach.
- Document Size: This section displays the physical dimensions of your image (e.g., inches, centimeters, millimeters) and its resolution (pixels/inch or pixels/cm). This is particularly important for print output.
- Fit To: A dropdown menu offering preset sizes (e.g., Common Paper Sizes, Web sizes), or the ability to save your own custom presets.
- Resample: A crucial checkbox and dropdown menu that determines how Photoshop handles the addition or removal of pixels when dimensions change.
Understanding and correctly utilizing these settings is paramount for maintaining the quality of your “Beautiful Photography” and ensuring your “Digital Art” looks impeccable, whether viewed online or in print.
Critical Settings: Constrain Proportions and Resolution
Within the Image Size dialog box, two settings stand out as critically important for preserving image quality and achieving desired output: “Constrain Proportions” and “Resolution.”
Constrain Proportions: Just like with Free Transform for layers, maintaining proportions is vital for the entire document. In the Image Size dialog box, you’ll see a chain-link icon situated between the “Width” and “Height” input fields.
- Active Chain Link: When this icon is active (linked), changing either the width or the height will automatically adjust the other dimension to maintain the original aspect ratio. This is the default and recommended setting for most resizing tasks to prevent distortion. For “Wallpapers” and “Backgrounds,” this ensures your images scale correctly without looking stretched.
- Inactive Chain Link: If you click the chain-link icon and it becomes inactive (unlinked), you can independently change the width and height. This will distort your image. Use this with extreme caution and only when intentional distortion is part of your “Creative Ideas” or “Photo Manipulation.”
Resolution: Resolution refers to the number of pixels per unit of physical dimension, typically expressed as pixels per inch (ppi). It’s a critical factor for print quality but also has implications for web and display.
- Print: For high-quality print output, a resolution of 300 pixels/inch is generally considered ideal. This ensures sharp, detailed images when printed. A resolution of 200 pixels/inch might be acceptable for some uses, but 300 ppi is the professional standard. When preparing “High Resolution” images from Tophinhanhdep.com for physical display, always aim for 300 ppi.
- Web/Screen: For images displayed solely on screens (websites, social media, “Wallpapers”), a resolution of 72 pixels/inch is usually sufficient. Screens display pixels, not inches, so what matters most are the total pixel dimensions (e.g., 1920x1080 pixels for a full HD screen). A higher PPI for web images won’t make them look sharper on screen; it will only increase file size unnecessarily, leading to slower load times – an important consideration for “Stock Photos” and “Thematic Collections” uploaded to web platforms.
- Inputting Values: In the “Document Size” section, you can specify your desired physical width and height (e.g., in inches or cm) and set the resolution. Photoshop will then calculate the new pixel dimensions required to achieve those settings, or vice-versa.
When resizing for specific “Photo Ideas” or “Trending Styles,” understanding the interplay between pixel dimensions, physical size, and resolution is key. For example, if you’re preparing a “Nature” photograph for a large poster print, you’ll want high pixel dimensions and a high resolution (e.g., 300 ppi). If it’s for a small web thumbnail, smaller pixel dimensions and 72 ppi would be appropriate.
Resampling Options for Optimal Quality
The “Resample” checkbox in the Image Size dialog box is arguably the most critical setting, determining how Photoshop handles pixel data when you change an image’s pixel dimensions. When “Resample” is checked, Photoshop adds or removes pixels to fit the new dimensions. If it’s unchecked, Photoshop only changes the document size and resolution (physical dimensions), not the pixel dimensions.
When “Resample” is checked, you get a dropdown menu with various interpolation methods, each designed for different resizing scenarios:
- Automatic: Photoshop tries to guess the best method based on whether you’re enlarging or shrinking. It’s a good default if you’re unsure.
- Preserve Details (enlargement): This is often the best choice for significantly enlarging images. It attempts to maintain sharper details and textures while minimizing blurriness, particularly useful for making “High Resolution” images even larger (though always within reasonable limits from the original). It also includes a “Reduce Noise” slider to counteract any noise that might be introduced during the enlargement. This is a game-changer when you need to upscale an image for a “Wallpaper” that’s just a bit too small.
- Bicubic Smoother (enlargement): Generally good for enlarging images. It produces smoother transitions between pixels and is useful when you want to avoid a blocky, pixelated look. Ideal for “Aesthetic” images or “Digital Art” where smooth gradients are important.
- Bicubic Sharper (reduction): Recommended for reducing the size of images. It retains detail and sharpness, making the downscaled image look crisp rather than soft or blurry. Perfect for creating sharp thumbnails or web versions of your “Beautiful Photography.”
- Bicubic (smoother gradients): A more generalized method that works well for both enlargement and reduction, often providing a balance between sharpness and smoothness.
- Nearest Neighbor (hard edges): This is the fastest but lowest quality method. It simply duplicates or deletes pixels without any blending, resulting in jagged, pixelated edges. Only suitable for very specific use cases, like pixel art or very small, non-complex images where speed is paramount.
- Bilinear: A mid-range method, faster than Bicubic but usually less precise for photo quality.
Choosing the correct resampling method is vital for preserving image quality, especially when optimizing images for Tophinhanhdep.com, where visual excellence is key. For example, if you’re downsizing a “Nature” photograph for a mobile background, “Bicubic Sharper” will ensure the foliage and details remain crisp. If you’re preparing an “Abstract” piece for a larger display, “Preserve Details” might be your best bet.
It’s important to note that while Photoshop’s resampling options are robust, there are limits to traditional upscaling. For truly dramatic enlargements of lower-resolution images, “Image Tools” like “AI Upscalers” (which Tophinhanhdep.com might explore or recommend) leverage artificial intelligence to intelligently add detail and produce superior results that go beyond what Photoshop’s standard algorithms can achieve.
Advanced Transformations and Workflow Enhancements
Photoshop’s transformation capabilities extend far beyond simple resizing, offering a suite of tools that enable complex “Photo Manipulation” and “Creative Ideas” for “Visual Design” and “Digital Art.” Understanding these advanced options, alongside efficient workflow practices, can elevate your image editing to a professional level.
Beyond Scaling: Skew, Distort, Perspective, and Warp
The Free Transform tool, accessed via Cmd+T / Ctrl+T, is your gateway to a broader range of transformations. Once activated, you can right-click (Windows) or Control-click (Mac) anywhere inside the bounding box to reveal a context menu with additional transformation commands:
- Scale: This is the default resizing function we’ve already covered.
- Rotate: Allows for precise rotation, or you can use the freehand rotation outside the bounding box.
- Skew: This lets you slant the image horizontally or vertically. Dragging a side handle while holding
Ctrl(Windows) orCmd(Mac) will activate skewing, allowing you to create perspective or lean elements. This is excellent for placing images onto surfaces that aren’t perfectly aligned, a common task in “Graphic Design.” - Distort: This is a more freeform transformation where you can drag each corner handle independently. This is incredibly powerful for fitting an image into an irregular shape, correcting perspective, or creating dynamic compositions. For instance, embedding a “Beautiful Photography” shot into a mock-up screen with a skewed angle.
- Perspective: This transformation applies a one-point perspective effect, allowing you to make an object appear to recede into the distance or come forward. Dragging a corner handle will move both adjacent corners symmetrically, creating a convincing sense of depth. This can add a dramatic flair to “Abstract” elements or “Sad/Emotional” scenes, making them appear more immersive.
- Warp: This is one of the most flexible transformation tools. It allows you to bend and mold an image using a grid and control points, or even choose from preset warp styles (e.g., Arc, Flag, Wave). Warp is invaluable for intricate “Photo Manipulation,” like making a texture conform to a curved surface, shaping “Digital Art” elements, or subtly adjusting a portrait.
These advanced transformations are not just about making things look different; they are fundamental tools for crafting compelling “Visual Design” and realizing complex “Creative Ideas.” They enable artists to push boundaries, blend disparate elements seamlessly, and add a unique touch to “Image Inspiration” found on platforms like Tophinhanhdep.com. Experimenting with these tools on copies of your layers (or Smart Objects for non-destructive play) is the best way to understand their potential.
Saving Your Work: Preserving Originals and Batch Processing
The final steps in any image manipulation process involve saving your work. How you save can significantly impact file size, quality, and the preservation of your original assets.
-
Preserving Originals with “Save As”: A golden rule in digital editing is never to overwrite your original files. After resizing or making any significant changes, always use
File > Save As.... This allows you to save your modified image with a new name or in a different format, leaving your original file untouched. This is crucial for “Stock Photos” and “High Resolution” images that you might want to reuse in their pristine state. Saving in a format like JPEG for web use (smaller file size, lossy compression) or PNG for transparency (larger, lossless) or TIFF for print (large, lossless) depends on the intended final use. When curating “Thematic Collections” for Tophinhanhdep.com, having both original high-resolution files and optimized web versions is ideal. -
Batch Processing for Efficiency: Imagine you have dozens or even hundreds of “Images” – perhaps a “Thematic Collection” of “Nature” photos or a new set of “Wallpapers” – all needing to be resized to a consistent dimension for a website or social media. Manually opening and resizing each one in Photoshop would be incredibly tedious and time-consuming. Photoshop offers powerful automation features, particularly Actions and Image Processor.
- Actions: You can record a sequence of steps (like opening, resizing, and saving) as an “Action” and then apply that action to an entire folder of images using
File > Automate > Batch.... - Image Processor: A simpler tool for common tasks like resizing, converting file formats, and adding watermarks, found under
File > Scripts > Image Processor.... It allows you to set target dimensions and save locations with ease.
- Actions: You can record a sequence of steps (like opening, resizing, and saving) as an “Action” and then apply that action to an entire folder of images using
For Tophinhanhdep.com users who frequently deal with large volumes of “Photography,” understanding batch processing can save hours of manual work. Furthermore, this ties into the capabilities of dedicated “Image Tools” like “Compressors” and “Optimizers” which often provide similar batch functionality, potentially with more specialized algorithms for web optimization. If you’re preparing many “Backgrounds” for web distribution, external compressors can often achieve smaller file sizes than Photoshop alone, without noticeable quality loss.
Conclusion: Empowering Your Visual Journey with Tophinhanhdep.com
Mastering image resizing in Photoshop is more than just a technical skill; it’s an essential component of digital craftsmanship that underpins virtually every aspect of “Visual Design” and “Photography.” From precisely scaling individual layers for intricate “Photo Manipulation” to optimizing entire documents for “High Resolution” prints or lightning-fast web display, the techniques discussed in this guide are fundamental.
For the community of Tophinhanhdep.com, understanding these tools ensures that the “Beautiful Photography,” “Aesthetic” designs, and diverse “Image Collections” you discover or create maintain their intended impact and quality. Whether you’re downloading a stunning “Nature” wallpaper and need to adjust its size for your specific device, preparing an “Abstract” piece for a “Digital Art” portfolio, or uploading your own “Stock Photos” for others to enjoy, the knowledge of proper resizing and transformation in Photoshop is invaluable.
By leveraging the Free Transform tool, embracing the non-destructive power of Smart Objects, and navigating the nuances of the Image Size dialog box, you gain unparalleled control over your visual assets. Remember the importance of proportional scaling to prevent distortion, choose appropriate resampling methods for optimal quality, and always save your work carefully to preserve your originals.
Tophinhanhdep.com is dedicated to being your go-to resource for “Image Inspiration” and high-quality visuals. By empowering you with the knowledge to effectively manage and manipulate images, we hope to enrich your creative journey and help you bring your “Creative Ideas” to life with precision and excellence. Continue to explore our collections, experiment with these Photoshop techniques, and let your visual stories unfold with impeccable clarity and impact.