How to Reverse (Flip) an Image in Photoshop for Stunning Visuals

Adobe Photoshop is an indispensable tool for photographers, graphic designers, and digital artists worldwide. While often associated with complex manipulations, it also excels at fundamental tasks that can dramatically alter an image’s impact. Among these, reversing or flipping an image stands out as a simple yet powerful technique. Whether you aim to correct an orientation, create artistic mirror effects, or integrate an element seamlessly into a visual design, mastering how to flip an image in Photoshop is a core skill.
At Tophinhanhdep.com, we understand the nuances of visual artistry and digital photography. This comprehensive guide will walk you through the precise steps to reverse an image in Photoshop, delving into both basic and advanced techniques. We’ll explore how this skill ties into creating captivating wallpapers, aesthetic backgrounds, and high-resolution stock photos, and how it empowers you to unlock new creative ideas for your visual projects.
Understanding Image Reversal: Flipping vs. Rotating
Before diving into the “how-to,” it’s crucial to distinguish between flipping and rotating an image, as these terms are sometimes mistakenly used interchangeably. While both alter an image’s orientation, they achieve fundamentally different results.
Flipping (or Reversing/Mirroring) an Image: When you flip an image, you are essentially creating a mirror reflection of it. This means the image is inverted along a specific axis – either horizontally (left becomes right, and right becomes left) or vertically (top becomes bottom, and bottom becomes top). Imagine holding a photograph up to a mirror; what you see is a flipped version. This technique is often used for:
- Correcting the orientation of an element (e.g., a person facing the wrong way).
- Creating symmetrical designs or mirror effects.
- Achieving unique abstract patterns or compositions for digital art.
- Adjusting the visual flow or balance of an image within a graphic design layout.
Rotating an Image: Rotating, on the other hand, spins the image around a central point, typically by a specific degree (e.g., 90, 180 degrees) or a custom angle. This action changes the image’s angular position but does not create a mirror image. Think of tilting your head to view something differently; the object itself hasn’t mirrored. Rotation is primarily used for:
- Changing a portrait-oriented image to landscape, or vice-versa.
- Straightening a crooked horizon in a landscape photo.
- Achieving dynamic angles in photo manipulation or visual design.
Understanding this distinction is the first step towards precise image editing. In this guide, we will focus specifically on the art of “reversing” or “flipping” your images in Photoshop, a technique that opens up a world of creative possibilities for your digital photography and graphic design endeavors.
Why Flipping is a Fundamental Skill for Photographers and Designers
Flipping an image in Photoshop goes beyond mere correction; it’s a powerful tool in a visual artist’s arsenal, integral to various aspects of image creation and manipulation. For photographers, it can subtly shift the focus of a beautiful nature shot or make a portrait more engaging by altering the subject’s gaze. For graphic designers, it’s essential for achieving perfect symmetry in logos, creating dynamic backgrounds, or adjusting elements within a complex digital art piece.
Consider these scenarios, all enhanced by image flipping:
- Aesthetic Backgrounds and Wallpapers: Flipping parts of an image can create intriguing textures or symmetrical patterns that make for unique aesthetic backgrounds or high-resolution wallpapers. Imagine a cityscape mirrored vertically to create an ethereal reflection, or an abstract pattern emerging from repeated horizontal flips.
- Photo Manipulation and Digital Art: Flipping is a cornerstone of advanced photo manipulation. It allows for the seamless integration of elements, the creation of surreal compositions, or the exploration of abstract themes. Digital artists frequently use mirroring to build complex visual narratives or generate entirely new forms from existing images.
- High-Resolution Stock Photos: When preparing high-resolution stock photos for various applications, you might need to flip an image to suit a particular layout or composition requirement without cropping, preserving the original quality.
- Creative Ideas and Mood Boards: Experimenting with flips can spark new photo ideas, contributing to mood boards that explore thematic collections or trending styles. It encourages thinking outside the box, transforming ordinary photographs into extraordinary visual statements.
By mastering image flipping, you’re not just learning a command; you’re unlocking a creative pathway that enriches your ability to produce stunning, impactful visuals across all categories offered by Tophinhanhdep.com, from emotional photography to vibrant abstract art.
Step-by-Step Guide to Flipping Images in Photoshop
Photoshop offers straightforward methods for flipping images, whether you need to reverse the entire canvas or just a specific element. We’ll cover the primary techniques, ensuring you can apply them effectively regardless of your project’s complexity.
Reversing the Entire Canvas
This method is ideal when you want to flip your entire image, affecting all layers simultaneously. It’s a quick and easy way to mirror your complete visual composition.
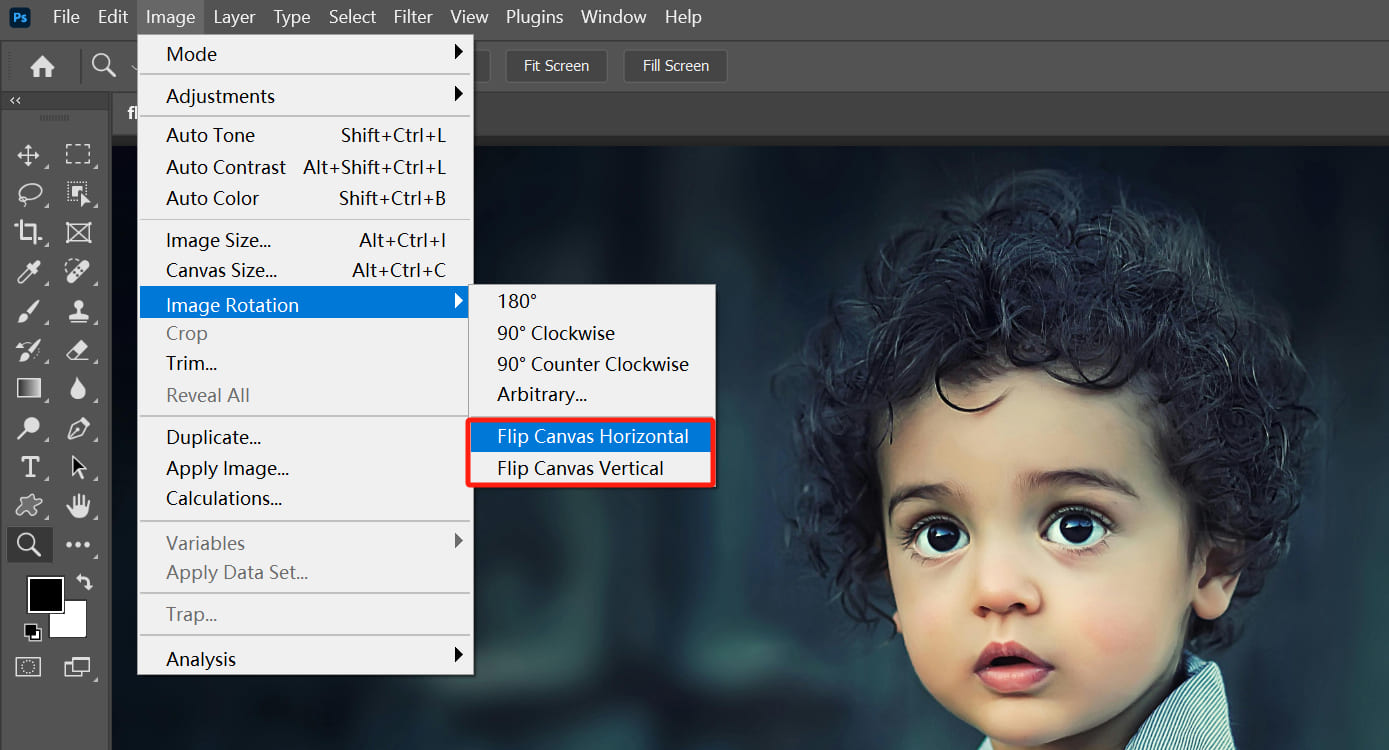
- Open Your Image: Launch Adobe Photoshop and open the image you wish to flip. Go to
File > Open, or simply drag and drop your image file into the Photoshop workspace. - Access Image Rotation: Navigate to the top menu bar. Click
Image. From the dropdown menu, selectImage Rotation. - Choose Your Flip Direction: In the
Image Rotationsubmenu, you’ll find two primary options for flipping:Flip Canvas Horizontal: This will mirror your entire image along a vertical axis. What was on the left will now be on the right, and vice-versa. This is often used for correcting directional errors or creating mirror effects.Flip Canvas Vertical: This will mirror your entire image along a horizontal axis. What was on the top will now be at the bottom, and vice-versa. This is particularly useful for achieving unique abstract reflections or unusual perspectives in nature photography.
With just a single click, your entire canvas, including all its layers, will be flipped according to your selection. This instant transformation makes it a convenient option for quickly adjusting the overall orientation of your wallpapers, backgrounds, or beautiful photography.
Flipping Individual Layers or Elements
Often, you’ll want to flip only a specific part of your image—perhaps a logo, text, or a distinct object—without affecting the rest of the composition. Photoshop provides flexible options for layer-specific flipping.
- Select the Desired Layer: In your
Layerspanel (usually on the right side of your Photoshop interface), click on the layer containing the element you want to flip. Ensure that the element is on its own layer for precise control. If it’s part of the background, you might need to duplicate the background layer and then isolate the element using selection tools before proceeding. - Enter Free Transform Mode: There are several ways to activate Free Transform:
- Go to
Edit > Free Transformfrom the top menu bar. - Use the keyboard shortcut:
Ctrl + T(Windows) orCommand + T(Mac). Once activated, you’ll see a bounding box with handles appear around your selected layer, indicating that it’s ready for transformation.
- Go to
- Right-Click for Flip Options: While the Free Transform bounding box is active around your layer, right-click anywhere inside the bounding box. A context menu will appear with various transformation options.
- Choose Your Flip Direction: From this context menu, select:
Flip Horizontal: Mirrors the selected layer along its vertical axis.Flip Vertical: Mirrors the selected layer along its horizontal axis.
- Confirm the Transformation: After selecting your flip option, the layer will instantly flip. To commit this change and exit Free Transform mode, press
Enter(Windows) orReturn(Mac), or double-click inside the bounding box.
This layer-specific flipping technique is crucial for detailed photo manipulation, graphic design, and crafting complex digital art where individual components need precise adjustments without disturbing the overall composition.
Advanced Layer Flipping Techniques
For more intricate visual designs or when working with multiple components, Photoshop offers additional flexibility for flipping elements.
Flipping Multiple Layers Simultaneously
If your project involves several related elements that need to be flipped together, you don’t have to flip them one by one.
- Select Multiple Layers: In the
Layerspanel, hold downCtrl(Windows) orCommand(Mac) and click on each layer you wish to flip. This will select them all. Alternatively, to select contiguous layers, click the first layer, then holdShiftand click the last layer. - Group Layers (Optional, but Recommended): For better organization and control, it’s often helpful to group these selected layers. With multiple layers selected, press
Ctrl + G(Windows) orCommand + G(Mac), or click the folder icon at the bottom of theLayerspanel. This places them into a single group. You can then flip the entire group as a single entity. - Enter Free Transform Mode: With your multiple layers selected (or the layer group selected), press
Ctrl + T(Windows) orCommand + T(Mac). A single bounding box will appear around all selected elements. - Right-Click and Flip: Right-click inside the bounding box and choose
Flip HorizontalorFlip Vertical. All selected layers or the entire group will flip accordingly. - Confirm: Press
EnterorReturnto apply the transformation.
This method streamlines the editing process for complex digital art pieces, allowing for cohesive adjustments across multiple elements, contributing to a more efficient workflow for your creative ideas and thematic collections.
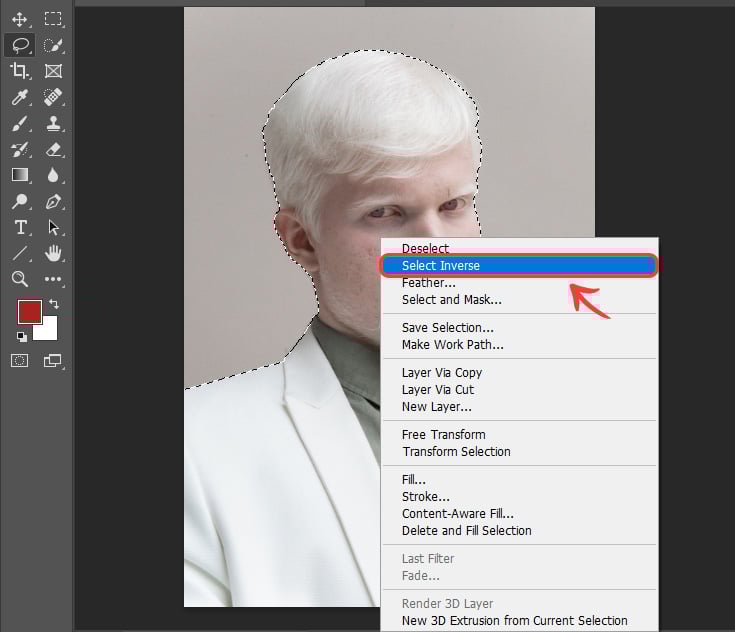
Flipping a Selection in Photoshop
Sometimes, you might only want to flip a specific area within a single layer without affecting the rest of that layer. This is where flipping a selection comes in handy.
- Make a Selection: Use any of Photoshop’s selection tools (e.g., Marquee Tool, Lasso Tool, Quick Selection Tool, Pen Tool) to define the area on your active layer that you want to flip.
- Transform the Selection: Go to
Select > Transform Selectionfrom the top menu bar. A bounding box will appear around your active selection area. - Right-Click and Flip: Right-click inside this bounding box. Choose
Flip HorizontalorFlip Vertical. - Commit the Transformation: Press
EnterorReturnto apply the flip to the selection boundary. - Apply to Pixels: Note that
Transform Selectiononly flips the selection boundary, not the pixels themselves. To actually flip the pixels within this new boundary, you would typicallyCut(Ctrl/Cmd + X) and thenPaste(Ctrl/Cmd + V) the selection. The pasted content will appear on a new layer, which you can then transform again (e.g.,Edit > Transform > Flip Horizontal/Vertical) if needed, or simply reposition.
While flipping a selection directly doesn’t instantly flip the pixels, understanding Transform Selection is vital for precise placement and manipulation of image areas before committing to pixel-level changes. For direct pixel flipping of a selection, a common workflow is to make the selection, copy it to a new layer (Ctrl/Cmd + J), then flip that new layer using the standard layer flipping method.
Troubleshooting Common Image Flipping Issues
Even simple tasks like flipping an image can sometimes encounter unexpected hurdles. Here’s a quick troubleshooting guide to address common issues you might face when reversing images in Photoshop, ensuring your high-resolution photography and graphic design projects run smoothly.
When the Flip Option Seems Missing
If you’re following the steps but can’t locate the Flip Canvas or Flip Horizontal/Vertical options, it could be due to a few reasons:
- Photoshop Version Differences: Older versions of Photoshop might have slightly different menu structures. If you can’t find
Image > Image Rotation, look forImage > Rotate. The underlying functionality is usually the same. - Contextual Availability: Ensure you are in the correct context.
Flip Canvasis under theImagemenu because it affects the entire document.Flip Horizontal/Vertical(for layers) appears in theEdit > Transformmenu or the right-click context menu only when Free Transform mode is active (Ctrl/Cmd + T). - Use the Help Menu: If all else fails, Photoshop’s built-in help is your best friend. Go to
Helpin the top menu bar and type “flip” into the search box. Photoshop will usually highlight or direct you to the correct command.
Preventing Unintended Flips: Logos and Text
A common frustration is when you flip your entire image, only to find that your logo, watermark, or text also flips, rendering it unreadable.
- The Solution: Flip Layers, Not the Canvas: This issue arises from using the “Flip Canvas” option when you only intended to flip the underlying image content. Remember to keep logos, watermarks, and text on separate layers. Then, use the “Flipping Individual Layers or Elements” method described above (
Edit > Free Transform > Right-click > Flip Horizontal/Vertical) to flip only the specific image layer, leaving your text and logos untouched. This preserves the integrity of your visual design elements.
Addressing Unnatural-Looking People
Sometimes, flipping a photograph of a person can make them appear subtly unnatural or “off.” This is often because we are accustomed to seeing people in a certain way, and their natural asymmetries become more apparent when mirrored.
- Acknowledge Asymmetry: Humans are not perfectly symmetrical. A flipped image will reveal these natural differences, which can sometimes look odd if the original pose or expression had a strong bias to one side.
- Consider the Impact on Portrait Photography: In portrait photography, the direction of gaze, hair part, or even specific facial expressions can be critical. Flipping might alter the emotional impact or visual flow.
- Subtle Adjustments or Selective Flipping: Instead of flipping the entire person, consider if only a minor element needs reversing. Sometimes, a slight rotation or a different crop might achieve the desired effect without resorting to a full flip. If a flip is necessary, minor touch-ups after the fact might be needed to restore a natural appearance. Ultimately, the best approach for natural pictures of people often comes back to ensuring your subjects feel at ease during the shoot, capturing authentic moments that can withstand minor digital manipulation.
By understanding these common pitfalls and their solutions, you can confidently integrate image flipping into your workflow, enhancing your high-resolution photography and creative visual designs without unexpected drawbacks.
Creative Applications of Image Flipping in Visual Design
Flipping an image in Photoshop isn’t just about correction; it’s a gateway to boundless creativity. This technique can transform ordinary photographs into extraordinary pieces of digital art, opening up new avenues for aesthetic expression, thematic collections, and trending styles that Tophinhanhdep.com celebrates.
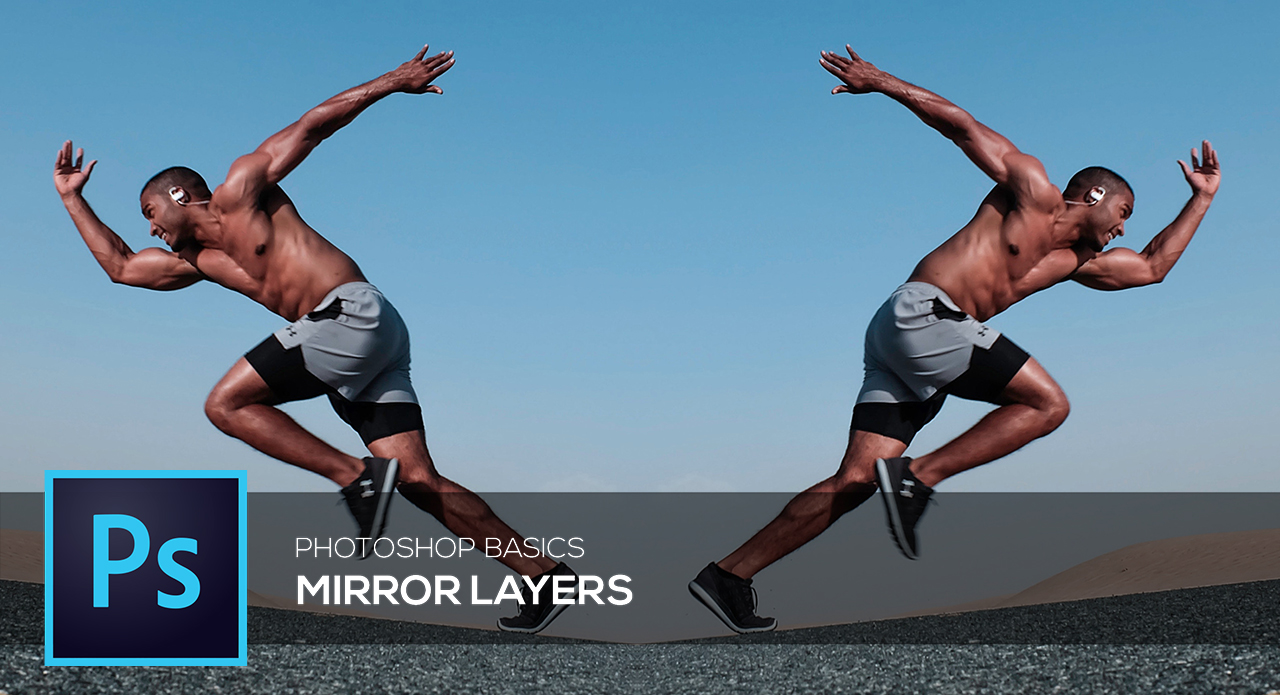
Crafting Captivating Mirror Effects
The most intuitive creative application of image flipping is creating mirror effects. This technique allows you to produce stunning symmetrical compositions that can be both striking and surreal, perfect for generating unique wallpapers and abstract backgrounds.
- Duplicate Your Layer: Start with your chosen image on a single layer. Duplicate this layer by dragging it to the
New Layericon at the bottom of theLayerspanel, or by pressingCtrl + J(Windows) /Command + J(Mac). - Add Canvas Space: To accommodate the mirrored half, you’ll likely need to expand your canvas. Go to
Image > Canvas Size. Choose to anchor your image to one side (e.g., the left for a horizontal mirror) and double the width. - Position and Flip: Use the
Move Tool(V) to drag one of the duplicated image layers to the newly added canvas space. Then, activateFree Transform(Ctrl/Cmd + T) on this layer, right-click, and selectFlip Horizontal(for a left-to-right mirror) orFlip Vertical(for a top-to-bottom mirror). - Refine and Merge: Adjust the position of the flipped layer to align perfectly with the original, creating a seamless mirror effect. You can then
Merge Down(right-click the top layer and selectMerge Down) orStamp Visible(Ctrl/Cmd + Shift + Alt/Option + E) to combine your layers.
Creative Ideas for Mirror Effects:
- Architectural Symmetry: Capture a building or structure and mirror it horizontally to create a perfectly symmetrical, almost infinite extension. This can result in powerful abstract or minimalist architectural photography.
- Dreamlike Landscapes: Mirror a serene lake landscape vertically. The reflection becomes a continuation, blurring the line between reality and illusion, creating a dreamlike aesthetic.
- Abstract Forms: Take an interesting texture or a close-up of a natural element and apply multiple, offset mirror flips. The resulting patterns can be used as compelling abstract wallpapers or digital art components.
- Conceptual Photography: Create surreal two-headed animals or fantastical creatures by flipping a subject vertically and carefully blending the halves. This pushes the boundaries of photo manipulation into the realm of digital art.
Generating Dynamic Patterns and Kaleidoscopes
Beyond simple mirror images, repeatedly flipping and rotating sections of an image can generate intricate, mesmerizing patterns and kaleidoscopic effects. These techniques are excellent for developing unique digital art, backgrounds, and thematic collections that stand out.
- Prepare Your Base Image: Begin with a visually interesting section of an image. Strong colors, distinct textures, or recognizable elements work well. Unlock the background layer.
- Duplicate and Expand: Duplicate your base layer. Expand the canvas significantly in both width and height to create ample space for repetitions.
- First Flip & Merge: Drag the duplicated layer to one side (e.g., right). Flip it horizontally (
Ctrl/Cmd + T, right-click,Flip Horizontal). Merge these two layers (Ctrl/Cmd + E). - Second Flip & Merge: Duplicate the newly merged layer. Drag this new duplicate below the original. Flip it vertically (
Ctrl/Cmd + T, right-click,Flip Vertical). Merge these two layers. - Rotate for Kaleidoscopic Effect: You now have a quadrant-like image. Duplicate this layer. Rotate the duplicate 90 degrees clockwise (
Edit > Transform > Rotate 90° Clockwise). Position it adjacent to the original to form a larger, more complex pattern. Repeat this process, rotating and merging, to build up a full kaleidoscopic image. - Crop and Refine: Once satisfied with your pattern, crop the canvas to your desired dimensions. You can use Tophinhanhdep.com’s image tools like compressors and optimizers afterward to prepare your finished art for online sharing or use as high-resolution wallpapers.
Creative Ideas for Patterns:
- Nature’s Intricacy: Take a macro shot of a flower, a leaf, or water ripples. Repeated flipping and rotation can highlight their organic patterns in an abstract, symmetrical way.
- Urban Textures: Concrete, brick, or metal surfaces, when manipulated in this manner, can yield surprisingly elegant and geometric designs suitable for contemporary graphic design.
- Personalized Branding: Designers can use this to create unique, recognizable patterns for branding, mood boards, or as elements in digital art collections.
By integrating these creative flipping techniques, you can move beyond basic photo editing and venture into advanced photo manipulation, creating visually rich content that embodies the spirit of creative ideas and trending styles found on Tophinhanhdep.com.
Beyond Photoshop: Enhancing Your Images with Tophinhanhdep.com
Mastering image manipulation in Photoshop, including the art of flipping, is a cornerstone of digital artistry. However, the creative journey doesn’t end there. At Tophinhanhdep.com, we offer a suite of powerful image tools and inspiration resources designed to complement your Photoshop skills and elevate your visual content to new heights.
Once you’ve perfected your flipped images, whether they are stunning symmetrical landscapes, intricate abstract patterns, or beautifully composed portraits for your thematic collections, Tophinhanhdep.com can help you further refine and showcase your work:
- Image Tools for Optimization: After creating high-resolution masterpieces in Photoshop, our Compressors and Optimizers can reduce file sizes without compromising quality, making your images load faster on websites or share more easily. Need to convert formats? Our Converters handle a wide range of image types. If you’re working with older or smaller images, our AI Upscalers can intelligently enlarge and enhance them, ensuring that every detail of your flipped artwork remains crisp and clear.
- Inspiration for Your Next Project: Explore our vast Image Collections featuring Wallpapers, Backgrounds, Aesthetic, Nature, Abstract, Sad/Emotional, and Beautiful Photography. Find new Photo Ideas, curated Mood Boards, and discover Trending Styles that can inspire your next Photoshop project or even prompt you to apply advanced flipping techniques to your stock photos or digital art. Whether you’re a beginner looking for thematic collections or a professional seeking fresh visual design concepts, Tophinhanhdep.com is your go-to source.
- Photography Resources: Dive deeper into Digital Photography and Editing Styles with our expert guides. Learn about high-resolution imaging, understand how different manipulations impact your final output, and discover techniques that go hand-in-hand with your Photoshop skills.
By combining your proficiency in Photoshop with the versatile resources available at Tophinhanhdep.com, you empower yourself to create, manage, and share captivating visuals effortlessly. From the initial flip to the final optimized output, we’re here to support every step of your creative process. Start exploring today and transform your photo manipulation efforts into stunning visual realities.