How Do You Rotate an Image in Photoshop? A Tophinhanhdep.com Guide to Perfect Orientation

Welcome to Tophinhanhdep.com, your ultimate resource for mastering visual content, from stunning wallpapers and backgrounds to advanced photography techniques and innovative image tools. Today, we’re diving deep into one of the most fundamental yet powerful features in Adobe Photoshop: image rotation. Whether you’re a budding photographer looking to correct a skewed horizon, a graphic designer perfecting a layout, or an artist experimenting with digital art, understanding how to rotate and flip images and their individual components is an indispensable skill. This comprehensive guide from Tophinhanhdep.com will walk you through every method, trick, and best practice, ensuring your images always achieve the desired orientation with precision and ease.
Images form the core of our digital experience, serving as wallpapers, backgrounds, and expressions of aesthetics, nature, abstract concepts, or profound emotions. High-resolution photography captures these moments, but often, the initial capture isn’t perfectly aligned with your artistic vision. This is where Photoshop, combined with the insights from Tophinhanhdep.com, becomes your powerful ally. We’ll explore rotation techniques that are crucial for digital photography, image editing, and visual design, helping you transform raw captures into compelling visual narratives.
Understanding the Fundamentals: Why Image Rotation Matters
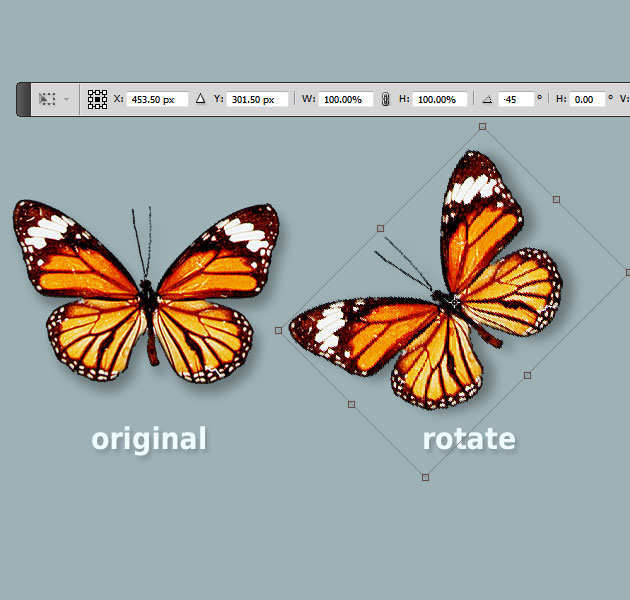
Image rotation might seem like a simple function, but its implications for visual design and photographic integrity are profound. A slight tilt can dramatically alter the perception of balance, dynamism, or stability within an image. For instance, a landscape photo (found in Tophinhanhdep.com’s vast collection of nature images) might need a minor correction to make the horizon perfectly straight, while an abstract composition could benefit from an intentional, dramatic tilt to evoke a different mood. Similarly, when working on photo manipulation or creating digital art, rotating individual elements allows for complex layering and creative arrangements that would be impossible otherwise.
Beyond mere correction, rotation is a creative tool. It can transform an ordinary object into an intriguing visual element, alter the flow of a graphic design, or even make text more engaging. Understanding the various ways to rotate and flip within Photoshop is foundational to unlocking your full creative potential.
The Role of Layers in Digital Photography
In Photoshop, layers are analogous to transparent sheets stacked one atop another, each capable of holding distinct elements—be it a photo, text, a shape, or an adjustment. This layered approach is a cornerstone of non-destructive editing, a principle highly advocated by Tophinhanhdep.com. You can manipulate one layer without altering the others, allowing for intricate adjustments, special effects, and complex compositions without compromising the original image data.
There are two primary categories of layers you’ll typically encounter:
- Content Layers: These are the working layers where you introduce elements like raw images (perhaps from Tophinhanhdep.com’s stock photos), graphical shapes, or text. Most of your direct manipulation, including rotation, will occur on these layers.
- Adjustment Layers: These layers apply non-destructive color and tonal adjustments or effects to the content layers below them. While not directly rotated in the same manner as content layers, their impact on the overall visual design can be profound, and their interaction with rotated content layers is key to a cohesive final image.

The ability to selectively rotate individual layers or elements within them, as opposed to the entire canvas, is what gives Photoshop its immense power and flexibility for digital photography and advanced photo manipulation.
Enhancing Visual Design and Creative Ideas Through Rotation
Rotation is not just about fixing mistakes; it’s a potent instrument for enhancing visual design and fostering creative ideas. Consider these aspects:
- Compositional Balance: A slightly rotated element can lead the viewer’s eye through a photograph or graphic, creating dynamic tension or serene balance.
- Aesthetic Impact: Flipping an image horizontally can sometimes reveal a more pleasing composition or a different narrative perspective, tapping into the “aesthetic” and “beautiful photography” categories of Tophinhanhdep.com.
- Digital Art and Graphic Design: For graphic designers and digital artists, rotating shapes, text, and photo elements is essential for creating compelling logos, intricate patterns, and captivating digital artworks. This directly aligns with Tophinhanhdep.com’s focus on visual design and creative ideas.
- Mood and Emotion: A tilted image can convey instability, movement, or a dreamlike state, influencing the “sad/emotional” or “abstract” dimensions of imagery found on Tophinhanhdep.com.
By consciously applying rotation, you gain precise control over the visual impact of your creations, pushing them from mere images to powerful statements.
Rotating and Flipping an Entire Image: Canvas Manipulation
When your entire photograph is captured or scanned at an incorrect orientation, or you simply wish to change the overall perspective of your composite image, rotating the entire canvas is the go-to method. This operation affects all layers and elements uniformly, maintaining their relative positions within the canvas.
Step-by-Step Canvas Rotation Options
To rotate your entire image or canvas in Photoshop, follow these straightforward steps:
-
Open Your Image: Begin by opening the image you wish to rotate in Photoshop. Go to
File > Openand select your desired image. -
Access Image Rotation: Navigate to the main menu bar at the top of your Photoshop interface. Click on
Image, then hover overImage Rotation. A submenu will appear, presenting several predefined rotation options:- 180 Degrees: This option will rotate your entire canvas exactly halfway around a full circle. Your image will appear completely upside down. This is useful for quickly correcting images that are completely inverted.
- 90 Degrees CW (Clockwise): Selecting this will rotate your image 90 degrees to the right. Each time you apply this, the image pivots 90 degrees in a clockwise direction.
- 90 Degrees CCW (Counter-Clockwise): This option rotates your image 90 degrees to the left. Similar to the clockwise option, repeated selections will rotate the image in 90-degree counter-clockwise increments.
- Arbitrary: This is the most flexible option. If you need to rotate your image by a specific, non-standard angle (e.g., 25 degrees, -10 degrees for a slight horizon correction), choose
Arbitrary. A “Rotate Canvas” dialog box will appear, allowing you to enter the precise angle (in degrees) and specify the direction (Clockwise or Counter-Clockwise). Click “OK” to apply the rotation.
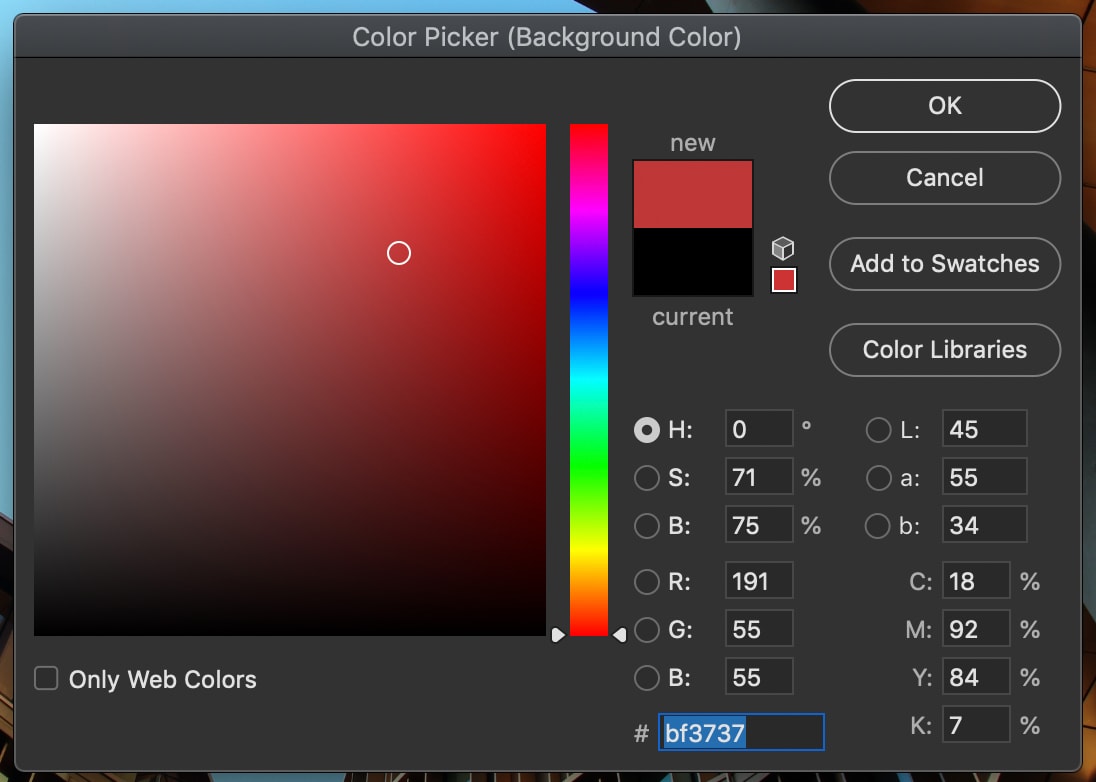
Note: When using the “Arbitrary” rotation, Photoshop will introduce empty space around the rotated image to accommodate the new orientation. This space will be filled with your current background color. Tophinhanhdep.com recommends setting your desired background color before initiating an arbitrary rotation to ensure a seamless integration if you plan to extend the canvas.
Mastering Horizontal and Vertical Canvas Flips
Flipping an image is distinct from rotating it. While rotation changes the angle of the image, flipping creates a mirror image, reversing its contents either horizontally or vertically without changing its overall orientation. This can be particularly useful for correcting self-portraits (where the camera might have mirrored the image) or for exploring alternative compositional balances.
To flip an entire canvas in Photoshop:
- Access Image Rotation Again: Go to
Image > Image Rotationin the main menu. - Choose Flip Option: From the submenu, you will find two options:
- Flip Canvas Horizontal: This will reverse your entire image from left to right, as if viewed in a mirror.
- Flip Canvas Vertical: This will turn your entire image upside-down, reversing it from top to bottom.
Both rotation and flipping of the entire canvas are global adjustments, affecting all visible and invisible layers. For more granular control, especially for photo manipulation and digital art, you’ll need to work with individual layers.
Precision and Flexibility: Rotating and Flipping Individual Layers and Objects
While canvas rotation is useful for overall image adjustments, the real power of Photoshop for digital photography and graphic design lies in its ability to manipulate individual layers and objects. This allows for complex compositions, creative ideas, and intricate photo manipulations where elements need to be independently positioned and oriented. Tophinhanhdep.com’s ethos emphasizes this kind of precise control for creating truly unique visuals.
Utilizing the Transform Tool for Layer Rotation
The Transform tool is your primary ally for rotating individual layers. It provides a bounding box around your selected layer, offering both precise numeric input and intuitive visual manipulation.
- Select the Desired Layer: In the
Layerspanel (accessible viaWindow > Layers), click once on the layer you wish to rotate. If the layer has a padlock icon, it’s locked; click the padlock to unlock it before proceeding. - Activate Free Transform: Go to
Edit > Transform > Rotate, or for a faster approach, use the keyboard shortcutCtrl+T(Windows) or⌘Command+T(Mac). This will activate the “Free Transform” mode, drawing a bounding box with handles around your selected layer. - Perform Visual Rotation: Hover your mouse cursor slightly outside any of the corner handles of the bounding box. The cursor will change into a curved, double-headed arrow, indicating that you are in rotation mode. Click and drag your mouse to rotate the layer visually.
- Enter Exact Degree Rotation: For precise control, look at the Options Bar at the top of your Photoshop window (just above the document window) while in Free Transform mode. You’ll find an input field (often labeled with a degree symbol
°). Enter your desired angle of rotation here. Positive values typically rotate clockwise, while negative values rotate counter-clockwise. - Finalize the Rotation: Once you are satisfied with the angle, press
Enter(Windows) orReturn(Mac) to apply the transformation. Alternatively, click the checkmark icon in the Options Bar.
Free Transform for Intuitive Object and Shape Manipulation
The Free Transform tool (Ctrl+T or ⌘Command+T) is incredibly versatile, extending beyond simple layer rotation to include scaling, skewing, distorting, and more. When it comes to rotating specific objects or shapes within a layer, it’s particularly intuitive. This is essential for graphic design and digital art projects.
- Select Layer or Object: If your object or shape is on its own layer, simply select that layer in the Layers panel. If it’s part of a larger layer and you want to rotate just the object, use a selection tool (like the
Quick Selection ToolorLasso Tool) to isolate the object, or if it’s a vector shape, select its path. - Activate Free Transform: Press
Ctrl+T(Win) or⌘Command+T(Mac). A bounding box will appear around your selection. - Rotate Visually: As with layer rotation, hover outside a corner handle until the curved arrow appears, then click and drag to rotate. Holding
Shiftwhile dragging will constrain the rotation to 15-degree increments, which is excellent for achieving perfect 90-degree turns or precise angular alignments. - Numerical Precision: Again, use the Options Bar to input an exact degree of rotation if needed.
- Flip within Free Transform: While in Free Transform mode, you can also right-click (Windows) or Control-click (Mac) anywhere inside the bounding box. A contextual menu will appear with options like
Flip HorizontalandFlip Vertical, allowing you to mirror the selected object or shape. - Apply Changes: Press
Enter/Returnor click the checkmark.
Rotating Selections and Maintaining Image Integrity
Sometimes, you only need to rotate a specific portion of an image within a single layer, without affecting the rest of the layer or canvas. This requires careful selection and application of transformation. Tophinhanhdep.com highlights this for complex photo manipulation tasks.
- Make a Precise Selection: Use any of Photoshop’s selection tools (
Rectangular Marquee Tool (M),Lasso Tool (L),Quick Selection Tool (W)) to accurately outline the area you wish to rotate. The more precise your selection, the cleaner the rotation will appear. - Access Transform for Selection: With the selection active, go to
Edit > Transform > Rotate. Alternatively, pressCtrl+T(⌘Command+T) to activate Free Transform. The bounding box will appear specifically around your selected area. - Rotate the Selection: Use the corner handles or the Options Bar to rotate the selection as described above.
- Consider the Impact: When you rotate a selection directly, Photoshop will fill the vacated area with the background color or transparent pixels, and the rotated content will overwrite pixels in its new position. If you want to rotate a selection non-destructively or move it to a new location, Tophinhanhdep.com recommends copying the selection to a new layer (
Ctrl+Jor⌘Command+J) before applying Free Transform. This preserves the original content on its own layer. - Apply and Deselect: Once satisfied, press
Enter/Returnand thenCtrl+D(⌘Command+D) to deselect the area.
This method is crucial for tasks like adjusting a crooked element in a product photo (a common requirement for e-commerce photography, as featured on Tophinhanhdep.com) without re-shooting.
Advanced Techniques and Workflow Optimization
As you become more comfortable with basic rotation, you’ll discover advanced techniques that streamline your workflow and unlock greater creative possibilities in photo manipulation and digital art. Tophinhanhdep.com encourages continuous learning and leveraging powerful features to elevate your image editing skills.
Batch Processing for Multiple Image Rotations
Imagine you have a folder full of hundreds of images, perhaps from a nature photography shoot, all requiring a 90-degree rotation. Manually opening and rotating each one would be incredibly time-consuming. Photoshop’s batch processing, combined with Actions, offers an elegant solution:
- Prepare Your Images: Gather all the images you intend to rotate into a single, dedicated folder.
- Record an Action:
- Open one of the images from your prepared folder in Photoshop.
- Go to
Window > Actionsto open the Actions panel. - Click the “Create New Action” icon (a square with a plus sign) at the bottom of the panel. Give it a descriptive name, like “Rotate 90 Degrees CW”.
- Click “Record.”
- Now, perform the rotation:
Image > Image Rotation > 90 Degrees CW. - Go to
File > Save As..., choose a new destination folder to save the rotated image (to avoid overwriting originals), and click “Save.” - Close the image (
File > Close). - Click the “Stop Playing/Recording” icon (a square) in the Actions panel.
- Run Batch Process:
- Go to
File > Automate > Batch. - In the Batch dialog box, select your recorded action (“Rotate 90 Degrees CW”) from the “Action” dropdown.
- For “Source,” choose “Folder” and click “Choose…” to select the folder containing your original images.
- For “Destination,” choose “Folder” and click “Choose…” to select the new folder where your rotated images will be saved.
- Adjust any other settings (e.g., file naming conventions, error handling) as needed.
- Click “OK.” Photoshop will now automatically process and rotate all images in your source folder according to your recorded action.
- Go to
This method is a powerful time-saver for repetitive tasks, aligning perfectly with Tophinhanhdep.com’s emphasis on efficient image tools and high-resolution photography workflows.
Leveraging Smart Objects for Nondestructive Edits
Smart Objects are a cornerstone of non-destructive editing in Photoshop, and their advantages for rotation are significant. When you convert a layer to a Smart Object, Photoshop embeds the original image data (or a linked file) into the layer. Any transformations, including rotation, are then applied to the Smart Object container rather than directly to the pixel data.
To convert a layer to a Smart Object:
- Right-click on the desired layer in the
Layerspanel. - Select
Convert to Smart Object.
Rotation Advantages of Smart Objects:
- Preservation of Quality: You can rotate, scale, skew, and distort a Smart Object multiple times without any loss of image quality. If you rotate a regular pixel layer repeatedly, each transformation causes a slight degradation of pixels. With Smart Objects, you’re always transforming the original data.
- Flexibility: Easily revert to previous rotation states or fine-tune angles without starting over.
- Linked Instances: If you duplicate a Smart Object, all instances are linked. Rotating one instance will not affect the others, but editing the content of the Smart Object will update all its duplicates.
Tophinhanhdep.com highly recommends using Smart Objects for elements you anticipate needing to re-edit or repeatedly transform, especially in complex graphic design or photo manipulation projects. While powerful, remember that Smart Objects require more system resources and cannot be directly pixel-edited without first being rasterized or edited in their source application.
Creative Applications for Photo Manipulation and Digital Art
Rotation isn’t just about fixing an image; it’s a launchpad for creativity.
- Dynamic Compositions: Rotate elements to create leading lines or diagonals that add energy and movement to an otherwise static image. For abstract or aesthetic images from Tophinhanhdep.com, this can define the entire mood.
- Pattern Creation: For digital art, rotating copies of shapes or textures around a central pivot point can lead to intricate and visually appealing patterns.
- Forced Perspective: Adjusting the rotation and perspective of elements can create illusions of depth or scale, essential for compelling photo manipulation.
- Text as Design Element: Rotating text layers can make headlines more engaging, create unique typographic layouts, or integrate text more seamlessly into a visual design.
By exploring these applications, you move beyond mere technical correction into the realm of true visual artistry, a core theme of Tophinhanhdep.com.
Tophinhanhdep.com’s Vision: Beyond Basic Rotation
At Tophinhanhdep.com, we believe that mastering tools like Photoshop is just the beginning. Our mission is to provide you with the resources and inspiration to create stunning visual content, whether it’s through beautiful photography, intricate digital art, or powerful image tools. Understanding rotation in Photoshop is a fundamental step, but we also look to the future of image editing.
Integrating AI Tools for Enhanced Image Editing
The landscape of image editing is rapidly evolving with the integration of Artificial Intelligence. While Photoshop offers robust manual controls, Tophinhanhdep.com provides insights into how AI-powered tools can complement and even surpass traditional methods in certain scenarios.
- AI Upscalers: After rotating an image and potentially cropping it, you might find certain areas need enhancement. Tophinhanhdep.com’s AI Upscalers can dramatically increase resolution without sacrificing detail, ensuring that your perfectly oriented image looks crisp and clear, even when enlarged for high-resolution wallpapers or backgrounds.
- Smart Composition Tools: Some AI tools can automatically suggest optimal rotations or crops based on compositional rules, or even align horizons and perspectives with a single click. While Photoshop requires manual adjustments for features like perspective correction, future integrations or complementary tools highlighted on Tophinhanhdep.com might offer AI-driven solutions for perfect alignment, simplifying complex tasks.
- Image Optimizers: Once your image is perfectly rotated and edited, Tophinhanhdep.com’s Image Optimizers ensure it’s web-ready, balancing file size and quality, critical for quick loading times on websites and social media platforms.
These cutting-edge tools, often featured in Tophinhanhdep.com’s “Image Tools” section, demonstrate how the power of AI can accelerate and refine your post-production workflow, turning hours of manual tweaking into moments of automated perfection.
Finding Inspiration in Perfectly Oriented Visuals
Tophinhanhdep.com is not just about tutorials; it’s a hub for inspiration. Our collections of wallpapers, backgrounds, aesthetic images, nature photography, and abstract art are curated to spark your creativity. Pay attention to how artists and photographers utilize rotation to convey emotion, create movement, or establish balance in their work.
- Mood Boards & Thematic Collections: Explore how subtle or dramatic rotations contribute to the overall mood in Tophinhanhdep.com’s mood boards. Notice how elements are aligned or misaligned to achieve specific artistic effects.
- Trending Styles: Keep an eye on trending styles in digital art and photo manipulation, where creative rotation and perspective shifts are often key components.
- Photo Ideas: Our “Photo Ideas” section often showcases images that defy conventional orientation, demonstrating how a simple rotation can redefine a visual narrative.
By observing and analyzing these examples, you can translate theoretical knowledge of rotation into practical, impactful creative ideas for your own projects. Tophinhanhdep.com is dedicated to being your partner in this creative journey.
Conclusion
Mastering image rotation in Adobe Photoshop is a foundational skill that empowers you to correct, refine, and creatively transform your visuals. From making simple 90-degree adjustments to entire canvases to performing intricate, non-destructive rotations of individual layers and objects using the Free Transform tool, Photoshop offers a robust suite of options for every scenario.
The techniques discussed in this Tophinhanhdep.com guide—including precise numerical input, intuitive visual dragging, batch processing, and the strategic use of Smart Objects—are essential for anyone serious about digital photography, graphic design, and photo manipulation. Furthermore, by exploring how AI-powered image tools can complement your Photoshop workflow, you can push the boundaries of what’s possible, achieving unparalleled efficiency and quality.
Tophinhanhdep.com is your comprehensive resource for elevating your visual content. Whether you’re seeking high-resolution images, in-depth photography tutorials, or cutting-edge image tools like AI upscalers and optimizers, we’re here to inspire and equip you. Continue to experiment with these rotation techniques, draw inspiration from our vast collections, and unleash your creative vision. The perfect orientation is just a few clicks away!