Mastering Image Rotation in Photoshop for Enhanced Visuals

In the dynamic world of visual content creation, whether you’re a professional photographer, a digital artist, or simply passionate about creating stunning images, Adobe Photoshop remains an indispensable tool. From crafting breathtaking wallpapers and backgrounds to perfecting high-resolution photography and digital art, the ability to precisely manipulate your visuals is paramount. One of the most fundamental yet powerful techniques in your arsenal is image rotation. Understanding how to effectively rotate and flip images or individual layers in Photoshop can dramatically transform your creative output, enabling you to achieve specific aesthetic visions, correct compositional flaws, or experiment with abstract designs.
This comprehensive guide from Tophinhanhdep.com will delve into the various methods of image rotation in Photoshop, covering everything from simple canvas adjustments to advanced layer transformations. We’ll explore how these techniques contribute to compelling visual design, enhance your photo manipulation skills, and inspire creative ideas, ultimately helping you curate impressive image collections and trending styles for Tophinhanhdep.com’s diverse audience.
Essential Techniques for Rotating Entire Images
When your entire image needs a new orientation – perhaps a photo was taken sideways, or a scanned document is upside down – Photoshop provides straightforward options to adjust the entire canvas. This initial step is crucial for establishing the foundational perspective of your image, whether it’s a beautiful landscape or a striking abstract piece.
Step-by-Step Canvas Rotation
To begin rotating your entire image, the first step is to open your desired file in Photoshop. Navigate to File > Open and select the image you wish to work with. Once open, you’ll find the primary rotation controls under the Image menu.
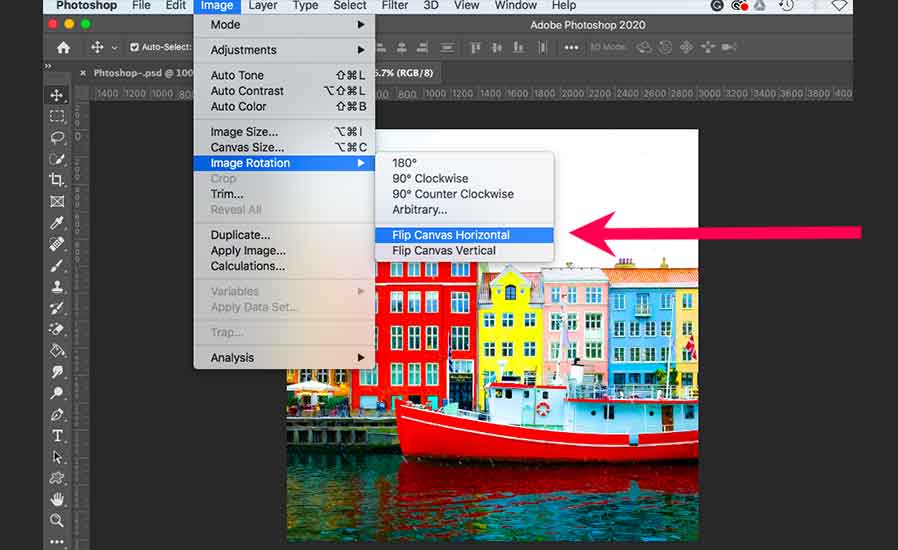
- Accessing Image Rotation: Go to
Image > Image Rotation. This submenu presents several pre-set and custom rotation options. - Pre-set Rotations:
- 180 degrees: This option rotates your image halfway around a complete circle, effectively turning it upside down. This can be useful for correcting inverted scans or for artistic symmetrical effects.
- 90 degrees CW (Clockwise): Rotates the image 90 degrees to the right. This is commonly used to shift a portrait-oriented image to landscape, or vice-versa, ensuring your high-resolution photography is correctly displayed.
- 90 degrees CCW (Counter-Clockwise): Rotates the image 90 degrees to the left. Similar to CW rotation, it offers quick orientation adjustments.
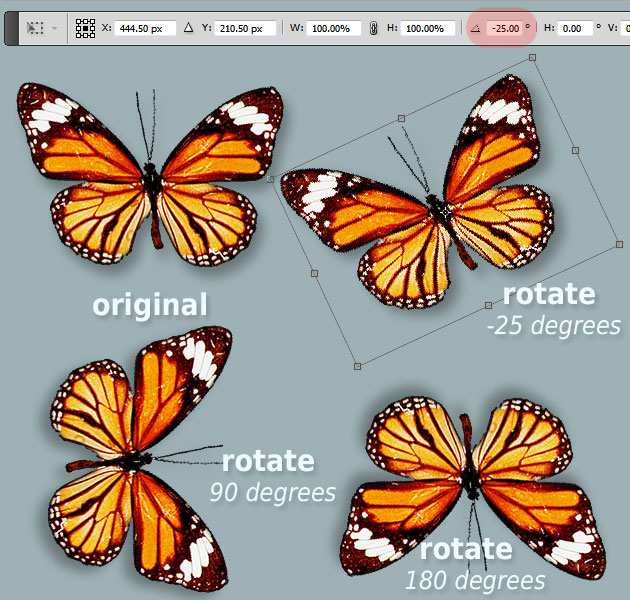
- Arbitrary Rotation for Precision: For situations requiring a specific, non-standard angle – perhaps 25 degrees for a tilted aesthetic, or a minor adjustment to straighten a horizon in a nature photo – the “Arbitrary” option is invaluable.
- Select
Image > Image Rotation > Arbitrary.... - A dialogue box will appear where you can input the exact angle (in degrees) and choose the direction (Clockwise or Counter-Clockwise). Click
OKto apply the rotation. This level of precision is vital for detailed graphic design and achieving unique visual compositions for Tophinhanhdep.com’s diverse range of images.
- Select
After rotating, you might notice empty space around your image, which Photoshop fills with the current background color. For a seamless integration into your visual design projects, it’s often a good practice to set your preferred background color before rotation, or crop the image afterward.
Flipping Images for Creative Perspectives
Beyond rotation, Photoshop also offers options to flip or mirror an entire image, which can dramatically alter its visual impact. Flipping maintains the image’s orientation but reverses its content horizontally or vertically, offering fresh perspectives for backgrounds, aesthetic photography, or abstract designs.
- Horizontal Flip: To mirror your image as if looking into a reflection, choose
Image > Image Rotation > Flip Canvas Horizontal. This can create compelling symmetrical compositions or provide alternative viewpoints for your stock photos. - Vertical Flip: To turn your image upside down without rotating it on its axis, select
Image > Image Rotation > Flip Canvas Vertical. This can be a simple yet effective way to introduce abstract elements or correct certain photographic anomalies.
Undoing and Saving: If you’re not satisfied with a rotation or flip, remember the universal undo shortcut: Ctrl+Z (Windows) or ⌘Command+Z (Mac). Once you’ve achieved the desired orientation, always save your work by going to File > Save As, choosing a suitable location and file format for your newly enhanced image. This ensures your efforts in creating beautiful photography or digital art are preserved for your Tophinhanhdep.com collections.
Precision Control: Rotating and Flipping Individual Layers
While rotating the entire canvas sets the global orientation, the true power of Photoshop for visual design and photo manipulation lies in its layer-based editing capabilities. Being able to rotate and flip individual layers independently offers unparalleled creative control, allowing you to fine-tune specific elements within a complex composition without affecting other parts of your image. This is particularly beneficial for digital art, photo collages, or detailed graphic design projects where each component plays a unique role.
Understanding Layers and Their Importance
In Photoshop, layers are like transparent sheets stacked on top of each other. Each sheet can hold different elements – a photo, text, a graphic shape, or a texture. This structure enables non-destructive editing, meaning you can modify one layer (e.g., rotating a specific object) without permanently altering others or the original image data. This flexibility is a cornerstone of professional digital photography and graphic design, allowing for endless experimentation and refinement.
- Visibility: The Layers panel (accessible via
Window > Layers) displays all layers in your project. Each layer has an eye icon next to its thumbnail; clicking this icon toggles the layer’s visibility, allowing you to isolate elements or preview changes. - Selection: To work with a specific layer, simply click on it in the Layers panel to select it. You can select multiple layers by holding
Ctrl(Win) or⌘Command(Mac) and clicking each one. - Locking Layers: If a layer has a padlock icon, it’s locked and cannot be modified. Click the padlock to unlock it before attempting transformations. This prevents accidental changes, especially when working on intricate photo manipulation projects.
Utilizing Transform Tools for Layer Rotation
Once you’ve selected the layer(s) you wish to modify, Photoshop offers a dedicated set of transform tools under the Edit menu. These tools provide precise control over rotation and flipping.
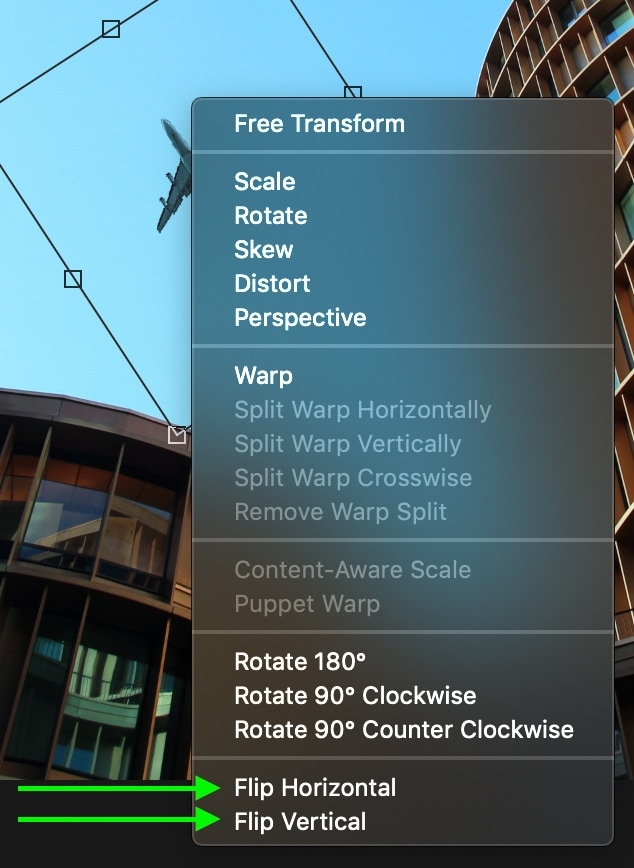
- Accessing Transform Options: Go to
Edit > Transform. This submenu reveals various options for manipulating your selected layer(s). - Specific Layer Rotation:
- Rotate: This allows you to manually input a specific angle for rotation, much like the arbitrary canvas rotation. This is ideal for exact alignments in visual design.
- Rotate 180 degrees: Flips the layer upside down.
- Rotate 90 degrees CW: Rotates the layer 90 degrees clockwise.
- Rotate 90 degrees CCW: Rotates the layer 90 degrees counter-clockwise. These options are perfect for quickly adjusting components in abstract or aesthetic images.
- Flipping Layers:
- Flip Horizontal: Mirrors the selected layer(s) horizontally. This is excellent for creating reflections, symmetrical designs, or adjusting the direction a subject is facing within a composition.
- Flip Vertical: Mirrors the selected layer(s) vertically. Useful for creative effects or correcting misoriented elements.
These distinct layer-level controls are essential for intricate photo manipulation, enabling artists to compose complex scenes or blend multiple images seamlessly into a unified visual narrative for Tophinhanhdep.com.
Dynamic Rotation with the Free Transform Tool
For more intuitive, visual control over rotation, Photoshop’s Free Transform tool is a go-to feature. It allows you to interactively rotate, scale, skew, and distort layers directly on the canvas.
- Activating Free Transform: The quickest way to access it is with the keyboard shortcut:
Ctrl+T(Windows) or⌘Command+T(Mac). This will draw a bounding box around your selected layer(s). - Visual Rotation:
- Hover your mouse cursor just outside any of the corner handles of the bounding box. The cursor will change into a curved, double-headed arrow – the “rotating arrow.”
- Click and drag the mouse up or down (or clockwise/counter-clockwise) to rotate the layer. As you drag, you’ll see the rotation happen in real-time, and Photoshop will display the current angle in the Options Bar at the top of your screen.
- Important: Be sure the cursor transforms into the rotating arrow before you drag. Dragging when the cursor is a double-sided straight arrow will scale the layer, and dragging from within the bounding box might move it or warp it, which can be frustrating if you’re aiming for a precise rotation.
- To constrain rotation to 15-degree increments (e.g., 90, 180 degrees), hold down the
Shiftkey while dragging. This is invaluable for maintaining geometric precision in graphic design and digital art.
- Finalizing and Saving: Once you’ve achieved the desired rotation, press
Enter(orReturnon Mac) to commit the transformation. If you decide against the changes, pressEscto cancel. After making your adjustments, save your image viaFile > Save Asto incorporate these refined elements into your collection on Tophinhanhdep.com. This dynamic control is especially beneficial when creating intricate aesthetic backgrounds or manipulating elements within beautiful photography to achieve creative ideas.
Advanced Strategies for Optimized Image Manipulation
Beyond the fundamental rotation techniques, Photoshop offers advanced strategies that enhance efficiency and creative control, particularly when managing complex visual design projects, curating large image collections, or integrating with various image tools. These strategies streamline your workflow and ensure your high-resolution photography and digital art maintain their quality throughout the manipulation process.
Rotating Selections for Targeted Adjustments
Sometimes, you only need to rotate a specific part of a layer, not the entire layer itself. This is where rotating selections comes into play, offering granular control essential for detailed photo manipulation and creative compositions.
- Making a Selection: First, use any of Photoshop’s selection tools (e.g., Lasso, Marquee, Quick Selection, or Object Selection Tool) to define the area you wish to rotate. For instance, if you want to subtly adjust the angle of a specific element within a nature photo or a sad/emotional image, this method is ideal.
- Applying Free Transform: With your selection active, press
Ctrl+T(Win) or⌘Command+T(Mac) to activate the Free Transform tool. A bounding box will appear around your selection. - Rotating the Selection: As with layer rotation, hover outside the bounding box until the curved rotating arrow appears, then click and drag to rotate. The selection will rotate independently of the rest of the layer, cutting it from its original spot and rotating the selected pixels.
- Committing Changes: Press
Enterto finalize the rotation. Remember to deselect (Ctrl+Dor⌘Command+D) when finished.
This technique is powerful for precisely aligning elements in digital art, adjusting facial features in portrait photography, or repositioning text blocks within graphic designs without affecting surrounding pixels.
Mastering Shape Rotation for Graphic Design
Shapes are fundamental elements in graphic design, digital art, and creating abstract backgrounds. Whether you’re working with pre-set vector shapes or custom creations, rotating them follows similar principles to other objects in Photoshop, but with the advantage of maintaining crisp edges.
- Selecting the Shape Layer: Ensure the specific shape layer is selected in your Layers panel.
- Using Free Transform (Ctrl+T): Activate Free Transform, and the bounding box will appear around your shape.
- Visual Rotation: Drag the rotation handles as described earlier to visually adjust the shape’s angle. This is the quickest way to find an aesthetically pleasing orientation for your creative ideas.
- Exact Degree Rotation: For precise angular adjustments, enter the desired degree directly into the rotation field in the Options Bar at the top of the screen. This ensures mathematical accuracy for logos, icons, and geometric patterns in your visual designs.
- Properties Panel Control: For even more control, open the
Window > Propertiespanel. Here, you can find precise rotation controls, including a dropdown for common angles and an input field for custom degrees.
Consistent and precise shape rotation is vital for creating impactful graphic design elements, cohesive visual branding, and dynamic abstract imagery that stands out on Tophinhanhdep.com.
Enhancing Workflow with Canvas Rotation
While “Image Rotation” permanently alters your image, Photoshop’s “Rotate View Tool” offers a different, non-destructive way to rotate. This tool temporarily rotates your view of the canvas, making it easier to draw, paint, or retouch at comfortable angles, without affecting the actual image data. This is a game-changer for artists using digital photography as a base for digital art, allowing for natural brush strokes and detailed work.
- Selecting the Rotate View Tool:
- Locate the Hand tool in the Tools panel (shortcut
H). Click and hold it to reveal a submenu, and select theRotate View Tool. - Alternatively, simply press
Ron your keyboard for a direct shortcut.
- Locate the Hand tool in the Tools panel (shortcut
- Dynamic Viewing: With the tool active, click and drag anywhere on your canvas. The entire canvas will rotate, but this is purely for your viewing convenience. If you export your project, it will export in its original orientation.
- Entering Specific Angles: In the Options Bar at the top, you can input a precise rotation angle for your view. This is useful if you have a preferred working angle for specific tasks, like brushwork or masking.
- Using the Scrubby Slider: Hover your mouse over the “Rotation Angle” label in the Options Bar, and your cursor will change to a scrubby slider. Click and drag left or right to dynamically adjust the view angle.
- Resetting the View:
- The quickest way to reset your canvas view to 0 degrees is to press the
Esckey. This only works when theRotate View Toolis currently selected. - Alternatively, click the
Reset Viewbutton in the Options Bar.
- The quickest way to reset your canvas view to 0 degrees is to press the
- Spring-Loaded Tool: For seamless workflow, Photoshop allows you to use the
Rotate View Tooltemporarily. If you’re using another tool (e.g., Brush Tool), simply press and holdR. The cursor will change to theRotate View Tool, allowing you to rotate your view. ReleaseR, and you’ll instantly revert to your previous tool. - Rotating Multiple Open Documents: If you’re working on a series of images, perhaps preparing a thematic collection of wallpapers or processing a batch of stock photos, you can synchronize your view.
- Arrange your open documents:
Window > Arrangeand choose a preferred layout (e.g.,Tile All Vertically). - Select the
Rotate View Tooland checkRotate All Windowsin the Options Bar. Now, rotating one canvas will apply the same view rotation to all open documents, ensuring consistency across your image inspiration and collections. For more detailed instructions on this, see the helpful guides on Tophinhanhdep.com.
- Arrange your open documents:
Best Practices and Integration with Tophinhanhdep.com’s Offerings
Mastering image rotation is more than just knowing where the buttons are; it’s about understanding when and why to apply these techniques to enhance your visual projects and align with the diverse offerings on Tophinhanhdep.com. From maintaining image quality to inspiring new creative ideas, rotation plays a pivotal role in the complete image lifecycle.
Smart Objects: Non-Destructive Rotation and Scalability
For any serious photographer or graphic designer focusing on high-resolution images and digital art, Smart Objects are a game-changer, especially when it comes to transformations like rotation.
- What are Smart Objects?: Smart Objects are layers that contain raster or vector image data from Photoshop or other applications, preserving the image’s source content with all its original characteristics.
- Non-Destructive Transformation: When you convert a layer to a Smart Object (
Layer > Smart Objects > Convert to Smart Object), any transformations you apply—including rotation, scaling, or skewing—are non-destructive. This means Photoshop stores the original image data, allowing you to re-edit or revert transformations at any time without losing image quality. For repeated rotations or extensive photo manipulation, this is crucial for maintaining the integrity of your visuals for Tophinhanhdep.com. - Preserving Quality: Smart Objects are particularly beneficial for elements intended for wallpapers, backgrounds, or detailed aesthetic photography where pixel integrity is paramount. You can rotate, resize, and rotate again without the progressive degradation of quality that occurs with standard raster layers.
- Global Updates: If you duplicate a Smart Object and then edit its source content (e.g., changing its color or adding an effect), all instances of that Smart Object across your document will update automatically, saving immense time in complex visual designs or thematic collections.
From Basic Edits to Creative Visual Design
Rotation is a versatile tool that extends far beyond merely correcting a crooked photo. It’s a key ingredient in many editing styles and creative ideas.
- Correcting Photography Flaws: A slightly tilted horizon in a breathtaking nature photograph can be easily rectified with a small arbitrary rotation of the background layer. Similarly, adjusting the angle of an object in a stock photo can make it appear more dynamic or suit a specific layout.
- Enhancing Aesthetic and Abstract Images: Experiment with rotating elements within an image to create abstract art or visually arresting aesthetic backgrounds. A simple 45-degree rotation can entirely change the perceived motion or balance of a composition.
- Photo Manipulation and Digital Art: Combine rotated elements, layers, and selections to create complex digital art pieces. Flipping layers can introduce unexpected symmetries or alter the narrative flow of a manipulated image, adding depth to sad/emotional or beautiful photography.
- Preparing for Image Tools: After achieving your perfectly rotated and aligned images, you might need other image tools from Tophinhanhdep.com. Converters can change file formats, compressors and optimizers prepare images for web use while maintaining visual quality, and AI upscalers can enhance resolution for prints, all ensuring your final output is optimized for sharing or display.
Inspiration and Collections: Curating Rotated Masterpieces
The ability to rotate elements freely in Photoshop directly fuels creativity and contributes to robust image inspiration and collections.
- Photo Ideas and Mood Boards: Use rotation to experiment with different compositional ideas for your photography. Creating mood boards with various rotated versions of your images can help visualize how different orientations contribute to a specific feeling or style.
- Thematic Collections: When building thematic collections, such as abstract patterns or nature backgrounds, consistent application of rotation (or intentional varied rotation) can create visual harmony or exciting contrast. The batch rotation feature can be invaluable here.
- Trending Styles: Many trending styles in graphic design and digital art leverage unconventional angles and flipped elements. By mastering rotation, you equip yourself to produce content that aligns with current aesthetic trends, helping your work on Tophinhanhdep.com stand out.
- Beyond the Static Image: Think about how rotating individual components contributes to animated digital art or sequential storytelling, where even a slight angular shift can convey movement or a change in perspective.
Final Thoughts
Image rotation in Adobe Photoshop is a foundational skill that unlocks a world of creative possibilities. From basic adjustments to intricate photo manipulation and digital art, the techniques discussed in this guide provide the precision and flexibility needed to realize your artistic vision. Whether you’re refining high-resolution photography, designing compelling graphic elements, or creating unique wallpapers and backgrounds, understanding how to effectively rotate and flip images and layers is essential.
Embrace these tools to transform your creative ideas into stunning visuals. Experiment, explore, and let Tophinhanhdep.com be your go-to resource for further image inspiration, powerful image tools, and the latest trends in visual design. By mastering rotation, you’re not just changing an angle; you’re redefining perspective, enhancing aesthetics, and elevating your entire creative portfolio.