How Do You Save an Image as a PDF?

In today’s visually driven world, images are central to communication, art, and information. From high-resolution wallpapers and aesthetic backgrounds to captivating nature photography and intricate digital art, images form the bedrock of our digital experience. At Tophinhanhdep.com, we understand the power and versatility of visual content. While images are typically stored in formats like JPEG, PNG, or TIFF, there are numerous scenarios where converting an image to a Portable Document Format (PDF) becomes not just convenient, but essential.
PDFs offer a universally accessible, platform-independent, and often more secure way to share and archive visual content. Unlike raw image files, PDFs can embed metadata, maintain precise layouts across different devices, and even combine multiple images into a single, cohesive document. For photographers, graphic designers, or anyone managing extensive image collections, mastering the art of converting images to PDF is a valuable skill. It allows for the professional presentation of digital photography portfolios, the creation of organized mood boards, or simply ensuring that your abstract art or beautiful photography retains its intended visual integrity when shared.
This comprehensive guide from Tophinhanhdep.com will walk you through various methods of saving images as PDFs, catering to different operating systems, tools, and user needs. We’ll explore built-in system functionalities, web browser capabilities, popular office applications, and specialized image tools designed to optimize your workflow and enhance your visual content management.
The Versatility of PDF: Why Convert Images?
Before diving into the “how-to,” it’s crucial to understand the “why.” What makes PDF such a compelling format for images, especially for the diverse range of visual content championed by Tophinhanhdep.com?
Preserving Image Quality and Resolution for Photography and Digital Art
For professionals and enthusiasts alike, maintaining the fidelity of an image is paramount. Whether it’s a meticulously crafted piece of digital art or a high-resolution stock photo, visual quality must not be compromised during sharing or archiving. PDFs are excellent for this purpose.

Unlike some image compression formats that can introduce artifacts, PDFs can embed images with minimal or no loss of quality, especially when saved at high resolution. This is vital for photographers who capture intricate details in nature photography or macro shots, ensuring that every nuance of their digital photography is preserved. For graphic designers and digital artists, converting their work to PDF means that the precise colors, intricate textures, and sharp lines of their creative ideas remain intact, offering a professional presentation every time. Furthermore, PDF ensures that print-ready images maintain their clarity and scale correctly, preventing pixelation or blurring—a common concern when dealing with large-format wallpapers or backgrounds.
Enhanced Sharing and Professional Presentation in Visual Design
In the realm of visual design, presentation is key. A well-designed portfolio, a concise mood board, or a thematic collection of images can significantly impact how your work is perceived. PDFs provide an ideal container for such presentations.
Imagine compiling a collection of aesthetic images or a series of photo ideas for a client. A PDF allows you to combine multiple images, along with text descriptions or captions, into a single, navigable file. This eliminates the need to send numerous individual image files, simplifying the recipient’s experience. Moreover, PDFs offer consistent rendering across various devices and operating systems, ensuring that your photo manipulation or creative ideas are viewed exactly as intended. This consistency is invaluable for professional settings, where cross-platform compatibility can often be a headache. You can also apply security features to PDFs, protecting your intellectual property, especially when sharing sensitive or unreleased beautiful photography or digital art.
Streamlined Document Management and Archiving for Image Collections
Managing a growing library of images—from personal backgrounds to extensive stock photo collections—can quickly become overwhelming. PDFs offer a structured approach to archiving and document management that benefits all types of image users.
By converting various image files (e.g., JPEG, PNG, TIFF) into a unified PDF format, you streamline your storage and retrieval processes. A single PDF can contain multiple pages, each with a different image, effectively bundling related visuals. This is particularly useful for thematic collections, where you might have several images pertaining to a single concept, such as different angles of a subject in photography or variations of an abstract design. Furthermore, modern PDF tools, including those available through Tophinhanhdep.com, often feature Image-to-Text capabilities, allowing you to extract searchable text from images. This means your scanned documents or images containing text can become fully searchable, making it easier to locate specific content within your vast image inspiration archives. This structured approach ensures that your valuable visual assets are not only preserved but also easily discoverable and accessible for future use.
Saving an Image as a PDF Using Built-in Operating System Features
One of the simplest and most accessible ways to convert an image to a PDF is by leveraging the built-in functionalities of your operating system. Both Windows and Mac OS X provide native “Print to PDF” options that can transform virtually any document or image displayed on your screen into a PDF file without requiring additional software. This method is quick, efficient, and ensures a basic level of quality preservation for your images.
Converting Images to PDF on Windows 10
Windows 10, and newer versions, come equipped with a handy feature called “Microsoft Print to PDF.” This acts like a virtual printer, allowing you to “print” any document or image to a PDF file instead of a physical printer. This is an excellent method for saving individual images or small batches of aesthetic photos, ensuring they’re ready for sharing or integration into a larger visual design project.
Here’s how to do it:
- Open Your Image: Locate the image file (e.g., JPEG, PNG, TIFF) you wish to convert. Double-click it to open it in your default image viewer (e.g., Windows Photos app, Paint, or any other photo editor).
- Access the Print Dialog: Once the image is open, look for the “Print” option. This is typically found by right-clicking on the image and selecting “Print,” or by going to “File” > “Print” within the image viewer.
- In the Photos App: Click the printer icon in the top right, or right-click the image and select “Print.”
- In Paint: Go to “File” > “Print” > “Print.”
- Select “Microsoft Print to PDF”: In the print dialog box that appears, you will see a list of available printers. From this list, select “Microsoft Print to PDF.”
- Adjust Print Settings (Optional): Before proceeding, you might want to adjust a few settings to optimize the PDF output for your image:
- Paper Size: Ensure the paper size matches your image dimensions or desired output.
- Orientation: Choose portrait or landscape based on your image.
- Fit Picture to Frame: This option ensures your image fills the page, though it might crop some edges if the aspect ratios don’t match. Alternatively, “Shrink to Fit” will ensure the whole image is on the page without cropping.
- Quality: While “Microsoft Print to PDF” generally maintains good quality, specific image editors might offer additional settings for print resolution.
- Initiate Save: Click the “Print” button. Instead of sending the image to a physical printer, a “Save Print Output As” dialog box will appear.
- Name and Save Your PDF: Choose a destination folder where you want to save your PDF. Give your file a meaningful name (e.g.,
nature-photography-lake-sunset-2024.pdf). Click “Save.”
Your image will now be saved as a PDF in the specified location. This method is perfect for quick conversions, making your high-resolution wallpapers or personal image inspiration easily shareable.
Converting Images to PDF on Mac OS X
Mac OS X, with its intuitive interface, also offers a seamless way to convert images to PDF using its built-in print functionality. This is particularly user-friendly for photographers and digital artists who appreciate macOS’s integration with visual media.
Here’s how to convert an image to PDF on a Mac:
- Open Your Image: Locate your image file (e.g., JPEG, PNG, TIFF) in Finder. Double-click it to open it in the default application, typically Preview. Preview is a powerful tool for viewing and basic editing of images and PDFs.
- Access the Print Dialog: Once the image is open in Preview, go to the menu bar at the top of your screen. Click “File,” then select “Print…” (or use the keyboard shortcut
⌘ Cmd + P). - Select “Save as PDF”: In the print dialog box that appears, look for the “PDF” dropdown menu located in the lower-left corner. Click on it, and a list of options will appear. Select “Save as PDF…”.
- Note: If you don’t see this option, some third-party applications might not directly support printing to PDF in the same way. In such cases, exporting the image from the application and then opening it in Preview usually resolves the issue.
- Name and Save Your PDF: A “Save” dialog box will appear.
- Save As: Enter a name for your PDF file (e.g.,
abstract-art-series-piece-01.pdf). - Tags (Optional): Add relevant tags for easier organization, especially for large thematic collections.
- Where: Choose the folder where you want to save your new PDF document. You can select from your “Favorites” in the sidebar or browse to any location on your Mac.
- Save As: Enter a name for your PDF file (e.g.,
- Click “Save”: After naming the file and choosing its location, click the “Save” button in the lower-right corner of the dialog box.
Your image is now a PDF file, complete with its original visual integrity. This Mac-specific method is highly favored by many visual designers and photographers for its simplicity and the quality of its output, making it ideal for everything from individual beautiful photography shots to entire digital art portfolios.
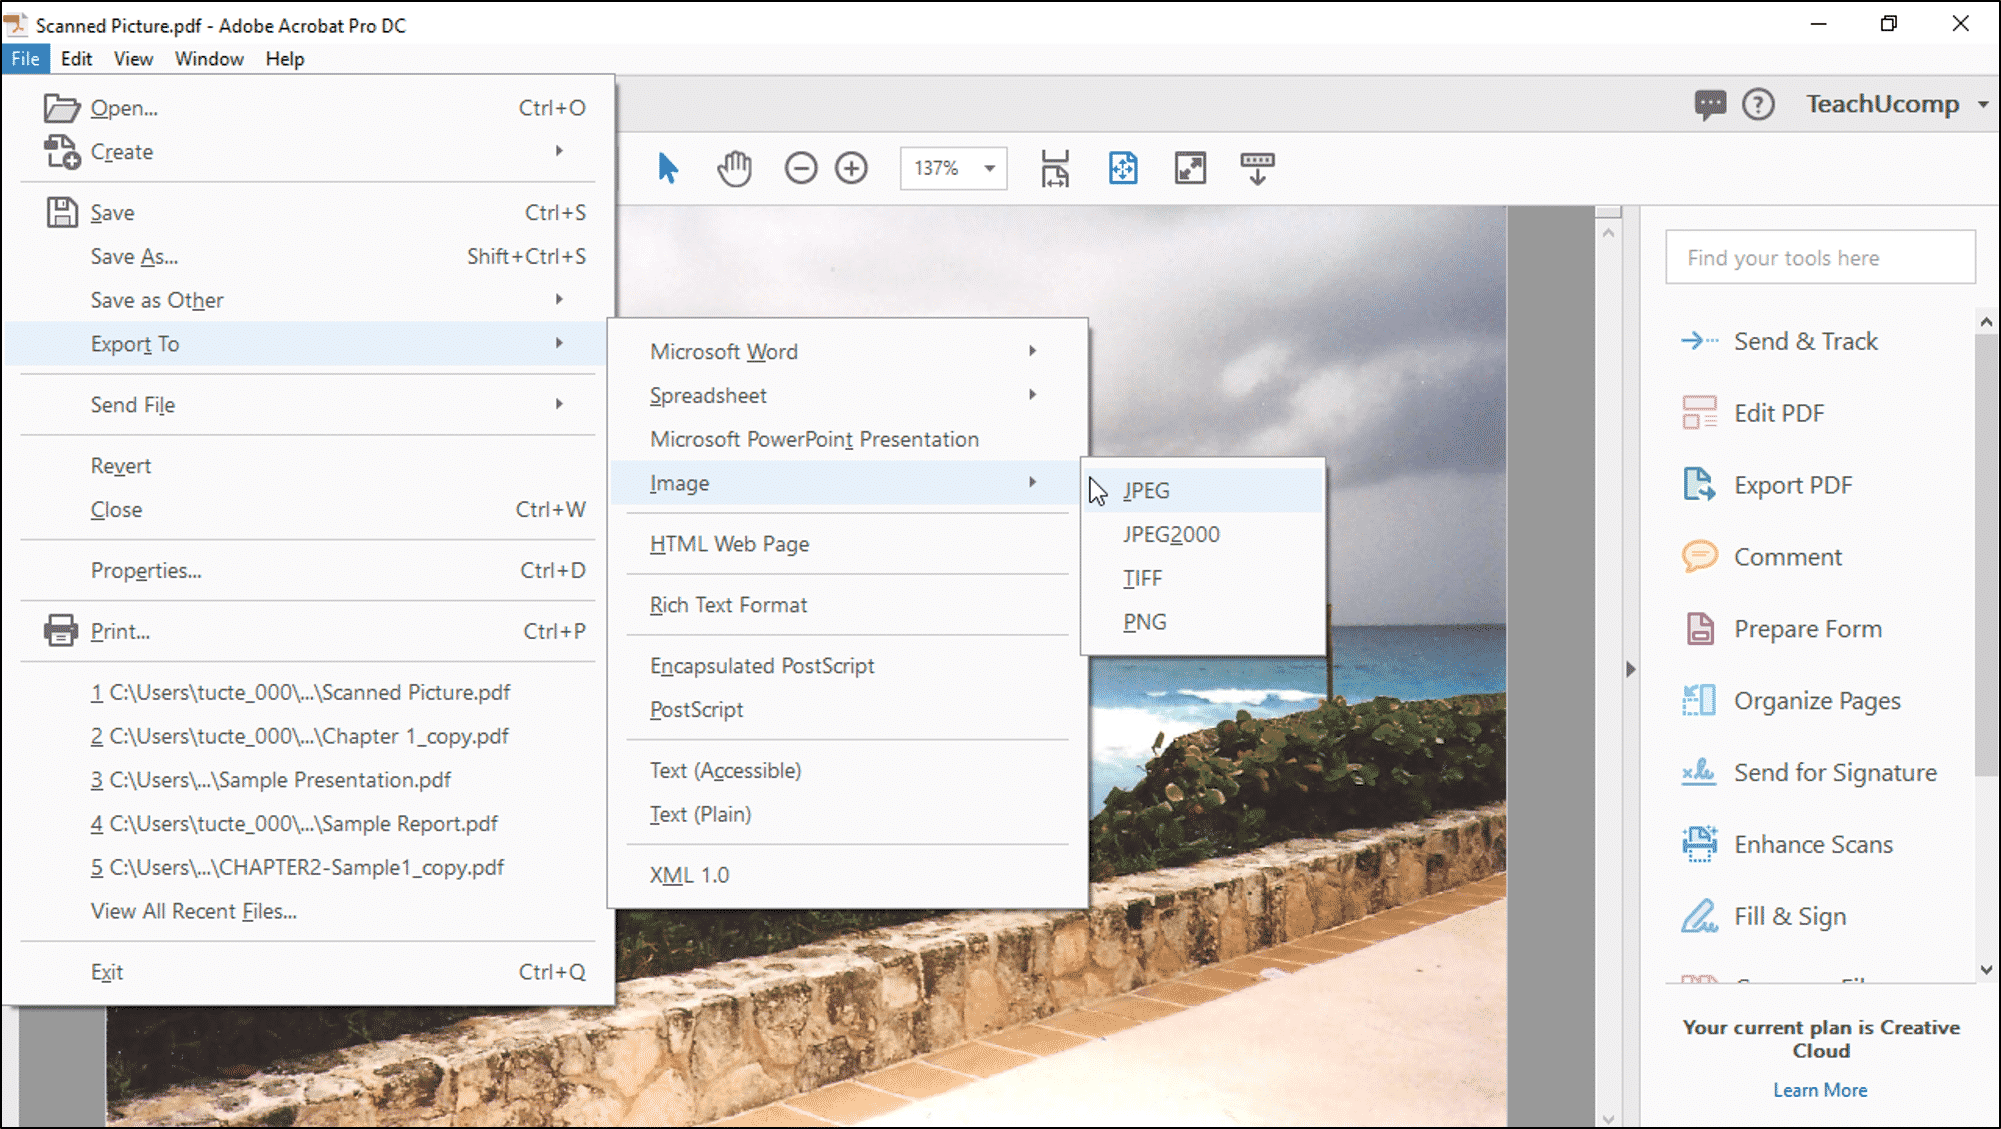
Leveraging Web Browsers and Online Tools for Image to PDF Conversion
In an increasingly online world, converting images to PDF often happens directly within web browsers or through specialized online platforms. These methods are particularly useful for handling images found online, or for users who prefer cloud-based solutions for their image tools.
Directly Saving Web Images or Pages as PDF
Web browsers have evolved to offer powerful functionalities beyond just browsing. They can often act as ad-hoc document converters, allowing you to save content directly from the web into a PDF format. This is especially handy for capturing visual inspiration, saving trending wallpapers, or archiving specific elements of a website that feature captivating backgrounds or photography.
Here’s how you can save web content, including images, as a PDF:
-
Saving an Entire Webpage as a PDF:
- Open the Webpage: Navigate to the webpage that contains the image(s) you wish to save, or the entire layout you want to preserve for visual design reference.
- Access Print Function: Press
Ctrl + P(Windows) or⌘ Cmd + P(Mac). Alternatively, click the browser’s menu icon (usually three dots or lines in the top-right corner) and select “Print.” - Change Destination to “Save as PDF”: In the print preview window, look for the “Destination” or “Printer” dropdown menu. Select “Save as PDF” (or “Microsoft Print to PDF” on Windows, or “Save as PDF” from the PDF dropdown on Mac).
- Adjust Settings (Optional):
- Pages: You can choose to save all pages or a custom range.
- Layout: Portrait or Landscape.
- More Settings: Explore options like “Headers and Footers” (uncheck to remove them for cleaner image-focused PDFs), “Background graphics” (check to include images and colors), and margins. This is crucial for maintaining the aesthetic of specific photo ideas or digital art displays on a webpage.
- Click “Save”: A dialog box will appear, allowing you to choose the save location and file name. This method captures the entire webpage, including its text, layout, and embedded images. It’s perfect for archiving an online article that heavily features high-resolution photography or a gallery of abstract images.
-
Saving Individual Images from a Webpage:
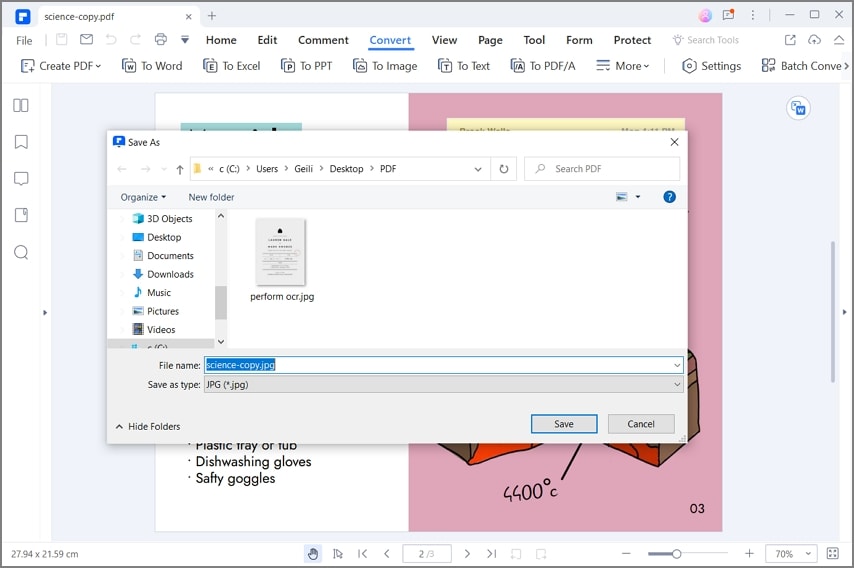
- Right-Click and Save Image As: For individual images, you can often right-click the image directly and choose “Save Image As…” This will save the image in its native format (e.g., JPEG, PNG). Once saved to your computer, you can then use the operating system’s built-in “Print to PDF” methods described previously.
- Screenshot and Convert: If the direct “Save Image As” option is unavailable, or if you need to capture a specific section of an image (e.g., a cropped version of a wallpaper) or a composite of multiple images on a page, take a screenshot.
- Windows: Use the Snipping Tool or
Windows Key + Shift + S. - Mac: Use
⌘ Cmd + Shift + 4for a selection. - Once the screenshot is taken, save it as an image file, then convert that image file to PDF using your OS’s “Print to PDF” function or Tophinhanhdep.com’s dedicated converters.
- Windows: Use the Snipping Tool or
These browser-based methods offer flexibility for users looking to quickly grab visual content from the internet for their mood boards, thematic collections, or image inspiration.
Tophinhanhdep.com’s Dedicated Converters for Image-to-PDF
While built-in OS features and browser capabilities are convenient, dedicated online image tools provide enhanced control, advanced features, and often superior results, especially when dealing with various image formats, batch processing, or optimizing for specific outcomes. Tophinhanhdep.com offers a suite of Image Tools, including powerful Converters specifically designed for seamless image-to-PDF transformations.
Here’s how to leverage Tophinhanhdep.com’s converters:
- Access the Tophinhanhdep.com Converter: Navigate to the “Image Tools” section on Tophinhanhdep.com and select the “Image to PDF Converter.”
- Upload Your Images: You’ll typically find an intuitive interface allowing you to “Drag & Drop” your image files or “Browse” your computer to select them. Tophinhanhdep.com’s converters support a wide array of image formats, including JPEG, PNG, TIFF, BMP, GIF, and many others. You can upload single images or multiple images for batch conversion. This is incredibly useful for photographers with large sets of high-resolution digital photography or graphic designers converting multiple elements of a visual design project.
- Configure Conversion Settings (Optional): Before initiating the conversion, Tophinhanhdep.com’s tools provide options to customize your PDF output:
- Output Quality: Choose between high, medium, or low quality to balance file size and visual fidelity. For beautiful photography or digital art, selecting “High” ensures maximum detail preservation.
- Page Layout: If converting multiple images, you can often choose how they are arranged on the PDF pages (e.g., one image per page, multiple images per page, or even specific arrangements for creating visual design layouts).
- Margin Size: Adjust margins around your images.
- Orientation: Set pages to portrait or landscape.
- Merge into Single PDF: For batch conversions, you can decide whether to combine all images into one multi-page PDF document or create individual PDF files for each image. This feature is a game-changer for organizing thematic collections or creating a single portfolio from diverse image inspiration.
- Compression/Optimization: Some advanced tools on Tophinhanhdep.com might offer options to Compress the PDF output, reducing file size without significant perceived quality loss. This is beneficial for sharing large files or optimizing storage for extensive image collections.
- Initiate Conversion: Click the “Convert” or “Generate PDF” button. The tool will process your images.
- Download Your PDF(s): Once the conversion is complete, a download link will be provided for your new PDF file(s). You can typically download them individually or as a ZIP archive if you converted multiple files.
Tophinhanhdep.com’s dedicated converters offer a robust solution for all your image-to-PDF needs, whether you’re a professional managing stock photos, an artist archiving digital art, or simply looking for the best way to present your aesthetic images. The convenience of handling various formats and batch processing makes it a powerful tool in your digital arsenal.
Utilizing Microsoft Office Applications for Image to PDF Conversion
Microsoft Office applications like Word, Excel, and PowerPoint are ubiquitous in both professional and personal environments. While primarily document-focused, they offer excellent capabilities for embedding and arranging images, making them a practical avenue for converting images to PDF, especially when you need to combine visuals with text or create structured presentations. This method is particularly useful for visual designers creating portfolios, or for anyone documenting high-resolution photography with accompanying descriptions.
Embedding and Exporting Images from Word, Excel, and PowerPoint
The strength of using Microsoft Office applications lies in their ability to integrate images seamlessly within a textual or structured layout. You can place your wallpapers, backgrounds, aesthetic images, or nature photography exactly where you want them, add captions, and then export the entire composition as a high-quality PDF.
Using Microsoft Word for Image-Rich Documents:
- Open Microsoft Word: Launch Word and start a new document or open an existing one.
- Insert Your Image(s): Go to the “Insert” tab on the ribbon, click “Pictures,” and choose to insert an image “From this Device,” “Stock Images,” or “Online Pictures.” You can insert single images or multiple images. For example, you might create a page dedicated to a beautiful photography series or a spread of abstract art.
- Arrange and Format Images: Once inserted, you can resize, reposition, and apply various formatting options to your images. Use Word’s layout tools (e.g., “Wrap Text,” “Position”) to achieve the desired visual design. Add text, captions, or descriptions as needed to complement your visual content.
- Save/Export as PDF:
- Go to “File” > “Save As.”
- Choose your desired save location.
- In the “Save as type” dropdown menu, select “PDF.”
- Click “Save.”
Using Microsoft PowerPoint for Visual Presentations:
PowerPoint is inherently visual and is an ideal tool for creating presentations that showcase digital photography, graphic design elements, or mood boards.
- Open Microsoft PowerPoint: Start a new presentation.
- Insert Your Image(s): For each slide, go to the “Insert” tab > “Pictures” to add your images. You can dedicate entire slides to high-resolution photography, or combine multiple aesthetic images on a single slide to form a collage or thematic collection.
- Design Your Slides: Arrange your images, add text, shapes, and other design elements to create a compelling visual narrative. This is where your creative ideas and photo manipulation skills can shine. Each slide can become a page in your PDF.
- Save/Export as PDF:
- Go to “File” > “Save As.”
- Choose your save location.
- In the “Save as type” dropdown menu, select “PDF.”
- Click “Save.”
Using Microsoft Excel for Organized Image Data:
While less common for purely visual content, Excel can be surprisingly useful for organizing images related to data, such as product photography with specifications, or stock photos categorized by attributes.
- Open Microsoft Excel: Start a new spreadsheet.
- Insert Your Image(s): Go to the “Insert” tab > “Pictures.” You can place images within cells or float them over the spreadsheet.
- Organize and Layout: Arrange your images and corresponding data (e.g., image dimensions, resolution, keywords, usage rights) in a structured manner.
- Save/Export as PDF:
- Go to “File” > “Save As.”
- Choose your save location.
- In the “Save as type” dropdown menu, select “PDF.”
- Click “Save.”
- Note: Excel will convert the visible worksheet area to PDF, so adjust print areas if necessary.
In all these Office applications, the “Save As PDF” option ensures that your embedded images, along with any accompanying text or graphic elements, are preserved in a unified, professional PDF document. This method provides robust control over layout and content, making it a powerful tool for visual designers and content creators working with images.
Advanced Image-to-PDF Conversion and Management Strategies
Moving beyond basic conversions, advanced techniques and specialized tools are crucial for photographers, graphic designers, and digital artists who demand greater control over their PDF output. This includes optimizing quality, enhancing accessibility, and employing smart organization strategies for extensive image collections. Tophinhanhdep.com’s advanced Image Tools are designed to meet these sophisticated needs.
Optimizing Image PDFs for Quality and Accessibility
Creating PDFs from images isn’t just about conversion; it’s about intelligent conversion that prioritizes visual integrity and user experience. For high-resolution digital photography or intricate digital art, quality is non-negotiable. Furthermore, accessibility ensures that your visual design work can reach a broader audience.
- Maintaining High Resolution: When converting images to PDF, especially those intended for large displays, printing, or detailed examination (e.g., a stock photo requiring close-up inspection), it’s crucial to select the highest possible quality settings during the conversion process. Tophinhanhdep.com’s Image Tools, for instance, allow you to specify output resolution or quality levels, ensuring that your beautiful photography retains its sharpness and detail. If your original image itself is low resolution, consider using Tophinhanhdep.com’s AI Upscalers before converting to PDF to enhance image quality and enlarge it intelligently. This preparatory step can significantly improve the final PDF’s visual impact, particularly for older or smaller aesthetic images.
- PDF Compression: High-resolution images can result in very large PDF files, which can be cumbersome for sharing and storage. Tophinhanhdep.com offers PDF Compressors that can reduce file size without a noticeable drop in visual quality. These tools use smart algorithms to optimize image data within the PDF, making it lighter and more efficient for email attachments or web distribution, while still preserving the essence of your abstract art or nature photography.
- Enhancing Accessibility: An accessible PDF benefits everyone. For image-heavy documents, this often involves adding features like “Alt Text” (alternative text) to embedded images, which describes the visual content for users who are visually impaired or when images fail to load. When using Microsoft Word to create PDFs from images (as discussed in the previous section), ensuring that your headings are properly structured using “Styles” and that images have alt text will automatically create a more accessible PDF with bookmarks. This is particularly relevant for educational materials, visual design documentation, or any content meant for a diverse audience.
- Adding Metadata and Security: Advanced PDF tools, like those you might find on Tophinhanhdep.com, allow you to embed metadata such as author, title, keywords, and copyright information directly into the PDF. This helps with discoverability and protects your intellectual property, especially for unique photo ideas or creative ideas. Additionally, you can apply security options like passwords to restrict opening, printing, or editing, which is invaluable for confidential digital art or pre-release photography collections.
Organizing Your Image PDFs: Naming Conventions and Bookmarks
Effective organization is key to managing any large collection, and image PDFs are no exception. Proper naming conventions and the intelligent use of bookmarks can transform a chaotic folder of visual assets into a streamlined, easily navigable archive. This is essential for photographers with extensive portfolios, designers managing mood boards, or anyone curating thematic collections.
- Strategic Naming Conventions: A clear and consistent naming convention makes it infinitely easier to locate specific images or collections. Instead of generic names like
IMG_001.pdf, consider a system that includes relevant keywords, dates, and versions.- Examples of Naming Conventions:
[Category]-[Subject]-[Date]-[Version].pdf(e.g.,Nature-LakeSunset-20240814-v1.pdf)[ProjectName]-[ImageTheme]-[SequenceNumber].pdf(e.g.,ClientPortfolio-AbstractSeries-001.pdf)[ArtistName]-[ArtworkTitle]-[Year].pdf(e.g.,DoeWilliams-CalculatingUniverse-2024.pdf)
- Tophinhanhdep.com, drawing inspiration from best practices, suggests using hyphens to separate words and keeping filenames descriptive yet concise. This approach applies whether you’re saving a single high-resolution image, a compilation of sad/emotional photography, or a portfolio of your finest digital art. Consistent naming aids in quick searching and enhances the professionalism of your image collections.
- Examples of Naming Conventions:
- Leveraging Bookmarks for Navigation: For multi-page PDFs containing numerous images (e.g., a portfolio compiled in Microsoft PowerPoint and exported as a PDF, or a merged collection created by Tophinhanhdep.com’s converters), bookmarks are indispensable. Bookmarks act as a table of contents, allowing viewers to jump directly to specific images or sections within the document.
- Automatic Bookmarking: When you export a document from Microsoft Word (especially if you’ve used “Styles” for your headings), or PowerPoint, to PDF, the application can automatically generate bookmarks based on your document structure. This is a powerful feature for visual designers who structure their portfolios with distinct sections (e.g., “Portrait Photography,” “Landscape Series,” “Digital Illustrations”).
- Manual Bookmarking in PDF Editors: For PDFs created from single images or when merging multiple images without a pre-defined structure, you might use a dedicated PDF editor (or advanced features within Tophinhanhdep.com’s tools) to manually add bookmarks. Each image could have its own bookmark, or you could create bookmarks for logical groupings within a thematic collection. For example, a PDF compiled from various photo ideas for a mood board could have bookmarks for “Color Palette Inspiration,” “Texture References,” and “Compositional Ideas.”
By implementing these advanced strategies for optimization, quality control, naming, and bookmarking, users of Tophinhanhdep.com can transform their image-to-PDF workflow into a highly efficient and professional process. These techniques not only preserve the beauty and detail of your images but also ensure they are organized, accessible, and ready for any purpose, from sharing high-resolution stock photos to archiving your most cherished beautiful photography.
In conclusion, the journey of saving an image as a PDF is more than just a technical conversion; it’s an enhancement of how we manage, share, and present our visual world. From the simple convenience of operating system utilities to the powerful capabilities of Tophinhanhdep.com’s dedicated image tools and the structured approach of office applications, there are diverse methods to suit every need. By embracing these techniques, you unlock new potentials for your wallpapers, backgrounds, aesthetic collections, digital photography, and visual design projects, ensuring that your images are not just seen, but truly appreciated in their optimal form. Explore the tools and resources on Tophinhanhdep.com to further refine your image-to-PDF workflow and elevate your visual content.