Mastering Image Retrieval: How to Download and Save Visual Content from Google and Google Docs for Your Creative Projects

In an increasingly visual world, images are not just decorative elements; they are powerful tools for communication, inspiration, and personal expression. Whether you’re curating a collection of stunning Wallpapers and Backgrounds, building a Mood Board for a new Visual Design project, or seeking High Resolution Stock Photos for Digital Photography and Graphic Design, the ability to efficiently save images is paramount. Many users search for “how do you save an image from Google” to enrich their digital libraries. While saving images directly from a Google Image search is often straightforward, extracting visuals embedded within Google Docs can be a surprisingly tricky endeavor.
At Tophinhanhdep.com, we understand the critical role high-quality images play in every aspect of digital life, from setting your desktop Aesthetic with breathtaking Nature scenes to inspiring your next Digital Art piece with Abstract compositions. We aim to provide not just a repository of beautiful imagery and Thematic Collections, but also the knowledge and Image Tools to manage them effectively. This comprehensive guide will demystify the process of saving images, covering both direct downloads from Google search results and the more nuanced techniques required for Google Docs, ensuring you can seamlessly integrate captivating visuals into your projects, whatever your creative vision may be.
Saving Images Directly from Google Search Results: Your Gateway to Visual Inspiration
When you’re browsing Google Images for that perfect Background, a specific Aesthetic photo, or perhaps inspiration for a new Creative Idea, saving the images you find is usually a quick and intuitive process. Unlike the complexities often found within document editors, web browsers are designed to facilitate easy content acquisition.
On Desktop: Right-Click and Save for Instant Access
The most common and widely recognized method for saving an image from Google search results on a desktop computer (whether Mac or Windows) involves a simple right-click:
- Perform your search: Navigate to Google Images and search for your desired visual, perhaps “high resolution nature wallpaper” or “abstract digital art inspiration.”
- Select an image: Click on a thumbnail image in the search results to expand it and view it in more detail. This step is crucial, as right-clicking the thumbnail itself might only save a low-resolution version or lead you to the source website. You want to see the larger, often higher-quality preview.
- Right-click the image: Once the image is expanded, right-click directly on the image itself. A context menu will appear.
- Choose “Save Image As…”: From the context menu, select “Save Image As…” (or “Save Picture As…” depending on your browser and operating system).
- Name and save: A dialogue box will prompt you to choose a location on your computer to save the file and to give it a filename. It’s good practice to rename images with descriptive keywords, especially if you’re building a collection for Photography or Visual Design purposes. This also aids in potential SEO if you plan to use these images on a website, a topic we cover extensively at Tophinhanhdep.com.
- Confirm: Click “Save,” and your image will be downloaded to your specified location.
This method typically allows you to save the highest resolution version of the image that Google has cached or linked to directly, making it ideal for sourcing Beautiful Photography or creating custom Wallpapers.
On Mobile Devices: Tap, Hold, and Share
Saving images from Google search on a smartphone or tablet (Android or iOS) is equally straightforward, though the interaction differs slightly:
- Search for images: Open your mobile browser or the Google app and perform an image search.
- Tap to expand: Tap on the desired image thumbnail to open its larger preview.
- Long-press the image: Press and hold your finger down on the expanded image. After a moment, a context menu or a share sheet will pop up.
- Select “Save Image” or “Download Image”: The exact wording may vary between devices and browsers (e.g., “Save to Photos,” “Download Image,” “Add to Photos”). Select the option that saves the image directly to your device’s photo gallery or downloads folder.
- Confirmation: The image will be saved, and you can usually find it in your device’s “Gallery,” “Photos” app, or “Downloads” folder.
This mobile-friendly approach ensures you can quickly capture inspiring visuals, whether you’re brainstorming Photo Ideas on the go or collecting images for a quick Mood Board.
Utilizing Google Collections for Inspiration & Organization
Beyond local storage, Google offers its own built-in organizational tool: Google Collections. This feature is particularly useful for anyone curating Image Inspiration & Collections, such as Thematic Collections for a project or tracking Trending Styles in Digital Art.
- Sign in to Google: You must be signed into your Google account to use Collections.
- Search and select: Perform an image search on Google and click on an image to expand it.
- Add to Collection: Below the expanded image, you will see an “Add to” button (often represented by a bookmark icon). Click this button.
- Organize: By default, it might save to a “Favorites” collection, but you can tap “CHANGE” (on mobile) or click to create a “New collection” on desktop. This allows you to categorize your images, perhaps into collections like “Abstract Backgrounds,” “Nature Photography,” or “Aesthetic Wallpapers.”
- Accessing Collections:
- Mobile: From any Google search results page (not the homepage), tap the Menu icon (three horizontal lines), then tap “Collections.”
- Desktop: You can find “Collections” below the search bar in image search results or by clicking the Google Apps grid (3x3 squares) on Google.com, then selecting “Collections.”
Google Collections provides a cloud-based way to store and revisit your visual finds, acting as a digital Mood Board that’s accessible across devices. While it doesn’t save the images directly to your local storage, it’s an excellent first step for gathering inspiration, especially when dealing with a vast array of Photo Ideas that Tophinhanhdep.com might help you discover.
Unlocking Images from Google Docs: A Comprehensive Guide to Content Extraction
While web pages make saving images a breeze, Google Docs presents a unique challenge. Unlike a simple web page where a right-click often suffices, Google Docs is a cloud-based word processor designed for editing and collaboration, not direct media extraction. The images embedded within a Google document are treated differently, making “saving an image from Google” a head-scratching task for many. This section delves into various workarounds, from saving individual pictures to extracting entire sets of images, catering to designers, photographers, and content creators alike.
Direct Methods for Individual Images: Precision Extraction
Sometimes, you only need one or two specific images from a document. These methods offer a way to target individual visuals without downloading the entire document.
Using Google Keep (Desktop and iOS)
Google Keep, Google’s note-taking service, is seamlessly integrated into Google Docs and offers a surprisingly efficient way to save individual images on desktop and even a clever workaround for iOS.
On Desktop:
- Open your Google Docs file: Navigate to the document containing the image you wish to save.
- Right-click the image: Select the image, then right-click on it.
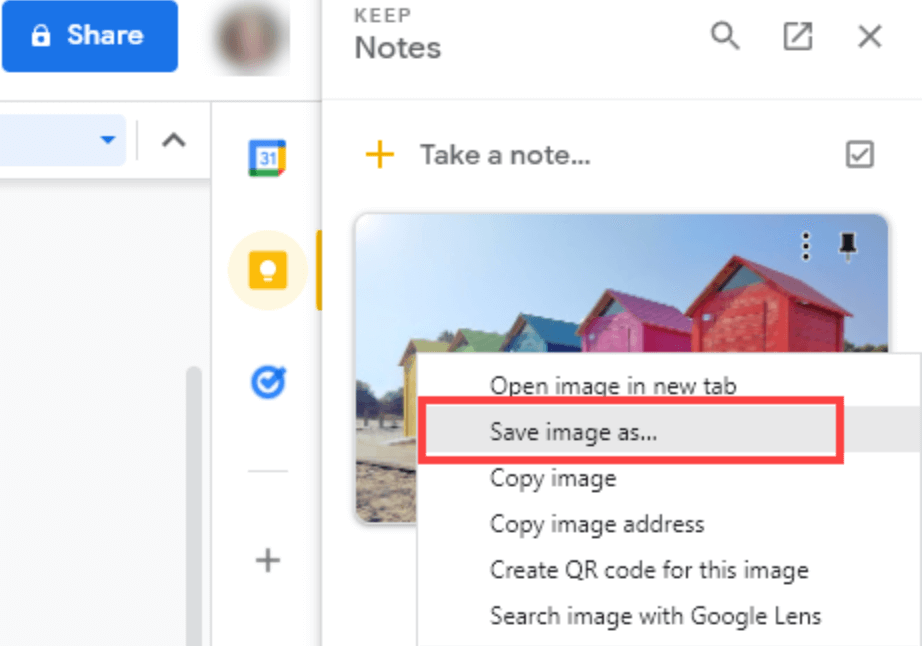
- Select “Save to Keep”: A sidebar will appear on the right, displaying the image as a new note in Google Keep. This is a quick way to isolate the image.
- Right-click in the Keep sidebar: Now, right-click on the image within the Google Keep sidebar.
- Choose “Save Image As…”: Select this option, and your browser’s download dialog will appear.
- Name and save: Provide a filename and choose your desired save location. You can then delete the note from Google Keep if it was a temporary step.
This method is quick and effective for obtaining single images, maintaining their original quality and making them ready for Editing Styles or integration into other Visual Design projects.
On iOS (iPhone/iPad):
While direct “Save to Keep” isn’t available for images from Docs to Keep on mobile, you can leverage a similar copy-paste function via Apple’s Notes app:
- Open in Google Docs app: Open the Google Docs document on your iPhone or iPad.
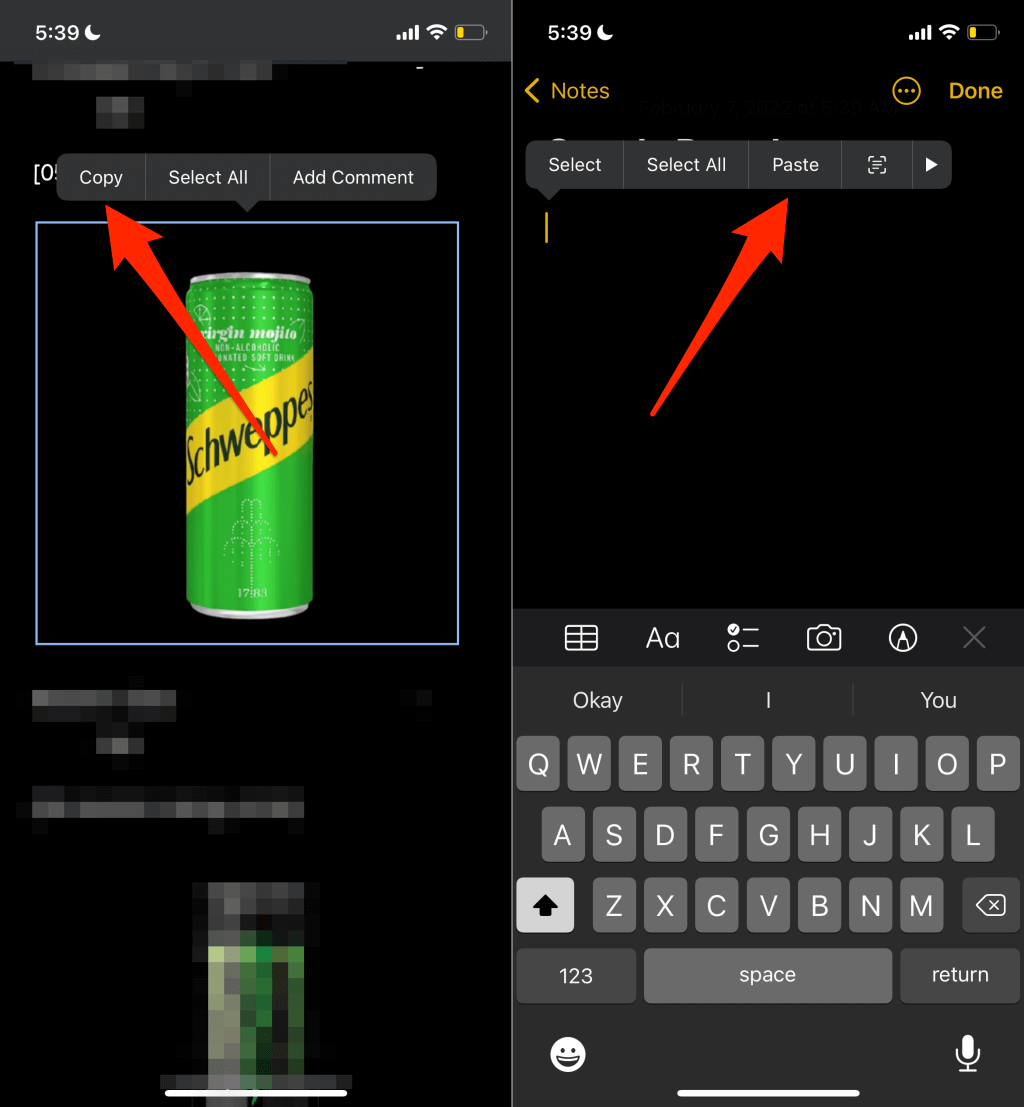
- Copy the image: Long-press on the image you want to save until a menu appears, then select “Copy.”
- Paste into Notes: Open the Apple Notes app (or a similar basic note-taking app), create a new note, long-press on a blank space, and select “Paste.” The image will appear.
- Save from Notes: Tap on the image within the Notes app. Then, tap the share icon (usually a square with an arrow pointing upwards) in the bottom-left corner.
- Select “Save Image”: This will save the image to your device’s Photos app.
This mobile workaround is particularly useful for quickly grabbing an Aesthetic picture or a Beautiful Photography example you need for a quick reference.
Capturing with a Screenshot (Desktop & Mobile)
The simplest, albeit often lowest-quality, method is to take a screenshot.
- Display the image: Ensure the image is fully visible on your screen.
- Take a screenshot:
- Desktop (Windows): Use the Snipping Tool, Print Screen key, or
Windows Key + Shift + S. - Desktop (Mac): Use
Shift + Command + 4for a selection, orShift + Command + 3for the whole screen. - Mobile: Use your device’s specific screenshot combination (e.g., Power + Volume Down for Android, Side Button + Volume Up for iOS).
- Desktop (Windows): Use the Snipping Tool, Print Screen key, or
- Crop and save: You’ll likely need to crop the screenshot to isolate the image. While easy, this method can result in a loss of High Resolution and is not recommended for professional Digital Photography or when maintaining original clarity is crucial. Tophinhanhdep.com emphasizes High Resolution imagery, so use this method only as a last resort.
Extracting Multiple or Bulk Images: Efficiency for Large Projects
For documents rich with visuals, such as an extensive collection of Photo Ideas or a presentation filled with Visual Design examples, individual saving can be tedious. These methods allow you to download all embedded images in one go.
Downloading as an HTML File (Zipped Web Page)
This is often considered one of the most effective methods for bulk image extraction from Google Docs on a desktop:
- Open the Google Docs file.
- Go to File > Download > Web Page (.html, zipped).
- Save the .zip file: Your browser will download a compressed (.zip) file to your computer.
- Unzip the file: Locate the downloaded .zip file (usually in your “Downloads” folder) and double-click it to extract its contents.
- Access the ‘images’ folder: Inside the unzipped folder, you’ll find an “images” subfolder. All the images from your Google Doc will be stored there.
A note on this method: the images will be named generically (e.g., image1.png, image2.jpeg) and their order might not match their appearance in the document. For organizing your Thematic Collections or preparing Stock Photos for a project, you’ll need to rename them manually, a process that can be streamlined with Image Tools for bulk renaming, or simply done as part of your Digital Photography workflow.
Using “Publish to the Web” for Direct Web Saving
Google Docs offers a “Publish to the web” feature that creates a lightweight, publicly accessible web page version of your document. This transforms the images into standard web content, making them easy to save.
- Open the Google Docs file.
- Go to File > Publish to the web.
- Click “Publish”: Confirm the action when prompted.
- Copy the link: Google Docs will provide a URL for the published document. Copy this link.
- Open in a new browser tab: Paste the URL into a new browser tab and press Enter. Your document will appear as a standard web page.
- Right-click and save: Now, you can right-click on any image on this web page and select “Save Image As…” just like you would with any image found via Google Search.
The advantage here is that published images often retain their original filenames, simplifying organization for your Image Inspiration & Collections. Remember to “Stop publishing” the document via the same “Publish to the web” menu if you wish to revoke public access. This method is excellent for selectively downloading images with their original names for projects like Graphic Design or Photo Manipulation.
Exporting as a Microsoft Word Document (.docx)
If you have Microsoft Word installed, exporting your Google Doc to a .docx file provides another robust way to extract images.
- Open the Google Docs file.
- Go to File > Download > Microsoft Word (.docx).
- Save the .docx file: Download the Word document to your computer.
- Open in Microsoft Word: Launch Microsoft Word and open the downloaded .docx file.
- Save individual images: Right-click on any image within the Word document and select “Save as Picture.” Word allows you to choose various image formats (PNG, JPEG, BMP, GIF) and rename the file. This is ideal for specific images where you might need a different format or precise naming for your Editing Styles.
- Save all images (bulk extraction from Word): To extract all images at once from the Word document, go to File > Save As, choose a location, and in the “Save as type” dropdown, select “Web Page (.htm).” This will save the document as an HTML file along with a folder containing all embedded images, similar to the Google Docs HTML export but using Word’s engine.
Android’s HTML Export via Google Drive
For Android users, saving individual images from Google Docs can be cumbersome. The best approach for bulk extraction mirrors the desktop HTML export, but routes through Google Drive:
- Open in Google Docs app: Access the document in the Google Docs app on your Android device.
- Tap the menu icon (three dots) on the document.
- Select “Send a copy.”
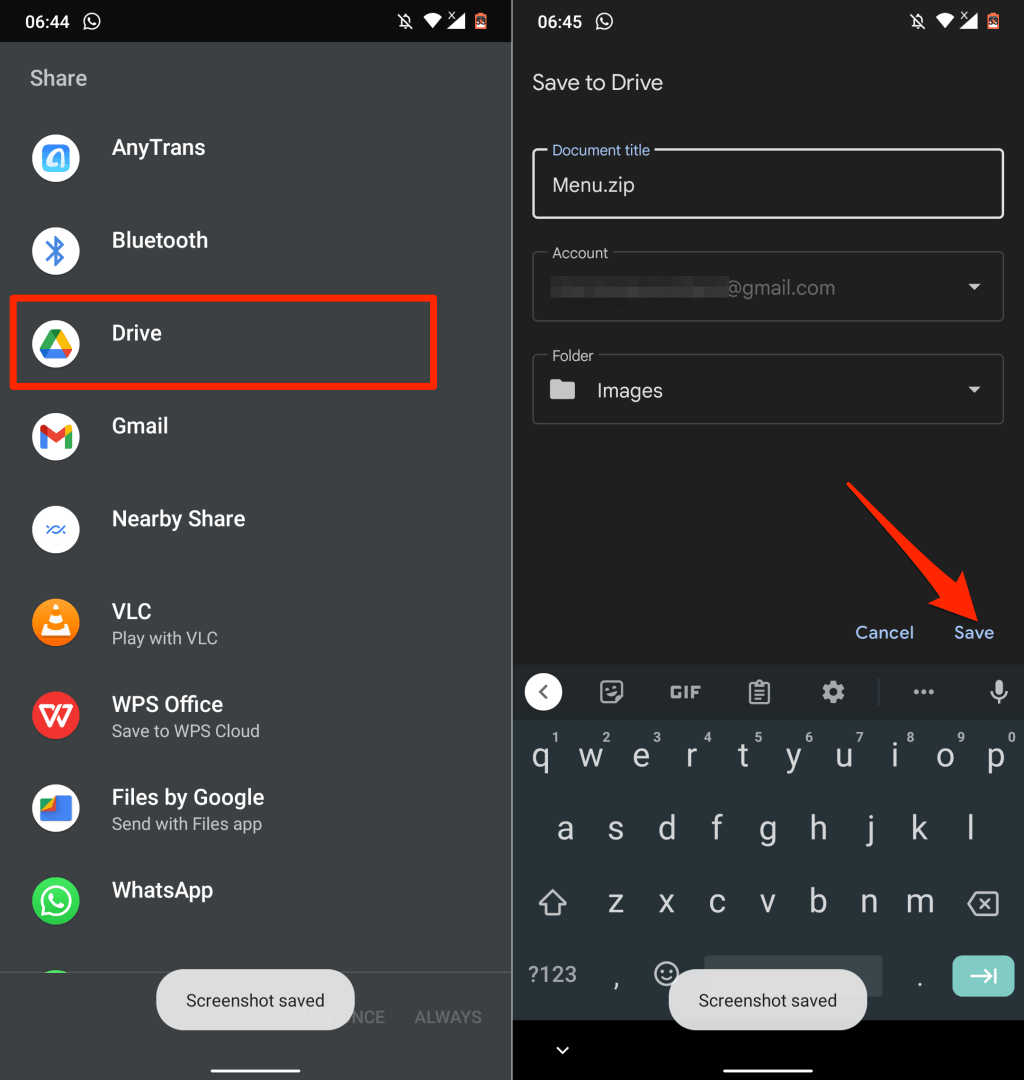
- Choose “Web page (.html, zipped)” and tap “OK.”
- Select “Drive” to upload the zipped file to your Google Drive account. Give it a name and select a folder.
- Download from Drive: Once uploaded, go to your Google Drive, locate the newly saved .zip file, tap its menu icon (three dots), and select “Download.”
- Unzip and extract: Use a file manager app on your Android device to open the downloaded .zip file and extract the images from the “images” folder.
This ensures that even on Android, you can obtain all the images for your Image Collections, ready for further use or processing with Image Tools.
Leveraging Image Tools for Enhanced Usage at Tophinhanhdep.com
Once you’ve successfully saved your images from Google Docs or Google Search, the journey doesn’t end there. At Tophinhanhdep.com, we advocate for smart image management and enhancement. The raw images you download might not always be perfectly suited for your needs, especially for web use or specific Digital Art projects. This is where Image Tools come into play:
- Converters: You might need to change a PNG to JPEG for smaller file size or a JPEG to PNG for transparency.
- Compressors & Optimizers: Essential for web performance. Large image files slow down websites. Using an image compressor can significantly reduce file size without noticeable quality loss, which is vital for any Graphic Design or Digital Photography published online.
- AI Upscalers: If you’ve had to resort to a screenshot or found a lower-resolution image you love, AI upscalers can intelligently enhance its resolution, bringing it closer to High Resolution quality. This is particularly useful for adapting smaller images for Wallpapers or larger prints.
- Image-to-Text: For accessibility or data extraction, converting images containing text into editable text formats can be invaluable for content creators.
Tophinhanhdep.com provides insights into the best practices and tools for these processes, ensuring your saved images are always production-ready and contribute effectively to your Creative Ideas.
Best Practices for Image Handling and Copyright Considerations
Acquiring images is only half the battle; managing them responsibly and effectively is equally important. This involves understanding image quality, optimizing for different platforms, and respecting intellectual property.
Preserving Image Quality and Size
Our experiments at Tophinhanhdep.com have shown that images downloaded using the HTML export, “Publish to the Web,” or Microsoft Word methods generally maintain their original size, dimension, and quality as they were uploaded to Google Docs. There’s usually no inherent reduction in quality when simply extracting them via these means. This means that if you uploaded High Resolution Stock Photos or intricate Digital Photography into your document, you should retrieve them in their original glory.
However, it’s crucial to remember that any editing performed within Google Docs (like cropping, resizing, or applying basic filters) will permanently alter the image, affecting its downloaded dimensions and quality. For serious Photo Manipulation or achieving specific Editing Styles, it’s always best to download the original image first and then use dedicated image editing software.
A clever last trick for image extraction, especially if you have a powerful PDF editor, is to download the Google Docs document as a PDF and then use a PDF image extractor tool. This can be a surprisingly effective way to retrieve high-quality embedded images.
Understanding and Respecting Image Copyright
This is perhaps the most critical aspect of image handling. Many of the Beautiful Photography pieces, Aesthetic visuals, and Digital Art examples you find on Google or embedded in documents are protected by copyright.
- Personal vs. Commercial Use: Always differentiate between saving images for personal use (e.g., as a Wallpaper, for a private Mood Board, or personal study) and using them publicly or commercially (e.g., on a blog, website, social media, or in products).
- Attribution and Licensing: For any public or commercial use, you must have the right to use the image. This typically means:
- Public Domain: Images whose copyrights have expired.
- Creative Commons: Licenses that allow free use under certain conditions (e.g., attribution to the creator).
- Royalty-Free Stock Photos: Images purchased or obtained from platforms that grant you a license for broad use (like many of the Stock Photos you’d find at Tophinhanhdep.com).
- Direct Permission: Obtaining explicit permission from the copyright holder.
- Best Practices: Always strive to source your images ethically. Tophinhanhdep.com often features content from photographers and artists, and we emphasize the importance of giving credit where credit is due. If you’re uncertain about an image’s origin or usage rights, it’s safer to find an alternative or assume it’s copyrighted and avoid public use.
Optimizing Images for Various Platforms
Once saved and cleared for use, optimize your images for their intended platform.
- Websites and Blogs: Use Image Compressors and Optimizers to reduce file size, which improves page loading speed and SEO. Choose appropriate formats (JPEG for photos, PNG for graphics with transparency, WebP for modern web performance). This aligns perfectly with Tophinhanhdep.com’s commitment to delivering a seamless visual experience.
- Print Media: Ensure images are High Resolution (typically 300 DPI) and in appropriate color profiles (CMYK) for crisp, clear results.
- Social Media: Adhere to platform-specific dimensions and aspect ratios to prevent unwanted cropping or quality degradation of your Aesthetic or Thematic Collections.
By following these best practices, you not only manage your visual assets professionally but also contribute to a respectful and high-quality digital environment, perfectly reflecting the values upheld by Tophinhanhdep.com.
In conclusion, while saving images from Google and Google Docs can present varying degrees of complexity, the methods outlined here provide robust solutions for every scenario. Whether you’re seeking a quick Wallpaper, compiling a comprehensive Mood Board, or preparing High Resolution Digital Photography for a professional project, mastering these techniques will empower your creative workflow. Remember, at Tophinhanhdep.com, we are dedicated to celebrating Beautiful Photography and fostering Creative Ideas, always encouraging responsible and inspired use of visual content.