How to Save an Image on a Chromebook: A Comprehensive Guide for Visual Enthusiasts

In today’s visually-driven world, images are more than just pictures; they are expressions, inspirations, and vital components of digital communication and personal aesthetic. Whether you’re a student compiling research, a professional curating visual content, a graphic designer seeking inspiration, or simply someone who loves personalizing their device with stunning wallpapers, knowing how to efficiently save images on your Chromebook is an indispensable skill. Chromebooks, known for their simplicity and cloud-centric design, offer several intuitive ways to acquire and manage visual content, making them surprisingly powerful tools for anyone engaged with images.
At Tophinhanhdep.com, we understand the profound impact of high-quality visuals. We are dedicated to providing a rich repository of images, from breathtaking nature photography and abstract art to aesthetic wallpapers and emotionally resonant visuals. Beyond just offering stunning imagery, Tophinhanhdep.com also equips users with essential image tools—like converters, compressors, optimizers, and AI upscalers—to enhance and refine their visual assets. This guide will walk you through every method of saving images on your Chromebook, from straightforward downloads to advanced screenshot techniques, while also exploring how Tophinhanhdep.com’s resources can elevate your entire visual workflow.
Navigating the Digital Canvas: Core Methods for Saving Images from the Web
The internet is an endless gallery of visual inspiration. Saving an image from a webpage on your Chromebook is typically the most common way to acquire new visuals. These methods are quick, efficient, and form the foundation of building your personal image collection.
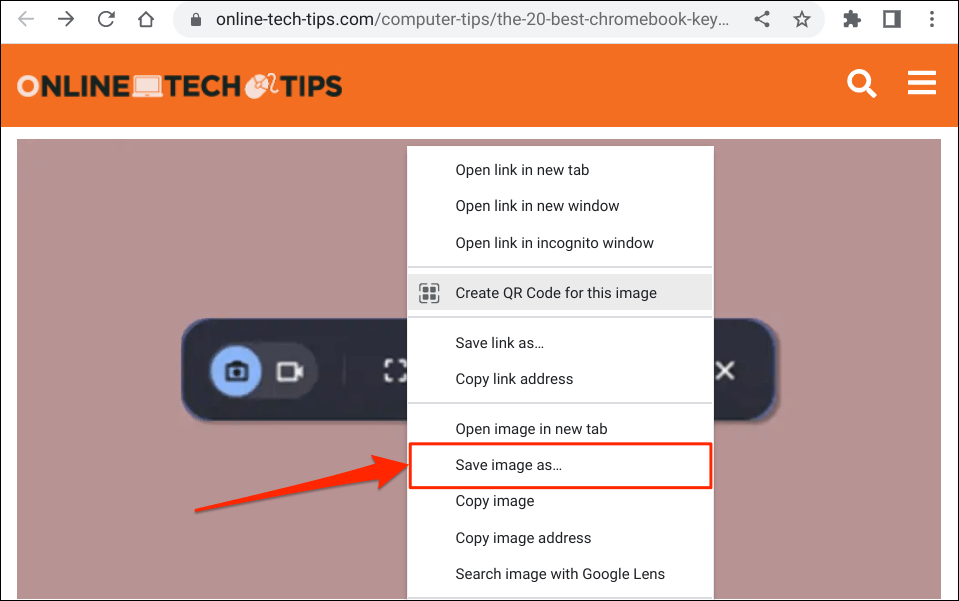
Right-Click (or Two-Finger Tap) and “Save Image As”
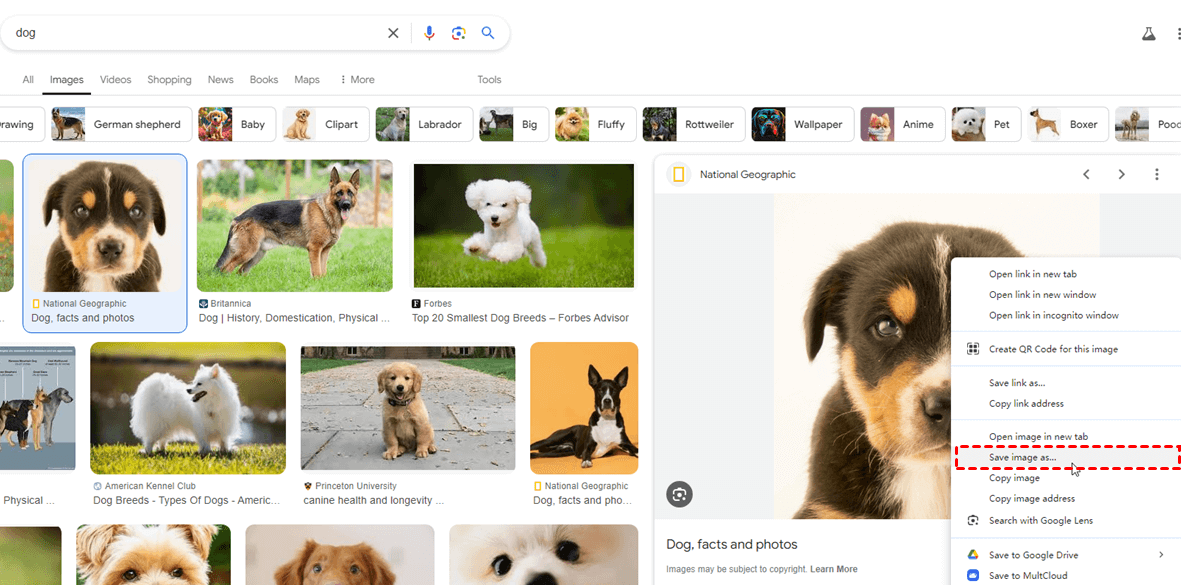
This is arguably the most universal and direct method for downloading an image from a webpage on any computer, and Chromebooks are no exception. It allows you to save images with control over their filename and destination.
Step-by-Step Process:
- Open Your Browser: Begin by opening your Chrome browser on your Chromebook.
- Locate Your Desired Image: Navigate to the webpage or website where the image you wish to save is displayed. Perhaps you’ve found a captivating Nature Wallpaper or an inspiring piece of Abstract Art on Tophinhanhdep.com that you want for your background.
- Initiate the Context Menu:
- Using a Mouse or Trackpad: Position your cursor directly over the image. Perform a “right-click.” On a Chromebook trackpad, a right-click is typically executed by tapping with two fingers simultaneously.
- Using a Touchscreen: If your Chromebook has a touchscreen, simply tap and hold your finger on the image until a context menu appears.
- Select “Save image as…”: From the options that appear in the context menu, select “Save image as…” This will open the “Save file as” dialog box.
- Name Your Image and Choose a Location:
- File Name: In the “Save file as” window, you’ll see a field where you can change the image’s default filename. Giving your images descriptive names (e.g., “MountainSunset_HighRes_Tophinhanhdep.com.jpg” instead of “image_001.jpg”) makes them much easier to find later, especially when managing extensive Image Collections or Mood Boards.
- Destination Folder: By default, ChromeOS saves downloaded files to your “Downloads” folder. This folder is stored locally on your Chromebook. However, you have the flexibility to change this destination.
- Local Storage: You can browse and select any other folder within your Chromebook’s local storage.
- Google Drive: For seamless cloud backup and access across all your devices, you can opt to save directly to your Google Drive. This is highly recommended for important High Resolution images, personal Digital Photography projects, or any Thematic Collections you’re building. Simply select “Google Drive” from the left-hand column in the “Save file as” dialog. You can even create a new sub-folder within Drive, perhaps for “Aesthetic Backgrounds” or “Creative Ideas.”
- External Storage: If you have an external storage device connected, such as a USB drive or an SD card, it will also appear as a selectable destination, offering a great way to manage large collections of Stock Photos or Beautiful Photography.
- Confirm Your Save: Once you’re satisfied with the filename and location, click the “Save” button or press “Enter” on your keyboard.
- Verify the Download: A “Download complete” notification will briefly appear in the bottom-right corner of your screen (the status area). You can click “Show in folder” directly from this notification to open the Files app and view your newly saved image. This immediate access is particularly useful if you intend to use the image as a Wallpaper or for a quick Photo Manipulation project.

Why this method is powerful for Tophinhanhdep.com users: When you discover an image on Tophinhanhdep.com – be it a vibrant Abstract piece, a serene Nature shot, or a Sad/Emotional photograph that resonates with your current mood – using “Save image as” ensures you retain control over its identity and storage location. This is crucial for maintaining an organized library of visuals, whether for personal use, Graphic Design projects, or building Image Inspiration & Collections. This method is also ideal for saving High Resolution images directly, which is a cornerstone of the Tophinhanhdep.com offering.
Copying Images to the Clipboard
Sometimes, you don’t need to permanently save an image to a file. You might just want to temporarily use it in a document, an email, or a quick Photo Manipulation within an online editor. This is where the clipboard comes in handy.
Step-by-Step Process:
- Locate Your Image: Find the image you want to copy on a webpage. This could be a small icon for a document, a quick reference image for a Creative Idea, or an element you want to add to a Digital Art composition.
- Copy the Image:
- Using a Mouse or Trackpad: Right-click (or two-finger tap) on the image. Select “Copy image” from the context menu.
- Using a Touchscreen: Tap and hold the image, then select “Copy image.”
- Paste the Image:
- Into an Application: Open the application or document where you want to insert the image (e.g., Google Docs, Google Slides, an online photo editor). Right-click (or two-finger tap) at the desired insertion point and select “Paste.”
- Using the Clipboard History: ChromeOS has a robust clipboard history feature. Place your cursor where you want the image to appear, then press
Search(the magnifying glass key) +V. This will open your clipboard history, allowing you to select and paste the most recent or any previously copied item, including images. This is incredibly useful when working on Visual Design projects that require multiple copied elements.
Applications and Benefits: Copying to the clipboard is perfect for transient use or for directly embedding images into web-based applications. It streamlines workflows for students inserting images into assignments, marketers creating presentations with Trending Styles, or anyone needing to quickly populate a mood board without cluttering their Downloads folder. While it doesn’t save the image as a file, it’s an essential tool for dynamic visual work.
Integrating Cloud and Local Storage: Saving Images from Google Photos and Other Sources
Chromebooks are inherently tied to Google’s ecosystem, with Google Photos and Google Drive playing central roles in file and photo management. Understanding how to leverage these services for saving images is key to a seamless experience.
Downloading from Google Photos
Google Photos serves as a powerful cloud backup for your personal Photography collections, making it easy to access your High Resolution photos from any device. Downloading images from Google Photos to your Chromebook is a straightforward process.
Step-by-Step Process:
- Open Google Photos: Launch the Google Photos app (or visit photos.google.com in your browser) on your Chromebook.
- Select Your Image: Browse through your library and select the Beautiful Photography or Digital Photography piece you wish to download.
- Access Options:
- Look for the “Info” icon (often an “i” in a circle) or the three-dot menu icon (vertical or horizontal ellipses), usually located in the top-right corner of the screen. Click or tap this icon.
- Select “Download”: From the menu that appears, choose “Download.”
- Confirmation: The image will be downloaded to your Chromebook’s “Downloads” folder by default. As with web downloads, you can typically customize the save location if prompted by your system settings or if you’re using a browser interface that allows it.
Advantages for Photographers and Enthusiasts: This method is invaluable for photographers who use Google Photos as their primary backup. It allows them to quickly retrieve High Resolution originals for Editing Styles or for use in Visual Design projects directly on their Chromebook. Tophinhanhdep.com often features guides on enhancing Digital Photography, and having easy access to your raw or original files from Google Photos is the first step in applying those Editing Styles recommendations.
Leveraging Cloud Storage and File Management
Beyond Google Photos, Chromebooks seamlessly integrate with Google Drive and allow easy interaction with external storage devices. This flexibility is crucial for organizing diverse Image Collections and ensuring accessibility.
General Advice for Cloud and External Storage:
- Google Drive: When you “Save image as…” from a webpage, you can directly navigate to and select a folder within your Google Drive. This immediately uploads the image to the cloud, making it accessible from your smartphone, tablet, or another computer. This is perfect for collaborative Graphic Design projects or for creating Mood Boards that need to be shared.
- External Storage: Plugging in a USB flash drive or an SD card will make it appear in your Files app. You can then drag and drop images into these external drives or select them as save destinations. This is ideal for archiving large volumes of Stock Photos, backing up Beautiful Photography, or transferring images for offline use.
Importance of Organized Image Collections: A well-organized image library is crucial, especially when dealing with various categories like Wallpapers, Backgrounds, Aesthetic visuals, or specific Photo Ideas. Tophinhanhdep.com encourages users to develop systematic file management habits. By utilizing Google Drive, you can create folders for different Thematic Collections or Trending Styles, ensuring that your saved images are not just stored but also easily retrievable and usable for future Creative Ideas.
Capturing Images with Chromebook’s Screenshot Tools
Sometimes, the image you want isn’t a standalone file you can right-click. It might be part of a document, a specific section of a webpage, or even an element within an application. In these cases, your Chromebook’s built-in screenshot capabilities come to the rescue, functioning like a digital camera for your screen.
Taking Partial or Full Screenshots
ChromeOS offers robust and flexible screenshot tools, allowing you to capture exactly what you need, whether it’s the entire screen or just a selected portion.
Methods for Capturing Screenshots:
- Using Keyboard Shortcuts:
- Full Screen Capture: To capture your entire screen, press
Ctrl+Show Windowkeys simultaneously. TheShow Windowkey typically looks like a rectangle with two lines next to it, located where F5 would be on a standard keyboard. - Partial Screen Capture (Selected Area): For more precise captures, press
Ctrl+Shift+Show Windowkeys. Your cursor will turn into a crosshair. Click and drag to draw a box around the specific area you want to capture. Release the mouse button, and the screenshot will be taken. This is incredibly useful for isolating elements for Photo Manipulation or extracting specific graphics for Digital Art.
- Full Screen Capture: To capture your entire screen, press
- Using the Screen Capture Tool from the System Tray:
- Access the Tool: Click on the time/date area in the bottom-right corner of your screen (the system tray) to open the Quick Settings panel.
- Select “Screen Capture”: Within the Quick Settings, you’ll find a “Screen capture” icon. Click it to activate the screenshot toolbar at the bottom of your screen.
- Choose Your Capture Type:
- Full Screen: Select the icon for a full-screen capture.
- Partial Screen: Select the icon that allows you to define a specific area with a crosshair, as described above.
- Window Capture: There’s also an option to capture a specific open window.
- Capture: Execute the capture based on your selection.
- Capturing in Tablet Mode:
- If your Chromebook converts to a tablet (flipping the keyboard back), taking screenshots is even more intuitive. Simultaneously press the
Powerbutton and theVolume Downbutton. This method captures the entire screen, much like on a smartphone or tablet. Remember that the orientation of the volume buttons doesn’t change with screen orientation, so you might need a moment to locate them.
- If your Chromebook converts to a tablet (flipping the keyboard back), taking screenshots is even more intuitive. Simultaneously press the
Saving and Managing Screenshots:
- Default Location: All screenshots are automatically saved as PNG image files to your “Downloads” folder. A notification will appear, allowing you to “Show in folder.”
- Customizing Save Location: When using the screen capture tool (via
Ctrl + Shift + Show Windowor the system tray), you might see a gear icon on the snipping tool’s toolbar. Clicking this often allows you to “Select folder” and choose an alternative destination for your screenshots, such as a dedicated folder in Google Drive for Graphic Design Assets or Image Inspiration.
Beyond Basic Captures: Screenshots are excellent for documenting processes, capturing elusive images that can’t be right-clicked (due to website restrictions, for example), or grabbing elements from videos for Visual Design references. If you’ve found a particularly interesting Aesthetic layout on Tophinhanhdep.com and want to save it as a Photo Idea for future projects, a partial screenshot is often the best approach. Keep in mind that screenshots are typically saved as PNGs, which are great for crisp graphics and text. However, if you need them in other formats like JPEG (for smaller file sizes) or TIFF (for high-quality print), Tophinhanhdep.com’s Image Tools (Converters) can effortlessly handle the transformation.
Utilizing Chrome Extensions for Enhanced Screenshot Capabilities
While native Chromebook screenshot tools are capable, Chrome extensions can significantly expand your capabilities, especially for more specialized tasks like capturing entire scrolling webpages or recording screen videos.
Popular Extensions and Their Benefits:
- Screencastify (as mentioned in a source): While primarily known for screen recording, many extensions like Screencastify also offer robust screenshot features, often including annotation tools, which are invaluable for Visual Design and Photo Manipulation projects.
- Full Page Screen Capture: This type of extension allows you to capture an entire webpage, even if it extends beyond your current screen view. This is perfect for documenting long articles, saving extensive Thematic Collections from Tophinhanhdep.com, or creating comprehensive Mood Boards that span multiple sections of a website.
How Extensions Enhance Your Workflow:
- Annotation and Markup: Many screenshot extensions allow you to directly add arrows, text, highlights, or blur sensitive information onto your captured images. This is fantastic for collaborative Graphic Design, providing feedback on Digital Art, or simply making personal notes on Photo Ideas.
- Variety of Output Formats: While native ChromeOS screenshots default to PNG, extensions often provide more options, letting you save directly to JPG, PDF, or even upload directly to cloud services.
- Advanced Capture Modes: Beyond full and partial screen, some extensions offer options for capturing specific tabs, delayed captures, or capturing elements within a browser frame.
Integrating with Tophinhanhdep.com’s Vision: For users deeply invested in Visual Design or Digital Art, these enhanced screenshot tools are a game-changer. Imagine capturing a detailed tutorial on an Editing Style from Tophinhanhdep.com, complete with your own annotations. Or saving a comprehensive gallery of Beautiful Photography examples for a new Creative Idea project. These tools bridge the gap between inspiration and execution, allowing you to gather and process visual information more effectively.
Optimizing and Managing Your Saved Images with Tophinhanhdep.com’s Tools and Resources
Saving images is just the first step. To truly harness the power of your visual library, especially when dealing with diverse content from Wallpapers to Digital Photography, effective management and optimization are crucial. This is where Tophinhanhdep.com’s dedicated Image Tools and rich content come into play.
Understanding Image Formats and Conversion
When you save an image on a Chromebook, you might encounter various file formats, such as JPEG, PNG, WEBP, GIF, and sometimes TIFF. Each format has its strengths and ideal use cases.
- JPEG (Joint Photographic Experts Group): Best for photographs and complex images with smooth color gradients. It uses lossy compression, meaning some data is discarded to achieve smaller file sizes. Ideal for most Beautiful Photography and Nature shots from Tophinhanhdep.com when file size is a concern.
- PNG (Portable Network Graphics): Excellent for images with transparent backgrounds, logos, line art, and screenshots. It uses lossless compression, preserving all image data, making it perfect for crisp Abstract graphics or Digital Art. Chromebook screenshots default to PNG.
- WEBP: A modern image format developed by Google, known for providing superior lossy and lossless compression for images on the web. Many images on websites, including potentially those on Tophinhanhdep.com, may be in WEBP format to ensure faster page loading. While efficient for web use, some older software might not fully support it.
- GIF (Graphics Interchange Format): Primarily used for simple animations and images with limited color palettes (up to 256 colors).
- TIFF (Tagged Image File Format): A high-quality, often uncompressed format, preferred by professional photographers and graphic designers for print. It preserves maximum image detail.
The Role of Tophinhanhdep.com’s Converters: You might download a stunning Wallpaper from Tophinhanhdep.com in WEBP format, but your preferred Photo Editing software might only work with JPG. Or you might need to convert a PNG screenshot to a JPG for an email to reduce its size. Tophinhanhdep.com’s Image Tools (Converters) are designed for this exact purpose. They allow you to:
- Convert WEBP to JPG/PNG: Essential for compatibility with various applications and platforms.
- Batch Convert: Process multiple images at once, saving time when dealing with large Image Collections.
- Maintain Quality: Our converters are optimized to ensure minimal loss of quality during format changes, crucial for preserving the integrity of High Resolution images.
Understanding and utilizing these conversion tools ensures that your saved images are always in the optimal format for their intended purpose, whether it’s for displaying as a Background, integrating into a Graphic Design project, or sharing online.
Enhancing and Organizing Your Visual Library
Beyond mere saving and conversion, elevating your visual content involves several layers of optimization and organization. Tophinhanhdep.com offers a suite of Image Tools that cater to these advanced needs, transforming your Chromebook from a simple image viewer into a powerful visual workstation.
Tophinhanhdep.com’s Image Tools in Action:
- Compressors: Large image files, especially High Resolution photos or Beautiful Photography, can quickly consume your Chromebook’s local storage or cloud space. Tophinhanhdep.com’s Compressors reduce file sizes without noticeable degradation in visual quality, allowing you to store more Wallpapers, Aesthetic photos, and Digital Photography on your device and in your Google Drive. This is particularly useful when preparing images for web upload or email attachments.
- Optimizers: Similar to compressors but often with a focus on web performance, optimizers ensure your images load quickly online. If you’re using images from Tophinhanhdep.com for a personal blog or website, running them through an optimizer can drastically improve loading times, enhancing user experience.
- AI Upscalers: Imagine you’ve saved a beautiful but low-resolution image, perhaps an older Nature photograph or a small snippet from a Sad/Emotional collection that you want to use as a Background. Tophinhanhdep.com’s AI Upscalers leverage artificial intelligence to intelligently increase the resolution of images, adding detail and sharpness. This can transform a pixelated image into a High Resolution masterpiece, breathing new life into older or smaller visuals for Digital Art or printing.
- Image-to-Text (OCR): While not directly about saving images, this tool is incredibly valuable for extracting information from images you’ve saved. If you’ve taken a screenshot of a document or a quote embedded in an image, Tophinhanhdep.com’s Image-to-Text tool can convert that visual text into editable digital text. This bridges the gap between static visuals and dynamic content, perfect for research, note-taking, or quickly capturing text for Creative Ideas from visual sources.
Creating Inspiring Collections with Tophinhanhdep.com: Effective organization is the backbone of any creative endeavor. Tophinhanhdep.com’s focus on Image Inspiration & Collections goes hand-in-hand with these tools.
- Photo Ideas & Mood Boards: As you save diverse images from Tophinhanhdep.com (be it Abstract, Nature, or Aesthetic), use folders in your Google Drive to categorize them into Mood Boards for specific projects. For instance, a folder for “Green & Serene Nature Wallpapers” or “Minimalist Abstract Backgrounds.”
- Thematic Collections & Trending Styles: Keep an eye on Trending Styles and curate Thematic Collections. If dark mode Wallpapers are popular, create a collection for them. Tophinhanhdep.com provides the content, and your organized Chromebook provides the canvas. Use AI Upscalers to ensure all images within a collection meet a consistent high-resolution standard, making your Digital Photography and Graphic Design projects truly shine.
- Editing Styles: After saving a High Resolution image from Tophinhanhdep.com, you might want to experiment with different Editing Styles. With the image saved locally or in Google Drive, you can easily open it in various Chromebook-compatible photo editors (web-based, Android apps, or Linux apps) and apply techniques learned from Tophinhanhdep.com’s tutorials.
In essence, saving an image on a Chromebook is not just about a simple download; it’s the beginning of a journey into visual exploration and creation. With the intuitive methods provided by ChromeOS and the powerful resources available on Tophinhanhdep.com, you have everything you need to build, manage, and enhance a vibrant personal library of visual assets.
Conclusion: Empowering Your Visual Journey with Chromebooks and Tophinhanhdep.com
Chromebooks, with their streamlined interface and seamless cloud integration, prove to be remarkably capable devices for managing visual content. From the simple act of right-clicking to save a captivating Nature Wallpaper from Tophinhanhdep.com, to employing sophisticated screenshot tools for Graphic Design inspiration, the methods for acquiring images are both diverse and user-friendly.
Whether you’re looking for the perfect Aesthetic Background, compiling Beautiful Photography for a presentation, or gathering Photo Ideas for your next Digital Art project, your Chromebook offers an accessible entry point. The ability to save images directly to local storage, Google Drive, or external devices provides unparalleled flexibility, ensuring your cherished Image Collections are always at your fingertips and securely backed up.
Beyond mere acquisition, the true power lies in enhancing and optimizing these visuals. This is where Tophinhanhdep.com becomes an indispensable partner. By leveraging our comprehensive Image Tools—including Converters to manage formats like WEBP, JPG, and PNG; Compressors to optimize storage; and groundbreaking AI Upscalers to transform lower-resolution finds into stunning High Resolution assets—you can elevate every image you save.
The world of Visual Design and Digital Photography is constantly evolving, with Trending Styles and Creative Ideas emerging daily. Tophinhanhdep.com is committed to being your go-to resource, not only for an expansive collection of Abstract, Sad/Emotional, and other Thematic Collections, but also for the tools and inspiration needed to make those images truly your own.
So, go ahead and explore Tophinhanhdep.com. Discover that perfect image, save it effortlessly on your Chromebook using the methods outlined in this guide, and then bring it to life with our advanced Image Tools. Your visual journey starts here, made simple and powerful by your Chromebook and enriched by the comprehensive resources of Tophinhanhdep.com. Happy saving, and happy creating!