Mastering Image Retrieval: How to Save Images from Google and Google Docs with Tophinhanhdep.com

In today’s visually-driven world, images are not just decorative elements; they are powerful tools for communication, expression, and information. From creating stunning “Wallpapers” and “Backgrounds” to compiling “Mood Boards” for “Creative Ideas,” the ability to efficiently save and manage images is indispensable. Whether you’re a professional designer delving into “Graphic Design” and “Digital Art,” a blogger seeking captivating “Beautiful Photography” for your posts, or simply someone curating personal collections of “Aesthetic” or “Nature” images, knowing how to reliably extract and save visual content is a fundamental skill.
Google, as the primary gateway to information, is often our first stop for image discovery. However, the process of saving images, especially from platforms like Google Docs, isn’t always as intuitive as a simple right-click. Many users find themselves scratching their heads, wondering why the familiar “Save image as…” option is conspicuously absent. This comprehensive guide from Tophinhanhdep.com is designed to demystify these processes, providing you with a plethora of methods to save images from both Google Image Search results and Google Docs, across various devices. We’ll explore efficient techniques, discuss the nuances of image quality, emphasize the importance of copyright, and highlight how Tophinhanhdep.com serves as your ultimate resource for all things imagery, from “High Resolution” “Stock Photos” to advanced “Image Tools” like “AI Upscalers.”

Saving Images Directly from Google Image Search Results
The most common scenario for saving images begins with a simple Google search. You type in a query, navigate to the “Images” tab, and a vast array of visual content unfolds before you. While seemingly straightforward, there are best practices and subtle features that can enhance your image-saving experience.
Standard Desktop Methods for Quick Image Saves
For desktop users, the classic method of saving images from Google Image Search is generally quite direct. When you find an image that resonates with your needs – perhaps a breathtaking “Nature” scene for a “Wallpaper,” an intriguing “Abstract” piece for “Digital Art,” or a compelling example of “Sad/Emotional” photography for a thematic collection – here’s how to capture it:
- Perform your Google Image Search: Enter your query (e.g., “high resolution nature wallpapers”) and switch to the “Images” tab.
- Click on the desired image: This will usually open a larger preview of the image on the right-hand side or in a new overlay, displaying details like its source website. It’s crucial to click on the image first, as attempting to right-click directly from the smaller thumbnail might save a low-resolution version or a web page element instead of the actual image.
- Right-click on the expanded image: A context menu will appear.
- Select “Save image as…” or “Save picture as…”: This option is usually towards the middle of the context menu.
- Choose your save location and filename: A dialog box will prompt you to select where you want to store the image on your computer and to give it a descriptive name. Renaming files immediately can be a great practice for future organization, especially if you’re building “Thematic Collections” or “Mood Boards.”
- Click “Save”: The image will then be downloaded to your specified location.
This method is quick and effective for individual images. However, remember to consider the resolution and origin. Tophinhanhdep.com consistently recommends seeking “High Resolution” images to ensure quality, especially if you plan any “Photo Manipulation” or extensive “Editing Styles.” If the image quality appears low even after clicking the preview, it might be beneficial to visit the source website directly (usually linked below the image preview) to see if a higher-resolution version is available. Many websites offer stunning “Stock Photos” and original “Digital Photography” in pristine quality, perfect for any “Visual Design” project.
Leveraging Google Collections for Curated Imagery
Beyond local file saves, Google offers a built-in feature called “Collections” that allows you to save and organize images directly within your Google account. This is particularly useful for gathering “Image Inspiration & Collections” without cluttering your local storage, acting as a dynamic “Mood Board” accessible across devices.
On Desktop:
- Perform an image search and expand an image: Just as with local saves, click on an image in the search results to see its expanded view.
- Look for the “Add to” button: This button, often represented by a bookmark icon, will appear below the expanded image.
- Click “Add to”: The image will be added to your default collection (usually “Favorites” or the last collection you used). A notification will confirm the addition.
- Organize into specific collections: You can click “CHANGE” in the notification or access your Collections directly to move the image to a different, more specific collection, or create a new one. For example, you might create collections for “Aesthetic Backgrounds,” “Nature Photography Ideas,” or “Abstract Digital Art.”
- To remove an image: If an image is already in a collection, the button will change to “Added.” Clicking “Added” again will remove it.
On Mobile (Android and iOS):
The process is similar on mobile devices, ensuring seamless collection management on the go:
- Tap the image in search results: This expands the image.
- Tap the “Add to” icon: This is typically a bookmark outline icon below the image.
- Manage your collections: Similar to desktop, you’ll see a notification indicating where the image was saved. You can tap “CHANGE” to select an existing collection or create a “+New” one. This is excellent for quickly sorting “Photo Ideas” while browsing.
- To view your saved images: On mobile, you can usually access the Google search menu (three horizontal lines) from any Google search results page, then select “Collections.” This will display thumbnails of your recently added images and a list of your curated collections.
Google Collections are a powerful way to organize images for “Visual Design” projects, gather “Creative Ideas,” or simply store appealing “Wallpapers” and “Backgrounds” for future use. Tophinhanhdep.com encourages users to leverage such tools for effective image management, enhancing workflows for “Digital Photography” and “Photo Manipulation.”
Extracting Images from Google Docs: A Deeper Dive
Google Docs is an incredibly versatile cloud-based word processor, but saving images embedded within documents can be surprisingly tricky. Unlike a typical web page or Microsoft Word, Google Docs doesn’t provide a direct “Save image as…” option when you right-click an image. This often leads to frustration, especially for users who need to repurpose “High Resolution” images from a draft document for a “Graphic Design” project or a blog post. Fortunately, Tophinhanhdep.com has identified several robust methods to help you overcome this challenge, applicable to both desktop and mobile environments.
Desktop Methods for Google Docs Image Extraction
These methods offer varying levels of convenience, from batch downloads to individual image saving, catering to different needs.
1. Download as an HTML File: The Most Efficient Batch Method
This is widely considered the best and easiest way to download multiple images from a Google Doc in one go. It’s particularly effective if your document contains numerous visual assets – perhaps a detailed presentation with various “Digital Art” pieces or a comprehensive “Mood Board” for a new project.
Steps:
- Open your Google Document: Access the document containing the images you wish to download.
- Navigate to File > Download > Web Page (.html, zipped): This command tells Google Docs to convert your document into a web page format, packaging all its components, including images, into a compressed .zip file.
- Download and Unzip the File: The .zip file will download to your computer (typically to your “Downloads” folder or desktop). Double-click the .zip file to extract its contents.
- Locate the “images” Folder: Inside the unzipped folder, you’ll find an “images” subfolder. All the images from your Google Doc will be neatly organized within this folder.
Pros:
- Highly efficient for bulk downloads: Saves all images simultaneously, a major time-saver for documents with many visuals.
- Maintains original quality: The images are typically extracted at their original resolution and quality as they were uploaded to the document. This is crucial if you’re working with “High Resolution” “Photography” or intricate “Digital Art.”
- Simple and intuitive: Once you know the steps, it’s a quick process.
Cons:
- Generic naming convention: Images are usually named generically (e.g.,
image1.jpg,image2.png), requiring manual renaming for better organization, especially for “Visual Design” assets. - Order may not match document flow: The numbering might not correspond to the chronological appearance of images in the document, meaning you might need to visually identify specific images.
- Unnecessary files for single image needs: If you only need one or two images, downloading the entire HTML package can feel like overkill.
After downloading, Tophinhanhdep.com recommends using “Image Tools” like “Compressors” or “Optimizers” to prepare these images for web use or other applications, ensuring fast loading times without compromising on visual integrity.
2. Publish the Document to the Web: Saving Images Like from Any Web Page
This method provides a clever workaround by temporarily converting your Google Doc into a publicly accessible web page, from which images can be saved conventionally. It’s useful for extracting a few specific images rather than the entire collection.
Steps:
- Open your Google Document.
- Go to File > Share > Publish to the web: This option prepares your document for web publication.
- Click “Publish” and confirm: Google Docs will generate a public link for your document.
- Copy the generated link and paste it into a new browser tab: Your document will now appear as a standard web page.
- Right-click on any image and select “Save image as…”: Now that the image is on a web page, the familiar right-click save option becomes available.
- Choose your location and filename, then click “Save.”
- IMPORTANT: Unpublish your document (optional but recommended): If you don’t want your document to remain public, go back to File > Share > Publish to the web, and click “Stop publishing.”
Pros:
- Selectivity: Allows you to pick and choose individual images you want to save. This is great for extracting specific pieces of “Beautiful Photography” or “Aesthetic” visuals.
- Familiar saving process: Once published, saving images is identical to saving from any other website.
- Retains original naming: In some cases, this method might retain more descriptive filenames than the HTML download, simplifying organization for “Thematic Collections.”
Cons:
- Temporary public access: Your document becomes publicly viewable during the process, which might be a privacy concern for sensitive content. Always remember to unpublish.
- Not ideal for bulk saves: Saving many images this way would be tedious as it requires right-clicking each one individually.
- Potential quality concerns: While generally good, ensure the displayed image on the web page maintains the “High Resolution” you expect for “Digital Photography” projects.
3. Using Google Keep: A Handy Tool for Individual Image Saves
Google Keep, Google’s note-taking application, is seamlessly integrated with Google Docs and offers a surprisingly elegant way to save individual images. This method is perfect when you only need one or two specific “Photo Ideas” or pieces of “Digital Art” from a longer document.
Steps:
- Open your Google Document.
- Right-click on the desired image.
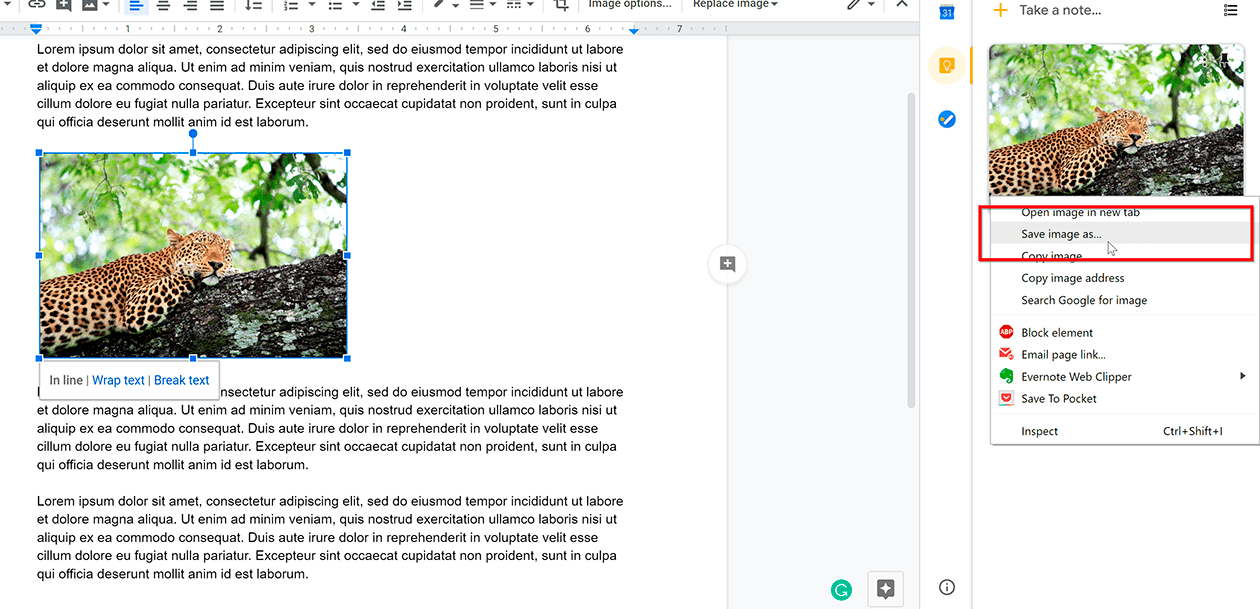
- Select “Save to Keep” or “View more actions > Save to Keep”: This action will open the Google Keep sidebar on the right side of your screen. Your selected image will appear as a new note within Keep.
- Right-click on the image within the Google Keep sidebar: Another context menu will appear.
- Select “Save image as…”: You can now save the image to your computer.
- Optional: Delete the note from Google Keep: If you no longer need the image in Keep, you can delete the note from the sidebar to keep your Keep organized.
Pros:
- Convenient for single images: Quick and straightforward for extracting one or a few specific visuals.
- Integrated workflow: Works within the Google Docs ecosystem, no external tools or downloads of entire documents needed.
- Preserves image quality: Generally saves images at their original quality, suitable for “High Resolution” requirements in “Visual Design.”
Cons:
- Not suitable for bulk extraction: Saving many images individually via Keep would be very time-consuming.
- Requires managing Keep notes: If you don’t delete notes after saving images, your Keep library might become cluttered.
Tophinhanhdep.com finds Google Keep to be an excellent method for grabbing elements for quick “Photo Ideas” or “Aesthetic” inspiration without disrupting your main document workflow.
4. Exporting to Microsoft Word: A Traditional Approach
For users who frequently switch between Google Docs and Microsoft Word, exporting the document can be a familiar route to image extraction. This method essentially shifts the problem to an environment where image saving is more intuitive.
Steps:
- Open your Google Document.
- Go to File > Download > Microsoft Word (.docx): This downloads your Google Doc as a Word document.
- Open the .docx file in Microsoft Word (or LibreOffice): Launch the document in your preferred word processing software.
- Right-click on the image and select “Save as Picture…”: Once in Word, the right-click option for saving images is readily available.
- Choose your file format and location: Word often gives you options for image formats (PNG, JPEG, GIF, BMP), allowing you to pick what best suits your “Visual Design” needs or desired “Editing Styles.”
Pros:
- Familiarity for Word users: Integrates well into workflows for those accustomed to Microsoft Office.
- Individual image saving with format options: Offers flexibility in saving specific images and choosing file types.
- Retains image quality: Images typically maintain their original resolution when exported to Word.
Cons:
- Additional software required: Necessitates having Microsoft Word or a compatible program installed.
- Multi-step process: More steps involved than the HTML download for batch extraction.
- Potential for minor formatting shifts: Converting between document formats can sometimes introduce slight layout changes, though images usually remain unaffected in quality.
For professionals engaged in “Graphic Design” or “Photo Manipulation” who routinely use various software, this method offers a reliable bridge between Google Docs and their desktop editing tools.
5. Using Third-Party Add-ons (with caution)
The Google Workspace Marketplace offers various add-ons designed to extract images from Google Docs. While some can be convenient, Tophinhanhdep.com advises prudence due to potential privacy concerns.
Steps (General for most image extractor add-ons):
- Open your Google Document.
- Go to Extensions > Add-ons > Get add-ons: This opens the Google Workspace Marketplace.
- Search for an “Image Extractor” add-on: Examples include “Images Extractor & Remover for Docs.”
- Install the add-on: Carefully review the permissions requested by the add-on. This is critical. Many add-ons require extensive access to your Google Drive files and personal information. Tophinhanhdep.com stresses the importance of understanding these permissions before installation.
- Launch and use the add-on: Once installed, you can typically access it via Extensions > [Add-on Name] > Start. The add-on usually provides an interface in a sidebar to select and download images, often to your Google Drive.
Pros:
- Potentially streamlined workflow: Some add-ons offer features beyond simple extraction, like bulk downloading or different saving options (e.g., directly to Drive).
- Can save time for frequent users: If an add-on proves reliable and trustworthy, it can simplify repetitive tasks.
Cons:
- Significant privacy concerns: Many add-ons require broad permissions to your Google account, including viewing, editing, and deleting files. The convenience might not outweigh the security risk. Tophinhanhdep.com strongly recommends against using add-ons that demand excessive permissions.
- Limited free functionality: Some add-ons offer only basic features in their free version, with advanced options locked behind a paywall.
- Redundant for desktop saving: If images are extracted to Google Drive, you’ll still need to download them from Drive to your computer, adding extra steps.
While “Image Tools” are a core focus of Tophinhanhdep.com, we prioritize secure and efficient solutions. Proceed with extreme caution when considering third-party add-ons, always valuing your data privacy.
Mobile Methods for Google Docs Image Extraction
Saving images from Google Docs on a smartphone or tablet presents its own set of challenges, often requiring different approaches than on a desktop.
1. On iPhone: Copy-Paste to Notes App or Drag-and-Drop (iOS 15+)
iPhones offer a couple of intuitive ways to handle images from Google Docs, particularly with newer iOS versions.
Method 1: Drag-and-Drop (iOS 15 and later)
- Open the Google Docs app and the document with the image.
- Long-press and drag the image: Use one finger to tap and hold the image, then drag it slightly.
- Switch to Photos app: While still holding the image with the first finger, use a second finger to swipe up from the bottom of the screen to minimize Google Docs and open your Photos app (or another compatible app like Files).
- Drop the image: Release your first finger to drop the image directly into your Photos library.
Method 2: Copy-Paste to Notes App (All iOS versions)
- Open the Google Docs app and the document.
- Long-press the image: A contextual menu will appear.
- Select “Copy.”
- Open the native Notes app on your iPhone.
- Create a new note, long-press in the blank space, and select “Paste.” The image will appear in the note.
- Tap the image in Notes, then tap the share icon (usually a square with an arrow pointing upwards) in the bottom-left corner.
- Select “Save Image.” The image will be saved to your iPhone’s Photos app.
Pros:
- No external apps needed: Uses native iOS features.
- Relatively quick for individual images: Especially the drag-and-drop method.
- Preserves quality: Images usually retain good quality, though minor compression can occur with the Notes app method.
Cons:
- Not for bulk saving: Each image must be saved individually.
- Drag-and-drop is iOS 15+ only.
Tophinhanhdep.com recognizes the value of efficient mobile workflows for capturing “Photo Ideas” on the go, making these methods highly useful for visual content creators.
2. On Android: Export as HTML Zipped File or Web Link
Android’s approach often involves a slightly more indirect path, similar to some desktop methods.
Method 1: Export as HTML Zipped File (Batch)
- Open the Google Docs app on your Android phone and the document.
- Tap the three dots (More options) at the top-right.
- Select “Share and export” > “Send a copy.”
- Choose “Web page (.html, zipped)” as the format, then tap “OK.”
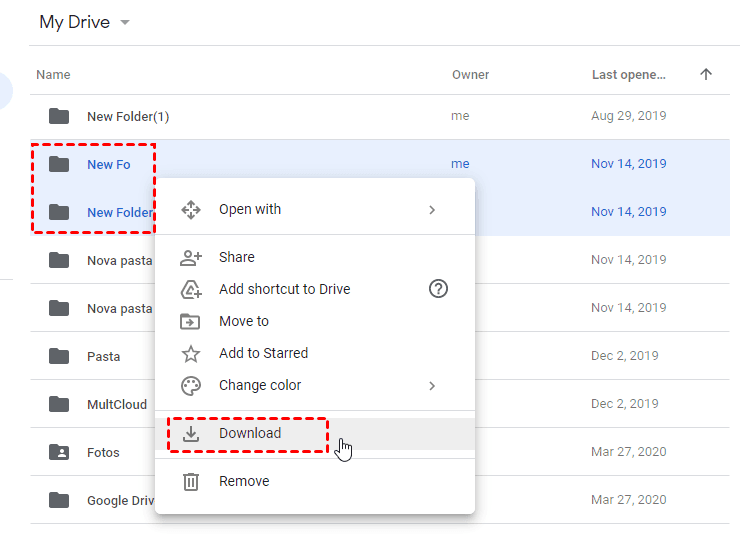
- Select “Drive” to save the zipped file to your Google Drive. Give it a suitable name and folder.
- Open the Google Drive app, locate the zipped file, tap the three vertical dots (More options), and select “Download.”
- Use a file manager app (like “Files” by Google) to locate the downloaded .zip file.
- Extract the contents of the .zip file. You’ll find an “images” folder containing all the pictures.
Pros:
- Batch download: Efficient for getting all images from a document at once.
- Maintains quality: Images typically retain their original quality.
Cons:
- Multi-step process: Requires several steps through different apps.
- Generic naming: Images will have generic names, requiring manual renaming.
- Not for individual image selection: Downloads all images, regardless of whether you need them all.
Method 2: Creating a Web Link (Individual Saves)
- Open the Google Docs app on your Android phone and the document.
- Tap the three dots at the top right, select “Share & export.”
- Enable “Link sharing” (if not already enabled) and then “Copy link.”
- Open your phone’s web browser (e.g., Chrome) and paste the link.
- Long-press on any image on the web page and select “Download image.”
Pros:
- Individual image selection: Allows you to pick specific images.
Cons:
- Potential quality degradation: This method can sometimes lead to noticeable image compression and pixelation, making it less suitable for “High Resolution” “Photography” or “Digital Art” that demands fidelity. Tophinhanhdep.com advises caution regarding quality when using this method.
- Not for batch saving.
3. Taking a Screenshot (Last Resort for Any Device)
While not ideal for “High Resolution” demands, taking a screenshot is a universal method available on any device.
Steps:
- Display the image clearly on your screen.
- Take a screenshot:
- Windows:
PrtScnkey, orWindows Key + Shift + Sfor selective capture. - Mac:
Shift + Command + 3(full screen) orShift + Command + 4(selective capture). - iPhone/Android: Varies by model (e.g.,
Volume Down + Power button,Power + Home button).
- Windows:
- Crop the image: Most devices offer built-in editing tools to crop the screenshot to just the image area.
Pros:
- Universal accessibility: Works on any device or platform.
- Very quick: Instant capture.
Cons:
- Significant quality loss: Screenshots capture screen resolution, not original image resolution, resulting in lower quality and often pixelation. Unsuitable for “High Resolution” photography or print.
- Requires cropping: An extra editing step to isolate the image.
- Not ideal for “Editing Styles” or “Photo Manipulation” due to quality degradation.
Tophinhanhdep.com generally advises against screenshots for critical “Visual Design” or “Digital Photography” work where image fidelity is paramount.
Beyond Saving: Optimizing Your Imagery with Tophinhanhdep.com
Saving images is just the first step. To truly harness the power of visual content, especially for web publication, “Graphic Design,” or “Digital Art,” further optimization is often necessary. Tophinhanhdep.com provides invaluable resources and insights into making the most of your saved images.
The Critical Importance of Image Quality and Resolution
When saving images, especially from Google search, you might encounter various resolutions. A low-resolution image, even if visually appealing as a thumbnail, will appear pixelated when scaled up or used in a “High Resolution” context like a large monitor “Wallpaper” or a printed “Beautiful Photography” piece. Tophinhanhdep.com consistently advocates for prioritizing “High Resolution” sources whenever possible, ensuring your “Digital Photography” projects or “Visual Design” elements maintain their clarity and impact.
Essential Image Tools for Post-Download Processing
After you’ve successfully saved images, Tophinhanhdep.com reminds you that they might not be optimized for your specific needs. This is where a suite of “Image Tools” becomes indispensable:
- Compressors: Images, especially “High Resolution” ones, can be very large. Compressing them significantly reduces file size without noticeable loss in visual quality, crucial for website loading speed (SEO) and sharing efficiency. Tophinhanhdep.com offers guides on the best compression tools available.
- Optimizers: Similar to compressors, optimizers fine-tune image files for specific uses, such as web display, ensuring the right balance of quality and size.
- Converters: You might save an image in JPG format but need it as a PNG for transparency in “Graphic Design,” or as a WebP for modern web performance. Tophinhanhdep.com provides tutorials on various “Converters” to change image file types effortlessly.
- AI Upscalers: For those instances where a “High Resolution” image simply isn’t available, or you’re working with older, lower-quality “Digital Photography,” AI Upscalers can use artificial intelligence to intelligently increase image resolution and detail. Tophinhanhdep.com explores the latest AI Upscaling technologies, transforming humble images into potential “Wallpapers” or “Backgrounds.”
- Image-to-Text Tools: While not directly related to saving images, tools that extract text from images can be incredibly useful for transcribing information found within visual content, connecting “Images” with broader data management.
Integrating these “Image Tools” into your workflow, as guided by Tophinhanhdep.com, ensures that your saved images are always primed for their intended purpose, whether it’s for “Photo Manipulation,” creating “Creative Ideas,” or simply making “Thematic Collections” look their best.
Ethical Considerations: Respecting Image Copyright
A crucial point, often overlooked, is the issue of image copyright. The ability to save an image does not automatically grant you the right to use it for any purpose. Most images found via Google Search or shared in Google Docs are protected by copyright.
Tophinhanhdep.com emphasizes that you should always:
- Assume copyright: Unless explicitly stated otherwise, assume an image is copyrighted.
- Check licenses: For commercial or public use, look for images with specific licenses (e.g., Creative Commons, public domain). Many platforms offer “Stock Photos” with clear licensing terms.
- Seek permission: If you want to use a copyrighted image, contact the owner for permission.
- Use royalty-free sources: Platforms specializing in “Stock Photos” or public domain images are excellent resources for legally usable content, often offering “High Resolution” options.
- Give attribution: Even with permission or certain licenses, proper attribution is often required.
Using images without permission can lead to legal complications. Tophinhanhdep.com believes in fostering a community that respects intellectual property while providing access to high-quality visual content and “Photo Ideas” responsibly. This includes understanding the nuances of how “Digital Photography” is legally shared and utilized in “Visual Design” and beyond.
Tophinhanhdep.com: Your Hub for Visual Excellence and Inspiration
At Tophinhanhdep.com, we understand the profound impact of visuals. Our platform is dedicated to empowering users with not only the technical skills to manage images but also the inspiration and resources to create and discover breathtaking visual content.
Explore our extensive categories:
- Images: Dive into curated collections of “Wallpapers,” “Backgrounds,” “Aesthetic” visuals, captivating “Nature” photography, thought-provoking “Abstract” art, evocative “Sad/Emotional” imagery, and simply “Beautiful Photography” that stirs the soul.
- Photography: Learn about the nuances of “High Resolution” photography, discover reputable sources for “Stock Photos,” master the art of “Digital Photography,” and experiment with various “Editing Styles” to find your unique visual voice.
- Image Tools: Access our guides and recommendations for the best “Converters,” “Compressors,” “Optimizers,” and “AI Upscalers.” Uncover how “Image-to-Text” technology can enhance your workflow.
- Visual Design: Unleash your creativity with insights into “Graphic Design,” “Digital Art,” advanced “Photo Manipulation” techniques, and a wealth of “Creative Ideas” to bring your visions to life.
- Image Inspiration & Collections: Spark your imagination with endless “Photo Ideas,” build stunning “Mood Boards,” explore diverse “Thematic Collections,” and stay ahead of the curve with insights into “Trending Styles” in the visual world.
Whether you’re looking for the perfect “Background” for your desktop, tips on achieving “High Resolution” in your own “Digital Photography,” or the latest “Image Tools” to streamline your “Visual Design” projects, Tophinhanhdep.com is your comprehensive partner.
Conclusion: Mastering Your Digital Visual Assets
The journey of saving images from Google, whether from search results or embedded within a Google Doc, can initially seem convoluted due to Google’s protective measures and platform intricacies. However, as this extensive guide from Tophinhanhdep.com demonstrates, a variety of effective methods exist for every scenario and device. From the efficient batch downloading of HTML files on desktop to the convenient drag-and-drop on an iPhone, and the strategic use of Google Keep, you now have a comprehensive toolkit at your disposal.
Remember, the act of saving an image is just the beginning. The real value comes from understanding its quality (“High Resolution” is key!), respecting its copyright, and then leveraging “Image Tools” like “Compressors,” “Optimizers,” and “AI Upscalers” to prepare it for your specific “Visual Design” needs. Whether you’re curating “Aesthetic” “Wallpapers,” building “Thematic Collections,” or developing complex “Digital Art,” Tophinhanhdep.com remains your steadfast resource for “Image Inspiration & Collections,” “Photography” insights, and the latest in “Image Tools.”
By mastering these techniques and adopting a responsible approach to digital asset management, you transform a potentially frustrating task into a seamless part of your creative workflow. Dive into the world of visuals with confidence, knowing that Tophinhanhdep.com is here to guide you every step of the way, helping you discover, manage, and create the “Beautiful Photography” and compelling imagery that defines our digital landscape.