How to Save Images on a Chromebook: Unlocking a World of Visual Potential

Chromebooks, with their streamlined ChromeOS and cloud-centric design, have become indispensable tools for productivity, education, and creative exploration. Their simplicity often belies a powerful capability for managing digital assets, particularly images. For anyone looking to curate a personal collection of aesthetic wallpapers, gather inspiration for graphic design projects, or simply save beautiful photography discovered online, understanding how to effectively save images on a Chromebook is a fundamental skill.
At Tophinhanhdep.com, we understand the profound impact of compelling visuals. From high-resolution stock photos that elevate digital art to thematic collections that spark creative ideas, images are at the heart of digital expression. This guide will walk you through various methods of saving images on your Chromebook, demonstrating how these techniques empower you to harness the vast visual resources available, including those found on Tophinhanhdep.com, and integrate them into your personal and professional visual design endeavors. Whether you’re a budding digital artist, a content creator, or simply someone who appreciates stunning visuals, mastering image saving on your Chromebook is your first step towards building an inspiring visual library.
Direct Download from Webpages: Your Gateway to Visual Inspiration
The most common and straightforward method for acquiring images on your Chromebook involves direct downloading from webpages. This technique is invaluable whether you’re collecting images for mood boards, archiving important visual information, or simply updating your device with fresh, aesthetic backgrounds from sources like Tophinhanhdep.com.
Standard Right-Click/Tap-and-Hold Method
Saving an image directly from a webpage is a process designed for ease and efficiency. When you encounter an image you wish to keep, whether it’s a breathtaking nature photograph, an abstract design element, or a high-resolution wallpaper from Tophinhanhdep.com, your Chromebook offers intuitive ways to save it.
For Chromebooks equipped with a traditional touchpad, the process begins by right-clicking the desired image. On most Chromebooks, a right-click is performed by tapping the touchpad with two fingers simultaneously. This action will conjure a contextual menu, presenting a list of options. Among these, you’ll find the crucial command: “Save image as…” Selecting this option will prompt a “Save file as” window to appear, giving you control over where and how your image is stored.
If your Chromebook features a touchscreen, the interaction is equally simple and perhaps even more tactile. Instead of a two-finger tap, you’ll tap and hold the image directly on the screen. This gesture brings up a similar context menu, from which you can also select “Save image as.” This versatility ensures that regardless of your Chromebook’s form factor—be it a traditional clamshell or a convertible tablet—saving images remains effortless.
Upon selecting “Save image as,” ChromeOS, the operating system powering your Chromebook, will typically default to saving the image in your “Downloads” folder. This folder acts as the primary local storage hub for all downloaded files. However, you are not confined to this default. The “Save file as” window provides the flexibility to rename the image file to something more descriptive and relevant to your needs. This is particularly useful when you’re accumulating many images for specific projects, such as categorizing different editing styles or thematic collections.
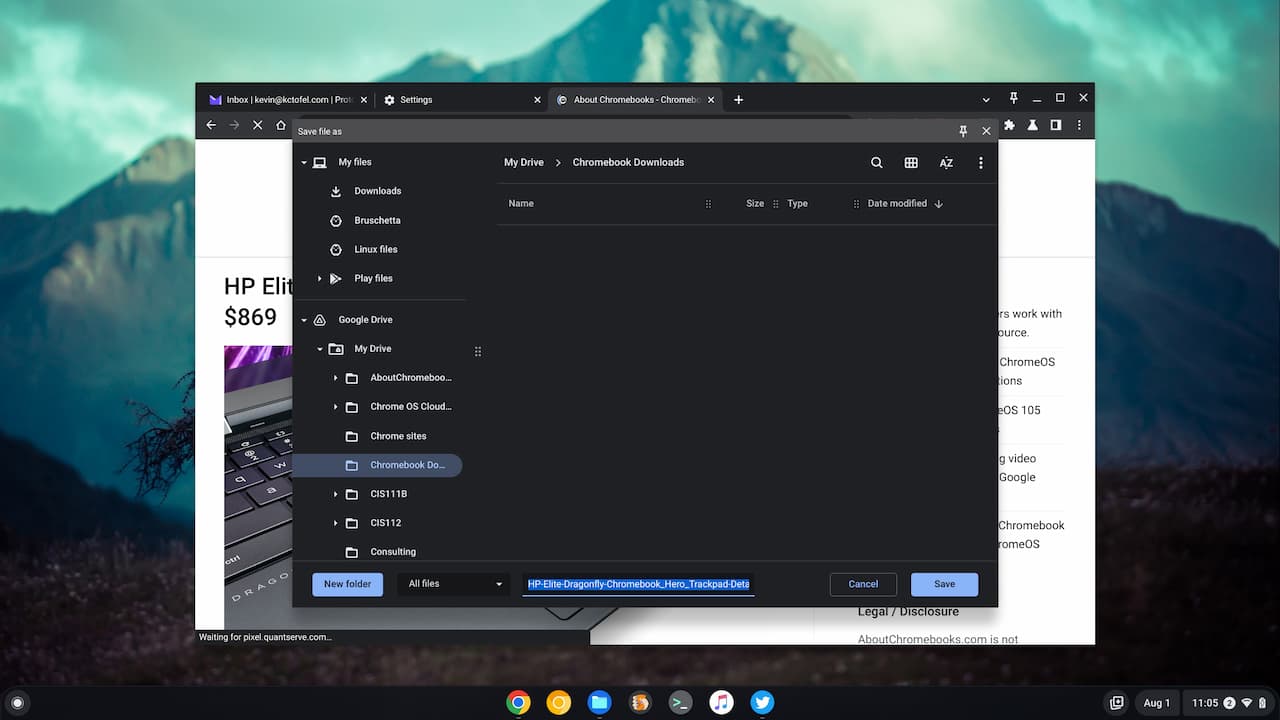
More importantly, this window allows you to designate an alternative destination for your image. You can navigate through your Chromebook’s local file system to store it in a specific folder, or even extend your reach to cloud storage services. For many Chromebook users, Google Drive is seamlessly integrated, offering a convenient way to save images directly to the cloud. This ensures that your high-resolution photography or carefully selected aesthetic visuals are accessible across all your devices, fostering a truly versatile workflow. Additionally, if you prefer physical backups or need to transfer images to other machines, you can save directly to external storage devices such as USB drives or SD cards, provided they are connected to your Chromebook.
Once you’ve chosen your desired file name and destination, a simple click on the “Save” button or a press of the Enter key on your keyboard finalizes the download. A “Download complete” pop-up notification will briefly appear in the bottom-right corner of your screen, indicating success. This notification often includes a “Show in folder” option, which, when clicked, will instantly open the Files app, taking you directly to your newly saved image. This immediate access allows for quick verification or further organization, making the process of collecting visual content for anything from digital photography inspiration to graphic design assets remarkably fluid.
Navigating File Formats and Conversion Needs
While the direct download method is incredibly user-friendly, it’s also crucial to understand the nuances of image file formats, especially when curating content for visual design or digital art projects. Images found across the web, including those on Tophinhanhdep.com, come in various formats, each with its own characteristics and optimal use cases. The most common you’ll encounter are JPEG, PNG, GIF, and increasingly, WEBP.
WEBP (WebP), for instance, is a modern image format developed by Google that provides superior lossless and lossy compression for images on the web. It allows websites like Tophinhanhdep.com to load high-resolution images faster by reducing file size significantly without a noticeable drop in quality. While excellent for web performance, WEBP images might not always be natively supported by all image editing software or applications on your Chromebook, or you might require them in a more universally compatible format for specific visual design projects or for integration into older software.
This is where the concept of image tools becomes indispensable. If you download an image in WEBP format and find it incompatible with your intended use—perhaps you want to incorporate it into a presentation that only accepts JPEG, or a digital art program that prefers PNG—you’ll need a converter. Rather than searching generically for “online converters,” which can be hit-or-miss in terms of quality and security, you can leverage dedicated tools. Tophinhanhdep.com, recognizing this need for flexibility in image management, offers robust Image Tools including Converters. These tools allow you to seamlessly transform your saved WEBP images into a variety of formats like JPEG, PNG, TIFF, or GIF, ensuring your visual assets are always ready for your specific graphic design, photo manipulation, or digital photography needs.
Beyond conversion, managing file sizes and quality is another critical aspect of working with images, particularly high-resolution photography. Large image files can quickly consume your Chromebook’s local storage and impact performance, especially if you’re building extensive thematic collections or mood boards. This is where compressors and optimizers come into play. Tophinhanhdep.com’s Image Tools also provide functionalities for compressing and optimizing images. These tools intelligently reduce file sizes while maintaining visual integrity, making your saved images more manageable for storage, faster to upload, and more efficient for web use or digital sharing. For instance, if you’re creating a website and need background images that load quickly, optimizing them with a compressor ensures a smooth user experience without sacrificing the aesthetic quality of your chosen nature or abstract visuals.
Furthermore, consider scenarios where you might save a lower-resolution image, perhaps a snippet from an online article, that you later wish to use in a high-resolution capacity—such as a large print or a significant element in a digital art piece. Traditional scaling often leads to pixelation and loss of detail. This is where advanced AI Upscalers, also part of Tophinhanhdep.com’s Image Tools, become invaluable. These AI-powered tools can intelligently enhance the resolution of your saved images, adding detail and clarity that simply stretching pixels cannot achieve. This capability transforms seemingly unusable low-res captures into viable assets for more demanding applications, effectively preserving and improving your visual inspiration.
In essence, while directly saving images provides the raw material, understanding and utilizing specialized image tools like those found on Tophinhanhdep.com allows you to refine, adapt, and enhance these assets. This holistic approach ensures that every image you save on your Chromebook, from trending styles to personal photography, is not just stored, but is optimized and ready for any creative or practical application you envision.
Leveraging the Chromebook Clipboard for Quick Visual Captures
Beyond saving images as distinct files, your Chromebook offers a versatile clipboard functionality that allows for rapid image capture and immediate deployment into various applications. This method is especially beneficial for quick visual design references, incorporating elements into digital art mock-ups, or compiling thematic collections on the fly.
Copying Images for Instant Use
The “Copy image” feature is an often-underestimated yet incredibly powerful tool for anyone working with visual content on a Chromebook. Instead of saving an image to a specific folder, which involves navigating a file system, copying an image places it directly onto your Chromebook’s clipboard, ready for instant pasting. This streamlines workflows, particularly for creative ideas that require swift integration.
To copy an image, the process mirrors the initial steps of a direct download. Simply right-click (two-finger tap on the touchpad) or tap and hold (on a touchscreen) the image you wish to capture. From the context menu that appears, select the “Copy image” option. Unlike “Save image as,” this action doesn’t prompt a save dialog; the image is immediately held in memory.
Once copied, the image is primed for insertion into a wide array of applications. You can open a document in Google Docs, a presentation in Google Slides, a note in a notepad app, or even an online photo editor. Position your cursor where you intend to place the image, then perform another right-click (or tap-and-hold) to bring up the contextual menu, and select “Paste.” The image will then appear at the selected location, ready for further manipulation or serving its purpose as a quick visual reference. This method is perfect for rapidly gathering assets for a mood board, quickly grabbing a graphic for a creative brief, or pulling a specific visual element from Tophinhanhdep.com to experiment with in a digital art canvas.
Chromebooks also boast an enhanced clipboard history, allowing you to access multiple copied items. To open your Chromebook’s clipboard history, press Search + V (the Search key is typically where Caps Lock is found, or it might be a dedicated magnifying glass icon). This shortcut reveals a panel displaying all your recently copied text and images. From this history, you can simply click or tap on the desired image to paste it into your active document or application. This is particularly useful when you’re gathering several elements – perhaps different aesthetic backgrounds, abstract patterns, or examples of beautiful photography – and want to recall them without repeatedly revisiting the source webpage.
Beyond Simple Pasting: Visual Design Applications
While basic pasting is straightforward, the clipboard’s true power for visual content creators lies in its role as a bridge for more complex visual design and photo manipulation workflows. The ability to quickly copy and paste an image serves as an initial step, allowing designers and artists to rapidly iterate and experiment with their creative ideas.
For instance, a graphic designer might copy various elements from Tophinhanhdep.com – a striking texture, an abstract shape, or a specific color palette – and paste them into a canvas within a web-based design tool or a local Android app on their Chromebook. These pasted images can then be used as overlays, background elements, or inspiration for drawing digital art. The immediacy of the clipboard reduces friction, enabling a more fluid creative process where ideas can be quickly prototyped without the overhead of saving multiple temporary files.
Consider a scenario where you’re developing a thematic collection or a series of photo ideas. You might copy a series of sad/emotional images for a particular project, or a collection of high-resolution nature scenes for a presentation. Pasting these into a Google Slides document or a digital sketchbook allows for effortless arrangement, annotation, and review. This acts as a living mood board, evolving as new visual inspiration strikes.
The clipboard also facilitates photo manipulation. You might copy a foreground element from one image and paste it onto a background from another, using a Chromebook-compatible editing app to refine the composition. While advanced photo manipulation often requires more robust software, the quick copy-paste function allows for preliminary layouts and creative brainstorming, providing a flexible starting point.
Furthermore, for those interested in trending styles or analyzing editing styles in photography, copying images to the clipboard enables swift comparative analysis. You can paste multiple examples side-by-side in a document or a simple image viewer to discern patterns, understand visual trends, and inform your own digital photography practice.
In essence, the Chromebook clipboard is more than just a temporary storage area; it’s a dynamic tool that empowers immediate interaction with visual content. It fosters a more agile approach to collecting, experimenting with, and integrating images into your graphic design, digital art, photo manipulation, and creative ideas, making it an indispensable part of any visual creator’s toolkit, especially when drawing from the rich resources available on platforms like Tophinhanhdep.com.
Saving Personal Photography and Digital Art from Cloud Services
Chromebooks are inherently designed to integrate seamlessly with cloud services, especially Google’s ecosystem. This makes managing and saving your personal photography, digital art, and other visual assets stored in the cloud a straightforward process. Whether you’re a digital photographer backing up your high-resolution images or a graphic designer storing your latest projects, retrieving these files to your Chromebook is essential for local access, editing, or offline use.
Retrieving from Google Photos and Other Cloud Storage
Google Photos serves as a primary hub for many users’ personal image collections, offering automatic backup and organization of countless photographs. To save an image from your Google Photos library to your Chromebook’s local storage:
- Open the Photos app: Navigate to and launch the Google Photos application on your Chromebook.
- Select the image: Browse through your albums or timeline and click on the specific image or photograph you wish to download. This will open it in full view.
- Access the options menu: In the top-right corner of the screen, you will typically find either an “Info” icon (an ‘i’ in a circle) or a three-dot menu icon. Click on this icon to reveal a dropdown menu of actions.
- Select “Download”: Within this menu, choose the “Download” option. This command initiates the transfer of the high-resolution image from your Google Photos cloud storage directly to your Chromebook.
Similar to direct webpage downloads, the Photos app usually saves your picture or photo to the “Downloads” folder within the Files app by default. From there, you can move it to a more organized folder, rename it, or begin working on it immediately.
The concept extends beyond Google Photos to other cloud storage applications as well. Many Chromebook users leverage services like Google Drive, Dropbox, or Microsoft OneDrive to store a vast array of digital photography, graphic design files, or creative ideas. The process for downloading from these platforms is generally consistent:
- Open the respective cloud app or website: Access your chosen cloud storage service through its dedicated app on your Chromebook or via its web interface in the Chrome browser.
- Locate the file(s): Navigate to the specific image, digital art project, or document containing visual content that you want to save.
- Initiate download: Look for a download icon (often an arrow pointing downwards) or a three-dot/right-click menu that provides a “Download” option. Selecting this will begin transferring the file to your Chromebook’s local storage.
It’s crucial to stress the importance of organizing these saved high-resolution images. As you accumulate more personal photography, stock photos, or visual design assets, a well-structured folder system becomes invaluable. Consider creating folders based on categories such as “Wallpapers,” “Digital Art Projects,” “Client Work,” “Nature Photography,” or “Mood Boards.” This organizational strategy, whether on your local drive or within your Google Drive for cloud access, greatly simplifies retrieval and management of your visual resources.
For users deeply invested in digital photography and experimenting with editing styles, saving images locally ensures that you have direct access to your raw or edited files for use with Chromebook-compatible photo editing software. This local availability allows for faster processing and provides a stable working environment, especially if you’re dealing with very large files or have intermittent internet connectivity. Moreover, having your images readily available enables you to easily integrate them with services like Tophinhanhdep.com, perhaps to use our AI Upscalers on an older photograph or to find complementary images for a new thematic collection.
Ultimately, whether from Google Photos or another cloud provider, saving images to your Chromebook bridges the gap between your cloud-based archives and your local creative workspace, empowering you to fully utilize your visual assets for any project or inspiration.
Capturing Screenshots: A Versatile Tool for Visual Content
Screenshots are an incredibly versatile method for saving images on a Chromebook, particularly when direct downloads aren’t feasible or when you need to capture specific parts of a document, application interface, or non-downloadable visual content. This technique is invaluable for everything from documenting technical processes to gathering specific elements for visual design inspiration, including aesthetic layouts or trending styles from Tophinhanhdep.com.
Full-Screen and Partial Screenshots
ChromeOS offers built-in tools that make taking screenshots remarkably simple and efficient, catering to both full-screen captures and precise selections.
For a full-screen screenshot, which captures everything visible on your Chromebook’s display, the keyboard shortcut is straightforward: simultaneously press the Ctrl + Show Window keys. The “Show Window” key is typically located at the top of your keyboard, often represented by an icon that looks like a stack of rectangles or a window. Upon pressing these keys, your screen will momentarily flash, and a notification will appear in the bottom-right corner, confirming that your screenshot has been saved.
If your aim is to capture only a specific portion of the screen, perhaps a striking abstract pattern, a detail from a high-resolution photograph on Tophinhanhdep.com, or a particular element of a graphic design layout, you’ll opt for a partial screenshot. The shortcut for this is Ctrl + Shift + Show Window. After pressing these keys, your screen will dim slightly, and your cursor will transform into a crosshair icon. You can then click and drag the crosshair to define the exact rectangular area you wish to capture. Once you release the mouse button, the selected region is instantly saved as an image.
Alternatively, you can access the screen capture tool through the system tray. Click on the date/time in the bottom-right corner of your screen to open the Quick Settings panel. Among the various icons and toggles, you’ll find the “Screen capture” tool. Clicking this icon will bring up a small toolbar at the bottom of your screen, offering options for full-screen, partial, or window captures, along with screen recording. You can select the “Take partial screenshot” icon and then use the crosshair to map out your desired image, providing a visual way to engage with the tool.
For Chromebooks used in tablet mode (where the keyboard is flipped back or detached), using keyboard shortcuts can be inconvenient. Fortunately, there’s an intuitive physical button combination for taking a full-screen screenshot: simultaneously press the Power button and the Volume Down button. This mirrors the common screenshot method on many smartphones and tablets. It’s important to remember that this method only captures the entire screen; for partial screenshots in tablet mode, you would need to revert to using the onscreen screen capture tool or reattach the keyboard. When using the physical buttons, be mindful of your Chromebook’s orientation, as the volume button’s position remains fixed relative to the device’s hardware, not its screen orientation.
All screenshots taken using these methods are automatically saved as PNG images to your Chromebook’s “Downloads” folder by default. However, the screen capture tool also allows for customizability. If you prefer your screenshots to be saved in a different location, you can click the gear icon within the snipping tool’s interface, select “Select folder,” and choose your preferred destination, such as a specific folder in Google Drive for organizing visual inspiration or a dedicated folder for digital art assets.
These screenshot capabilities are incredibly powerful for content curation. Imagine capturing specific elements of a webpage for a mood board, grabbing a quote with its accompanying background for a creative idea, or even saving snippets of digital art tutorials. Screenshots provide an immediate and flexible way to collect visual information that might otherwise be difficult to extract, acting as a quick archive for anything from trending styles to obscure nature images that catch your eye.
Screenshots for Creative Inspiration and Visual Design
Screenshots are more than just practical captures; they are potent instruments for creative inspiration and integral components of visual design workflows. For artists, designers, and anyone building a visual library, screenshots offer a dynamic way to collect, analyze, and synthesize ideas from the vast digital landscape.
Designers frequently utilize screenshots to build mood boards. Instead of laboriously downloading individual images, they can rapidly capture snippets of websites, color palettes, typography, or elements of beautiful photography that resonate with their project’s aesthetic. These quick captures, whether an abstract texture or a specific emotional expression conveyed through imagery, can then be pasted into a digital collage or a presentation, forming a cohesive visual brief for clients or personal projects. This streamlines the initial ideation phase, allowing for faster experimentation with various photo ideas and thematic collections.
Furthermore, screenshots are invaluable for digital art and photo manipulation as reference material. An artist might capture a unique lighting effect from a stock photo, a specific pose from an illustration, or a complex pattern from a graphic design example found on Tophinhanhdep.com. These references, saved instantly, become guides for their own creations. They can also capture images displaying different editing styles to study and learn from, incorporating techniques into their own digital photography. The ability to grab specific visual details without downloading entire files allows for a more focused approach to learning and creative development.
The flexibility of partial screenshots means you can isolate specific aspects. For example, if you’re inspired by a particular color scheme from a natural landscape image, you can precisely capture just that color block. If a piece of digital art features an intriguing composition, you can screenshot the compositional lines alone, aiding in your understanding of visual design principles.
While ChromeOS’s built-in tools are robust, some users might opt for third-party Chrome extensions for enhanced screenshot functionality. These extensions often provide additional features like scrolling screenshots (to capture an entire webpage), annotations, or direct integration with cloud storage or image editing tools. For example, extensions might allow you to directly edit a screenshot with arrows, text, or highlights before saving, making it even more useful for communicating creative ideas or providing feedback on graphic design mock-ups. While specific product names should be avoided unless generic, the existence of such tools highlights the ecosystem’s support for advanced visual capture.
By making screenshots an active part of your creative process, you transform your Chromebook into a powerful visual research and development hub. You can quickly document trending styles, gather components for digital art, or compile rich image inspiration libraries. Paired with the curated resources available on Tophinhanhdep.com, these quick captures empower you to not only save images but to actively engage with them, informing and enhancing every aspect of your visual endeavors.
Enhancing Your Saved Images with Tophinhanhdep.com’s Ecosystem
Saving images on your Chromebook is merely the first step. The true power lies in what you do with these visual assets. Tophinhanhdep.com offers a comprehensive ecosystem of images, photography, image tools, visual design resources, and image inspiration & collections that can significantly enhance the utility and creative potential of every picture you save. By integrating your Chromebook’s saving capabilities with Tophinhanhdep.com, you unlock a world of possibilities for your digital projects.
Integrating Saved Images with Tophinhanhdep.com’s Offerings
Once you have successfully saved images to your Chromebook—be it through direct download, clipboard copy, cloud retrieval, or screenshot—Tophinhanhdep.com becomes an invaluable partner for their enrichment and deployment.
For instance, that stunning landscape you downloaded as a potential wallpaper or background? Tophinhanhdep.com offers thousands more, enabling you to curate a constantly fresh collection of aesthetic, nature, and abstract visuals. You might find a high-resolution version of a picture you screenshotted, or discover a companion image that complements your saved beautiful photography for a multi-image display. If you’ve saved a particularly sad/emotional image, Tophinhanhdep.com can help you explore similar themes for deeper artistic expression or storytelling.
In terms of photography, the high-resolution stock photos available on Tophinhanhdep.com can serve as excellent bases for your own digital photography projects or as complementary elements for your saved personal images. Have you saved a photo that needs a specific editing style? You can browse Tophinhanhdep.com for examples and tutorials on achieving that look, or even use our platform to find similar images that have already been edited to your liking, saving you time and inspiring new directions.
The Image Tools offered by Tophinhanhdep.com are designed to refine and optimize your saved visuals. If you’ve downloaded images in varied formats, our Converters can standardize them to JPEG, PNG, or TIFF, ensuring compatibility across all your projects. For large collections of high-resolution images, our Compressors and Optimizers are essential for managing file sizes, allowing you to store more visuals on your Chromebook or prepare them for web use without compromising quality. The AI Upscalers are transformative, capable of taking a lower-resolution screenshot or an older photograph you’ve saved and intelligently enhancing its detail and size, making it suitable for larger prints or more prominent features in your digital art. Furthermore, if you’ve saved images containing text—like an inspiring quote in a unique font—our Image-to-Text tool can extract that information, bridging the gap between visual and textual data.
For Visual Design enthusiasts, every image saved on your Chromebook becomes a potential building block. Tophinhanhdep.com provides a wealth of resources for graphic design, digital art, and photo manipulation. You can use saved images as textures, overlays, or primary subjects, then return to Tophinhanhdep.com for additional elements, backgrounds, or creative ideas to complete your compositions. Whether you’re a seasoned professional or just exploring digital art, the synergy between your saved images and Tophinhanhdep.com’s expansive library fosters limitless creativity.
Finally, for Image Inspiration & Collections, Tophinhanhdep.com is an unparalleled resource. The images you save on your Chromebook form the core of your personal photo ideas and mood boards. You can use Tophinhanhdep.com to discover new thematic collections that align with your interests or explore trending styles to keep your work contemporary and engaging. By compiling these collections, you create a rich visual repository that continuously fuels your imagination and provides a ready source of reference for all your creative endeavors.
In conclusion, saving images on your Chromebook is a straightforward process with multiple effective methods. From standard web downloads and clipboard functionality to cloud synchronization and versatile screenshots, ChromeOS provides the tools to capture virtually any visual content. What truly elevates these saved images, however, is their integration with a comprehensive platform like Tophinhanhdep.com. Our extensive library of images and photography, coupled with powerful image tools and rich visual design resources, transforms your collected visuals into actionable assets. Whether for professional graphic design, personal digital art, curating image inspiration, or simply enjoying a stream of aesthetic backgrounds, Tophinhanhdep.com empowers you to maximize the potential of every image you save on your Chromebook, fostering a vibrant and visually rich digital experience.