How to Sharpen an Image in Photoshop for Professional Results

In the vast and dynamic world of digital imagery, where every pixel contributes to the overall aesthetic, achieving impeccable sharpness is paramount. Whether you’re curating stunning wallpapers, preparing high-resolution stock photos, or perfecting a piece of digital art, the clarity and definition of your images can dramatically impact their visual appeal. At Tophinhanhdep.com, we understand the critical role image quality plays across all aspects of visual design and photography. This comprehensive guide will delve into the various methods and best practices for sharpening images in Adobe Photoshop, empowering you to transform dull, soft photos into crisp, vibrant masterpieces.
Sharpening an image isn’t merely about making it “less blurry”; it’s a sophisticated process of enhancing contrast along the edges of objects, making details pop and the overall image more engaging. Often, photos can lose a degree of sharpness due to factors like camera shake, lens softness, or even the process of resizing and compression. Fortunately, Photoshop offers a suite of powerful tools, from classic filters to more advanced, intelligent options, to reclaim and elevate your image’s inherent sharpness. We’ll explore these tools in detail, providing you with the knowledge to select the right technique for every scenario and integrate sharpening seamlessly into your creative workflow.
Understanding Image Sharpening: More Than Just Clarity
Before we dive into the practical steps, it’s essential to grasp the fundamental concept behind image sharpening. This isn’t just a simple slider adjustment; it’s an intelligent manipulation of pixels designed to trick the human eye into perceiving greater detail.
The Illusion of Sharpness: Edges and Contrast
At its core, image sharpening is an optical illusion. Photoshop doesn’t magically create new detail where none existed; instead, it increases the contrast along the edges of objects within your image. An “edge” is defined as any area where there’s a significant, abrupt change in brightness or color between neighboring pixels.
When you sharpen an image, Photoshop makes the light side of an edge lighter and the dark side darker. This amplified contrast accentuates the separation between objects and their surroundings, causing your brain to interpret this heightened definition as “sharpness.” The more precisely you can target these edges and enhance their contrast without introducing unwanted artifacts (like halos or noise), the more effective your sharpening will be. Understanding this principle is crucial, as it guides the strategic application of Photoshop’s various sharpening tools. Over-sharpening can lead to an unnatural, gritty, or pixelated look, detracting from the image’s quality rather than enhancing it.

Why Sharpening Matters in Digital Photography and Visual Design
The importance of effective image sharpening extends far beyond simple aesthetic preference; it’s a fundamental step that enhances the professional quality and impact of your visual content.
For Digital Photography, especially when dealing with high-resolution images or stock photos, sharpening is often the final polish. Even the best cameras and lenses can produce slightly soft images, and sharpening helps recover that perceived detail. It ensures that textures in nature photography (like bark on a tree or the intricate patterns of a leaf) are distinct, and that subjects in portraits (such as the sharpness of eyes or strands of hair) stand out. For photographers aiming to produce high-resolution, print-ready images or crisp visuals for online portfolios, meticulous sharpening is non-negotiable.
In the realm of Visual Design and Graphic Design, sharp images contribute significantly to overall visual impact. Whether you’re designing marketing materials, creating digital art, or preparing images for a website’s backgrounds and aesthetic collections, clarity is key. A sharp graphic element commands attention, and clear text overlays a well-sharpened background image are more legible. For designers working on mood boards or thematic collections, ensuring consistency in image sharpness helps unify the visual narrative and elevate the professional perception of their creative ideas. It’s also vital for photo manipulation projects, where blending multiple elements requires consistent sharpness across all components for a seamless, believable result.
Ultimately, proper sharpening ensures your images are not just seen, but felt. They convey professionalism, attention to detail, and a commitment to quality that resonates across all categories, from abstract art to beautiful photography collections.
Mastering Photoshop’s Core Sharpening Filters
Photoshop offers several powerful filters for sharpening, each with its own strengths and ideal use cases. Understanding these differences allows for more precise and effective image enhancement.
The Versatile Unsharp Mask
The Unsharp Mask (USM) filter is a classic and widely used sharpening tool in Photoshop. Despite its seemingly counterintuitive name (it’s derived from traditional darkroom techniques where a blurred negative was used to create a sharper print), it’s highly effective. USM works by identifying areas of contrast and increasing the difference between light and dark pixels along those edges.
To apply the Unsharp Mask:
- Open your image in Photoshop. It’s always recommended to convert your image layer to a Smart Object first (right-click the layer in the Layers panel and choose “Convert to Smart Object”). This allows you to apply the filter non-destructively, meaning you can always go back and adjust the settings without permanently altering your original pixels.
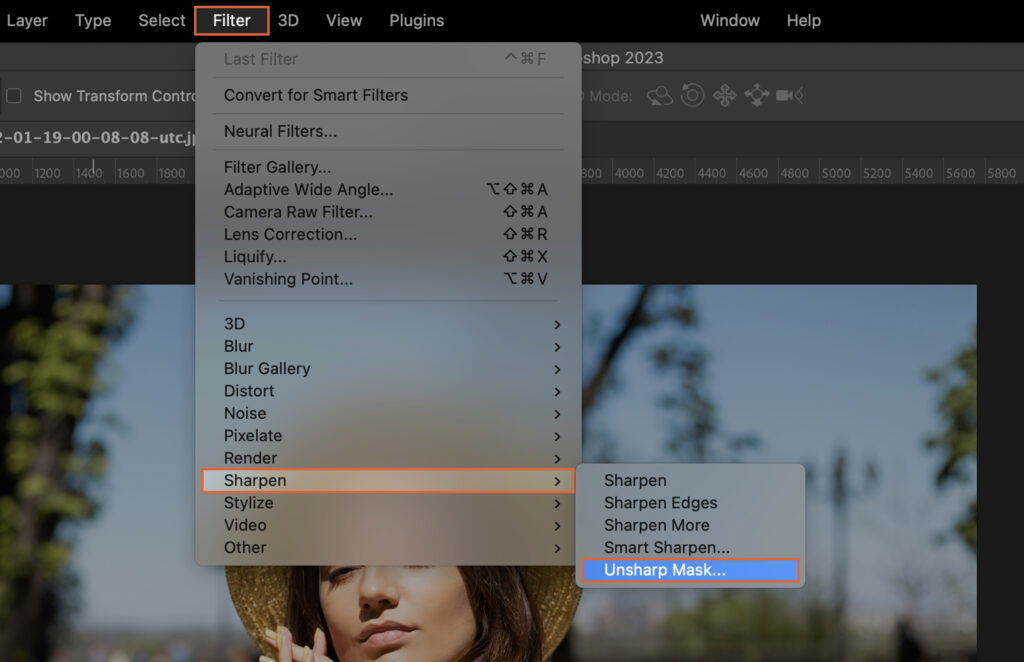
- Go to
Filter > Sharpen > Unsharp Mask. - The Unsharp Mask dialog box presents three main sliders:
- Amount: This controls the intensity of the sharpening effect. Higher values mean more sharpening. Be careful not to go too high, as it can introduce noise or exaggerated halos.
- Radius: This determines the width of the sharpened edge. A smaller radius (e.g., 0.5-1.5 pixels) is ideal for fine details, while a larger radius (e.g., 2-5 pixels) can create a broader, more noticeable sharpening effect. Experimentation is key; a radius too high can create noticeable halos around objects.
- Threshold: This slider helps prevent unwanted sharpening of smooth areas, such as skin or skies, which often contain subtle noise. It tells Photoshop to only apply sharpening to pixels that differ in contrast by a certain amount. A higher threshold value means fewer areas will be sharpened, effectively protecting smooth gradients. Start with a low value and increase it until noise is minimized without sacrificing desired detail.
- Always zoom to 100% (double-click the Zoom tool) in your image preview while adjusting the sliders to accurately judge the sharpness, especially for high-resolution images.
- Click OK when satisfied. Because it’s a Smart Filter, you can double-click “Unsharp Mask” in the Layers panel at any time to re-open the dialog box and refine your settings.
Unsharp Mask is excellent for general sharpening and is a go-to for many photographers for its balance of control and effectiveness, making it suitable for everything from landscape photography to enhancing backgrounds for digital art.
Smart Sharpen for Precision and Control
Smart Sharpen is Photoshop’s more advanced and intelligent sharpening filter, offering greater control over the sharpening process, particularly in minimizing artifacts like halos and noise. It’s often recommended for targeted sharpening and achieving cleaner results.
Here’s how to use Smart Sharpen:
- Open your image and convert the layer to a Smart Object (for non-destructive editing).
- Go to
Filter > Sharpen > Smart Sharpen. - The Smart Sharpen dialog box provides several key controls:
- Amount: Similar to Unsharp Mask, this controls the overall intensity of the sharpening.
- Radius: Again, this defines the width of the sharpened edges. Start with lower values and increase gradually.
- Reduce Noise: This is a crucial distinction from Unsharp Mask. Smart Sharpen includes a built-in noise reduction feature, which helps to preserve smooth areas and prevent sharpening from exaggerating existing noise. This is particularly useful for photographs with higher ISO settings.
- Remove: This dropdown menu allows you to specify the type of blur you’re trying to correct (Gaussian Blur, Lens Blur, or Motion Blur). Choosing the correct option can lead to more effective sharpening.
- Shadow and Highlight controls (Advanced section): By clicking the “Advanced” checkbox, you gain access to sliders (Fade Amount, Tonal Width, Radius) that let you control how sharpening affects the shadow and highlight areas independently. This is invaluable for preventing blown-out highlights or crushed shadows that can result from aggressive sharpening.
- Adjust the
AmountandRadiusfirst, then fine-tune withReduce Noise. Use theShadowandHighlightcontrols to mitigate any artifacts in those specific tonal ranges. - The
Previewcheckbox allows you to quickly toggle the effect on and off for comparison. - Click OK when done.
Smart Sharpen is particularly beneficial for high-resolution photography, where precise control over detail and noise is critical. It’s ideal for refining stock photos or bringing out intricate details in professional portraits, contributing significantly to a polished editing style.
The High Pass Filter: An Edge-Detection Powerhouse
While not a dedicated sharpening filter by name, the High Pass filter is a remarkably effective and straightforward tool for image sharpening, especially favored by many for its visual simplicity and excellent results. It operates purely on the principle of edge detection.
Here’s how to sharpen using the High Pass filter:
- Open your image and convert the layer to a Smart Object. This is crucial for non-destructive editing and allows you to easily adjust blend modes and opacity.
- Duplicate the Smart Object layer (Ctrl+J or Cmd+J). While not strictly necessary for the filter itself, this provides an extra layer for control and comparison.
- Go to
Filter > Other > High Pass. - The image will turn gray. The High Pass filter identifies edges and highlights them with light and dark lines against a neutral gray background. Areas without significant detail remain flat gray.
- Radius: This is the only slider. Adjust it slowly. The goal is to set the Radius just high enough so that you can clearly see the edges and details of your image against the gray background, but not so high that you start seeing broader areas of color or texture, especially in smooth regions. Typically, values between 2-5 pixels work well, depending on the image size and desired effect.
- Click OK to apply the filter. Your image will still appear gray with highlighted edges.
- Now, in the Layers panel, change the Blend Mode of this High Pass layer. The contrast-boosting blend modes are essential here:
- Overlay: A commonly used mode, offering a strong sharpening effect.
- Soft Light: Provides a more subtle and gentle sharpening.
- Hard Light/Linear Light: These offer even stronger, more aggressive sharpening than Overlay.
- Experiment with these blend modes to see which best suits your image. These modes effectively hide the neutral gray areas of the High Pass result, leaving only the enhanced edges to interact with the original image below.
- Adjust the Opacity of the High Pass layer to fine-tune the overall strength of the sharpening. Lowering the opacity reduces the effect.
The High Pass filter is particularly praised for its ability to sharpen images without greatly increasing color saturation or noise in flat areas. It’s a favorite for refining details in high-resolution photography, making it ideal for everything from abstract art to beautiful landscape shots, as it focuses purely on definition.
Advanced Techniques and Specialized Sharpening
Beyond the core filters, Photoshop provides specialized tools and techniques for addressing specific sharpening challenges and for achieving highly selective and nuanced results.
Addressing Motion Blur with Shake Reduction
Sometimes, an image isn’t just generally soft; it suffers from distinct blur caused by camera shake during exposure. Photoshop’s Shake Reduction filter is specifically designed to analyze and correct these types of blurs, which can range from linear to rotational or even zigzag patterns. This is a game-changer for digital photography where a fleeting moment might be captured with slight movement.
To use the Shake Reduction filter:
- Open your image in Photoshop. As always, converting your layer to a Smart Object (right-click the layer in the Layers panel >
Convert to Smart Object) is recommended for non-destructive editing. - Go to
Filter > Sharpen > Shake Reduction. - Photoshop will automatically analyze the image, detect the nature of the blur, and attempt to correct it. A
Shake Reductiondialog box will appear, displaying the corrected image. - You’ll often see a “Blur Trace Region” box appear on your image. You can reposition or resize this box to select the area that best represents the blur you want to correct. Photoshop will use this region to learn the blur pattern. You can even draw multiple blur regions for more complex blur patterns.
- Adjust the
Blur Trace SensitivityandSmoothingsliders within the dialog box to fine-tune the correction.Artifact Suppressioncan help manage unwanted side effects. - Use the
Previewcheckbox to quickly compare the before and after states. - Click OK when you are satisfied with the result.
The Shake Reduction filter is an invaluable asset for rescuing otherwise unusable images, particularly for action shots in photography or when preparing images for collections where perfect clarity is crucial. It’s a testament to Photoshop’s capabilities in photo manipulation and restoration.
Selective Sharpening with the Sharpen Tool and Layer Masks
While global sharpening filters apply effects across the entire image, there are instances where only specific areas require enhancement. This is where the dedicated Sharpen Tool and the strategic use of Layer Masks become indispensable, allowing for highly artistic and controlled adjustments.
Using the Sharpen Tool: The Sharpen tool, located in the Photoshop toolbar (often grouped with the Blur and Smudge tools), functions much like a brush.
- Select the Sharpen tool (looks like a triangle). If it’s not visible, click and hold on the Blur tool to reveal it.
- Adjust the brush settings:
- Choose an appropriate brush tip size and hardness.
- Set the Strength in the options bar (usually between 20-50%) to control the intensity of each stroke.
Sample All Layers: If checked, the tool will sharpen based on data from all visible layers. If unchecked, it only works on the active layer.Protect Detail: This option, generally recommended, helps minimize pixelated artifacts while enhancing details. Deselect it only if you want a more dramatic, artistic, or pixelated effect.
- Paint over the specific areas you want to sharpen. Remember, the more you paint over an area, the more it sharpens. Use short, controlled strokes.
- Tip: This tool can be aggressive. Use it sparingly and on a duplicate layer or Smart Object for non-destructive editing.
Selective Sharpening with Layer Masks: Layer masks offer superior control and are often preferred for selective sharpening, especially when combined with Smart Filters like High Pass or Unsharp Mask.
- Apply your chosen sharpening filter (e.g., High Pass, Unsharp Mask) to a Smart Object layer, as discussed earlier. This applies the sharpening globally.
- With the Smart Object layer selected in the Layers panel, click the
Add Layer Maskicon at the bottom of the panel. By default, this creates a white mask, revealing the sharpening everywhere. - To selectively hide the sharpening from areas, you can invert the mask to black (Ctrl+I or Cmd+I). Now, no sharpening is visible.
- Select the Brush Tool (B), set your Foreground Color to White, and choose a soft brush.
- Paint with white on the black layer mask over the areas where you want the sharpening to appear (e.g., eyes in a portrait, specific textures in a nature shot).
- To remove sharpening from an area, switch your foreground color to Black and paint over it.
- You can adjust the Opacity of the brush to apply the sharpening effect with varying intensities, giving you incredibly precise control over the final look.
This method is crucial for visual design, especially in portrait retouching (to sharpen eyes and hair while keeping skin smooth) or when working on creative ideas where certain elements need to pop more than others. It ensures your photo manipulation is seamless and professional.
Non-Destructive Workflow: Smart Objects for Flexible Editing
A cornerstone of professional image editing in Photoshop is the non-destructive workflow. This approach ensures that you can make changes to your image without permanently altering the original pixel data, allowing for endless adjustments, experiments, and corrections. Smart Objects are fundamental to this.
What are Smart Objects? A Smart Object is a layer in Photoshop that contains raster or vector image data from Photoshop files, or content from other applications (like Illustrator), that remains independent of the parent document. When you convert a regular layer (like your image layer) into a Smart Object, Photoshop essentially embeds or links the original image data within that layer.
Why Use Smart Objects for Sharpening?
- Editable Smart Filters: When you apply a filter (like Unsharp Mask, Smart Sharpen, High Pass, or Shake Reduction) to a Smart Object, it becomes a “Smart Filter.” Smart Filters are non-destructive and appear as editable sub-layers beneath the Smart Object in the Layers panel. You can double-click them at any time to reopen their dialog box and modify their settings. This is invaluable for fine-tuning sharpness, especially when working on detailed high-resolution images or preparing images for aesthetic collections.
- Layer Masking for Filters: Smart Filters automatically come with a built-in layer mask. This allows you to selectively apply or hide the sharpening effect from different parts of your image, using the techniques described above with the Brush tool (painting with black to hide, white to reveal). This level of control is essential for preventing sharpening artifacts in smooth areas or for artistic photo manipulation.
- Scalability: If you need to resize a Smart Object (e.g., for different wallpapers or web backgrounds), the original image data is preserved, meaning you can scale it down and up again without permanent loss of quality.
- Flexibility: It’s easy to toggle Smart Filters on and off (using the eye icon next to the filter name) to compare the sharpened and unsharpened versions, aiding in crucial decision-making during the editing process.
To convert a layer to a Smart Object, simply right-click on the layer in the Layers panel and choose “Convert to Smart Object.” Adopting this workflow will make your sharpening process much more robust, giving you the freedom to iterate and refine your visual design work to perfection.
Beyond Photoshop: AI-Powered Sharpening and Workflow Enhancement
While Photoshop remains the industry standard, the landscape of image editing is continuously evolving. Artificial Intelligence (AI) has emerged as a powerful ally, offering innovative approaches to common editing challenges, including image sharpening.
The Rise of AI in Image Sharpening
AI-powered image tools represent a significant leap forward in addressing complex issues like blur and lack of detail. Unlike traditional sharpening filters that often rely on global algorithms and pixel-level contrast adjustments, AI-driven solutions are trained on vast datasets of images. This allows them to “understand” what sharp details should look like, even in severely blurred or low-resolution images.
How AI Sharpening Works: AI models can intelligently differentiate between genuine detail and noise, reconstruct missing information, and selectively enhance edges without introducing the harsh halos or artifacts common with aggressive traditional sharpening. This is particularly beneficial for:
- Fixing severe blur: AI tools can often recover details from images that are too blurry for conventional Photoshop filters.
- Upscaling and sharpening: When using AI upscalers to increase image resolution (e.g., for converting a smaller image into a high-resolution wallpaper), AI sharpening tools can seamlessly enhance the newly generated details, preventing a soft, interpolated look.
- Automated efficiency: Many AI tools automate complex processes, saving significant time, especially for batch processing large collections of stock photos or thematic images.
The integration of AI into image editing streamlines workflows and offers solutions that were once impossible, making it a valuable complement to traditional Photoshop techniques.
Luminar Neo: An Intuitive Alternative for Fast Results
For those seeking a powerful yet user-friendly alternative or complement to Photoshop’s often complex interface, Luminar Neo by Skylum stands out. This advanced photo editor is celebrated for its intuitive design and robust AI-powered tools that simplify and accelerate the sharpening process. At Tophinhanhdep.com, we recognize the value of efficient tools that empower creators.
Key AI Sharpening Features in Luminar Neo:
- Sharpness Tool (Develop Category):
- Sharpen: A straightforward slider to control the overall intensity of sharpening.
- Radius: Similar to Photoshop, this adjusts the width of the sharpening effect. Luminar Neo’s algorithms are designed to keep this natural.
- Masking: A powerful feature that allows you to selectively apply sharpening. For instance, you can increase sharpness in areas with high contrast (like eyes or foliage) while deliberately avoiding smooth areas like skin or skies, preventing unwanted texture or noise. This granular control helps in creating beautiful photography and aesthetic portraits.
- Structure AI: Found in the Edit tab, Structure AI intelligently enhances clarity and detail across an image. What makes it particularly smart is its ability to apply enhancements selectively, often avoiding human faces where sharpening can look unnatural, maintaining the integrity of portraits for your image collections.
- Supersharp AI (Extension): For more challenging cases, especially those involving motion blur or general fuzziness, Luminar Neo offers Supersharp AI. This professional-grade extension simplifies the daunting task of correcting blur with easy-to-use controls, making it effective for everything from blurry action shots to enhancing blurry faces in group photos. This is a powerful tool for recovering details in high-resolution photography.
- Synchronization Settings: A significant time-saver, Luminar Neo allows you to copy and paste your sharpening settings (and other adjustments) across multiple photos. This consistency is invaluable when working with large batches of images, such as stock photo collections or thematic sets for a mood board, ensuring a cohesive editing style.
Luminar Neo provides Photoshop-quality results with a significantly flatter learning curve. Its AI-driven approach is ideal for photographers and designers who want to achieve stunning sharpness quickly and efficiently, making it a top contender in photo editing alternatives, as noted by various industry professionals and resources like Tophinhanhdep.com. Its streamlined workflow makes it perfect for enhancing visual design elements, from simple backgrounds to complex photo manipulation.
Integrating Sharpening into Your Creative Workflow
Sharpening is not an isolated step but an integral part of a holistic image editing process. Its effective integration can elevate all your visual endeavors, from aesthetic backgrounds to complex graphic design projects.
Elevating Image Collections and Visual Design
For website managers and content creators focused on Images (Wallpapers, Backgrounds, Aesthetic, Nature, Abstract, Sad/Emotional, Beautiful Photography), consistent and appropriate sharpening is crucial. A collection of wallpapers, for instance, benefits from uniform sharpness that brings out textures in nature scenes or the subtle nuances in abstract art, making each image more impactful. For Stock Photos, high-resolution images with impeccable sharpness are a non-negotiable requirement, as they are expected to be versatile and adaptable for various uses across different platforms.
In Visual Design (Graphic Design, Digital Art, Photo Manipulation, Creative Ideas), sharpening plays a strategic role:
- Graphic Design: Sharp edges and clear details ensure that graphic elements, logos, and typography stand out against backgrounds. A subtly sharpened background can provide context without distracting from foreground elements.
- Digital Art: Artists can use selective sharpening to direct the viewer’s eye to key focal points or to enhance specific textures, adding depth and realism to their creations.
- Photo Manipulation: When compositing multiple images, consistent sharpening across all elements is essential for a believable final image. Sharpening can also be used creatively to draw attention to manipulated elements.
- Creative Ideas: Sharpening can be a tool to emphasize a mood or narrative. A crisply sharp image might convey precision or intensity, while a softer image might evoke a dreamier or more nostalgic feel.
By carefully considering how sharpening contributes to the overall visual message and aesthetic, you can enhance the impact of your entire image library.
Optimizing Images for High Resolution and Diverse Platforms
The final application of your image significantly influences the sharpening approach. Photography (High Resolution, Stock Photos, Digital Photography, Editing Styles) demands a nuanced understanding of output sharpening.
- High-Resolution Images: For large prints or high-definition displays, meticulous sharpening is key to prevent details from appearing soft. The larger the output, the more visible subtle blur becomes.
- Web Use: Images destined for the web (e.g., website backgrounds, social media posts) often require a different sharpening approach. They might be resized and compressed, which can reintroduce softness. A slight additional “output sharpening” might be necessary after resizing, but care must be taken to avoid over-sharpening artifacts that become more noticeable with web compression.
- AI Upscalers: When using tools like AI Upscalers (under Image Tools), sharpening often serves as a crucial follow-up step. Upscaling can sometimes leave images with a slightly synthetic or soft look, and a gentle application of a sharpening filter can restore natural definition to the newly interpolated pixels.
Furthermore, integrating sharpening into your workflow means understanding its relationship with other Image Tools such as Converters, Compressors, and Optimizers. Sharpening is typically one of the last steps in the editing process, applied after color correction, retouching, and resizing. This ensures that the sharpening effect is tailored to the final dimensions and composition of the image. For instance, a beautifully sharpened image for a thematic collection needs to maintain its clarity even after being compressed for faster web loading.
By adopting a thoughtful, multi-faceted approach to sharpening, leveraging both Photoshop’s traditional tools and modern AI solutions, and considering the final context of your images, you can consistently achieve professional-grade results across all your creative endeavors. At Tophinhanhdep.com, we are dedicated to providing the knowledge and inspiration you need to master every aspect of visual excellence.