How to Vectorize an Image in Photoshop: A Comprehensive Guide

In the dynamic world of digital imagery, the ability to manipulate and transform visuals is a highly coveted skill. Among the most practical techniques for designers, artists, and anyone engaged in visual creation is image vectorization. This process transforms pixel-based (raster) images into scalable, resolution-independent vector graphics, opening up a universe of creative possibilities. At Tophinhanhdep.com, we understand the importance of diverse image formats for various applications, from stunning wallpapers and backgrounds to intricate graphic design projects and high-resolution photography. This comprehensive guide will walk you through the essential steps to vectorize an image directly within Photoshop, a powerful tool that, while primarily known for raster editing, offers robust capabilities for venturing into the vector realm.
Vectorizing an image in Photoshop involves a series of calculated steps: carefully selecting your image, employing specific tools for conversion, and then refining and optimizing the results. Whether your goal is to create crisp logos, large-format posters, or unique digital art pieces for your thematic collections, mastering this skill will significantly enhance your creative toolkit. Tophinhanhdep.com is your go-to resource for image inspiration, high-resolution stock photos, and cutting-edge image tools, and learning vectorization is a perfect complement to exploring our vast collections and enhancing your visual design prowess.

Understanding Vector Graphics: The Foundation of Scalable Design
Before diving into the “how-to,” it’s crucial to grasp the fundamental differences between the two primary types of digital images: vector and raster. This understanding informs why vectorization is such a valuable skill, especially when aiming for flawless scalability in your visual projects.
Vector vs. Raster: A Fundamental Distinction
A vector graphic is an image constructed from mathematical paths or lines, rather than pixels. These paths are defined by starting and ending points, control points, and other specific mathematical instructions that dictate their curves and forms. The profound advantage of vector graphics lies in their unparalleled scalability: they can be enlarged or reduced to any size without any loss of clarity, crispness, or sharpness. This is because when you scale a vector image, the underlying mathematical formulas are simply re-calculated, redrawing the paths perfectly at the new dimensions. This characteristic makes vectors indispensable for applications requiring variable sizes, such as company logos, branding elements, illustrations, posters, and banners. The “Images,” “Visual Design,” and “Graphic Design” sections of Tophinhanhdep.com often feature assets that benefit immensely from being in vector format.
In stark contrast, raster graphics (also known as bitmap graphics) are composed of a grid of individual pixels, each assigned a specific color. Photographs, for instance, are quintessential examples of raster images. When you zoom in on a raster image, you eventually reach a point where the individual pixels become visible, leading to a blurry or “pixelated” appearance. This resolution dependency means raster images are best viewed at their native resolution or smaller. While perfect for capturing photographic detail and complex tonal gradients found in “Beautiful Photography” or “Nature” images on Tophinhanhdep.com, their fixed pixel structure makes them unsuitable for projects requiring extreme resizing without quality degradation.
The choice between vector and raster graphics hinges entirely on your specific project needs and creative objectives. For designers and digital artists who frequently work with logos, iconography, typography, or illustrations that need to adapt across various mediums and scales, understanding how to convert raster images to vectors, even in Photoshop, is an invaluable asset. It allows for greater flexibility and ensures that your visual assets maintain a professional, high-resolution appearance regardless of their final output size, aligning perfectly with Tophinhanhdep.com’s commitment to “High Resolution” imagery.
The Step-by-Step Process: Vectorizing Images in Photoshop
While Adobe Illustrator is the industry standard for native vector creation, Photoshop provides powerful tools to convert raster images into vector paths, which can then be used within Photoshop or exported for further vector editing. This process is particularly useful for achieving stylized, line-art, or silhouette effects from existing photographs or designs, transforming them into “Digital Art” or “Photo Manipulation” ready elements.
Preparing Your Raster Image for Vector Conversion
The journey to vectorization begins with careful image preparation. The quality of your initial raster image and how well you prepare it will significantly impact the final vector output.
-
Import Your Image: Open the image you wish to vectorize in Photoshop. While Photoshop can handle both black-and-white and color images, the subject matter is crucial. Complex landscape photos with intricate details are generally not practical for vectorization in this manner. For optimal results, select an image with a simple background – ideally a solid color or even a transparent one – to ensure the subject’s details stand out clearly. Tophinhanhdep.com offers many “Stock Photos” and “Backgrounds” that could serve as excellent starting points for this process.
-
Isolate Your Subject (If Necessary): If your image has a busy background, the first step is to remove it. Photoshop offers several robust tools for background removal, such as the Quick Selection tool, Magic Wand, Pen tool, or more advanced features like “Select Subject” or “Remove Background” (found under the ‘Select’ menu or Properties panel). Tophinhanhdep.com’s “Image Tools” section might feature background removal tools that could complement your Photoshop workflow. Once the background is removed, you should have your subject isolated on a transparent layer.
-
Enhance Details with Sharpening (Optional but Recommended): To ensure crisp edges for the vector paths, sharpen your subject. While there are many ways to sharpen an image in Photoshop, the High Pass filter (Filter > Other > High Pass) is highly recommended. Apply it to a duplicate layer, set its blend mode to Overlay or Soft Light, and adjust the radius to bring out fine details without over-sharpening.
-
Create a Threshold Adjustment Layer: This is a critical step in converting your image into a high-contrast black and white representation, making it easier for Photoshop to define paths. Go to the Layers panel, click the “Create new fill or adjustment layer” icon (half-black, half-white circle), and select “Threshold.” Adjust the “Threshold Level” slider in the Properties panel. Observe how the image transforms into a stark black-and-white graphic. Your goal is to find a balance where the key details of your subject are clearly preserved, yet the image is simplified enough for vector conversion. This threshold adjustment effectively creates a simplified silhouette or line art from your original image.
-
Merge Visible Layers: Once satisfied with the threshold result, go to the Layers panel, select all visible layers (Shift-click to select multiple), right-click, and choose “Merge Visible” or go to Layer > Merge Visible. This consolidates your preparation work into a single black-and-white layer.
- Additional Tip: For more complex images that need further refinement after the initial threshold, you can use tools like the Sharpen tool, the Curves adjustment (Image > Adjustments > Curves), or even the Brush tool (shortcut ‘B’) with black and white colors to manually clean up any unnecessary details, remove specks, or refine edges before proceeding. This step is crucial for achieving clean vector lines. Tophinhanhdep.com’s emphasis on “Digital Photography” and “Editing Styles” highlights the importance of such meticulous adjustments.
Transforming Selections into Scalable Paths
With your image prepped and simplified into a clear black-and-white form, the next phase involves telling Photoshop where to draw the vector lines.
-
Select Tonal Areas with Color Range: Navigate to the top menu bar and select “Select” > “Color Range.” In the “Color Range” panel that appears, you’ll typically want to select “Shadows” to target the black areas of your image. Adjust the “Fuzziness” and “Range” sliders to fine-tune your selection. The “Fuzziness” controls the tolerance for color similarity, while “Range” defines the tonal spectrum included. Click “OK” when you’re satisfied; you’ll see “marching ants” indicating your selection is active.
-
Create a Work Path: While the selection is active, choose any selection tool from the left toolbar (e.g., Rectangular Marquee tool, shortcut ‘M’). Right-click directly on your selected design (within the “marching ants” area). From the dropdown menu, select “Make Work Path.” In the “Make Work Path” dialog box, set the “Tolerance.” A value between 1 and 1.5 pixels is generally ideal for balancing smoothness and detail retention for irregular shapes like portraits. A lower tolerance creates a path that more closely follows the original pixel edges, resulting in more anchor points and potentially sharper detail but less smoothness. A higher tolerance creates a smoother path with fewer anchor points but might simplify details too much. Experimentation based on your specific image is key here. This step essentially converts the pixel-based selection into a vector path. You can view and manage your path in the “Paths” panel (Window > Paths). It’s good practice to double-click and name your work path to save it.
-
Create a Solid Color Fill Layer: With your work path still active (you can reactivate it by clicking on its name in the Paths panel), go to the Layers panel. Click the “Create new fill or adjustment layer” icon again and select “Solid Color.” A “Color Picker” window will appear. Choose any color you desire for your vector graphic (e.g., black to represent the original dark areas). Click “OK.” Photoshop will automatically create a new “Solid Color” fill layer, which is, in fact, a vector shape layer. This layer uses your work path as a vector mask, effectively filling the path with a solid color. You now have a resolution-independent vector shape within your Photoshop document.
Finalizing and Exporting Your Vector Art
Having successfully created a vector shape, the final steps involve adding color effects if desired and exporting the graphic in a suitable vector format. This solidifies your work as a piece of “Digital Art” or a versatile “Graphic Design” element.
-
Add Color Effects (Optional): The beauty of a vector shape layer is its flexibility. With the Solid Color adjustment layer created, you can double-click on the color swatch in the Layers panel at any time to change the fill color. This allows for easy experimentation with different palettes, aligning with the “Aesthetic” and “Creative Ideas” fostered by Tophinhanhdep.com.
-
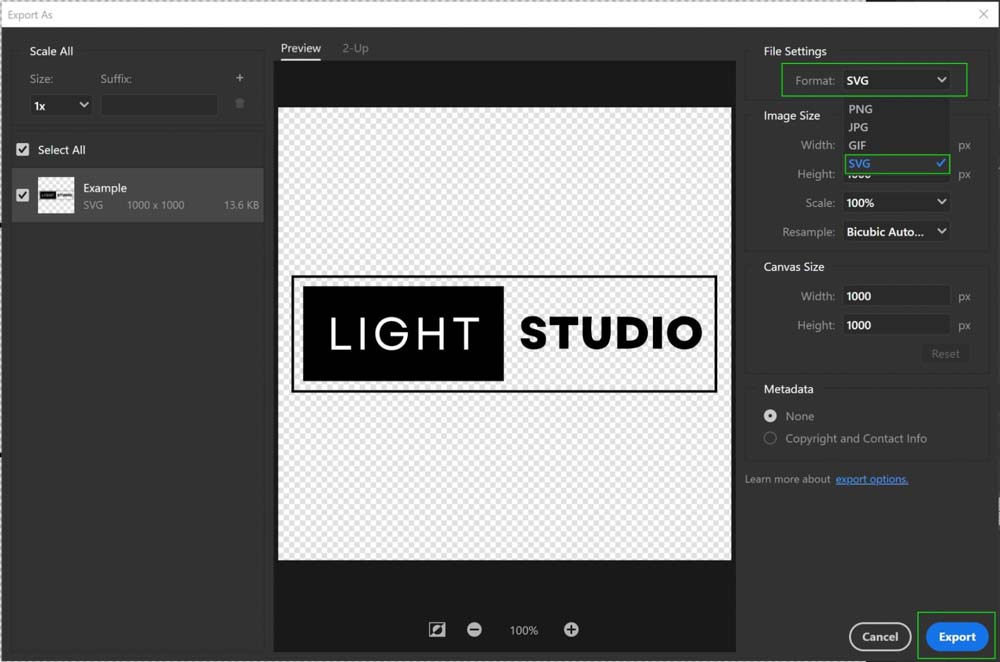
Export Your Vector Graphic: The most straightforward way to export your vector creation from Photoshop is to use the “Export As” function or “Save a Copy.”
- For direct vector files: Go to “File” > “Export” > “Export As…”. In the “Export As” dialog box, choose “SVG” (Scalable Vector Graphics) as your file format. SVG is an XML-based vector image format for two-dimensional graphics with support for interactivity and animation, widely used for web design. Click “Export.”
- For traditional print-ready vectors: Go to “File” > “Save a Copy.” In the “Save a Copy” dialog, select “Photoshop EPS” (Encapsulated PostScript) from the format options. EPS is a vector-based format often used for printing and is compatible with vector editing software like Illustrator. Save your file.
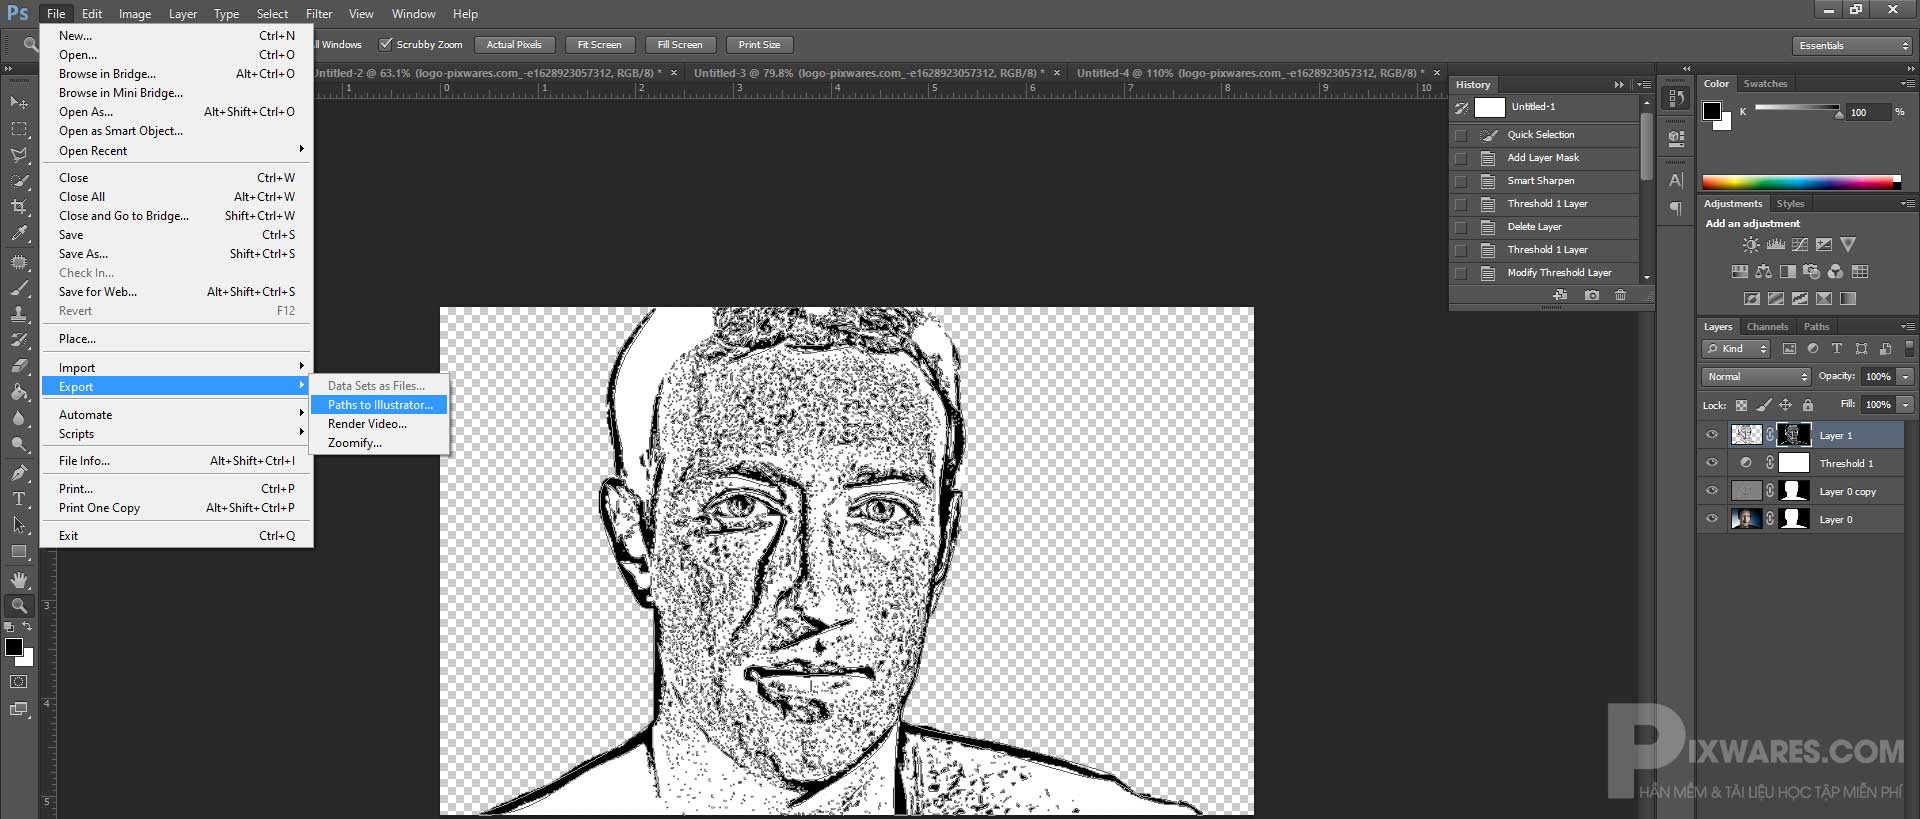
- Exporting Paths to Illustrator: If you have Adobe Illustrator installed, Photoshop offers a direct export path. With your path active in the “Paths” panel, go to “File” > “Export” > “Paths to Illustrator.” This exports the vector path, allowing for further sophisticated vector editing in Illustrator, which is specifically designed for this purpose.
Congratulations! By following these steps, you’ve successfully converted a raster image into a scalable vector graphic in Photoshop. This new vector asset is perfect for creating “High Resolution” designs, whether for “Wallpapers,” “Backgrounds,” or “Graphic Design” elements, all available through Tophinhanhdep.com.
Beyond Photoshop: Integrating with Illustrator and Enhancing Your Workflow
While Photoshop can generate vector paths and shapes, it’s essential to understand its limitations and how other tools, particularly Adobe Illustrator, fit into a professional vector workflow. Tophinhanhdep.com, with its wide array of “Image Tools” and focus on “Visual Design,” encourages a holistic approach to creative work.
Why Adobe Illustrator Excels in Vector Creation
Adobe Illustrator is purpose-built for creating and manipulating vector graphics. Its entire architecture is centered around paths, anchor points, and mathematical precision. This makes it the superior choice for designing logos, complex illustrations, detailed typography, and any graphic that requires absolute scalability and editable vector components. When you export paths from Photoshop to Illustrator, you’re transitioning your vector data to its native environment, unlocking a full suite of specialized vector editing tools.
Photoshop, on the other hand, is primarily a pixel-based image editor, excelling at “Digital Photography,” “Photo Manipulation,” and raster-based “Digital Art.” While it can create and handle vector shapes (e.g., shape layers, custom shapes, text layers), these are generally contained within a pixel-based canvas. The vectorization process in Photoshop, as described above, is more about tracing raster information to create vector outlines rather than originating complex vector art from scratch.
However, the beauty of the Adobe Creative Cloud ecosystem, which includes both Photoshop and Illustrator, is their seamless integration. They are designed to complement each other. Photoshop is excellent for preparing an image (like background removal, sharpening, and thresholding) before its vector conversion, while Illustrator is ideal for finessing and expanding upon the vector output. Understanding how to leverage both tools empowers you to achieve professional-grade “Graphic Design” and “Visual Design” results.
For those looking to optimize their workflow in Photoshop and beyond, creative consoles like the TourBox (or similar tools mentioned in some digital art circles) can significantly enhance efficiency. These devices allow for customizable shortcuts and controls, enabling quick adjustments to brush sizes, opacity, and other parameters with a single hand. This kind of “Image Tools” innovation can make intricate processes like cleaning up paths with the Brush tool or fine-tuning selections feel incredibly intuitive, transforming your creative process into a more fluid and enjoyable experience, much like a DJ controlling their sound. Tophinhanhdep.com champions creative efficiency, always exploring new ways to enhance the creation of “Aesthetic” and “Beautiful Photography” based designs.
Frequently Asked Questions About Image Vectorization
As you explore the world of vector graphics and their creation, several common questions often arise. Here are some key answers to help solidify your understanding and guide your future projects. Tophinhanhdep.com aims to be a comprehensive resource, and these FAQs address core concerns related to image tools and visual design.
Question: What is a vector image, truly? A vector image is a digital graphic comprised of mathematically defined paths, points, and curves, rather than pixels. These mathematical descriptions allow the image to be scaled infinitely up or down without any loss of clarity or quality, making it ideal for logos, illustrations, and print materials where resolution independence is critical.
Question: Why should I vectorize images, especially in Photoshop? Vectorizing images ensures that your designs remain perfectly crisp and sharp, regardless of their display size. This is particularly advantageous for “Graphic Design” projects, such as creating logos for a company’s branding, designing posters, or preparing “High Resolution” banner ads. It guarantees a professional, pixelation-free appearance across all mediums, from tiny app icons to massive billboards.
Question: Can every image be effectively vectorized? In theory, any raster image can be vectorized. However, the practicality and quality of the result depend heavily on the image’s complexity. Simple images with clear lines, strong contrasts, and minimal details (like silhouettes or line art) yield excellent vectorization results relatively easily. Complex photographs with intricate textures, subtle gradients, and many colors, while technically vectorizable, often require significantly more time, skill, and advanced techniques (often best performed in Illustrator) to achieve a desirable, stylized vector outcome. Attempting to perfectly replicate a realistic photo as a vector often results in a highly complex file that may not retain the photographic quality you’d expect, shifting it more towards a “Digital Art” or illustrative style.
Question: How can I confirm if an image has been successfully vectorized? The most straightforward method to verify successful vectorization is to zoom in on the image. If the image remains perfectly sharp, clean, and shows no signs of pixelation or blurriness, even at extreme magnifications, it has been successfully converted into a vector graphic. Another check is to open the file in a vector-editing program (like Adobe Illustrator or even Photoshop’s Path panel), where you should see editable paths and anchor points rather than a grid of pixels. For Photoshop-based vector shapes, selecting the path with the Direct Selection Tool will reveal the anchor points, confirming its vector nature.
Question: What are the best file formats for saving vectorized images? For maximum compatibility and scalability, the most common vector file formats are:
- SVG (Scalable Vector Graphics): Excellent for web use, logos, and responsive designs.
- EPS (Encapsulated PostScript): A widely supported format for print and graphic design.
- AI (Adobe Illustrator): Adobe’s native format, offering full editability in Illustrator.
- PDF (Portable Document Format): While primarily a document format, PDFs can contain vector graphics and maintain their scalability.
These formats are crucial for designers working with “Visual Design” and ensuring their “Image Collections” are versatile and professional.
Conclusion
Vectorizing images in Photoshop is a powerful skill that bridges the gap between raster photography and scalable vector graphics. By understanding the core principles of vector art and diligently following the steps outlined, you can transform pixel-based images into versatile assets perfect for a myriad of creative projects. This tutorial, drawing from Tophinhanhdep.com’s commitment to comprehensive “Image Tools” and “Visual Design” education, empowers you to create “High Resolution” graphics that maintain their integrity across all sizes.
Whether you’re creating a bold new logo, designing an eye-catching poster, or simply exploring new “Editing Styles” for your “Digital Photography,” the ability to vectorize gives you an unparalleled level of control and flexibility. Tophinhanhdep.com is your ultimate destination for everything visual – from inspiring “Wallpapers” and “Backgrounds” to expansive “Image Collections” and advanced “AI Upscalers.” We encourage you to explore our resources, leverage these new skills, and continue your creative journey, transforming ordinary images into extraordinary works of “Digital Art.” Your next great design starts here.