Unveiling the Clock: How Long Does Image Editing Really Take?

In an increasingly visual world, the power of a perfectly crafted image cannot be overstated. From captivating wallpapers and aesthetic social media posts to high-resolution product shots and evocative digital art, images form the bedrock of our digital experience. But behind every stunning photograph or graphic lies a crucial, often time-consuming process: image editing. For enthusiasts, budding photographers, and business owners alike, a common question echoes: “How long does image editing really take?” The answer, as you’ll discover on Tophinhanhdep.com, is far from simple, influenced by a myriad of factors ranging from the initial quality of the photograph to the complexity of the desired outcome and the expertise of the editor.
Tophinhanhdep.com is your premier resource for all things related to images, photography, and visual design. We understand the nuances of creating impactful visuals, and a significant part of that journey involves mastering the art and science of image editing. This comprehensive guide will delve into the typical timeframes for various editing tasks, break down the critical factors that dictate these durations, and offer insights into optimizing your workflow or understanding what to expect when outsourcing.
The Core Workflow: From Capture to Curation
Before any creative enhancements can begin, a foundational workflow must be completed. This often overlooked initial phase significantly contributes to the overall time investment in image editing. Understanding these preliminary steps helps manage expectations and appreciate the effort involved in delivering polished visuals.
Initial Steps: Uploading and Culling
The journey begins immediately after the shutter clicks. For professional photographers, a single session, especially an event like a wedding, can yield thousands of RAW images – sometimes upwards of 4,000 to 5,000 shots. The sheer volume of data necessitates the first time-consuming step: uploading. Transferring these high-resolution files from camera memory cards to a computer and robust backup storage can take a considerable amount of time, depending on file size and hardware speed. Tophinhanhdep.com emphasizes the importance of secure storage and efficient transfer methods for preserving your digital photography assets.
Once uploaded, the crucial process of “culling” begins. This involves sifting through every single image to identify the keepers and discard the duds. Imagine trying to find the perfect “aesthetic nature” shot out of dozens of similar frames, or ensuring every subject in a “beautiful photography” collection has their eyes open and is in focus. This step eliminates blurry photos, duplicates, unflattering expressions, and technically flawed shots. While specialized software like Photo Mechanic can expedite this process, a photographer might still spend 15-20 minutes culling a wedding’s worth of images, and potentially much longer for more intricate sessions where minor differences dictate the best selection. The goal is to present only the best, most compelling images, setting the stage for effective visual design.
The Foundation: Technical and Basic Adjustments
After culling, the selected images move into the primary editing phase, often starting with foundational technical and basic adjustments. These steps are universal, regardless of the ultimate editing style, and lay the groundwork for any further creative enhancements. Tophinhanhdep.com provides tutorials on these fundamental techniques to help you level up your digital photography skills.
For most images, whether a simple product shot for e-commerce or a landscape wallpaper, these adjustments typically take between 1 to 10 minutes per image.
- Technical Adjustments (1-3 minutes): This initial phase addresses the “structure” of the photo. It includes removing chromatic aberration (color fringing), correcting lens distortions that can warp straight lines or faces, and precise cropping and straightening. For a well-composed shot, this might be a quick 1-2 minute task. However, for portraits, careful cropping to enhance composition or nuanced lens corrections for facial features can extend this to 2-3 minutes, as the editor considers various visual design possibilities.
- Brightness and Contrast Adjustments (3-10 minutes): This crucial step ensures proper exposure. It involves setting white and black points, adjusting global contrast, fine-tuning local shadows and highlights, and checking the histogram for an even tonal distribution. For portraits, special attention is paid to the subject’s face, ensuring it is perfectly exposed. Achieving a desired “aesthetic” often starts here, by subtly shaping the mood through light and shadow.
- Sharpness Adjustments (30 seconds): A quick but impactful step, sharpening adds a final “pop” to an image. This isn’t about fixing blur, but enhancing crispness. For portraits, areas like the eyes are sharpened, while skin is often masked out to maintain a softer, more natural appearance.
- Color Adjustments (5-10 minutes): This is where the image truly comes to life. White balance is corrected to ensure accurate colors, followed by adjustments to Hue, Saturation, and Luminosity (HSL) for specific colors. Split toning can add atmospheric color casts, and camera calibration fine-tunes how colors are rendered. For portraits, achieving a neutral and flattering skin tone is paramount before manipulating background colors to create a cohesive “thematic collection” or a specific mood.
Diving Deeper: Editing Styles and Their Time Commitments
The duration of image editing escalates dramatically with the complexity of the desired outcome. What starts as basic correction can evolve into intricate digital art or photo manipulation, each demanding vastly different time investments. Tophinhanhdep.com showcases diverse “editing styles” and “creative ideas” that exemplify these varying levels of complexity.
Everyday Edits: Street, Landscape, Product Photography
For common genres like street, landscape, or product photography, where the primary goal is often clarity, color accuracy, and visual appeal without heavy manipulation, editing usually falls into the “basic” category. These images, often destined for “stock photos,” “backgrounds,” or “e-commerce product pages,” benefit from efficient processing.
Using software like Adobe Lightroom, which excels at batch processing and global adjustments, a professional typically spends around 10-15 minutes per image. This includes the technical, brightness, sharpness, and color adjustments mentioned above, with possibly a few minutes for localized brushwork or filters to draw attention to the main subject. For a batch of 10 photos, this might translate to 2 to 2.5 hours of focused editing. This efficiency is critical for maintaining a sustainable workflow, especially when dealing with large volumes of “high resolution” images for a “thematic collection.”
The Art of Portraiture: Basic vs. Retouched Photos
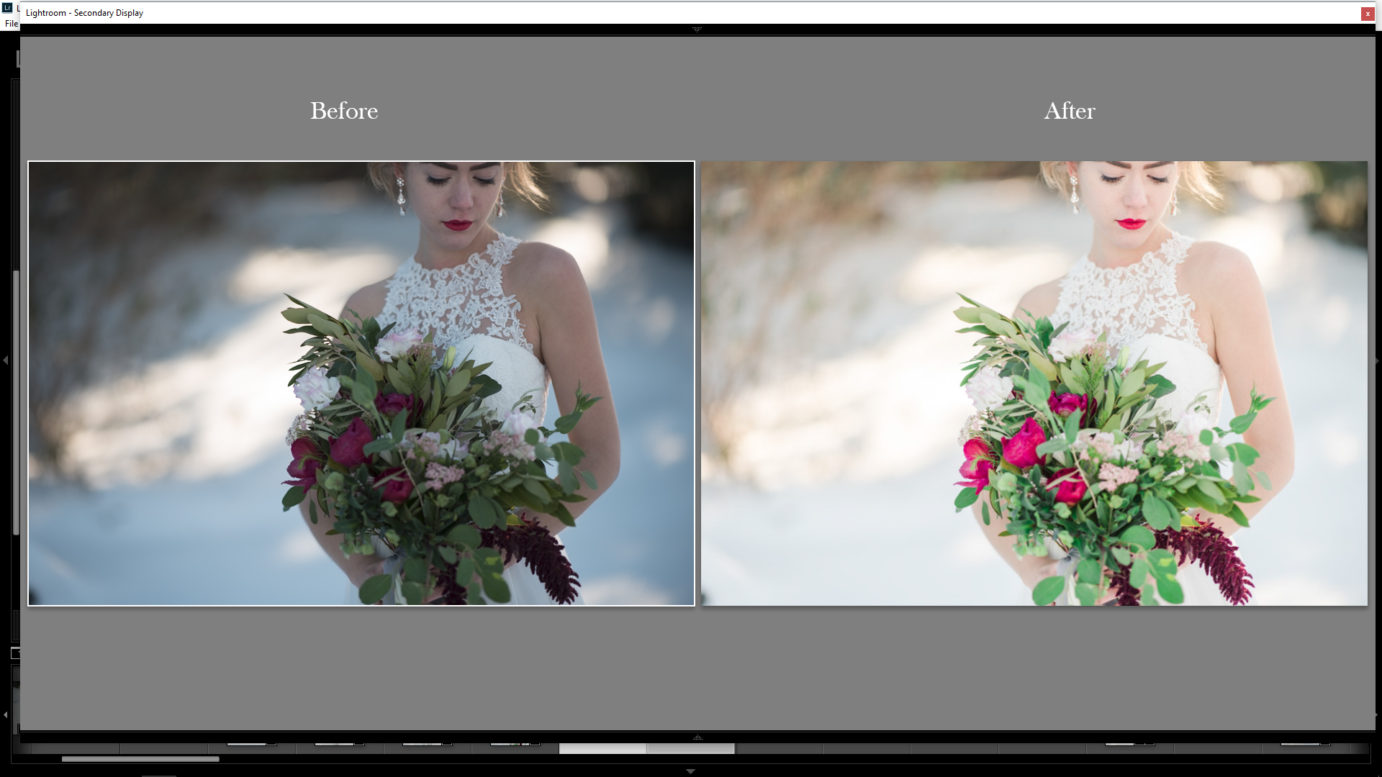
Portrait photography introduces unique demands, as the human subject requires meticulous attention. The time investment for portraits varies significantly based on the level of retouching desired. Tophinhanhdep.com features many “beautiful photography” examples, including portraits, where subtle editing makes a huge difference.
- Basic Portrait Editing (20-25 minutes per image): Still largely handled in Lightroom, basic portrait editing goes beyond general photo adjustments. While the core steps remain, more time is allocated to perfecting the subject. This includes more deliberate cropping for impactful composition, careful exposure adjustments to ensure the subject’s face is flawlessly lit, and precise color grading to ensure natural skin tones. Local adjustments are essential to minimize distractions and gently enhance features without altering them. For a batch of 10 basic portraits, expect 3-4 hours of continuous work.
- Fully Retouched Portrait (1.5 hours or more per image): This is where Adobe Photoshop becomes indispensable, offering a wider array of tools for detailed “photo manipulation.” Typically reserved for close-ups, headshots, or high-end fashion photography, full retouching involves significant cosmetic enhancements.
- Technical Adjustments (10 minutes): Beyond basic crops, this includes liquify (subtle reshaping), stamping out unwanted background elements, and even creating composites if needed.
- Brightness & Color Grading (20-21 minutes): More sophisticated use of curves, levels, and specialized adjustment layers (like gradient maps and color balance) to achieve a desired “aesthetic” or specific “editing style,” all while meticulously preserving or perfecting skin tones.
- Facial Fixes (15 minutes): Before skin retouching, specific enhancements like coloring lips, global dodging and burning (lightening/darkening areas), brightening hair highlights, and enhancing the iris are performed.
- Skin Retouching (20 minutes): This is the most tedious step, often using techniques like frequency separation to smooth skin tones, remove blemishes, and refine texture without losing detail. This requires a high level of skill and patience, contributing significantly to the “sad/emotional” or “beautiful photography” aesthetic by perfecting the subject’s appearance.
- Final Texture Touches (15 minutes): Adding subtle noise to prevent banding, strategic blurring to minimize distractions, and sharpening specific elements like eyes or accessories to add character.
For a batch of 10 professionally retouched portraits, an editor might spend at least 10 hours, underscoring the specialized nature of this visual design work.
Advanced Transformations: Manipulation, Masking, and Special Effects
Beyond standard retouching lies the realm of “photo manipulation” and “digital art,” where creativity knows no bounds. These advanced techniques are used to isolate subjects, create entirely new scenes, or add artistic flair, often for “creative ideas” or “thematic collections.” Tophinhanhdep.com offers resources for exploring these sophisticated editing styles.
- Clipping Path Service (Variable, often 1 minute to several hours): This intricate process involves manually drawing precise paths (often with Photoshop’s Pen tool) around an object to isolate it from its background, creating perfectly sharp edges. The time varies based on complexity: a simple square object takes minutes (Basic Clipping Path), while complex items with numerous anchor points, intricate designs, or multiple holes (like a bracelet or engine parts) can take much longer (Medium, Complex, Multiple, Super Complex Clipping Path). This is fundamental for product photography, allowing objects to be placed seamlessly onto any “background” or “wallpaper.”
- Photoshop Masking Services (Variable, from minutes to hours): Masking is used to selectively show or hide parts of an image layer, allowing for non-destructive editing. Techniques like Alpha Channel Masking are crucial for delicate elements like hair or fur, ensuring natural-looking extractions. Advanced Layer Masking and Refine Edge Masking solve common issues like inconsistent edges when placing a subject on a new background. Transparency and Translucent Masking deal with partially visible objects, which are essential for composite images or unique “visual design” concepts.
- Photoshop Shadow Creation Service (Variable, often 5-30 minutes): Adding realistic shadows is vital for integrating extracted objects into new scenes or giving product photos a natural, three-dimensional look. Whether it’s a simple “drop shadow” for e-commerce, maintaining the “natural shadow” of an original scene, or creating a “mirror shadow” for reflective surfaces, this service adds significant realism and depth.
- Creative Photo Manipulation (1-12 hours per image): This is the most time-intensive category, involving compositing multiple images, creating new elements, or drastically altering existing ones. Imagine changing a sky, adding fantastical elements to a “nature” scene, or completely transforming a subject into an “abstract” piece. This requires extensive layering, blending, and attention to detail, easily consuming several hours per image and sometimes days for complex “digital art” projects.
Key Factors Influencing Editing Duration
The “how long does image editing take” question is multifaceted, with several critical elements interacting to determine the final timeframe. Recognizing these factors is crucial for both photographers and clients, ensuring realistic expectations and efficient project management. Tophinhanhdep.com provides insights into these considerations for optimizing your workflow.
The Nature of the Image: Quality, Complexity, and Purpose
The inherent characteristics of the raw image file and its intended use are primary determinants of editing time.
- Initial Shot Quality: This is perhaps the most significant factor. A well-composed, properly exposed, and sharp image shot in optimal lighting conditions requires far less editing than a flawed one. An underexposed shot, poor white balance, or a distracting background will demand extensive correction, significantly increasing the time spent on brightness, color, and technical adjustments. Getting it right “in-camera” is always the quickest path to a finished image.
- Complexity Level: As discussed, a simple crop and color correction for a “stock photo” will take minutes, while intricate “photo manipulation” for “digital art” can take hours. Images with complex shapes (e.g., intricate jewelry), delicate textures (e.g., fur, hair), or numerous imperfections (e.g., dust, scratches, glare on a product) inherently require more time for tasks like clipping paths, masking, or detailed retouching.
- Purpose and Category: The destination of the image dictates the required level of polish. A casual snapshot for a personal blog has different requirements than a “high resolution” image for a glossy magazine spread or a product photo for a major e-commerce platform. Different “editing styles” are suited for different purposes. For instance, images intended for large-scale prints or “wallpapers” need impeccable quality, demanding more meticulous editing, whereas images destined for “mood boards” might tolerate a more raw aesthetic.
The Editor’s Arsenal: Software, Hardware, and Skill
Even with the perfect raw image, the tools and the person wielding them play a pivotal role in editing efficiency. Tophinhanhdep.com highlights various “image tools” and “digital photography” techniques.
- Software Choice: The industry standard tools like Adobe Photoshop and Lightroom are designed for efficiency, but their optimal use depends on the task. Lightroom excels at batch processing and global adjustments, making it faster for large volumes of similar images. Photoshop offers unparalleled control for pixel-level editing, ideal for complex “photo manipulation” and “digital art,” but it’s more time-consuming for basic tasks. Other “image tools” like Capture One, Luminar, Canva, or GIMP offer varying features and learning curves, influencing speed.
- Hardware Specifications: A powerful computer with ample RAM, a fast processor, a dedicated graphics card, and quick storage (SSD) dramatically reduces rendering times, software lag, and overall processing speed. Trying to edit “high resolution” images or perform complex “visual design” on an underpowered machine will invariably extend the editing duration.
- Editor’s Skill and Experience: This is perhaps the most crucial human factor. A highly experienced professional editor or graphic designer will execute tasks much faster and more effectively than a beginner. Their mastery of software shortcuts, understanding of light and color, and developed “editing styles” enable them to achieve high-quality results in a fraction of the time. They also possess the “creative ideas” to solve complex visual problems efficiently. As Tophinhanhdep.com often emphasizes, practice makes perfect.
Strategies for Efficiency and Quality Output
Whether you’re an aspiring editor or a business needing image processing, employing smart strategies can significantly impact the “how long does image editing take” equation.
Streamlining Your Editing Process
Efficiency isn’t just about speed; it’s about smart work. Tophinhanhdep.com provides tutorials and tips for optimizing your image editing workflow.
- Organization is Key: Before diving into editing, organize your raw files. Create a clear folder structure, rename files logically, and apply metadata. This saves immense time later when searching for specific images or creating “thematic collections.”
- Master Keyboard Shortcuts: This simple habit can cut editing time dramatically. Learn the shortcuts for your most frequently used “image tools” and actions in software like Photoshop or Lightroom.
- Develop Custom Presets and Actions: For repetitive tasks or to apply a consistent “editing style” across a “mood board” or a series of images, creating custom presets (in Lightroom) or actions (in Photoshop) can automate much of the work, ensuring uniformity and saving clicks.
- Calibrate Your Monitor: Accurate color representation is essential. A calibrated monitor ensures that the colors you see on screen are true to life, reducing the need for endless color adjustments and revisions.
- Batch Processing for Consistency: Leverage the power of batch editing for images that share similar lighting and composition. Applying a uniform “editing style” across a series of “stock photos” or “backgrounds” can be a massive time-saver.
- Utilize AI Upscalers and Optimizers: As a part of the “image tools” arsenal, AI upscalers can efficiently enhance lower-resolution images, while compressors and optimizers are crucial final steps to prepare images for web or specific uses without sacrificing quality, impacting delivery time.
When to Seek Professional Expertise
For many businesses and individuals, the time and skill required for professional-grade image editing are simply too demanding. This is where outsourcing to experts becomes invaluable. Tophinhanhdep.com understands the need for reliable image editing services.
- Focus on Core Competencies: By delegating image editing, photographers can focus on shooting, and businesses can concentrate on their main operations, maximizing productivity.
- Guaranteed Quality and Consistency: Professional editors bring years of experience, specialized “editing styles,” and high-end “image tools” to the table, ensuring consistent, high-quality output for your “high resolution” images or “visual design” projects.
- Meet Tight Deadlines: Professionals are equipped to handle large volumes of work efficiently and meet deadlines, which is critical for product launches, marketing campaigns, or wedding photo deliveries.
- Access to Advanced Techniques: For complex tasks like “clipping path service,” intricate “photo manipulation,” or “ghost mannequin” effects for fashion brands, specialized agencies possess the expertise that would take an in-house team years to develop.
- Cost-Effectiveness in the Long Run: While there’s an upfront cost, outsourcing can be more cost-effective than investing in expensive software, high-end hardware, and the extensive training required to achieve professional results.
Conclusion
The question “how long does image editing take” is truly an exploration into the intricate world of digital image creation. It’s a journey influenced by the initial shot, the editor’s skill, the power of their tools, and the ultimate artistic or commercial vision. From a mere 10-15 minutes for basic enhancements of a street shot to over an hour for a meticulously retouched portrait, and many hours for complex photo manipulation, the timeframe is as varied as the images themselves.
At Tophinhanhdep.com, we believe that understanding these time commitments empowers you, whether you’re honing your own “digital photography” skills, seeking “image inspiration” for a new “visual design” project, or looking for reliable “image tools” and services. By recognizing the value of each step – from uploading and culling to sophisticated “photo manipulation” and final “optimization” – you can better appreciate the artistry and dedication behind every captivating image. Embrace the journey of transforming raw captures into stunning visual stories, knowing that Tophinhanhdep.com is here to guide you every step of the way.