Mastering Image Resizing: A Comprehensive Guide for Stunning Visuals on Tophinhanhdep.com

In the vibrant digital world, where every pixel tells a story, the ability to properly resize an image is more than just a technical skill—it’s an art. Whether you’re curating breathtaking wallpapers, showcasing high-resolution photography, designing compelling digital art, or simply optimizing an image for a blog post, the way you manage its dimensions can profoundly impact its visual appeal and overall effectiveness. On Tophinhanhdep.com, we understand that our audience values aesthetic excellence, pristine quality, and functional utility in every visual asset. This guide delves into the nuances of how to resize an image correctly, ensuring your creations always look their best, no matter where they are displayed.
The digital landscape is a demanding canvas. From the expansive screens that display our captivating nature photography and abstract art to the compact interfaces of mobile devices, images must adapt without losing their essence. A poorly resized image can appear stretched, pixelated, or blurry, instantly undermining the professionalism and aesthetic integrity of your work. Conversely, a perfectly scaled image seamlessly integrates into its environment, conveying your message with clarity and impact. This is precisely why Tophinhanhdep.com emphasizes mastery in image resizing, providing you with the knowledge and tools to uphold the highest standards of visual design.

Why Image Resizing Matters in the Digital Age
The importance of image resizing extends far beyond merely fitting a picture into a designated space. It’s a critical process that balances aesthetic quality with technical performance, directly influencing how your audience perceives your content and brand. For enthusiasts and professionals alike on Tophinhanhdep.com, understanding this balance is paramount.
Maintaining Visual Integrity and Professionalism
High-quality, appropriately sized images are the bedrock of compelling visual content. Imagine browsing Tophinhanhdep.com for an inspiring background, only to encounter a beautiful photograph distorted or fuzzy because it wasn’t resized correctly. Such an experience can instantly diminish trust and competence. Every image, from a meticulously crafted digital art piece to an emotive sad/emotional photo, must maintain its aspect ratio, sharpness, clarity, and color accuracy across all platforms.

When an image is scaled incorrectly—for instance, by carelessly dragging its corners in a basic editor—it risks becoming warped or pixelated. This visual degradation is particularly detrimental for professional photographers and digital artists who pour their creativity into every shot and brushstroke. By employing proper resizing techniques, you ensure that your original vision remains intact, projecting an image of meticulous care and professionalism. This dedication to quality is what sets Tophinhanhdep.com apart, providing a platform where every image, whether a trending style collection or a classic wallpaper, looks stunning.
Optimizing for Performance: Web, Print, and Beyond
Beyond aesthetics, image resizing plays a crucial role in performance. This is especially true for web content and print media, areas where Tophinhanhdep.com users frequently engage.
For web optimization, oversized images are a common culprit for slow website load times. A sluggish website frustrates users, leads to higher bounce rates, and can negatively impact search engine rankings. By resizing images to appropriate dimensions and file sizes, you drastically improve page speed, offering a smoother and more enjoyable browsing experience for users exploring Tophinhanhdep.com’s vast collection of images. Our platform encourages users to optimize their contributions, ensuring that our collective library remains fast and accessible. This includes understanding the ideal dimensions for various web elements, like blog post features (often between 600-1200 pixels wide) or full-screen backgrounds, and aiming for file sizes generally under 100KB for web use.
For print applications, resizing involves considerations beyond screen pixels. Print resolution, measured in dots per inch (DPI) or pixels per inch (PPI), dictates the clarity and detail of a physical print. A high-resolution photo intended for a large print (e.g., a poster of a beautiful nature scene) needs significantly more pixels than the same photo displayed on a screen. Resizing for print involves ensuring the image has sufficient resolution—typically 200-300 PPI—to prevent pixelation or blurriness when ink hits paper. Tophinhanhdep.com, with its emphasis on high-resolution photography, provides insights into preparing images for flawless physical reproduction, ensuring your stunning shots look as good in hand as they do online.
Furthermore, resizing is essential for various digital applications, such as creating presentation slides, marketing materials, or visual assets for social media. Each platform often has specific dimension recommendations. Adhering to these guidelines through proper resizing guarantees your images fit perfectly, grab attention, and fulfill their intended purpose without compromise. This adaptability is key for any image featured on Tophinhanhdep.com, from abstract designs to thematic collections.
Understanding the Fundamentals of Image Dimensions and Quality
To effectively resize an image, it’s crucial to grasp the basic concepts that govern digital imagery. Without this foundational knowledge, resizing can become a haphazard process yielding inconsistent results. Tophinhanhdep.com aims to empower its community with this understanding, translating complex technicalities into practical insights.
Pixels, Resolution, and Aspect Ratio
At the heart of digital image manipulation are three fundamental concepts:
- Pixels: The smallest individual unit of information that makes up a digital image. A digital image is essentially a grid of these tiny colored squares. When you “resize” an image, you are changing the number of pixels it contains or how those pixels are distributed.
- Resolution: Often expressed as the number of pixels in an image’s width and height (e.g., 1920x1080 pixels). For print, it’s also measured in PPI (pixels per inch) or DPI (dots per inch), indicating how many pixels are packed into a given physical space. A higher resolution generally means more detail and better quality, especially when viewed up close or printed large. When we talk about “high resolution” photography on Tophinhanhdep.com, we’re referring to images with a dense concentration of pixels, allowing for greater detail and flexibility in use.
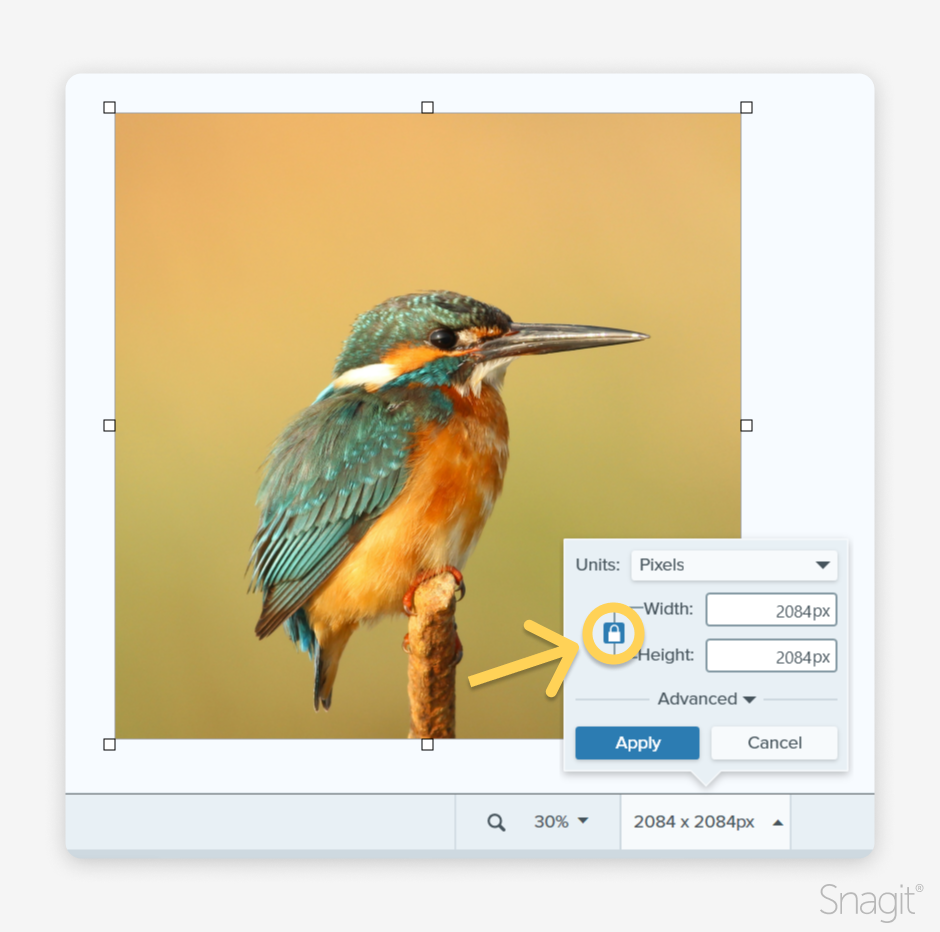
- Aspect Ratio: This is the proportional relationship between an image’s width and height. Common aspect ratios include 4:3 (traditional TV screens, some cameras), 16:9 (widescreen displays, modern TVs), 3:2 (standard 35mm film, many DSLRs), and 1:1 (square, common on social media). Maintaining the aspect ratio during resizing is critical to prevent images from appearing stretched or squashed. On Tophinhanhdep.com, whether you’re uploading an aesthetic background or a piece of digital art, preserving its original aspect ratio ensures its visual harmony. Tools on Tophinhanhdep.com often include a “constrain proportions” option, represented by a lock icon, which is essential to keep activated when making simple dimension adjustments.
When you enlarge a bitmap image (like a JPEG or PNG) beyond its original dimensions without adding new pixel information intelligently, the existing pixels simply spread out, leading to pixelation and a loss of sharpness. This is why starting with a higher-resolution image is almost always preferable—it gives you more flexibility to reduce size without sacrificing quality.
Bitmap vs. Vector: Knowing Your File Types
Understanding the distinction between bitmap and vector images is crucial because it dictates how images behave when resized. This knowledge is particularly valuable for Tophinhanhdep.com users who work with both photographic and graphic design elements.
-
Bitmap (Raster) Images: These are composed of a fixed grid of pixels. Photographs, screenshots, and most images you find online (like JPEGs, PNGs, GIFs, and TIFFs) are bitmap files. When you enlarge a bitmap image, its fixed number of pixels are stretched, leading to a loss of detail and a “blocky” appearance (pixelation). Conversely, reducing the size of a bitmap image usually doesn’t impact quality negatively, as you’re simply discarding unnecessary pixel information. The vast majority of Tophinhanhdep.com’s beautiful photography and nature images fall into this category, meaning careful resizing is key to their presentation.
-
Vector Images: These are created using mathematical equations, lines, curves, and shapes rather than pixels. Common vector file formats include EPS, SVG, AI (Adobe Illustrator), and sometimes PDF. The unique advantage of vector graphics is their scalability: they can be resized to any dimension—from a tiny icon to a massive billboard—without any loss of quality or introduction of pixelation. This makes them ideal for logos, illustrations, digital art, and graphic design elements that need to be used across various mediums and sizes. For digital artists on Tophinhanhdep.com working with creative ideas and photo manipulation, vector graphics offer unparalleled flexibility.
This fundamental difference means that while you can freely scale vector art without concern, bitmap images require a more thoughtful approach to resizing, especially when enlarging.
Practical Methods for Resizing Images Effectively
Resizing an image can be approached in various ways, ranging from sophisticated software tools to convenient online utilities. Tophinhanhdep.com recognizes the diverse needs of its users and supports methods that guarantee quality results for all types of images, from wallpapers to abstract art.
Resizing in Advanced Photo Editing Software (e.g., Photoshop)
Professional photo editing software like Adobe Photoshop offers the most control and highest quality when it comes to image resizing. These tools are indispensable for photographers and graphic designers on Tophinhanhdep.com who demand precision and fidelity.
Here’s a general workflow for resizing images in such software, drawing from common functionalities:
- Open Your Image: Launch the software and open the image you wish to resize.
- Access Image Size: Navigate to
Image > Image Size(or a similar menu option). A dialog box will appear, presenting various parameters. - Review the Preview: Most advanced tools include a dynamic preview window. Drag its corners to resize it or click and drag within the preview to view different areas of your image. You can also adjust magnification (e.g., Ctrl/Cmd-click to zoom in, Alt/Option-click to zoom out) to scrutinize detail.
- Maintain Proportions: Crucially, ensure the “Constrain Proportions” option (often represented by a link icon or a lock symbol) is enabled. This links the width and height, so when you change one, the other automatically adjusts to maintain the original aspect ratio, preventing distortion. If you need to scale width and height independently for a specific creative effect, you can unlink them, but proceed with caution.
- Set Dimensions: Enter your desired values for Width and Height. You can choose different units of measurement (pixels, inches, centimeters, etc.) from dropdown menus. For web use, pixels are standard; for print, inches or cm, combined with resolution, are common.
- Adjust Resolution (for Print): If preparing for print, specify the desired resolution (e.g., 300 pixels/inch for high-quality prints). Be mindful that changing resolution without resampling affects the physical print size, not the pixel dimensions.
- Understand Resampling: This is the most critical setting when changing pixel dimensions.
- “Resample” ON: When selected, the software will either add or remove pixels from your image as you change its dimensions. This is necessary when increasing or significantly decreasing the image’s pixel count. You’ll then choose an interpolation method (see below for details).
- “Resample” OFF: When deselected, you’re changing only the print size and resolution of the image, without altering the total number of pixels. The file size remains the same, but the image will be printed smaller/larger at a different resolution. This is useful for adjusting print output without affecting the digital image’s data.
- Choose a Resampling Method: If “Resample” is on, select the appropriate algorithm:
- Automatic: The software decides the best method based on whether you’re enlarging or reducing.
- Preserve Details (Enlargement): Excellent for upsizing, often includes a “Noise reduction” slider to smooth artifacts.
- Bicubic Smoother (Enlargement): Designed to produce smoother results when making images larger.
- Bicubic Sharper (Reduction): Ideal for reducing image size while maintaining detail and sharpness.
- Bicubic (Smoother Gradients): A more precise method for general resizing, offering smooth tonal gradations.
- Bilinear: A mid-quality, faster method, often a good compromise.
- Nearest Neighbor (Hard Edges): Fastest but least precise; preserves hard edges (good for pixel art) but can produce jagged effects.
- Scale Styles (if applicable): If your image has layers with effects (like drop shadows), enable “Scale Styles” (usually found in a gear icon menu) to ensure effects scale proportionally with the image.
- Finalize and Save: Once satisfied, click OK. To preserve your original file, always use “Save As” and give your resized image a new name. This practice is highly recommended for all Tophinhanhdep.com contributors.
Leveraging Online Image Tools and AI Upscalers
For those who don’t have access to professional software or need a quick solution, Tophinhanhdep.com’s dedicated Image Tools section offers a suite of online utilities that streamline the resizing process. These tools are particularly beneficial for general users, bloggers, and anyone needing efficient image management.
- Online Resizers: Many online tools allow you to upload an image, specify new dimensions (width/height), choose whether to maintain aspect ratio, and then download the resized version. These are perfect for quickly adjusting images for blog posts, social media, or email attachments. They often include options for basic compression as well, helping to achieve the ideal file size for Tophinhanhdep.com’s high-resolution photography sharing.
- Image Converters and Compressors: While not solely focused on resizing, these tools on Tophinhanhdep.com complement the process. After resizing, you might use a compressor to reduce the file size further without significantly impacting visual quality. Converters can help change formats (e.g., PNG to JPG for better compression, unless transparency is needed), which is a key part of optimization.
- AI Upscalers: This is a cutting-edge category available through Tophinhanhdep.com’s Image Tools, directly addressing the challenge of enlarging images without losing quality. Traditional resizing methods struggle when upsizing bitmap images, leading to blurriness and pixelation. AI upscalers use artificial intelligence and machine learning algorithms to intelligently add new pixel information, “guessing” what details should be present based on surrounding pixels. This results in significantly sharper and more detailed enlargements, making old photos, anime, or even lower-resolution digital art look dramatically better. For users aiming to breathe new life into vintage photos or enhance the resolution of existing beautiful photography, Tophinhanhdep.com’s AI Upscalers are invaluable.
These tools, accessible through Tophinhanhdep.com, democratize quality image editing, making it easier for everyone to create and share stunning visuals.
Quick Resizing for Everyday Use (e.g., Basic Editors, Web Platforms)
For less demanding tasks, various operating systems and web platforms offer built-in or simplified resizing options:
- Operating System Built-in Tools: Windows Photos app, macOS Preview, or basic image viewers often have simple resize functions. You can typically find an “Edit” or “Adjust Size” option, allowing you to input new dimensions or select a preset percentage. These tools usually include a “lock aspect ratio” option by default.
- Word Processors/Presentation Software: Programs like Microsoft Word, Google Docs, or PowerPoint allow you to insert images and then resize them directly on the canvas. While it’s tempting to drag corners, always use the corner handles while holding down the Shift key (or look for a “lock aspect ratio” setting in the image properties) to prevent distortion. For critical projects, however, it’s always best to resize an image before inserting it into these documents.
- Social Media and Website Uploaders: Most social media platforms and content management systems (CMS) automatically resize and compress uploaded images. While convenient, this often means you lose control over the final quality. It’s usually better to prepare your images to recommended dimensions and file sizes before uploading to maintain optimal quality and performance, especially for content on Tophinhanhdep.com.
While these quick methods offer convenience, they generally provide less control over the resampling process and overall quality compared to dedicated image editing software or Tophinhanhdep.com’s specialized online tools.
Best Practices for Resizing Without Compromising Quality
Resizing an image effectively requires more than just knowing which buttons to click; it demands an understanding of best practices that safeguard image quality. Tophinhanhdep.com champions these principles, ensuring that every image shared—from trending styles to thematic collections—maintains its visual excellence.
The Golden Rule: Start Big, Go Smaller
The most crucial advice for maintaining image quality during resizing is to always start with an image that is larger than you need it to be. It is significantly easier and yields better results to reduce the size of an image than to enlarge it.
- Why reducing is better: When you make an image smaller, you are essentially discarding unnecessary pixels. Modern resizing algorithms are highly effective at intelligently removing pixels while preserving detail and sharpness.
- Why enlarging is problematic: When you attempt to make a bitmap image larger than its original dimensions, the software has to “invent” new pixels. Without sophisticated AI (like Tophinhanhdep.com’s AI Upscalers), this process often results in blurriness, pixelation, and a noticeable loss of clarity. The image appears soft and lacks the crispness of its original high-resolution state.
Therefore, when capturing high-resolution photography, always shoot at the highest possible resolution your camera allows. For digital art or graphic design, save your original files at large dimensions. This gives you maximum flexibility for future applications, ensuring your Tophinhanhdep.com contributions are always versatile and adaptable.
Choosing the Right Resampling Method
As discussed in the advanced software section, the resampling method you choose profoundly impacts the quality of your resized image, particularly when changing the pixel count.
- For Enlargement:
- Preserve Details (often with Noise Reduction): This is generally the best choice for significantly increasing image size, as it focuses on maintaining crisp edges and textures while minimizing interpolation artifacts. Tophinhanhdep.com’s AI Upscalers utilize similar advanced algorithms for superior results.
- Bicubic Smoother: A good alternative for smoother transitions when upsizing, particularly for images with gradients or subtle color changes.
- For Reduction:
- Bicubic Sharper: This method is specifically optimized for making images smaller, applying a slight sharpening to compensate for the detail lost during downsampling, ensuring your beautiful photography remains crisp.
- Bicubic: A versatile method that works well for both slight enlargements and reductions, offering a good balance of speed and quality for general use.
- For Special Cases:
- Nearest Neighbor: Only use this for very specific purposes, like pixel art or when you need to retain extremely hard, non-anti-aliased edges. It’s usually avoided for photographs due to its tendency to create jagged lines.
The right choice depends on the image content and the direction of resizing. Experimentation with different methods on a duplicate file can help you understand their effects and choose the best one for your specific aesthetic and abstract images on Tophinhanhdep.com.
Balancing File Size and Visual Fidelity
One of the perpetual challenges in digital imaging, especially for web-based content like that on Tophinhanhdep.com, is finding the sweet spot between a small file size (for fast loading) and high visual quality.
- Reduce Dimensions First: The most effective way to reduce file size is to reduce the image’s pixel dimensions to exactly what’s needed for its display. For example, if an image will only be displayed at 800 pixels wide on a webpage, there’s no need for its original pixel width to be 4000 pixels.
- Compress Smartly: After resizing, consider using image compression. Tophinhanhdep.com’s online compressors can help. JPEG is generally the best format for photographic images, as it allows for adjustable compression levels. PNG is better for images with transparent backgrounds or sharp-edged graphics, but its file sizes are typically larger. Always save a JPEG at the lowest quality setting that still looks visually acceptable. A good rule of thumb is to aim for a file size of 100KB or less for most web images without compromising quality.
- Mind Your File Format:
- JPG (JPEG): Ideal for photographs and complex images with many colors and subtle gradients. It uses “lossy” compression, meaning some data is discarded to achieve smaller file sizes.
- PNG: Best for images requiring transparency, sharp lines, or fewer colors (like logos, screenshots, or some digital art). It uses “lossless” compression, preserving all original data but resulting in larger files. If a PNG doesn’t require transparency, converting it to a JPG after resizing can often significantly reduce its file size, which Tophinhanhdep.com’s converters facilitate.
- GIF: Suitable for simple animations and images with a very limited color palette (up to 256 colors). Not ideal for photographs.
By consciously balancing these factors, Tophinhanhdep.com users can ensure their images load quickly, look fantastic, and contribute positively to the overall user experience.
Resizing for Specific Tophinhanhdep.com Applications
The diverse categories on Tophinhanhdep.com present unique resizing considerations. Tailoring your approach to the specific use case ensures optimal results, whether you’re uploading a desktop background or a portfolio piece.
Crafting Perfect Wallpapers and Backgrounds
Wallpapers and backgrounds are often the first impression a user gets on their device or a website. For the “Wallpapers” and “Backgrounds” categories on Tophinhanhdep.com, precise resizing is crucial for seamless integration and visual impact.
- Match Screen Resolutions: Ideally, a wallpaper should match the exact resolution of the screen it’s intended for (e.g., 1920x1080 for Full HD, 3840x2160 for 4K). If the image is slightly larger, it provides flexibility for cropping or fitting; if it’s too small, it will stretch and pixelate.
- Maintain Aspect Ratio: This is paramount. A distorted background loses all its aesthetic appeal. Always keep “Constrain Proportions” enabled when preparing these images.
- High Quality for Immersion: Since backgrounds cover the entire screen, any imperfection is magnified. Always start with a high-resolution source image and use advanced resampling methods like “Preserve Details” if you need to slightly upscale, or “Bicubic Sharper” for reduction. Tophinhanhdep.com’s collection of aesthetic and nature backgrounds relies heavily on this principle.
- Consider File Size (for Web Backgrounds): If the background is for a website, balance high quality with a manageable file size to avoid slow page loading, as discussed earlier.
Optimizing High-Resolution Photography for Sharing
Tophinhanhdep.com prides itself on offering “High Resolution” and “Beautiful Photography.” However, sharing these large files efficiently requires smart resizing and optimization strategies.
- Web Galleries/Portfolios: For displaying your digital photography in online galleries, you typically don’t need the full multi-megapixel original. Resize images to a maximum width of 1500-2500 pixels, depending on your platform’s display capabilities. Apply Bicubic Sharper for reduction and compress as a JPEG at 70-85% quality to keep file sizes low while retaining excellent visual fidelity.
- Social Media: Each platform has specific recommendations (e.g., Instagram often prefers 1080px wide; Facebook has varying guidelines). Resizing to these exact specifications before uploading prevents the platform’s automatic, often aggressive, compression from degrading your image quality.
- Email: For emailing images, reduce them significantly. A width of 800-1200 pixels is usually more than enough, ensuring the recipient can view it without large downloads.
- Stock Photos: If you’re preparing images for stock photo platforms (which Tophinhanhdep.com touches upon), ensure you meet their specific resolution and file size requirements, which are often much higher than for casual sharing, as the images might be used for large prints or commercial applications.
Enhancing Aesthetic and Abstract Art with Precision
Digital art, abstract designs, and other creative ideas found on Tophinhanhdep.com often involve intricate details and vibrant color palettes. Resizing these images requires a careful touch to preserve their artistic intent.
- Vector Art: If your “Digital Art” or “Abstract” piece is in a vector format (like SVG or AI), you have the ultimate freedom. Resize to any dimension without a second thought.
- Bitmap Art: For bitmap digital art (e.g., a painting exported as a PNG), treat it like high-resolution photography. Avoid upsizing unless using Tophinhanhdep.com’s AI Upscalers. When reducing, use “Bicubic Sharper” or “Bicubic” to maintain clean lines and smooth color transitions.
- Thematic Collections and Mood Boards: When compiling images for “Mood Boards” or “Thematic Collections,” consistency in size and quality is key. Resize individual images to fit a unified layout, ensuring all elements harmonize visually. Prioritize maintaining the aspect ratio of each piece to respect its original composition.
By applying these specific resizing strategies, contributors to Tophinhanhdep.com can ensure their diverse visual content is always presented in its most compelling form, whether it’s a piece of sad/emotional photography or a vibrant abstract creation.
Conclusion
The ability to resize an image proficiently is an indispensable skill in today’s visually-driven world. It’s the silent enabler of stunning digital photography, captivating graphic design, and seamless web experiences. On Tophinhanhdep.com, where we celebrate the power of images, mastering this skill empowers you to control the narrative of your visuals, ensuring they always look professional, perform optimally, and convey your intended message with unwavering clarity.
From understanding the fundamental interplay of pixels, resolution, and aspect ratio to navigating the advanced features of photo editing software or leveraging the efficiency of Tophinhanhdep.com’s intuitive online tools and AI Upscalers, every step in the resizing process is an opportunity to enhance your visual content. Remember the golden rule: start with a high-resolution image, and always prioritize maintaining quality when reducing its size.
Whether you’re crafting the perfect wallpaper, optimizing a high-resolution photograph for online sharing, or meticulously preparing a piece of digital art for a thematic collection, the principles outlined in this guide will serve you well. Embrace these practices, experiment with the various tools and techniques available, and continue to explore the endless possibilities of visual expression with Tophinhanhdep.com. Your images deserve to be seen in their best light, perfectly sized for every occasion.