Mastering Image Resizing in Photoshop: A Comprehensive Guide for Visual Excellence on Tophinhanhdep.com

In the dynamic world of digital imagery, the ability to precisely control the dimensions and quality of your visual content is paramount. Whether you’re a professional photographer, a graphic designer, a digital artist, or simply someone who loves curating beautiful images for wallpapers and backgrounds, knowing how to resize images in Adobe Photoshop is an indispensable skill. At Tophinhanhdep.com, we understand that every pixel counts when it comes to showcasing high-resolution photography, crafting aesthetic designs, or preparing images for various platforms. This guide will walk you through the essential techniques for resizing images and layers in Photoshop, ensuring your visuals always look their best, without distortion or compromise.

Photoshop stands as the industry standard for image manipulation, offering robust tools for every aspect of visual design. Resizing, while seemingly simple, involves nuances that can dramatically impact the final output, from optimizing images for the web to preparing them for professional printing. This article will delve into both document-wide resizing and individual layer transformations, providing you with the knowledge to maintain artistic integrity and technical quality, aligning perfectly with the diverse image collections and visual tools offered on Tophinhanhdep.com.
Understanding the Basics: Resizing Your Entire Image or Document
Resizing an entire image or document in Photoshop is often the first step in preparing your visual content for a specific purpose. This could be to reduce a high-resolution photograph for a web background, to standardize dimensions for a thematic collection, or to prepare a digital art piece for print. Photoshop’s “Image Size” dialog box is your primary control center for these adjustments.
To begin, ensure you have Photoshop open, which is widely available in many creative studios and accessible through various educational institutions and personal licenses. Once you’re ready, let’s dive into the process:
- Open Your Image: Launch Adobe Photoshop and open the image you wish to resize. Go to
File > Open, select your desired image file, and clickOpen. - Access Image Size: Navigate to the top menu bar, click on
Image, and then selectImage Size. Alternatively, you can use the shortcutAlt + Ctrl + I(Windows) orOption + Cmd + I(Mac) to quickly bring up the dialog box.
The Image Size Dialog Box: Your Control Center
The Image Size dialog box is where you’ll make all your crucial decisions regarding the overall dimensions and resolution of your image. Here’s a breakdown of its key components and how to use them effectively:
- Pixel Dimensions: This section shows the current width and height of your image in pixels. As you adjust the dimensions, you’ll also see the updated file size, which is critical for web optimization, where smaller file sizes lead to faster loading times for wallpapers and backgrounds on platforms like Tophinhanhdep.com.
- Document Size: This section displays the physical dimensions of your image for print. You can choose your unit of measurement here, such as inches, centimeters, or millimeters.
- Unit of Measurement: For web images (like those in our aesthetic or nature collections), pixels are usually preferred. For print (e.g., beautiful photography intended for display), inches or centimeters are more appropriate.
- Resolution: This is perhaps the most critical setting, especially when moving between digital display and print. Resolution is measured in pixels per inch (ppi) or dots per inch (dpi).
- For web and screen display, a resolution of 72 pixels/inch is generally sufficient. Most monitors display at this density, so higher resolutions often add unnecessary file size without visual benefit.
- For high-quality printing, a resolution of 200 to 300 pixels/inch is ideal. Printing at lower resolutions can result in pixelated or blurry images. If your abstract or sad/emotional photography is destined for print, always aim for 300 ppi.
- Constrain Proportions (Chain Link Icon): This is a fundamental setting. When the chain link icon between the Width and Height fields is active (it looks like a linked chain), Photoshop will automatically adjust the other dimension proportionally as you change one. This prevents your image from appearing stretched or squashed, preserving its original aspect ratio. For example, if you have a square image (1000x1000 pixels) and you change the width to 500 pixels, the height will automatically update to 500 pixels. Always keep this checked unless you have a specific creative reason to intentionally distort the image, which is rare for general resizing.
- Inputting Desired Dimensions: Simply type in your desired
WidthorHeightinto the respective fields. IfConstrain Proportionsis active, the other value will automatically adjust.
Maintaining Quality: Resampling Options
When you resize an image, especially when changing its pixel dimensions, Photoshop has to either create new pixels (when enlarging) or discard existing pixels (when shrinking). This process is called “resampling,” and the chosen method can significantly impact the final image quality. You’ll find the “Resample” checkbox, usually accompanied by a dropdown menu, in the Image Size dialog box.
- Bicubic Automatic: Photoshop chooses the best resampling method based on whether you are enlarging or shrinking. This is a safe default if you’re unsure.
- Bicubic Smoother (for Enlargement): This method is designed to produce smoother results when you’re increasing the size of an image, preventing jagged edges. While it can’t magically add detail that wasn’t there, it does a good job of interpolating new pixel data. Keep in mind that quality loss will always happen if you resize an image to be larger than its original size; however, this option minimizes the perceived degradation.
- Bicubic Sharper (for Reduction): When shrinking an image, this method helps maintain crisp details by sharpening the edges slightly as pixels are removed. It’s excellent for ensuring your reduced images, perhaps for social media banners or smaller abstract image elements, retain their clarity.
- Nearest Neighbor/Bilinear: These are older, faster methods that are less ideal for photographic content as they can produce blockier or softer results. They are sometimes used for very specific pixel-art effects.
For most cases, Bicubic Automatic or manually selecting Bicubic Smoother (for enlarging) or Bicubic Sharper (for shrinking) will yield the best results for your high-resolution photography and detailed digital art.
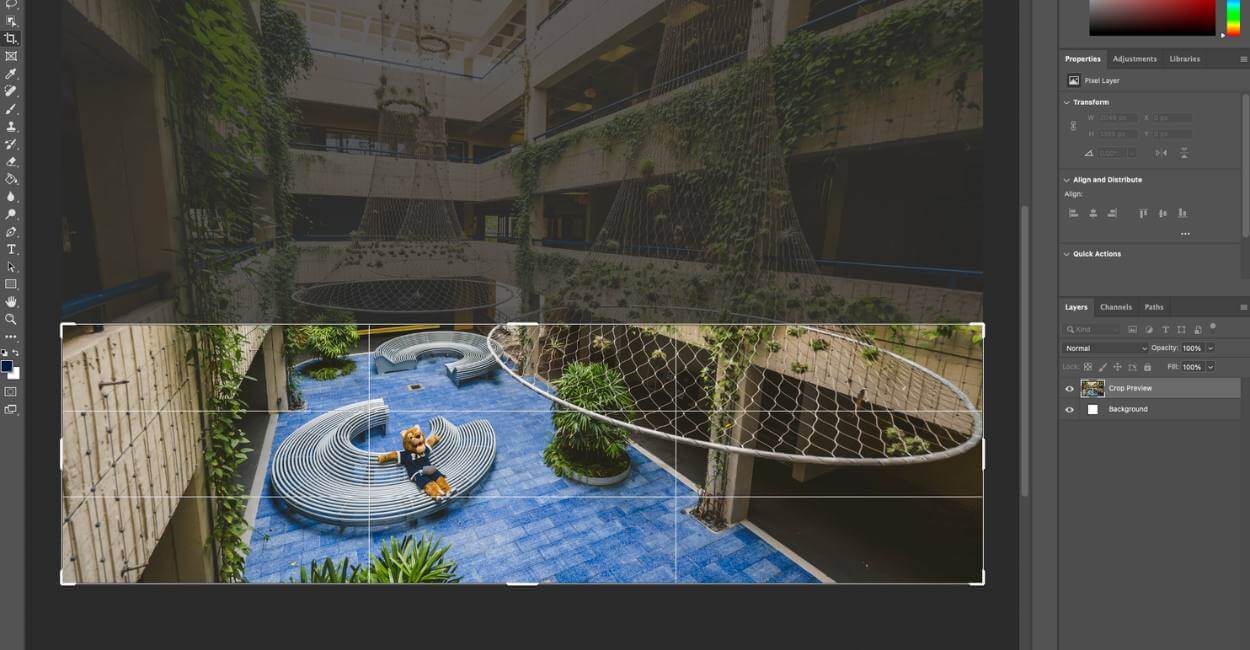
Post-Resize Cropping: When Proportions Don’t Align
Sometimes, your original image might have different proportions than your desired output size. For instance, you might have a wide landscape photo that you want to fit into a square frame for an aesthetic collection. If you try to resize this without Constrain Proportions or by forcing new dimensions, it will distort.
In such cases, it’s often best to resize the image proportionally first, making one dimension (e.g., the width) match your target, and then use the Crop Tool to trim the excess from the other dimension (e.g., the height). This allows you to select the most visually appealing part of the image, maintaining its original aspect ratio within the cropped area. This technique is crucial for curating uniform visual elements for mood boards and thematic collections on Tophinhanhdep.com, ensuring a cohesive look.
Precision Control: Resizing Individual Layers with Free Transform
While Image Size modifies the entire canvas and all its contents, Free Transform provides granular control over individual layers. This is particularly useful in visual design, graphic design, and photo manipulation where you might be combining multiple images, text, or digital art elements into a single composition. Imagine integrating a stock photo into a background, or scaling down a logo to fit a specific area – Free Transform is your go-to tool.
Activating the Free Transform Tool
Resizing a layer is incredibly straightforward thanks to Photoshop’s Free Transform function.
- Select the Layer: In the
Layerspanel (usually on the right side of your Photoshop interface), click on the specific layer you wish to resize. - Activate Free Transform: Press
Ctrl + T(Windows) orCmd + T(Mac). You’ll see a bounding box with handles appear around your selected layer. Alternatively, you can go toEdit > Free Transformfrom the top menu. - Resize by Dragging Handles: Once the bounding box is active, simply click and drag one of the corner handles to resize the layer.
- Confirm or Cancel: When you’re satisfied with the new size, press
Enter(or click the checkmark in the Options bar) to confirm the transformation. If you want to cancel the changes, press theEscapekey (or click the cancel icon in the Options bar).
Proportional Resizing Across Photoshop Versions
One of the most common requirements for layer resizing is to maintain proportionality, preventing distortion. Adobe made a significant change to how Free Transform handles this, so it’s important to understand the behavior based on your Photoshop version.
- Photoshop CC 2019 and Newer (e.g., CC 2020, CC 2021, etc.):
- Default Proportional: In these newer versions, resizing from a corner handle is proportional by default. You no longer need to hold the
Shiftkey. This streamlines the workflow, as proportional scaling is generally what designers aim for. - To Resize Non-Proportionally: If you want to intentionally stretch or squash a layer, you now hold the
Shiftkey while dragging a corner handle. This is the opposite of older versions and can be a “gotcha” for long-time users, so be mindful of your software version!
- Default Proportional: In these newer versions, resizing from a corner handle is proportional by default. You no longer need to hold the
- Photoshop Versions Before CC 2019:
- Manual Proportionality: In older versions, you must hold the
Shiftkey while dragging a corner handle to resize proportionally. If you don’t holdShift, the layer will resize non-proportionally, leading to distortion.
- Manual Proportionality: In older versions, you must hold the
Tip: Resize from the Center
To make your layer resize from its center point rather than from the corner you’re dragging, hold down the Alt (Windows) or Option (Mac) key while dragging a corner handle. This can save you time by preventing the need to reposition the layer after resizing, especially useful when centering visual elements within your design.
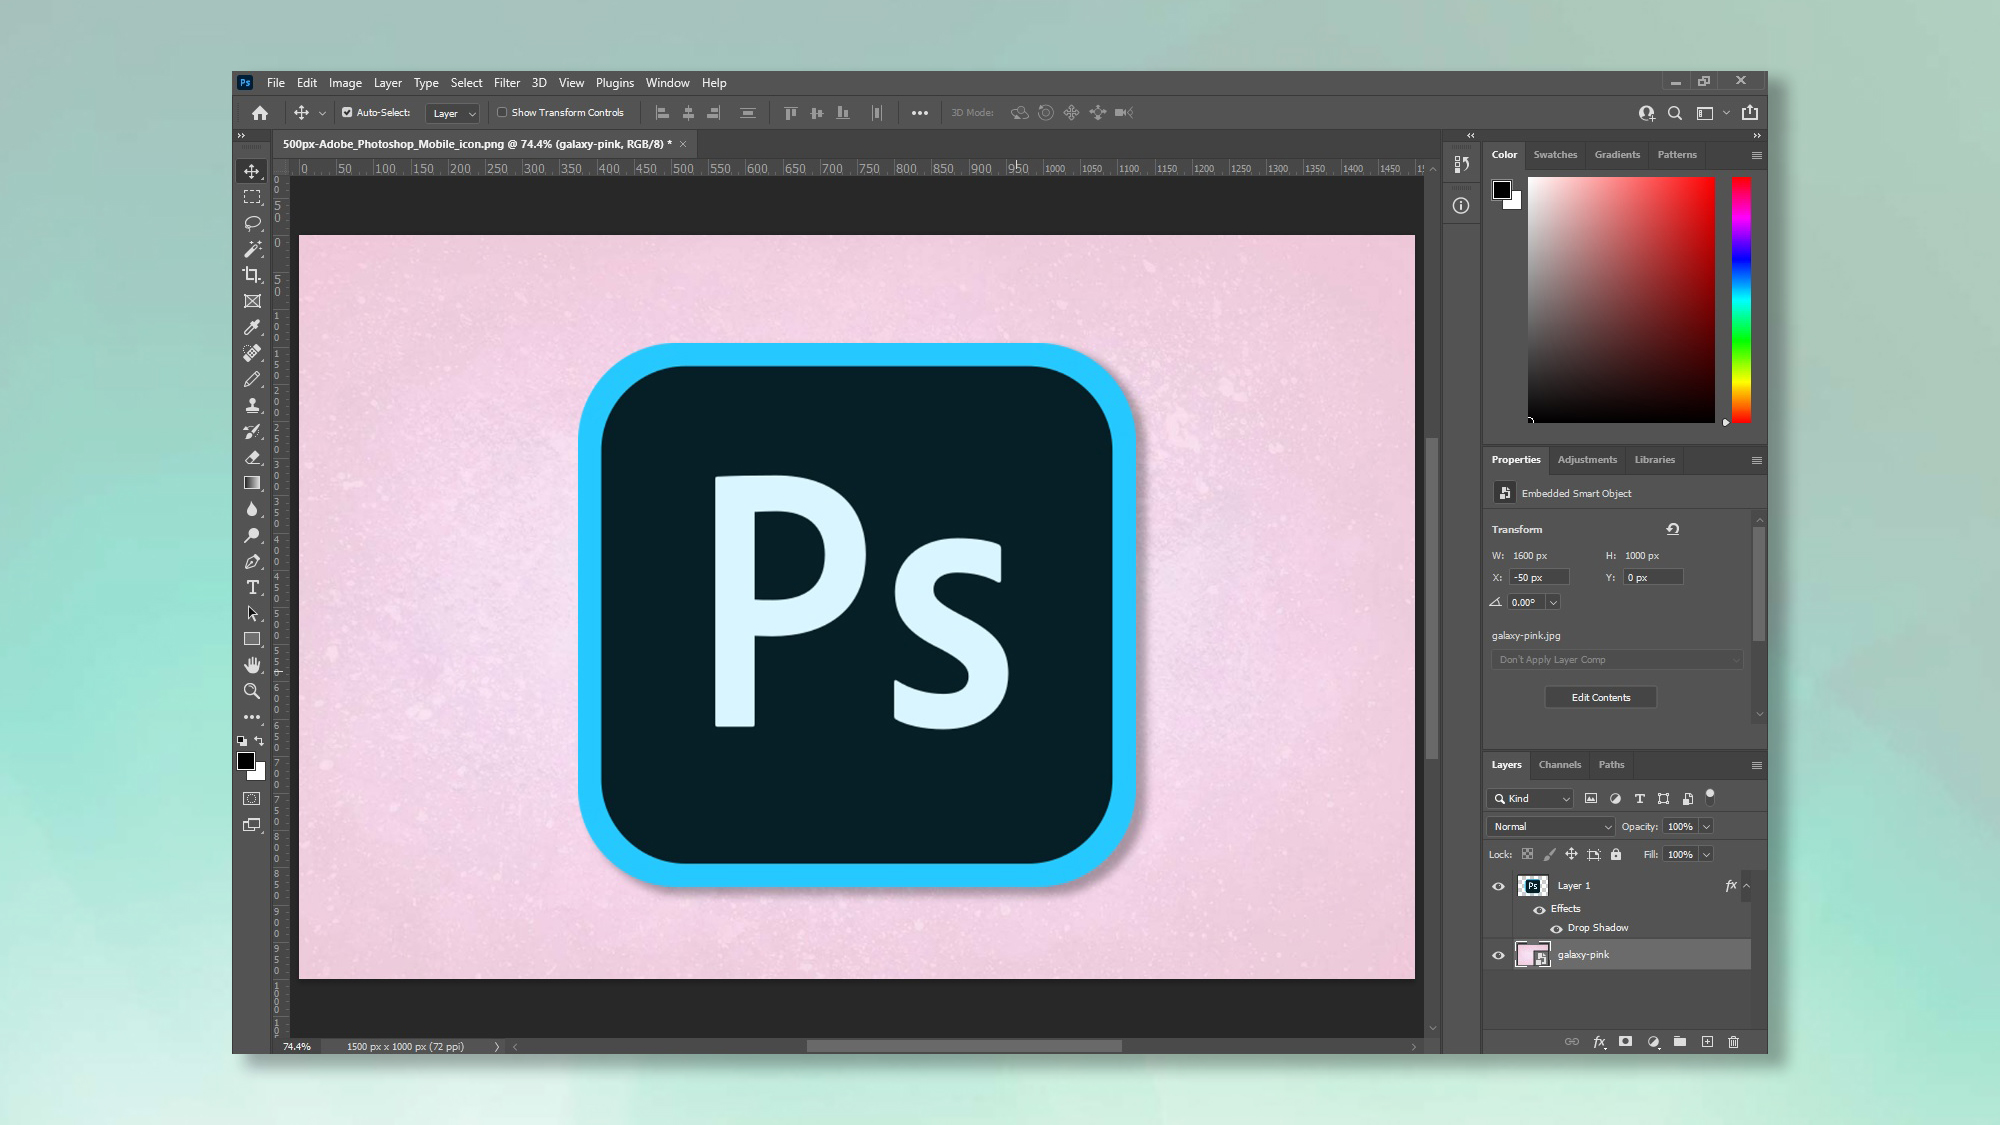
Non-Destructive Scaling with Smart Objects
This is a professional-level technique that can save you immense headache and preserve the quality of your image assets, particularly important for high-resolution stock photos or digital art components. When you resize a regular pixel layer (a rasterized layer) down, Photoshop discards pixel information. If you then try to resize that same layer back up, Photoshop has to invent new pixel data, leading to noticeable quality loss, blurriness, or pixelation.
Smart Objects solve this problem. A Smart Object is a special type of layer that contains all the original image data, regardless of how much you scale it down. This means you can resize a Smart Object layer down, then scale it back up to its original size (or anything smaller than its original size) without losing any quality.
How to use Smart Objects for resizing:
- Convert to Smart Object: Right-click on the layer in the
Layerspanel, and selectConvert to Smart Object. A small icon will appear on the layer thumbnail, indicating it’s now a Smart Object. - Apply Free Transform: Now, use
Ctrl + T(Windows) orCmd + T(Mac) to activateFree Transformand resize your layer as needed. - Enjoy Non-Destructive Editing: You can now resize this layer repeatedly, up and down, without permanently degrading its internal pixel quality. Of course, remember that scaling beyond the Smart Object’s original dimensions will still result in some interpolation and potential quality loss, as Photoshop still has to create new pixel information relative to the original embedded resolution.
This approach is highly recommended for any element you might want to scale multiple times or keep flexible in your visual designs, photo manipulations, or digital art compositions. It aligns perfectly with Tophinhanhdep.com’s commitment to preserving the integrity of high-resolution images and creative assets.
Beyond Basic Scaling: Advanced Transformations and Creative Control
The Free Transform tool is incredibly versatile, extending beyond simple resizing and rotation. Within the Edit > Transform menu, Photoshop offers a suite of advanced transformation tools that enable intricate manipulation of layers, opening doors for complex photo manipulation and creative digital art.
- Skew: Distorts the layer by slanting it along an axis. Useful for creating perspective or achieving stylized angles.
- Distort: Allows you to drag each corner independently, deforming the layer freely. Ideal for fitting an image onto an irregular surface or creating extreme perspective effects.
- Perspective: Applies a one-point perspective to the layer, making it appear as if it’s receding into the distance or coming closer. Perfect for architectural elements or integrating objects into a scene with depth.
- Warp: This is a powerful tool that lets you bend and mold a layer using a grid and various warp presets (e.g., Arc, Flag, Twist). Warp is fantastic for shaping text, making elements conform to curves, or creating organic distortions for artistic effects. It’s an invaluable tool for transforming flat images into dynamic components within your digital art.
These advanced transformation options provide artists and designers with immense creative freedom, allowing for intricate adjustments that go far beyond simple proportional scaling. Experimenting with these tools can unlock new possibilities for your visual design projects and elevate your photo manipulation skills.
Best Practices for Resizing: Optimizing Your Visual Content on Tophinhanhdep.com
Effective image resizing isn’t just about knowing the steps; it’s about understanding the implications for your visual content’s quality, file size, and intended use. Adopting best practices ensures your images always look professional and perform optimally, whether they’re featured in our aesthetic collections or used as high-resolution stock photos.
Saving Your Work: Preserving Originals and Optimizing for Output
After spending time resizing and perfecting your images, the way you save them is critical.
- “Save As” vs. “Save”: Always use
File > Save Aswhen you’ve resized or made significant changes to an image. This creates a new file, allowing you to keep your original, unaltered image intact. This is a vital practice for photographers and designers who might need to revert to the original high-resolution file later. Give your resized file a descriptive name (e.g.,MyImage-Web-Small.jpgorMyImage-Print-300dpi.tif). - File Formats: Choose the appropriate file format for your output.
- JPEG (.jpg): Best for photographs and complex images for the web. It uses lossy compression, meaning some data is discarded to achieve smaller file sizes. Adjust the quality slider (8-10 for web, 10-12 for print-ready if size permits) to balance quality and file size.
- PNG (.png): Ideal for images with transparency (like logos or icons) and graphics with sharp edges and fewer colors. It uses lossless compression.
- GIF (.gif): Suitable for simple animations and images with very few colors (e.g., old-school pixel art).
- TIFF (.tif) or PSD (.psd): Recommended for print, archival, or ongoing editing. These formats are lossless and retain all image data, including layers, ensuring the highest quality for your beautiful photography or intricate digital art. PSD is native to Photoshop and allows you to preserve all layers and editing capabilities.
- Image Tools & Optimization: While Photoshop’s
Save Asdialogue offers compression options, for maximum web optimization, you might also consider dedicatedImage Toolslike compressors and optimizers. These can further reduce file sizes for faster loading of wallpapers and backgrounds on Tophinhanhdep.com, especially for large image galleries. AI Upscalers, on the other hand, can be complementary tools if you need to enlarge an image beyond its original resolution with minimal quality loss, leveraging artificial intelligence to intelligently add pixels.
Resizing for Different Platforms and Purposes
The ideal size and resolution for an image are entirely dependent on its intended use.
- Web (Wallpapers, Backgrounds, Social Media, Websites):
- Resolution: 72 ppi.
- Dimensions: Vary widely. For general web use, widths like 1920px (for hero images/desktop wallpapers) or 1080px (for social media posts) are common. Always check platform-specific requirements (e.g., Instagram, Facebook, Tophinhanhdep.com’s specific background dimensions) to avoid automatic compression or awkward cropping. The goal is a balance of visual quality and fast loading times.
- File Size: Aim for the smallest possible file size without a noticeable drop in visual quality. This is crucial for user experience on any image-heavy website.
- Print (Posters, Brochures, Professional Photography):
- Resolution: 200-300 ppi.
- Dimensions: Match the physical print size (e.g., 8x10 inches, 24x36 inches). A 300 ppi image that is 8x10 inches would have pixel dimensions of 2400x3000 pixels.
- File Size: Larger file sizes are expected and necessary for print quality. Use TIFF or high-quality JPEG (10-12) to retain detail.
- Digital Art & Graphic Design (Logos, Composites, Creative Ideas):
- Resolution: Depends on final output. Start high if unsure.
- Dimensions: Often work with larger canvas sizes to allow for flexibility and detail, scaling down only at the final export stage. Use Smart Objects extensively for elements that might be resized multiple times. Precision in resizing is critical here to ensure graphic elements, logos, and digital art maintain their sharp edges and intended visual harmony.
- Image Inspiration & Collections (Mood Boards, Thematic Styles):
- When curating images for mood boards or thematic collections, consistency in size or aspect ratio can create a more cohesive presentation. Resizing tools help achieve this uniformity, making your collections on Tophinhanhdep.com look polished and professional.
Mastering image resizing in Photoshop is more than just a technical skill; it’s an art form that directly impacts the quality and impact of your visual content. By understanding the nuances of Image Size and Free Transform, leveraging the power of Smart Objects, and adhering to best practices, you can ensure your photographs, digital art, and design elements always look their best.
At Tophinhanhdep.com, we are dedicated to providing you with the inspiration and tools to create stunning visuals, from high-resolution wallpapers to captivating abstract art. By incorporating these Photoshop resizing techniques, you’ll be well-equipped to manage, optimize, and present your images with unparalleled precision and excellence. Dive into Photoshop, experiment with these controls, and elevate your visual journey!