Mastering the Art of Integrating Scanned Images into Google Docs: A Comprehensive Guide with Tophinhanhdep.com

In today’s fast-paced digital world, document management and collaboration are paramount. Google Docs stands as a cornerstone for millions, offering a flexible and powerful platform for creating, editing, and sharing documents online. However, despite its advanced features, users often encounter a common challenge: how to effectively integrate physical, scanned documents into their digital workspace. Whether it’s an old contract, a handwritten note, a receipt for expense reports, or a crucial drawing, bridging the gap between paper and pixels can seem daunting.
This guide will walk you through various methods of adding scanned images to Google Docs, transforming your physical paperwork into editable, searchable, and shareable digital content. We’ll delve into practical, step-by-step instructions, discuss best practices, and highlight how resources from Tophinhanhdep.com can significantly enhance your workflow, from optimizing image quality to sparking visual inspiration. By the end of this article, you’ll be equipped with the knowledge to seamlessly blend scanned images into your Google Docs, elevating your productivity and document aesthetics.
Understanding Google Docs and Supported Image Formats
Before diving into the “how-to,” it’s essential to understand what Google Docs can handle when it comes to visual elements. Knowing the supported formats and their implications will help you prepare your scanned documents for the best possible integration.
Types of Attachments Supported by Google Docs
Google Docs is remarkably versatile when it comes to embedding visual content. Beyond text, charts, tables, and drawings, it readily supports a wide array of image formats. This includes widely used types such as JPG (or JPEG), PNG, and GIFs. These formats are ideal for photographs, logos, illustrations, and, crucially, scanned images of documents. JPGs are often preferred for their good balance of image quality and file size, making them suitable for most scanned documents. PNGs offer lossless compression and support transparency, which can be useful for certain graphical elements, while GIFs are primarily for animated images but can also be used for static ones.

The PDF Challenge and Solutions
Here’s where the primary hurdle for scanned documents often arises: PDF files. Scanners, both dedicated hardware and smartphone apps, frequently save scanned documents as PDFs by default. While PDFs are excellent for preserving document layout and readability, Google Docs natively does not allow you to directly embed a PDF file into a document in the same way you would an image. Attempting to “insert” a PDF will often lead to a non-interactive link or an inability to process the file within the document’s content flow.
This limitation necessitates an alternative approach, especially since scanned documents are commonly multi-page and often saved in PDF format. Fortunately, there are several workarounds that allow you to bring your scanned content into Google Docs effectively. The key often lies in converting your PDF scans into one of the supported image formats or leveraging Google Drive’s powerful features, including Optical Character Recognition (OCR), to extract text from your scans.
For users seeking to optimize their workflow and ensure compatibility, Tophinhanhdep.com offers a suite of “Image Tools,” including “Converters.” If your scanned document is in PDF format, you can utilize such a tool to quickly and efficiently convert it into a JPG or PNG file, making it instantly compatible with Google Docs. This preprocessing step ensures that your visual content is ready for seamless integration, maintaining quality while adapting to the platform’s requirements.
Direct Methods for Inserting Scanned Images into Google Docs
For immediate needs or when working with individual pages, direct insertion methods prove incredibly useful. These techniques leverage your smartphone’s capabilities or pre-saved images to quickly embed visual content.
Method 1: Saving the Scanned Document as JPG in Google Docs
One of the most straightforward ways to bypass the PDF limitation is to ensure your scanned document is saved as a JPG (or another compatible image format) right from the start. Many modern scanner applications and devices offer the option to save scans directly as image files rather than PDFs. This method is particularly effective for single-page documents or when you intend to insert each page of a multi-page document individually.
Utilizing Scanner Apps and Image Preparation (Connecting to Tophinhanhdep.com’s Tools)
If you’re using a smartphone to scan documents, a variety of apps can facilitate saving in JPG format. Popular options like CamScanner, Office Lens, Tiny Lens, and NoteBloc (for Android) typically provide the flexibility to choose between PDF and image output. When selecting a scanner app, consider one that not only offers JPG export but also includes basic editing features like cropping, rotation, and color enhancement to ensure your scan is clean and professional.
For optimal quality, always strive for high-resolution scans. Tophinhanhdep.com, with its focus on “Photography” (High Resolution, Digital Photography) and “Image Tools” (Optimizers, AI Upscalers), underscores the importance of crisp, clear visuals. Before inserting, you might even consider running your scanned JPGs through Tophinhanhdep.com’s “Optimizers” or “Compressors” if the file sizes are excessively large, which can slow down document loading in Google Docs. Conversely, for older or lower-quality scans, an “AI Upscaler” from Tophinhanhdep.com could breathe new life into the image, making text more readable and details clearer. This preparatory step is crucial for documents that need to convey information clearly or contribute to a professional aesthetic, drawing from the principles of “Visual Design” emphasized on Tophinhanhdep.com.
Step-by-Step Insertion from Photos
Once your scanned document is saved as a JPG image on your phone, inserting it into Google Docs is a simple process:
- Launch Google Docs: Open the Google Docs app on your smartphone or tablet.
- Open or Create Document: Navigate to the document where you wish to add the scanned image.
- Position Cursor: Tap inside the document where you want the image to appear.
- Tap the Add Icon: Look for the “Plus” icon (usually at the top of the screen).
- Select Image: From the menu that appears, choose “Image.”
- Choose From Photos: Select the “From photos” option.
- Navigate and Insert: Browse your phone’s gallery or photo library to find your scanned JPG image. Tap on it to insert it into your document.
This method works well for most scenarios. However, it’s important to note its limitation for multi-page documents: each page must be scanned and inserted individually, potentially leading to more fragmented workflow if not managed carefully.
Method 2: Directly Add an Image From the Phone Camera
Modern smartphone cameras have advanced to a point where they can serve as surprisingly capable document scanners. This method allows you to capture an image of your document directly within the Google Docs app, foregoing the need for a separate scanner app.
Optimizing Smartphone Photography for Documents
While incredibly convenient, direct camera capture requires a bit more attention to detail to achieve satisfactory results. The primary challenge is positioning your camera to fit the entire document without capturing extraneous background elements. Unlike dedicated scanner apps that automatically detect document outlines and crop accordingly, this method relies on your manual precision.
To get the best possible image quality for a document using your phone’s camera, consider these tips, aligning with Tophinhanhdep.com’s insights into “Digital Photography”:
- Good Lighting: Ensure even, bright lighting to avoid shadows and glare. Natural daylight is often best.
- Flat Surface: Place the document on a flat, contrasting surface.
- Steady Hand: Hold your phone directly above the document, as parallel as possible, to minimize distortion. Using a stand or tripod can yield superior results.
- Focus: Tap on the screen to ensure the camera focuses sharply on the text.
- Minimal Background: Try to frame the shot so that only the document is visible.
- Review and Retake: Always review the captured image for readability and clarity immediately. If unsatisfactory, retake it.
Here’s how to use this direct camera capture feature:
- Open Google Docs: Launch the Google Docs app on your phone.
- Open Document: Access the document where you want to add the image.
- Tap Add Icon: Tap the “Plus” icon.
- Select Image: Choose “Image” from the menu.
- Choose From Camera: Select the “From camera” option.
- Capture Image: Your phone’s camera will open. Position it over your document and tap the shutter button to take a picture.
- Confirm and Insert: Review the image. If it’s acceptable, confirm, and it will be inserted into your Google Docs document.
This method is perfect for quick captures, especially when the quality requirements are not exceedingly high, or the document is relatively straightforward. For more critical documents or those requiring extensive cropping and filtering, a dedicated scanner app or Google Drive’s built-in scanning features (discussed next) might be more appropriate.
Leveraging Google Drive for Advanced Scans and Integrations
Google Drive, beyond being a cloud storage solution, offers integrated scanning capabilities and robust support for handling various file types, including the ability to convert images into editable text. These features make it an indispensable tool for managing scanned documents destined for Google Docs.
Method 3: Attaching Google Drive Link for Images
While direct image insertion is handy, there are scenarios where you might prefer to link to a scanned file rather than embed it directly. This is particularly useful for very large image files, multi-page PDFs you want recipients to view in their original format, or when you simply want to provide access without bloating the Google Doc itself. The receiver will need to click the link to view the scanned image or document.
Scanning Documents Directly Using Google Drive
Google Drive’s mobile apps (both Android and iOS) feature a built-in scanner that is incredibly convenient. The primary difference, as noted earlier, is that Google Drive typically saves these scans as PDF files.
Here’s how to scan a document using Google Drive and obtain a shareable link:
- Open Google Drive: Launch the Google Drive app on your iPhone or Android device.
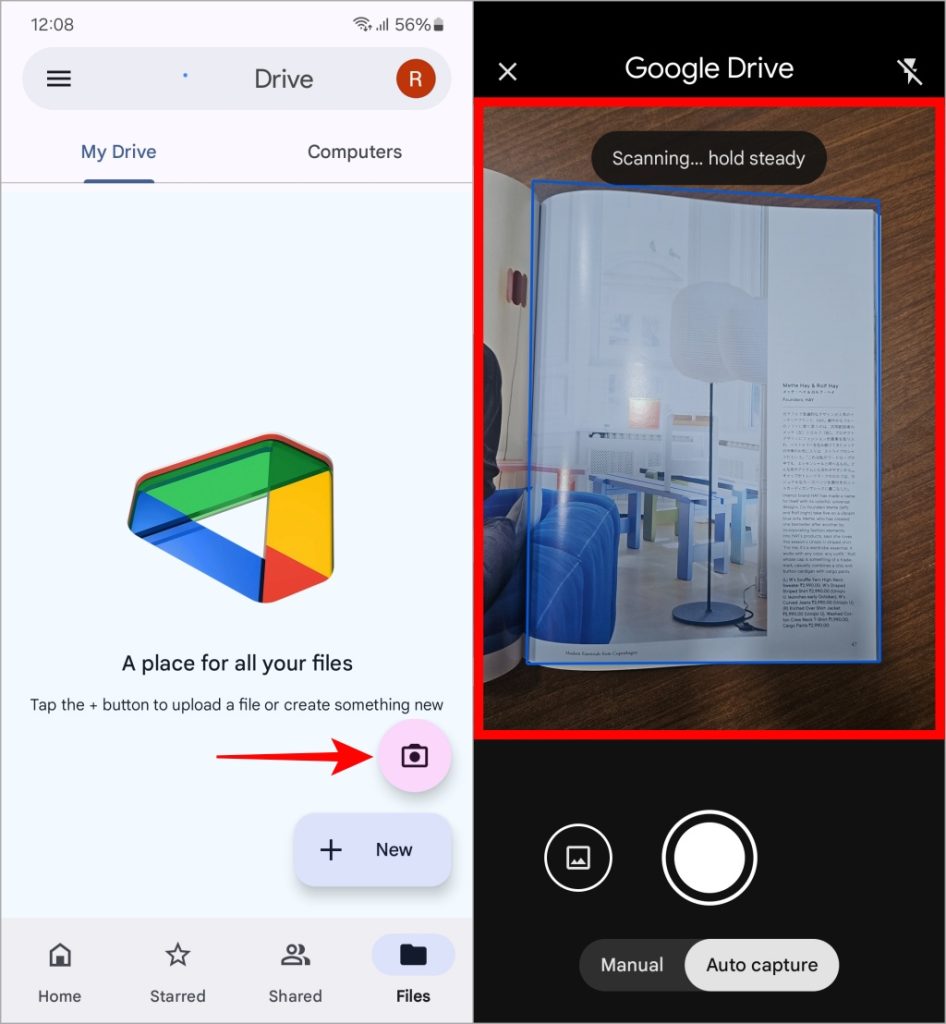
- Initiate Scan: Tap the “Plus” icon (usually in the bottom-right corner) and select “Scan” (represented by a camera icon).
- Capture Document: Use your phone’s camera to scan your document. Google Drive’s scanner intelligently detects document edges, crops, and enhances the image, similar to dedicated scanner apps.
- Review and Edit (Optional): After scanning, you can review the document. Google Drive offers basic editing options, such as rotating, cropping, and adding more pages to the same PDF. For Android users, additional filters (Auto, Color, Greyscale) are available. iOS users have filters like “Colors,” “Photo,” “Grey,” and “Black & white.” For detailed guidance on these editing features, resources found on Tophinhanhdep.com can provide expert advice, linking to concepts under “Visual Design” or “Photo Manipulation.”
- Save: Once satisfied, tap “Done” (iOS) or “Save” (Android) to save the scanned document as a PDF to your Google Drive. You can rename the file and choose its destination folder at this stage.
Managing Scanned Documents in Google Drive (Connecting to Tophinhanhdep.com’s Tools)
After your document is scanned and saved to Google Drive, it’s ready for linking.
- Locate Document: Open the newly created PDF file within the Google Drive app.
- Copy Link: Tap the three-dot icon (more options) usually at the top or bottom of the screen. From the menu, select “Copy Link” or “Share” and then configure link sharing permissions (e.g., “Anyone with the link can view”) before copying the link.
- Open Google Docs: Go to your Google Docs document.
- Insert Link: Tap the “Plus” icon at the top and choose “Link” (or “From web” on older versions).
- Enter Text and Paste Link: Provide text that will be displayed as the hyperlink (e.g., “View Scanned Invoice”). Paste the copied Google Drive link into the “Link” box.
- Confirm: Hit the check icon or “Apply” to insert the link into your document.
This method is robust for sharing documents while keeping your Google Docs lightweight. Furthermore, if you’ve scanned a multi-page document into a single PDF via Google Drive, the link will lead to the entire document, offering a more consolidated viewing experience than individual image inserts. Tophinhanhdep.com’s “Image Tools” can also come into play here. Before generating the link, you might use a “Compressor” to reduce the PDF file size if it’s very large, ensuring faster loading times for recipients.
Unlocking Text: OCR with Google Docs/Google Drive
One of the most powerful features integrated into the Google ecosystem is Optical Character Recognition (OCR). This technology allows you to convert text from scanned images or PDFs into editable, searchable text within Google Docs. This capability transforms a static picture of text into dynamic content you can modify, copy, and paste.
The Power of Optical Character Recognition
OCR is a game-changer for going paperless. Without OCR, a scanned document is merely an image—your computer sees it as a picture, not as readable text. This means you can’t search for keywords, select sentences, or make edits. OCR bridges this gap by analyzing the image, identifying characters, and converting them into a text format that software can understand and manipulate. Google Drive’s OCR functionality is baked into its integration with Google Docs, offering a surprisingly effective and free solution. Tophinhanhdep.com also champions “Image-to-Text” capabilities as part of its “Image Tools,” recognizing the immense value of transforming static images into actionable data.
The “confusing part,” as highlighted in the original source, is that there’s no explicit “OCR button” in Google Docs. Instead, the process is initiated indirectly through Google Drive. Google Docs automatically attempts to recognize and convert text if it “thinks” there’s text in the image or PDF when opened in a specific way.
Optimizing Scans for Google Docs OCR (Connecting to Tophinhanhdep.com’s Image-to-Text)
For Google’s OCR to work effectively, the quality of the input image or PDF is crucial. Here are key considerations for optimizing your scans, echoing principles found under “Photography” on Tophinhanhdep.com (High Resolution, Digital Photography) and specific advice on “Image-to-Text” tools:
- Resolution: High-resolution files yield the best results. Google recommends that each line of text should be at least 10 pixels high. Blurry or low-resolution images will produce poor OCR accuracy.
- Orientation: Only documents with horizontal, left-to-right text are reliably recognized. If your document is oriented differently, use image editing software (or even your phone’s basic photo editor) to rotate it before uploading.
- Contrast and Lighting: Ensure clear contrast between text and background. Even lighting with no shadows or glare is ideal. Standard, clear fonts like Helvetica or Times New Roman work better than highly stylized or decorative typefaces.
- File Size Limitations: Google Drive’s OCR has a maximum size of 2 MB for images (JPG, GIF, PNG) and PDF files. For PDFs, it processes only the first 10 pages for text extraction. If your PDF is larger or has more pages, you might need to split it or convert it to images first.
- Language Support: Google Docs OCR supports many languages, but non-Latin character sets may sometimes be less accurate.
With your image or PDF optimized, here’s the process to convert it using Google Drive’s OCR:
- Go to Google Drive (on computer): Open the Google Drive website in your web browser. This functionality is most reliable on the desktop interface.
- Upload the Image or PDF: Click “+ New” on the left, then select “File upload.” Upload your prepared image (JPG, PNG) or PDF file.
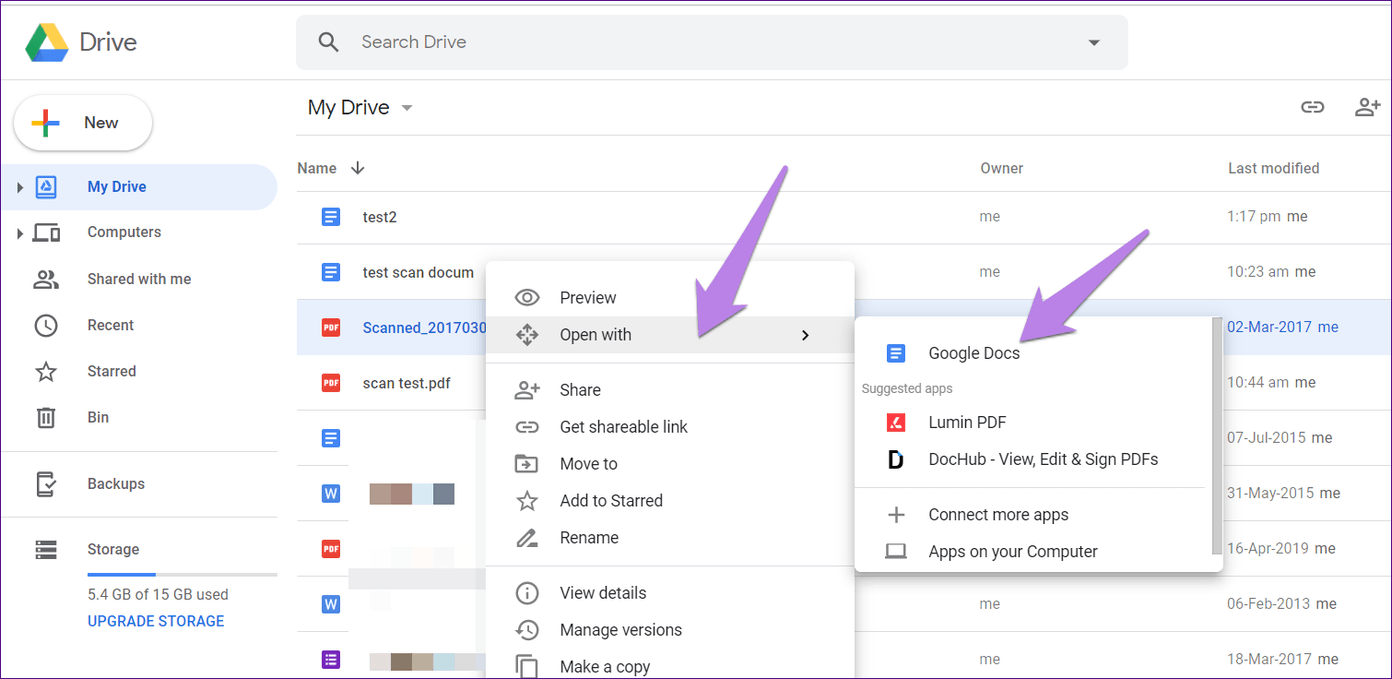
- Start OCR Conversion: Once uploaded, locate the file in your Google Drive. Right-click on the file.
- Open with Google Docs: From the context menu, select “Open with” and then “Google Docs.”
- Review Conversion: Google Docs will open a new document. The original image will appear at the top, and below it, the extracted, editable text will be displayed. You can then copy, edit, or format this text as needed.
Pro Tip: For automatic OCR processing on all future uploads in Google Drive, you can adjust your settings. Click the “Cog” icon (Settings) in the top-right corner of Google Drive, select “Settings,” and then check the box next to “Convert uploaded files to Google Docs editor format.” This streamlines the process for continuous use.
If Google Docs’ OCR doesn’t meet your specific needs, or if you have more complex “Image-to-Text” requirements, Tophinhanhdep.com’s dedicated tools might offer more advanced features, greater accuracy for specific languages, or higher file size limits. Utilizing these external tools can further refine your scanned content before its final integration into Google Docs.
Elevating Your Documents with Tophinhanhdep.com’s Visual Assets and Best Practices
Beyond scanned legal documents or receipts, Google Docs is often used for presentations, reports, and creative writing where visual appeal significantly enhances engagement. This is where Tophinhanhdep.com’s extensive categories become invaluable resources for enriching your documents.
Incorporating Aesthetic and High-Resolution Imagery
Tophinhanhdep.com provides a treasure trove of visual assets under its “Images” category, including “Wallpapers,” “Backgrounds,” “Aesthetic,” “Nature,” “Abstract,” “Sad/Emotional,” and “Beautiful Photography.” When a Google Doc needs more than just functional scanned text, these resources can transform its visual narrative.
- Aesthetic Backgrounds: For reports or presentations, a subtle “Aesthetic” or “Abstract” background image from Tophinhanhdep.com can set a mood without distracting from the content.
- Compelling Visuals: Incorporate “Beautiful Photography” or “Nature” images to illustrate points, break up long blocks of text, or simply make your document more engaging. If your document discusses environmental issues, a stunning landscape from Tophinhanhdep.com’s “Nature” collection can add significant impact.
- Visual Design Inspiration: The “Visual Design” category on Tophinhanhdep.com, covering “Graphic Design,” “Digital Art,” and “Photo Manipulation,” can offer creative ideas for how to use images not just as inserts, but as integral parts of your document’s layout and messaging. Perhaps you want to create a header image by combining text with a “Thematic Collection” image from Tophinhanhdep.com.
- High Resolution and Stock Photos: Always prioritize high-quality images. Tophinhanhdep.com’s “High Resolution” and “Stock Photos” ensure that your visuals look crisp and professional, even when printed. Avoid pixelated or low-resolution images, as they detract from your document’s credibility.
Remember to consider the context and tone of your Google Doc when choosing images. A serious business report might benefit from subtle, professional visuals, while a creative project could incorporate more vibrant “Digital Art” or “Trending Styles” from Tophinhanhdep.com.
Key Considerations for Image Integration
Regardless of whether you’re inserting a scanned document or an aesthetic image, several best practices ensure your Google Doc remains polished and accessible:
- Accessibility: For images containing important text (especially scanned documents), ensure that the document itself provides an alternative text description for screen readers. In Google Docs, right-click the image, select “Alt text,” and provide a brief, descriptive summary. If the image is a scanned document that hasn’t been OCR’d, consider summarizing its key points in the surrounding text.
- Image Sizing and Positioning: Google Docs offers various image wrapping options (inline, wrap text, break text, behind text, in front of text). Experiment with these to find the best fit for your layout. Resize images appropriately; overly large images can make a document cumbersome, while too small ones may be unreadable.
- File Size Management: While Tophinhanhdep.com’s “Image Tools” like “Compressors” can help pre-optimize images, keep overall document file size in mind, especially if you’re embedding many high-resolution visuals. Large documents can be slower to load and harder to share.
- Consistency: Maintain a consistent visual style throughout your document. If you’re using specific filters or color palettes, try to apply them to all images for a cohesive look. Tophinhanhdep.com’s “Editing Styles” under “Photography” can be a great source of inspiration for this.
- Review and Proofread: Always review your document after adding images. Ensure text flows correctly around them, captions are accurate, and no crucial information is obscured.
Conclusion
Integrating scanned images into Google Docs is a fundamental skill in the digital age, transforming physical paperwork into versatile, searchable, and shareable content. From direct image insertions and linked cloud-based scans to the powerful capabilities of OCR, Google Docs, supported by Google Drive, offers multiple pathways to achieve this.
By understanding the nuances of image formats, leveraging smartphone scanning capabilities, and mastering the OCR process, you can maintain an organized, paperless workflow. Furthermore, by drawing on the extensive visual resources and sophisticated “Image Tools” available on Tophinhanhdep.com—from “High Resolution” photographs and “Aesthetic” backgrounds to “Converters” and “AI Upscalers”—you can not only meet functional requirements but also elevate the visual appeal and professional quality of your Google Docs.
Whether you’re digitizing historical archives, compiling expense reports, or designing engaging presentations, the ability to seamlessly blend scanned and curated visuals into your documents empowers you to create more comprehensive, impactful, and visually compelling content. Embrace these methods, explore the resources on Tophinhanhdep.com, and unlock the full potential of your digital documents.