Mastering Multiple Images: A Comprehensive Guide to Adding a Second Image in Photoshop

In the dynamic world of visual content creation, the ability to seamlessly combine multiple images is not just a skill; it’s a fundamental superpower. Whether you’re a budding graphic designer, a professional photographer, or simply someone looking to create stunning digital art, knowing how to add a second image in Photoshop is the gateway to unlocking endless creative possibilities. From crafting breathtaking photo composites and intricate collages to subtle overlays that enhance a narrative, this technique lies at the heart of modern visual communication.
At Tophinhanhdep.com, we understand the power of a well-composed image. Our platform is dedicated to providing you with an expansive collection of images—Wallpapers, Backgrounds, Aesthetic visuals, Nature shots, Abstract designs, Sad/Emotional expressions, and Beautiful Photography—alongside essential Photography resources, Image Tools, and Visual Design insights. This guide will walk you through the core methods and advanced techniques for integrating a second image into your Photoshop projects, ensuring your creations truly stand out.
The Foundational Methods: Importing Your Second Image into Photoshop
Before you can begin the magic of manipulation, you first need to bring your second image into your primary Photoshop document. Photoshop offers several intuitive methods, each with its own advantages, catering to different workflows and desired outcomes. Understanding these methods is crucial for efficient and non-destructive editing.
Method 1: Copy-Pasting Between Documents

This is perhaps the most straightforward method, often favored for quick transfers or when working with small selections rather than entire images.
Step-by-Step:
- Open Both Images: Start by opening both your primary image (the canvas you’re working on) and your secondary image (the one you want to add) in separate Photoshop tabs or windows.
- Select the Second Image: Go to the tab containing your second image. Press
Ctrl+A(Windows) orCmd+A(Mac) to select the entire canvas. If you only want to copy a specific part of the image, use a selection tool (e.g., Rectangular Marquee, Lasso Tool) to select your desired area. - Copy the Selection: Press
Ctrl+C(Windows) orCmd+C(Mac) to copy the selected pixels. - Paste into the Primary Document: Switch back to your primary image’s tab. Press
Ctrl+V(Windows) orCmd+V(Mac) to paste the copied image. - Result: Photoshop will automatically create a new layer for the pasted image, placing it in the center of your canvas. You can then use the Move Tool (
V) to reposition it.
Pros: Quick and easy for simple transfers. Cons: Pastes pixels directly, meaning any transformations (scaling, rotation) can lead to quality loss if done repeatedly or at extreme values. It also doesn’t preserve smart object capabilities by default.
Method 2: Drag and Drop Directly into Your Canvas
This method is incredibly efficient for bringing images from your computer’s file explorer or even from other applications directly into your Photoshop document.
Step-by-Step:
- Open Primary Document: Ensure your primary Photoshop document is open and visible.
- Locate Second Image: Open your file explorer (Finder on Mac, Windows Explorer on PC) and navigate to the location of your second image.
- Drag and Drop: Click and drag the image file directly from your file explorer onto your open Photoshop canvas.
- Result: Photoshop will automatically place the image as a new Smart Object layer. It will also enter Free Transform mode, indicated by a bounding box around the image. You can resize, rotate, or reposition it immediately. Once satisfied, press
Enter(Windows) orReturn(Mac) to commit the transformation.
Pros: Extremely fast and intuitive. Crucially, it imports the image as a Smart Object, preserving its original quality and allowing for non-destructive transformations. Cons: Can be less precise if you need to select only a specific part of the image without prior cropping.
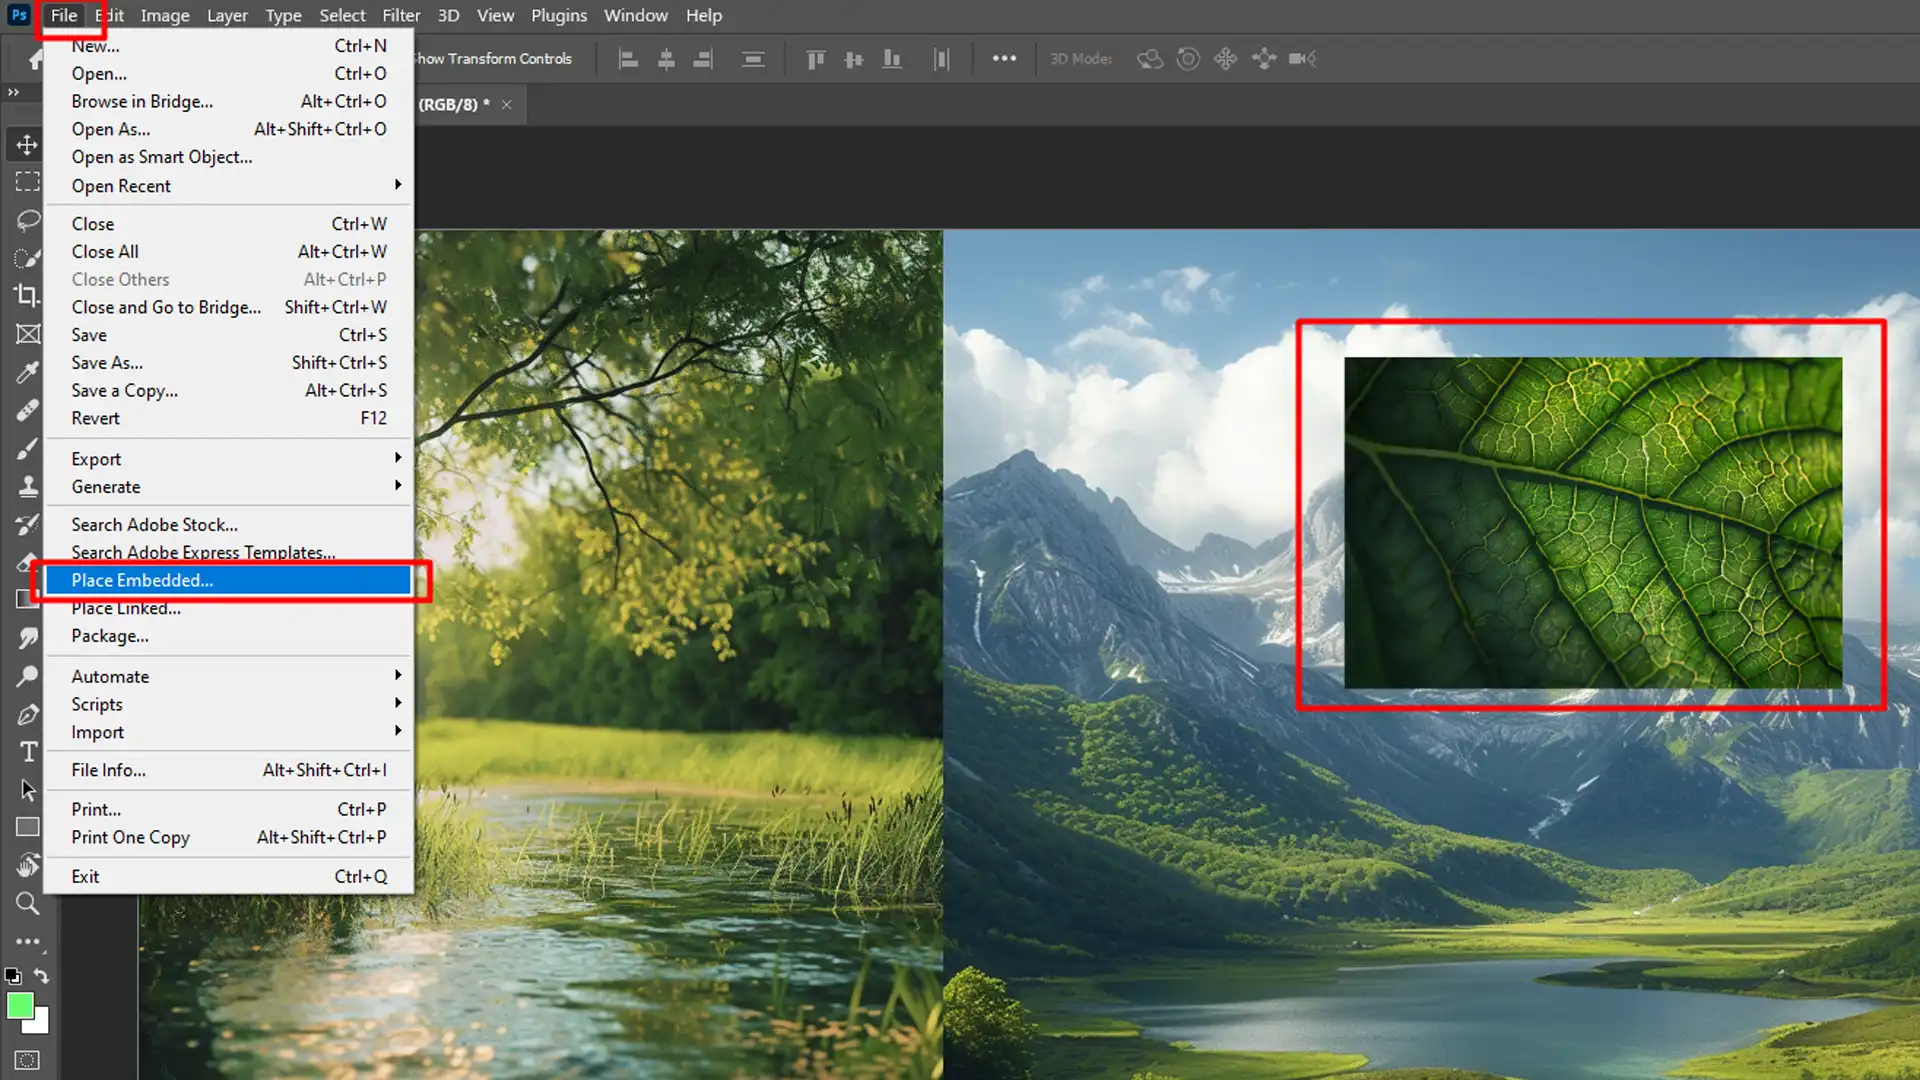
Method 3: Using the “Place Embedded” or “Place Linked” Commands
This is often the preferred method for professional workflows, especially when dealing with complex projects that require non-destructive editing and potential integration with external files.
Step-by-Step:
- Open Primary Document: With your primary document open, go to the top menu bar.
- Choose “Place”: Navigate to
File > Place Embedded...orFile > Place Linked.... - Select Image: A file browser window will appear. Locate and select your second image file.
- Place: Click “Place.”
- Result: Similar to the drag-and-drop method, Photoshop will embed (or link) the image as a Smart Object on a new layer and automatically enter Free Transform mode. Adjust as needed and press
Enterto confirm.
“Place Embedded” vs. “Place Linked”:
- Place Embedded: The image file is fully incorporated into your Photoshop document. This makes your Photoshop file larger but self-contained. It’s ideal if you plan to share the PSD file without worrying about missing linked assets.
- Place Linked: The image file remains external, and Photoshop simply maintains a link to its location. This keeps your PSD file size smaller and allows for automatic updates if the original linked image file is modified outside of Photoshop. However, if the linked file is moved or deleted, Photoshop will report a missing asset. This is beneficial for collaborative workflows or when working with assets managed in a larger system.
Pros: Offers the most robust and professional way to add images. Always imports as a Smart Object, ensuring non-destructive editing. Provides the choice between embedded and linked assets based on project needs. Cons: Requires navigating through menus, which might be slightly slower than drag-and-drop for single, quick additions.
Regardless of the method you choose, mastering the initial step of bringing a second image into Photoshop is fundamental. On Tophinhanhdep.com, you can find stunning High Resolution Stock Photos and an array of Images suitable for any project, ensuring your raw materials are always of the highest quality before you even begin to place them.
Essential Techniques for Integrating Your Second Image Seamlessly
Adding a second image is just the beginning. The real artistry lies in how you integrate it into your existing composition. This involves understanding layers, transforming objects, and employing powerful blending and masking techniques. These steps are crucial for achieving the refined aesthetics seen in professional Visual Design, Graphic Design, and Photo Manipulation.
Understanding Layers and Layer Management
Photoshop’s layer system is its backbone. Every image, text, shape, or effect exists on its own layer, allowing for independent manipulation without affecting other elements.
- Layer Panel: Get familiar with the Layers panel (
F7). Each new image you add will appear as a new layer. - Layer Order: The order of layers matters. Layers higher in the stack appear “on top” of layers below them. You can drag layers up or down in the panel to change their stacking order.
- Naming Layers: Always name your layers descriptively (e.g., “Main Background,” “Subject Image,” “Overlay Texture”). This becomes invaluable in complex projects, preventing confusion and streamlining your workflow.
- Grouping Layers: For projects with many elements, group related layers (
Ctrl+GorCmd+G). This keeps your Layers panel tidy and allows you to apply transformations or effects to an entire group.
Effective layer management is a hallmark of efficient Digital Photography editing and complex graphic design, ensuring that even elaborate Photo Manipulation remains organized.
Resizing, Transforming, and Positioning for Perfect Alignment
Once your second image is on its own layer, you’ll almost certainly need to adjust its size, orientation, and position to fit your composition.
- Free Transform (Ctrl+T / Cmd+T): This is your primary tool for all transformations. With the layer selected, press
Ctrl+T(Windows) orCmd+T(Mac). A bounding box will appear around your image.- Scale: Drag corner handles. Hold
Shiftto maintain aspect ratio (highly recommended to prevent distortion). HoldAlt(Windows) orOption(Mac) to scale from the center. - Rotate: Move your cursor slightly outside a corner handle until it becomes a curved arrow, then click and drag to rotate.
- Move: Click and drag the image from within the bounding box.
- Distort/Perspective/Skew: Right-click inside the bounding box to access advanced transformation options. These are incredibly useful for aligning images with existing elements in your composition (e.g., aligning an image with a wall or floor in a scene).
- Scale: Drag corner handles. Hold
- Commit Transformations: After making your adjustments, press
Enter(Windows) orReturn(Mac) to apply the transformations. If you imported as a Smart Object, these transformations are non-destructive, meaning you can always revert or change them later without losing image quality.
Careful positioning and accurate scaling are crucial for creating believable composites and ensuring your images blend harmoniously, contributing to Beautiful Photography and a cohesive Aesthetic.
Harnessing the Power of Blending Modes
Blending modes dictate how the pixels of one layer interact with the pixels of the layers beneath it. They are incredibly powerful for integrating images, adding textures, creating stylistic effects, and achieving various visual moods, from Abstract to Sad/Emotional.
- Accessing Blending Modes: In the Layers panel, above the layers list, there’s a dropdown menu (usually set to “Normal” by default). Click it to reveal a long list of blending modes.
- Experimentation is Key: The best way to understand blending modes is to experiment. Select your second image layer and cycle through the modes while observing the effect on your canvas.
- Common Blending Mode Categories and Their Uses:
- Darkening Modes (Multiply, Darken, Color Burn): These modes darken the composite, often used for adding shadows, textures, or darkening skies.
Multiplyis excellent for integrating line art or turning white backgrounds transparent. - Lightening Modes (Screen, Lighten, Color Dodge): These modes lighten the composite.
Screenis perfect for combining light sources, creating glow effects, or making black backgrounds transparent. - Contrast Modes (Overlay, Soft Light, Hard Light): These modes increase contrast by lightening lights and darkening darks, based on the colors of the blending layer.
OverlayandSoft Lightare popular for adding subtle textures, enhancing color, or creating double exposure effects. - Inversion Modes (Difference, Exclusion): These modes create interesting, often psychedelic, effects by subtracting or inverting colors.
- Component Modes (Hue, Saturation, Color, Luminosity): These modes transfer specific color components from one layer to another, ideal for color grading, tinting, or matching the color palette between images.
- Darkening Modes (Multiply, Darken, Color Burn): These modes darken the composite, often used for adding shadows, textures, or darkening skies.
By selectively applying blending modes, you can transform a simple overlay into a sophisticated element of your Digital Art or Photo Manipulation project, turning separate images into a single, unified vision.
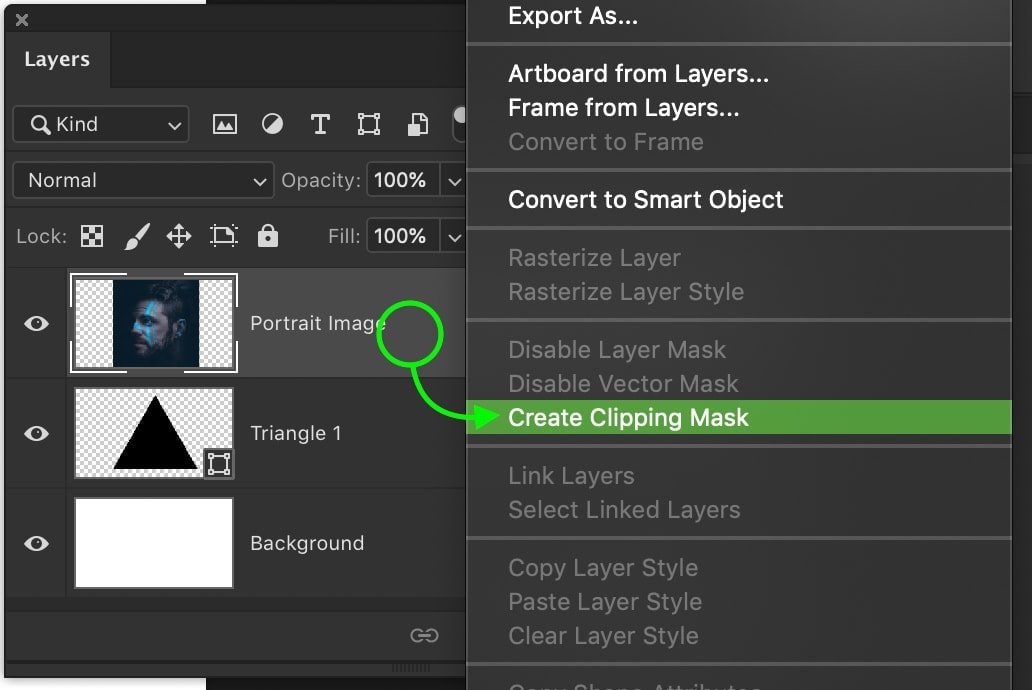
Non-Destructive Integration with Layer Masks
Layer masks are arguably the most important tool for seamlessly integrating multiple images. They allow you to selectively reveal or hide parts of a layer without permanently erasing any pixels, offering unparalleled flexibility and control. This non-destructive approach is a cornerstone of professional Editing Styles.
- How Layer Masks Work: A layer mask is a grayscale image attached to a layer.
- White: Reveals the layer’s content.
- Black: Hides the layer’s content.
- Grays: Partially hide/reveal (transparency).
- Adding a Layer Mask: Select the layer you want to mask. Click the “Add layer mask” icon (a rectangle with a circle inside) at the bottom of the Layers panel. A white thumbnail will appear next to your layer thumbnail.
- Painting on the Mask:
- Ensure the mask thumbnail is selected (it will have a white border).
- Select the Brush Tool (
B). - Set your foreground color to black to hide parts of the layer.
- Set your foreground color to white to reveal parts of the layer.
- Adjust brush size, hardness, and opacity to control the precision and softness of your mask.
- Refining the Mask:
- Use the Gradient Tool (
G) on the mask to create smooth transitions between layers, perfect for blending skies or backgrounds. - Apply Feathering to your selections before creating a mask for softer edges.
- Right-click on the mask thumbnail and choose “Refine Mask” (or “Select and Mask”) for advanced edge detection, particularly useful for intricate cutouts like hair.
- Use the Gradient Tool (
Layer masks are indispensable for creating realistic composites, removing unwanted backgrounds, blending images with natural transitions, and achieving the polished look characteristic of high-quality Visual Design. They enable you to iterate and refine your integration endlessly, which is key to achieving truly professional results in Photo Manipulation and creative image assembly.
Elevating Your Visuals: Creative Applications and Advanced Tips
Beyond the mechanics, the true power of adding a second image in Photoshop lies in its creative applications. This skill forms the foundation for countless artistic endeavors, transforming simple photographs into captivating works of digital art and compelling narratives. Tophinhanhdep.com, with its vast collection of Images and Image Inspiration, serves as the perfect springboard for these creative explorations.
Crafting Compelling Photo Composites and Digital Art
Photo compositing is the art of combining multiple photographs to create a single, cohesive image that often looks like it was captured in one shot. This is where your skills in layers, transformations, blending modes, and masks truly shine.
- Surreal Landscapes: Combine elements from different Nature images—a sky from one, mountains from another, and a mystical creature from a third—to create an entirely new, imaginary world. Tophinhanhdep.com’s collections of Landscape and Abstract images offer endless possibilities.
- Conceptual Photography: Overlay symbolic elements onto a portrait to convey a deeper meaning or emotion. For instance, integrate subtle textures or abstract shapes (found in Tophinhanhdep.com’s Abstract collection) to represent inner thoughts or feelings in a Sad/Emotional portrait.
- Product Mockups: Place a product image onto a stock photo of a stylish scene or a person interacting with it, creating a professional and engaging visual for marketing.
- Fantasy Art: Merge different creatures, environments, and magical effects to build intricate fantasy scenes, a core element of Digital Art and advanced Photo Manipulation.
The key to a successful composite is making all elements look like they belong together. This involves meticulous attention to lighting, color matching (using adjustment layers like Color Balance, Hue/Saturation), perspective, and scale.
Storytelling Through Multi-Image Collages and Double Exposures
Beyond realism, combining images can be a powerful storytelling tool, allowing you to juxtapose ideas, evoke moods, and create visual poetry.
- Thematic Collages: Assemble a collection of related images to tell a story or explore a theme. For example, a collage of “Beautiful Photography” of cityscapes, nature, and people could represent the diversity of life. Tophinhanhdep.com’s Thematic Collections and Mood Boards can inspire your starting point.
- Double Exposure Effects: This popular technique involves superimposing one image onto another, typically a portrait onto a landscape or abstract texture, creating a dreamlike and often poignant effect.
- Technique: Place your landscape/texture image over your portrait. Use blending modes like “Screen,” “Lighten,” or “Overlay.” Then, use a layer mask on the top image to reveal parts of the portrait and blend the two seamlessly. This often results in a visually stunning and “Aesthetic” image.
- Narrative Overlays: Use a subtle second image (e.g., an old map, handwritten text, or a faint pattern) as an overlay on a primary image to add context, texture, or a sense of history. This can transform a simple background into a narrative element, enhancing the depth of your visual story.
These techniques don’t just combine images; they combine ideas, emotions, and narratives, bringing your visual concepts to life. Tophinhanhdep.com provides a wealth of Image Inspiration and diverse collections, from Wallpapers to Backgrounds, ensuring you have the creative assets to tell any story.
Pre- and Post-Processing with Tophinhanhdep.com’s Image Tools
The journey of creating a multi-image masterpiece doesn’t begin and end solely within Photoshop. Tophinhanhdep.com offers a suite of Image Tools that can significantly enhance your workflow both before and after the main editing process.
Before Photoshop: Preparing Your Assets
- AI Upscalers: Found an ideal image on Tophinhanhdep.com or elsewhere, but its resolution is too low for your project? Use our AI Upscalers to intelligently increase its size and detail, making it suitable for high-resolution composites without significant pixelation. This is invaluable when combining images of varying quality.
- Converters: Sometimes, your source images might be in an incompatible format. Tophinhanhdep.com’s Converters can quickly change them to a Photoshop-friendly format like JPEG or PNG, streamlining your import process.
- Sourcing High Resolution Stock Photos: Before you even open Photoshop, visit Tophinhanhdep.com to find an extensive library of High Resolution Stock Photos. Starting with quality assets simplifies the entire integration process and ensures a professional outcome.
After Photoshop: Optimizing Your Output
- Compressors and Optimizers: Once you’ve perfected your multi-image creation, you’ll likely want to share it online. Large Photoshop files or high-resolution images can be slow to load. Use Tophinhanhdep.com’s Compressors and Optimizers to reduce file size without compromising visual quality, making your images web-ready for faster loading times on websites or social media.
- Image-to-Text (for documentation or metadata): While not directly related to image composition, if you’re creating a complex project with specific documentation needs, our Image-to-Text tool could assist in extracting details from reference images or notes.
By integrating Tophinhanhdep.com’s comprehensive suite of tools, you can ensure that every stage of your multi-image project, from initial asset sourcing to final delivery, is optimized for quality and efficiency.
Best Practices and Workflow Enhancements
To consistently produce high-quality multi-image projects, adopting best practices and refining your workflow is essential. These tips apply across all forms of Digital Photography and advanced Editing Styles.
- Always Work Non-Destructively: This cannot be stressed enough. Utilize Smart Objects for all imported images. Use Layer Masks instead of the Eraser Tool. Apply adjustments and effects as Adjustment Layers rather than directly to pixel layers. This approach allows for endless revisions without damaging your original image data.
- Maintain Resolution and Quality: Whenever possible, start with High Resolution images. When resizing, always scale down (don’t scale up pixels unless absolutely necessary and with AI Upscalers). Be mindful of the final output resolution. If your final image needs to be print-ready, ensure all source images and your document settings meet print standards. Tophinhanhdep.com emphasizes quality with its selection of beautiful photography, making it easier to start strong.
- Organize Your Layers: As your projects grow in complexity, a messy Layers panel becomes a nightmare. Name layers, use color-coding, and group related layers into folders. This makes it easier to navigate, edit, and collaborate.
- Match Lighting and Perspective: For realistic composites, carefully analyze the light source, direction, and intensity in all your source images. Adjust shadows, highlights, and contrast on your added images to match the primary scene. Similarly, ensure that the perspective and scale of added elements are consistent with the background.
- Color Harmony: Disparate color palettes can make a composite look disjointed. Use adjustment layers (Color Balance, Hue/Saturation, Curves, Levels, Selective Color) to unify the color schemes across all elements, creating a cohesive visual aesthetic.
- Consider the Narrative: Every image you add should contribute to the overall story or message you’re trying to convey. Avoid adding elements just for the sake of it. Think about the composition, the emotional impact (Sad/Emotional, Beautiful Photography), and how each piece fits into the larger picture.
- Save Regularly and Version Control: Photoshop files can be large and complex. Save your work frequently (
Ctrl+S/Cmd+S). Consider saving incremental versions (e.g.,project_v1.psd,project_v2.psd) so you can always revert to an earlier stage if needed. - Seek Inspiration: Regularly browse Tophinhanhdep.com’s Image Inspiration, Mood Boards, and Trending Styles sections. Observing how other artists combine images can spark new ideas and refine your own approach to Visual Design and Graphic Design.
By consistently applying these best practices, you’ll not only streamline your workflow but also elevate the quality and impact of your multi-image creations.
Conclusion
The ability to add a second image in Photoshop is more than just a technical maneuver; it’s a foundational skill that unlocks a universe of creative possibilities in digital art, photography, and graphic design. From the simplest overlay to the most intricate photo manipulation, mastering this technique allows you to weave together disparate visual elements into cohesive, compelling narratives.
Whether you’re creating striking Wallpapers, evocative Backgrounds, or delving into complex Visual Design projects, the methods of copy-pasting, drag-and-dropping, or placing images, combined with the power of layers, transformations, blending modes, and layer masks, empower you to bring your artistic visions to life. And with the added benefits of Tophinhanhdep.com’s vast reservoir of stunning Images, High Resolution Stock Photos, and indispensable Image Tools, you have everything you need to embark on your creative journey.
Remember, every masterpiece begins with a single step. By practicing these techniques and continuously exploring the boundless resources available on Tophinhanhdep.com, you’ll refine your skills, expand your creative horizons, and transform your digital canvases into truly unforgettable works of art. So, open Photoshop, visit Tophinhanhdep.com for your next inspiring image, and start adding that second image – your next great creation awaits.