How to Add an Image as a Layer in Photoshop: A Comprehensive Guide for Visual Creators

In the vibrant world of digital creativity, mastering foundational skills in software like Adobe Photoshop is paramount. Whether you’re a seasoned graphic designer crafting intricate digital art or a budding photographer looking to enhance your beautiful photography, the ability to effectively add and manage images as layers is a core competency. Photoshop’s powerful layering system provides the flexibility for complex compositions, photo manipulation, and sophisticated editing styles, allowing artists to blend elements seamlessly, experiment non-destructively, and unlock endless creative ideas.
This guide, brought to you by Tophinhanhdep.com, a leading resource for images, photography insights, and visual design inspiration, will walk you through the essential techniques for adding images as layers in Photoshop. From simple drag-and-drop methods to advanced layer management with Smart Objects and Clipping Masks, we’ll cover everything you need to know. Tophinhanhdep.com offers a vast collection of high-resolution stock photos, aesthetic backgrounds, nature wallpapers, and abstract imagery perfect for your next Photoshop project. We also provide image tools like AI upscalers and compressors, ensuring your sourced images are always optimized for quality and performance. Let’s dive into the fundamental methods that will empower your visual design journey.
Fundamental Methods for Integrating Images into Your Photoshop Projects
Adding images to your Photoshop document is the first step towards creating stunning visual compositions. Tophinhanhdep.com’s extensive galleries, ranging from emotional and sad imagery to breathtaking landscapes, provide an excellent starting point for any project. Photoshop offers several intuitive ways to bring these images into your workspace, each with its own advantages depending on your workflow and the source of your imagery.
Option 1: Drag & Drop an Image into Your Project
The drag-and-drop method is arguably the most straightforward and fastest way to add an image to an existing Photoshop document. This technique is ideal when you have images saved locally on your computer, perhaps high-resolution downloads from Tophinhanhdep.com’s diverse collections of wallpapers or backgrounds.
Step 1: Drag an Image and Drop It Into Photoshop
Begin by locating the image file you wish to import on your computer. This could be a stunning nature photograph, an abstract design, or a carefully selected aesthetic background from Tophinhanhdep.com. With your Photoshop project already open, simply click and hold the image file, then drag it directly onto your open Photoshop canvas.

Upon release, Photoshop will automatically place the image onto your canvas. It will appear as a new layer in your Layers Panel, denoted by a bounding box around it. This new layer is, by default, a Smart Object, which is an excellent feature that preserves the image’s original resolution and allows for non-destructive transformations.
Step 2: Scale and Reposition the Image
Once dropped, the image will be in Free Transform mode, indicated by the bounding box and transform handles. This allows you to immediately scale, rotate, and reposition the image to fit your composition. If the image is a high-resolution stock photo from Tophinhanhdep.com, you’ll have ample pixel data to work with without losing quality when scaling down.
To resize, click and drag any of the corner handles. To maintain the aspect ratio (preventing distortion), hold down the Shift key while dragging. For precise centering, hold down the Alt (Windows) or Option (Mac) key along with Shift. You can also rotate the image by hovering your cursor outside a corner handle until it becomes a curved arrow, then click and drag. To reposition, simply click and drag the image itself within the bounding box.
Step 3: Press Enter to Confirm the Changes
After you’ve adjusted the size and position to your satisfaction, press the Enter key (Windows) or Return key (Mac) on your keyboard. Alternatively, you can click the checkmark icon in the Options Bar at the top of the screen. This action confirms your transformations and embeds the image as a new layer above your existing content. The layer will remain a Smart Object, ready for further editing or manipulation, perfectly integrated into your digital art piece or photo composition.
Option 2: Copy & Paste an Image into a Project
The copy-and-paste method is particularly useful when you have multiple images already open in separate Photoshop documents, or when you’ve copied an image directly from another application or a browser, such as a trending style image from Tophinhanhdep.com’s inspiration collections. This method is quick and efficient for transferring visual elements between projects.
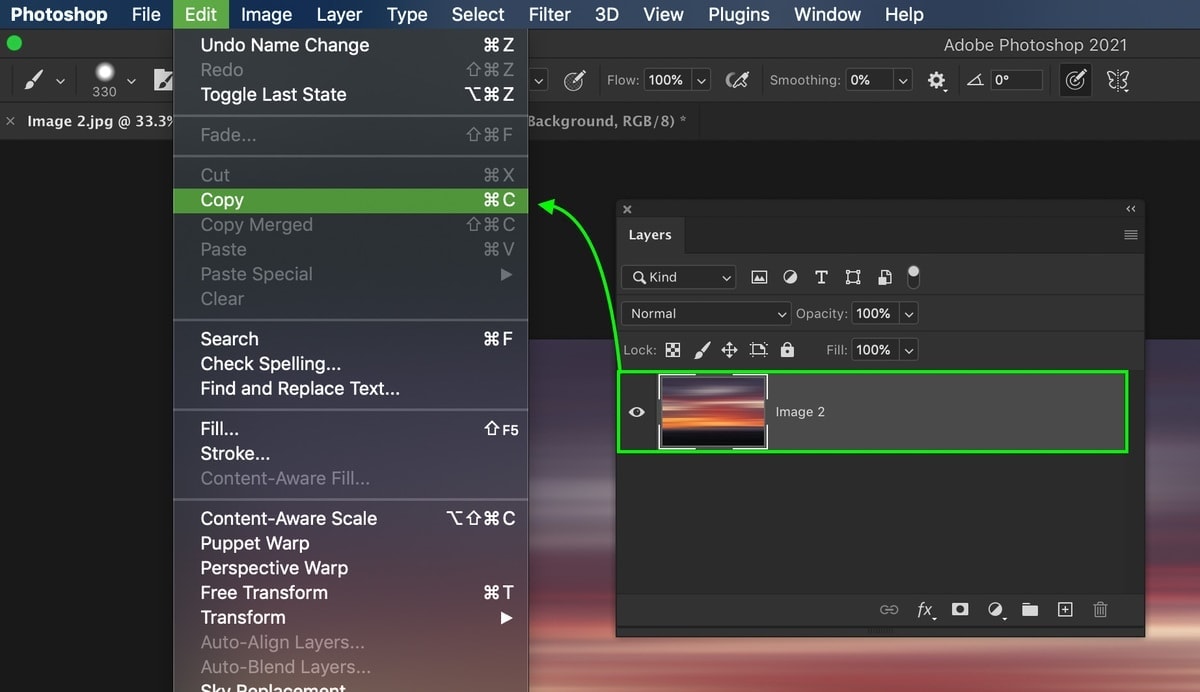
Step 1: Copy the Image Layer
First, navigate to the Photoshop document containing the image you wish to copy. Ensure the desired image layer is selected in the Layers Panel. Then, go to the Edit menu at the top of the screen and choose “Copy,” or use the keyboard shortcut Control + C (Windows) or Command + C (Mac). This action copies the entire selected layer, including its contents and any transparency. If you only want to copy a specific part of an image, you can make a selection first using tools like the Marquee or Lasso tool, then copy.
Step 2: Paste the Image Layer Into the Photoshop Document
Next, switch to your target Photoshop document where you want to add the image. Go to the Edit menu and select “Paste,” or use the keyboard shortcut Control + V (Windows) or Command + V (Mac).
Photoshop will paste the copied image onto your canvas as a new layer. This new layer will typically appear at the top of your Layers Panel. Like with drag-and-drop, the pasted image will often retain its Smart Object properties if copied from another Photoshop document, preserving its quality for subsequent resizing and transformations, crucial for any high-resolution digital photography or graphic design project.
Step 3: Resize and Position the Image Layer
Similar to the drag-and-drop method, the pasted image will likely appear with a bounding box, indicating it’s in Free Transform mode. If not, activate the Free Transform tool by pressing Control + T (Win) or Command + T (Mac). Use the handles to scale, rotate, and reposition the image as needed within your composition. This flexibility is essential when combining different aesthetic elements or crafting complex photo manipulations from Tophinhanhdep.com’s diverse library. Once satisfied, press Enter (or Return) to commit the transformation.
Step 4: Merge the Layers (Optional)
While it’s generally recommended to keep images on separate layers for non-destructive editing and maximum flexibility, there might be instances where merging layers is desirable for organization or to apply effects across combined elements. To merge the newly pasted image layer with the layer directly below it, select both layers (Shift-click to select multiple), then press Control + E (Windows) or Command + E (Mac).
For more extensive organization without merging, consider grouping layers (Control + G or Command + G) or linking layers. These methods allow you to manage multiple elements together while maintaining their individual editability, a key practice in advanced visual design and digital art projects.
Option 3: Place Embedded in Photoshop
The “Place Embedded” command is a robust method for adding images from your hard drive, particularly useful when you want more control over the import process and ensure the image is properly linked or embedded within your Photoshop document. It’s a professional choice for integrating high-resolution photography or carefully selected assets into your digital compositions.
Step 1: Go To File > Place Embedded
With your Photoshop document open, navigate to the top menu bar, click “File,” and then select “Place Embedded…” This action opens a file browser window, allowing you to search for the image file on your computer.
Step 2: Locate the Image on Your Hard Drive and Click Place
Browse your computer to locate the image you wish to add. This could be a background, a wallpaper, or any of the beautiful photography pieces you’ve acquired from Tophinhanhdep.com. Once you’ve found and selected the image file, click the “Place” button at the bottom of the dialog box.
Photoshop will then embed the selected image into your document as a new layer, automatically entering Free Transform mode. Like the drag-and-drop method, “Place Embedded” imports the image as a Smart Object by default, preserving its original data for flexible, non-destructive editing, which is crucial for maintaining the quality of your digital photography and graphic design work.
Step 3: Position and Scale the Image (Optional)
In Free Transform mode, you have immediate control over the image’s placement and size. Use the transform handles to scale and rotate the image, holding Shift to maintain aspect ratio and Alt/Option to scale from the center. This step is vital for seamlessly integrating your chosen image into your composition, whether it’s an abstract element or a natural landscape. Once positioned to your liking, press Enter (or Return) to confirm the changes and exit Free Transform mode.
Advanced Layer Integration: Smart Objects and Clipping Masks
Beyond simply adding images as new layers, Photoshop offers advanced techniques that allow for more sophisticated integration, offering greater control and non-destructive editing capabilities. These methods are indispensable for complex visual design, digital art, and photo manipulation projects.
How To Add An Image Inside Of An Existing Layer Using A Smart Object
Smart Objects are Photoshop’s answer to non-destructive editing, acting as containers that preserve an image’s original characteristics, even after scaling, rotating, or applying filters. This feature is particularly powerful when working with high-resolution images or stock photos from Tophinhanhdep.com, ensuring that you can always revert to the original quality regardless of subsequent transformations.
To use a Smart Object to add an image inside another existing layer (or combine multiple layers), start by bringing your desired images into your project using one of the methods described above (drag & drop, copy & paste, or Place Embedded). Ensure these images are on separate layers.
- Select Layers to Combine: In the Layers Panel, Shift-click to select all the layers you want to convert into a single Smart Object.
- Convert to Smart Object: Right-click on any of the selected layers and choose “Convert to Smart Object” from the context menu.
- Observe the Change: Your selected layers will now collapse into a single layer with a small Smart Object icon in its thumbnail, signifying its non-destructive nature.
On the surface, this might appear similar to merging layers, but the key difference lies in editability. Double-clicking the Smart Object thumbnail will open its contents in a new Photoshop document. Here, you’ll find all the original layers, individually editable. Any changes saved in this Smart Object document (File > Save or Ctrl/Cmd + S) will automatically update in your main project, reflecting adjustments to scaling, positioning, or even replacing individual elements within the Smart Object without affecting the overall composition’s integrity. This flexibility is a game-changer for iterative design and creative experimentation.
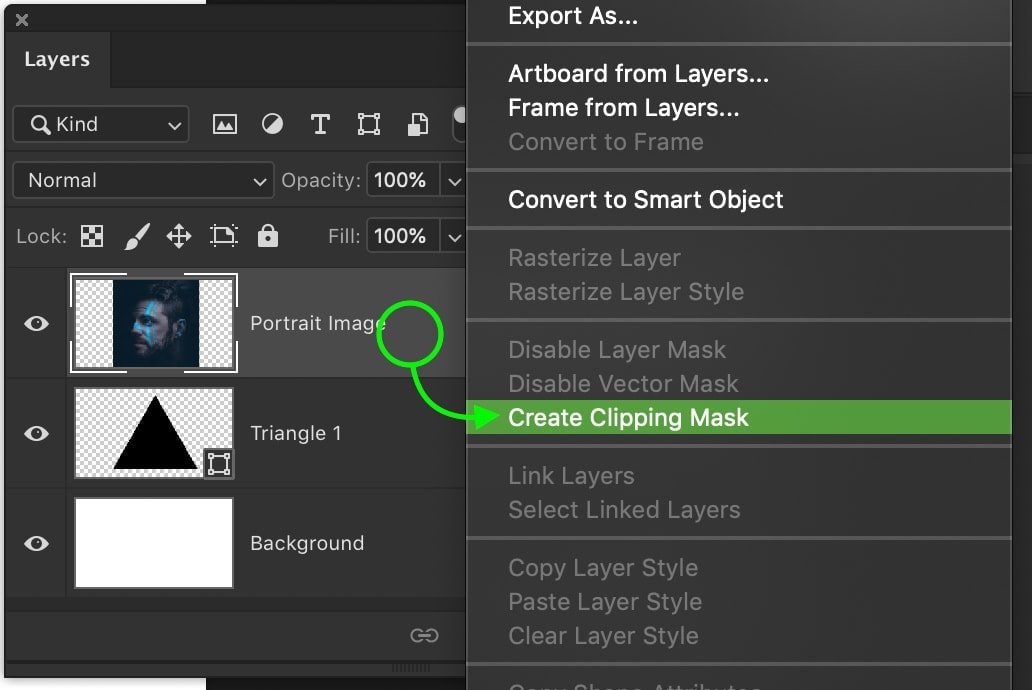
How To Place An Image Inside Of Another Layer With Clipping Masks
Clipping Masks offer a distinct way to place an image within the confines of another layer’s shape or transparency. This technique is invaluable for graphic design, creating unique visual effects, or even for compositing thematic collections from Tophinhanhdep.com into stylized frames. For example, you might want to place a vibrant nature image inside a custom text shape or an abstract texture within a specific geometric design.
- Prepare Your Layers: First, ensure you have two layers ready:
- The “base” layer: This is the layer whose shape or transparency you want to use as a mask (e.g., a custom shape, a text layer, or a rasterized image with transparency).
- The “image” layer: This is the image you want to clip into the base layer (e.g., a beautiful landscape, an aesthetic pattern, or a wallpaper from Tophinhanhdep.com). Make sure the image layer is positioned directly above the base layer in the Layers Panel.
- Create the Clipping Mask: Right-click on the image layer in the Layers Panel. From the context menu, select “Create Clipping Mask.”
- Observe the Effect: Instantly, your image will appear only within the visible pixels of the layer directly below it. The image layer will be indented in the Layers Panel with a small arrow pointing down to the base layer, indicating it’s clipped.
- Edit Non-Destructively: Both the clipped image and the base layer remain independently editable. You can use the Move Tool (V) to reposition and scale the clipped image within the shape of the base layer. You can also edit the base layer’s shape or transparency, and the clipped image will adjust accordingly. This non-destructive approach allows for immense creative freedom in photo manipulation and digital art, enabling you to experiment with different thematic collections or photo ideas from Tophinhanhdep.com without committing to permanent changes.
Understanding and Managing Layers in Photoshop
Effectively managing layers is as crucial as adding them. Photoshop’s layer system is the backbone of its power, enabling complex visual design and digital photography editing.
The Significance of Photoshop’s Layers
Layers are fundamental to Photoshop, allowing you to work on individual components of an image without affecting others. Imagine creating a visual masterpiece where each element – from a nature background to an abstract overlay – exists independently. This isolation prevents destructive editing, making it easy to adjust, rearrange, or remove any part of your artwork. For instance, if you’re experimenting with different editing styles on a portrait, you can apply adjustments to separate layers and toggle their visibility or opacity to compare effects.
Tophinhanhdep.com emphasizes the importance of utilizing layers for diverse projects, be it crafting unique mood boards or developing intricate thematic collections. Our high-resolution images are perfect for multi-layered compositions, allowing you to manipulate each element precisely.
Different Types of Layers in Photoshop
Photoshop offers various types of layers, each serving a specific purpose in your creative workflow:
- Image Layers (Pixel Layers): These are the most common layers, containing pixel-based image data. When you drag and drop a beautiful photography piece or a background from Tophinhanhdep.com, it often comes in as a pixel layer (or a Smart Object wrapping pixel data).
- Adjustment Layers: These layers apply non-destructive color and tonal adjustments (like Hue/Saturation, Levels, Curves) to the layers below them. They’re indispensable for digital photography editing, allowing you to refine contrast, color balance, and exposure without permanently altering your original image data. Tophinhanhdep.com encourages experimenting with these layers to achieve unique aesthetic or emotional effects on your images.
- Fill Layers: Used for adding solid colors, gradients, or patterns. These are useful for backgrounds, overlays, or adding creative flair to your graphic design.
- Type Layers: When you add text to your project, it resides on a Type Layer. These are vector-based, meaning they can be scaled infinitely without losing sharpness, ideal for branding elements or expressive digital art.
- Shape Layers: Created using Photoshop’s shape tools (rectangles, ellipses, custom shapes), these are also vector-based, offering scalable and editable geometric elements for your visual design.
- Smart Object Layers: As discussed, these are containers for one or more layers (pixel, vector, or other Smart Objects). They are crucial for non-destructive transformations and maintaining image quality, especially when working with stock photos or complex digital art.
Important Notes About Layers
- Non-Destructive Editing: Always prioritize working with layers (especially Smart Objects and Adjustment Layers) to keep your edits non-destructive. This means your original image data remains untouched, allowing for endless revisions and tweaks, which is a hallmark of professional photo editing and digital art.
- Organization is Key: As your projects grow in complexity, the Layers Panel can become cluttered. Grouping layers (Ctrl/Cmd + G), naming layers logically, and using color labels are essential for maintaining an organized workflow. This helps in managing complex graphic design projects or large thematic collections.
- Opacity and Blend Modes: These properties dramatically alter how layers interact. Adjusting opacity can blend images subtly, while Blend Modes (e.g., Multiply, Screen, Overlay) create diverse visual effects, perfect for creative ideas and unique photo manipulation.
- Layer Masks: Beyond clipping masks, layer masks allow you to selectively reveal or hide parts of a layer using black, white, and gray values. This is incredibly powerful for compositing multiple images, creating seamless transitions, and refining details in digital photography.
- Performance: While powerful, many layers can impact Photoshop’s performance. Optimizing images with tools like Tophinhanhdep.com’s compressors and optimizers before importing them, and merging layers when absolutely necessary (e.g., at the final stages of a project after saving multiple versions), can help manage this.
Elevating Your Visual Creations with Tophinhanhdep.com
Mastering the art of adding and managing layers in Photoshop is a fundamental skill that unlocks a world of creative possibilities. From crafting dynamic wallpapers and aesthetic backgrounds to performing intricate photo manipulation and digital art, layers provide the foundation for your visual expressions.
At Tophinhanhdep.com, we are dedicated to fostering your creative journey. Our extensive collections of high-resolution images – including diverse themes like nature, abstract, sad/emotional, and beautiful photography – serve as an endless wellspring of inspiration. Whether you’re looking for the perfect stock photo to enhance your graphic design, or a unique image to kickstart a new digital art project, Tophinhanhdep.com is your go-to resource.
Beyond imagery, we understand the importance of a smooth workflow. That’s why Tophinhanhdep.com also offers valuable Image Tools such as converters, compressors, optimizers, and AI upscalers. These tools ensure that the images you select are not only visually appealing but also perfectly prepared for integration into your Photoshop projects, maintaining high quality while optimizing file size. Our articles on Digital Photography and Editing Styles also provide context and advanced techniques that complement your Photoshop skills, helping you achieve professional results.
By diligently practicing the techniques outlined in this guide and leveraging the vast resources available on Tophinhanhdep.com, you’ll be well-equipped to transform your creative ideas into compelling visual realities. So, dive in, experiment, and let your imagination soar with Photoshop and Tophinhanhdep.com!