How to Add an Image to an MP4 File on Mac: Elevating Your Visual Content with Tophinhanhdep.com's Expertise

In today’s visually-driven world, video content reigns supreme. Whether you’re a content creator, a business professional, or simply someone looking to personalize their home videos, the ability to seamlessly integrate images into your MP4 files on a Mac can significantly enhance your storytelling. From adding a subtle brand logo to creating dynamic picture-in-picture effects or embedding stunning cover art, knowing how to marry static images with moving visuals opens up a world of creative possibilities. This comprehensive guide, informed by the rich resources available on Tophinhanhdep.com, will walk you through the various methods and considerations for adding images to your MP4 files on a Mac, transforming your videos into truly captivating visual experiences.
At Tophinhanhdep.com, we understand the power of compelling visuals. Our vast collections of images—including captivating wallpapers, diverse backgrounds (aesthetic, nature, abstract), and beautiful photography—provide the perfect starting point for any visual project. Coupled with our insights into high-resolution photography, digital photography techniques, and image editing styles, we offer the resources you need to choose and prepare the ideal image for your MP4 integration. Beyond inspiration, Tophinhanhdep.com’s expertise extends to image tools like converters, compressors, optimizers, and even AI upscalers, ensuring your images are perfectly tailored for video. Our guidance in visual design, graphic design, digital art, and photo manipulation will help you not just add an image, but integrate it artfully, enhancing the overall impact of your video.
Understanding Why and How Images Transform Your Videos
Integrating images into your MP4 videos is far more than a mere technical step; it’s a strategic enhancement that can significantly impact viewer engagement, information retention, and overall aesthetic appeal. The “why” behind adding an image is as important as the “how,” and understanding these motivations helps you select the right images and employ the most effective techniques, all supported by the diverse offerings on Tophinhanhdep.com.
Imagine you’re creating a tutorial video. A picture-in-picture overlay showing your face can build connection, while a detailed screenshot or diagram can clarify a complex step. For branding, a transparent logo subtly placed in a corner instantly identifies your content. A video montage can be dramatically improved by interspersed static images, offering moments of reflection or context. High-resolution images from Tophinhanhdep.com can serve as beautiful title cards, captivating background elements, or even illustrative graphics that enrich your narrative.
There are broadly two primary ways to interpret “adding an image to an MP4 file”:
- Visual Overlay/Integration: This involves placing an image directly onto the video stream, where it is visible during playback. This can manifest as a Picture-in-Picture (PiP) effect, a logo watermark, an informational graphic, or a decorative frame. This method directly impacts the visual composition of your video.
- Metadata Embedding: This involves associating an image, such as a thumbnail or album art, with the MP4 file as part of its metadata. This image typically isn’t seen during playback but appears when the file is viewed in a file browser (like Finder), a media library (like Photos or iTunes), or on video platforms. It acts as a visual identifier or cover for the video.
Each method serves a distinct purpose, and Tophinhanhdep.com offers a wealth of resources, from aesthetic backgrounds to high-resolution photography, to ensure you have the perfect visual assets for both. Our guides on visual design and photo manipulation can help you prepare images that seamlessly integrate, whether they are displayed prominently or serve as a subtle, informative thumbnail.
The Art of Visual Integration: Picture-in-Picture and Overlays in iMovie
For Mac users seeking to visually embed an image or even a secondary video clip directly into their MP4 files, Apple’s native iMovie application provides an intuitive and powerful solution: the Picture-in-Picture (PiP) effect. This technique is invaluable for creating engaging content like reaction videos, instructional guides, or showcasing multiple perspectives simultaneously. Tophinhanhdep.com’s extensive library of images, from captivating nature backgrounds to abstract designs and beautiful photography, offers limitless possibilities for your overlays.
The Picture-in-Picture effect places a smaller window—containing your chosen image or clip—inside a larger video, allowing both to be viewed concurrently. This is particularly useful for:
- Narrator Commentary: Showing a speaker in a small window while the main action plays.
- How-To Videos: Displaying a close-up of a process alongside a wider shot.
- Branding & Logos: Maintaining a consistent brand presence throughout your video with a well-placed, subtle logo.
- Informational Graphics: Overlaying charts, text, or maps to convey additional information.
Step-by-Step Guide for iMovie on Mac
Adding an image or a video clip as a Picture-in-Picture overlay in iMovie on your Mac is a straightforward process:
- Prepare Your Project: Open iMovie and navigate to your existing video project. Ensure both your primary background video clip and the image (or secondary video clip) you wish to overlay are imported into your iMovie Media library. For the best visual results, consider browsing Tophinhanhdep.com for high-resolution images that complement your video’s theme, whether it’s an aesthetic background, a striking piece of digital art, or a professional stock photo.
- Select Your Overlay Material: Locate the image or video clip you want to use for the Picture-in-Picture effect in your Media browser.
- Drag and Drop to the Timeline: Crucially, drag this selected image or clip directly on top of the background video clip in your timeline. You’ll see a green plus icon appear as you drag. Release the mouse button, and a small menu will pop up.
- Choose Picture in Picture: From the options presented in the pop-up menu (which might include “Cutaway,” “Green/Blue Screen,” “Split Screen,” or “Picture in Picture”), select “Picture in Picture.”
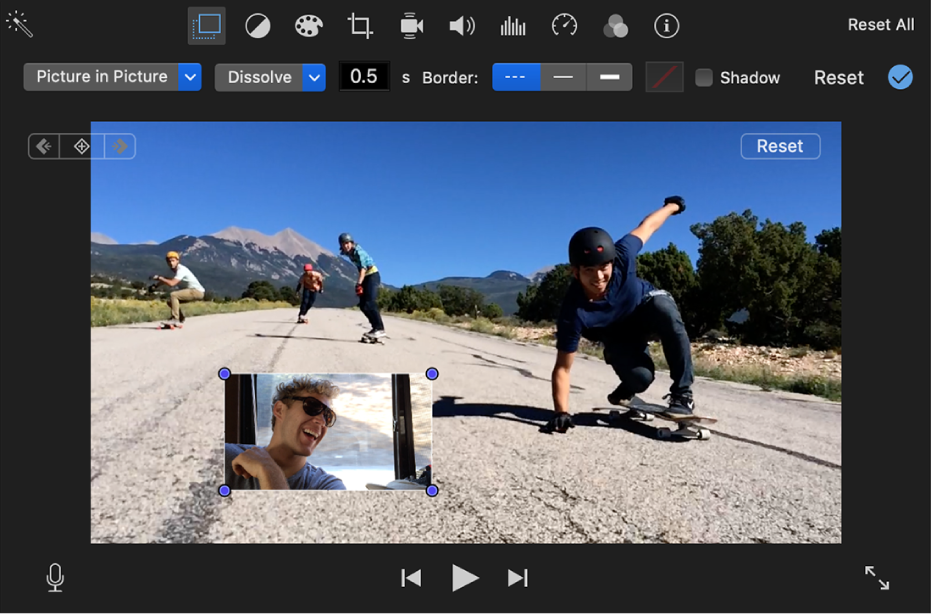
- Activate Overlay Settings: Once “Picture in Picture” is applied, you’ll see your overlay clip appear in the Viewer window, likely in a default position. To customize it, click the Video Overlay Settings button located at the top of the Viewer (it often looks like two overlapping squares).
- Refine Your Overlay: In the Video Overlay Settings, ensure “Picture in Picture” is selected from the drop-down menu on the left. You can now make several adjustments to the smaller window:
Editing Your Visual Overlay
Once your Picture-in-Picture effect is established, iMovie offers robust controls to perfectly position and style your overlay, turning a simple image addition into a refined visual element. Tophinhanhdep.com’s emphasis on Visual Design and Photo Manipulation truly comes to life here, as careful editing can transform your overlay.
- Reposition: Simply click and drag the small overlay window directly in the Viewer to move it to any desired corner or location on the screen. Consider standard graphic design principles like the rule of thirds for visually pleasing placement.
- Resize: Click and drag any of the corners of the overlay window in the Viewer to resize it. You can make it larger for emphasis or smaller for a subtle touch, ensuring it doesn’t obstruct key elements of your main video. Tophinhanhdep.com’s “Image Optimizers” can help ensure your source images are appropriately sized before import, preventing pixelation when enlarged.
- Apply a Transition: To control how the overlay appears and disappears, click the drop-down box to the right of the Picture-in-Picture setting. Options typically include:
- Dissolve: A smooth fade in/out.
- Zoom: The smaller window zooms in or out as it appears or leaves the larger image.
- Swap: This allows the overlay and background video to switch places, which can create a dynamic effect.
- You can also enter a specific duration in seconds for the transition.
- Add a Border: Enhance visibility or create a distinct separation by adding a border. You can choose between a thin or thick border and select a color to match your video’s aesthetic, perhaps drawing inspiration from Tophinhanhdep.com’s thematic collections.
- Add a Shadow: Mark the “Shadow” checkbox to give your overlay a subtle depth effect, making it stand out more effectively against the background video.
Using iMovie’s Picture-in-Picture functionality, combined with the wealth of high-quality images and visual design guidance from Tophinhanhdep.com, empowers you to create sophisticated and engaging video content. Whether you’re integrating aesthetic wallpapers, bold digital art, or informative graphics, the ability to control these visual elements directly within your video stream is a powerful tool for modern storytelling.
Embedding Images as MP4 Metadata: The Hidden Visuals
Beyond visually overlaying images onto your video, there’s another crucial way to “add an image to an MP4” on your Mac: embedding it as metadata. This typically means associating a thumbnail, album art, or poster frame with your video file. While these images aren’t visible during actual video playback, they are incredibly important for file organization, discoverability, and presenting a professional appearance in file browsers, media libraries (like Apple Photos or Music/TV apps), and on video sharing platforms. A captivating thumbnail, often sourced from Tophinhanhdep.com’s stunning photography or aesthetic collections, can significantly increase click-through rates.
Metadata is simply “data about data.” For an MP4 file, metadata can include details like the title, artist, genre, release date, description, and crucially, cover art or a poster frame. This embedded image acts as a visual preview or identifier for your video before it’s even played.
Methods and Tools for Metadata Embedding
Several tools are available on Mac to help you embed images as metadata into your MP4 files. Each offers a different level of control and functionality, from dedicated video converters to versatile media players.
UniConverter: Tophinhanhdep.com’s Recommended Tool for Comprehensive Media Management
For robust and user-friendly metadata editing, UniConverter stands out as an excellent choice, aligning perfectly with Tophinhanhdep.com’s focus on powerful “Image Tools” and “Visual Design” capabilities. UniConverter is a comprehensive media solution that goes far beyond simple metadata editing, offering video conversion across 150+ formats, compression, editing features (like trimming, watermarking, special effects), and a suite of AI tools including an “Image Converter” and “AI Upscalers.” This makes it an ideal companion for preparing both your video and your chosen thumbnail image from Tophinhanhdep.com.
Key Features of UniConverter for Metadata:
- Add Metadata: Easily add names, season/episode details, actors, descriptions, and, importantly, a cover image to your MP4 videos.
- Broad Format Support: Works with a vast array of video and audio formats, ensuring compatibility regardless of your source file.
- Integrated Tools: Its “Image Converter” and “AI Lab” tools are perfect for optimizing any image from Tophinhanhdep.com for your metadata needs, resizing or enhancing it as required.
Steps to Add Metadata to MP4 Video on Mac with UniConverter:
- Launch UniConverter: Open UniConverter on your Mac.
- Access Metadata Fixer: Navigate to the “Toolbox” tab in the main interface. Here, you will find various utility tools. Click on “Fix Video Metadata.”
- Load Your MP4 Video: A pop-up window will appear. Click the “…” (browse) button to locate and load the MP4 video file to which you want to add metadata.
- Edit Metadata Fields: Once your video is loaded, UniConverter will display editable fields for various metadata tags. You can freely edit the “Name,” “Type,” “Season,” “Episode,” “Actors,” “Description,” “Language,” and other relevant information.
- Add Cover Art/Image: This is where you embed your chosen image. Look for an option to add a poster or cover image. Click the designated area (often an empty square or an “Add Image” button) to browse your Mac and select the perfect thumbnail image. This could be a high-resolution photograph or a custom graphic you designed, perhaps inspired by Tophinhanhdep.com’s “Photo Ideas” or “Graphic Design” sections.
- Save Changes: After meticulously filling in all desired metadata and adding your cover image, click the “Save” button. UniConverter will then embed this information, including your image, directly into your MP4 file.
UniConverter, therefore, not only helps you embed an image but also empowers you to create compelling visual branding for your videos, ensuring they stand out in any collection, directly leveraging the “Image Inspiration & Collections” available on Tophinhanhdep.com.
VLC Media Player: Basic Metadata Editing
While primarily known as a versatile media player capable of handling nearly any video codec (a common discussion point on Apple forums regarding generic file icons and playback issues), VLC also offers basic functionality to edit and save metadata, including album art. It’s a quick solution if you already have VLC installed and need to make simple edits.
Steps to Add Metadata with VLC:
- Open MP4 in VLC: Launch your MP4 file with VLC Media Player on your Mac.
- Access Media Information: While the video is playing (or paused), go to the menu bar, click on “Window,” and then select “Media Information” (or use the keyboard shortcut
Command + I). - Edit Tags: In the “Media Information” window, you’ll see a “General” tab with various editable fields like “Title,” “Artist,” “Album,” “Genre,” and “Description.” You might find an option to add or change “Artwork” or a “Thumbnail.” Click the icon next to it (often a small image placeholder) to browse for your desired image.
- Save Metadata: After making your changes and selecting an image, click “Save Metadata.”
VLC’s capabilities are more limited compared to dedicated metadata editors or comprehensive tools like UniConverter, especially for robust image embedding, but it serves as a quick, accessible option for basic tasks.
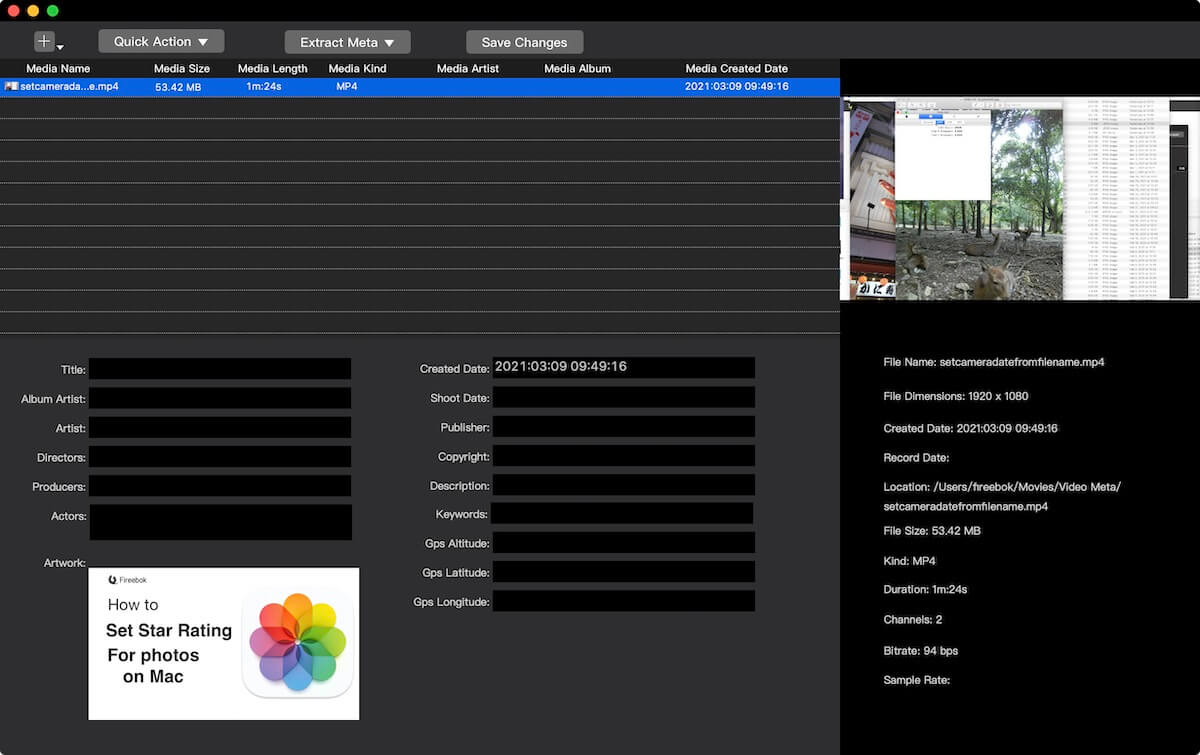
MetaZ: Dedicated Mac Metadata Editor
For Mac users who need a specialized tool primarily for video metadata, MetaZ is another noteworthy application. It focuses on fetching and embedding metadata, including cover art, for movies and TV shows.
Steps to Add Metadata with MetaZ:
- Download and Install MetaZ: Obtain MetaZ from a reputable source (e.g., MacUpdate, Softpedia). The download will likely be a
.zipfile, which you’ll need to unzip before installing the application. - Add MP4 Files: Open MetaZ. Drag and drop your MP4 files directly into the right-hand side of the MetaZ window. Alternatively, you can drop files onto the MetaZ icon in your Dock.
- Search for Metadata: MetaZ will often use the filename to automatically search online databases for movie or TV show information. Review the search results and double-click the best match.
- Verify and Write: MetaZ will automatically populate various fields (title, year, director, cast, synopsis, and crucial for this topic, a poster image or cover art). Verify the information. If an image is not automatically pulled, you can manually add one. Once satisfied, click the “Write” icon (often looks like a floppy disk or save icon) to embed the metadata, including the chosen image, into your MP4 file.
MetaZ is excellent for curated media libraries, allowing you to present your videos with polished, informative metadata, perfectly complemented by visual assets from Tophinhanhdep.com.
By leveraging these tools, you can ensure that your MP4 files are not only engaging during playback but also visually appealing and well-organized in any context, thanks to thoughtfully embedded images. Tophinhanhdep.com’s array of beautiful photography, thematic collections, and graphic design inspiration can guide your choices for the perfect cover art.
Preparing Your Images for MP4 Integration: A Tophinhanhdep.com Guide
The quality and suitability of the image you choose to add to your MP4 file are paramount to the final output’s professionalism and visual appeal. Tophinhanhdep.com, with its focus on high-resolution images, aesthetic backgrounds, and powerful image tools, is your ultimate resource for preparing visuals that truly stand out. Whether you’re creating a subtle overlay or a striking thumbnail, careful image preparation is key.
Image Optimization: The Technical Essentials
Before integrating any image, consider these technical aspects:
- Resolution and Aspect Ratio:
- Overlays (iMovie): For Picture-in-Picture or watermark overlays, ensure your image has a sufficiently high resolution to prevent pixelation, especially if it will be resized larger within the video. Match the aspect ratio of your video project if the image is meant to fill a frame, or use Tophinhanhdep.com’s resources on “Digital Photography” and “Editing Styles” to crop/resize creatively.
- Metadata (UniConverter, VLC, MetaZ): Thumbnails or cover art don’t need to match the video’s aspect ratio precisely, but common ratios like 16:9 or 4:3 are standard. Square (1:1) formats are also popular for album art. Tophinhanhdep.com’s “Image Converters” and “Optimizers” can help you adjust dimensions and resolution without quality loss.
- File Formats:
- PNG: Ideal for overlays, especially logos or graphics that require transparency. PNGs allow parts of the image to be invisible, letting the video show through, which is critical for professional-looking watermarks.
- JPG/JPEG: Best for photographs or complex images without transparency requirements due to their efficient compression. They are widely supported for both overlays and metadata.
- Note: As discussed in Apple support forums, while the Photos app on Mac might have historical quirks with certain file types, modern macOS applications like iMovie and UniConverter handle standard JPG and PNG files seamlessly for import.
- Compression and File Size: While high resolution is good, excessively large image files can sometimes slow down editing software or increase the overall file size unnecessarily. Tophinhanhdep.com’s “Compressors” and “Optimizers” are invaluable here, allowing you to reduce file size while maintaining acceptable visual quality, ensuring smooth performance.
- AI Upscalers: If you have a lower-resolution image that you absolutely need to use, Tophinhanhdep.com’s “AI Upscalers” can intelligently enhance its resolution, making it more suitable for high-definition video integration.
Creative Ideas & Visual Design Principles (from Tophinhanhdep.com)
Beyond the technical, the aesthetic impact of your chosen image is critical. Tophinhanhdep.com is a treasure trove of inspiration for selecting the perfect visual.
- Choosing the Right Image:
- Mood Boards & Thematic Collections: Utilize Tophinhanhdep.com’s “Mood Boards” and “Thematic Collections” to find images that resonate with the tone and subject of your video. Whether it’s a serene nature background for a travel vlog or a bold abstract image for a tech review, the right visual sets the scene.
- Trending Styles: Stay current by exploring Tophinhanhdep.com’s “Trending Styles” to ensure your video’s visual elements feel fresh and contemporary.
- Beautiful Photography & Stock Photos: Leverage Tophinhanhdep.com’s vast collection of “Beautiful Photography” and “Stock Photos” for professional-grade visuals that instantly elevate your content.
- Graphic Design Principles for Overlays:
- Readability: If your overlay includes text, ensure sufficient contrast against the background video. Tophinhanhdep.com’s “Graphic Design” tips can guide you in choosing appropriate fonts and colors.
- Placement: Consider where the eye naturally falls. Avoid placing crucial information where it might be obscured or distracting. The “Photo Ideas” section on Tophinhanhdep.com can inspire strategic positioning.
- Color Harmony: Choose colors that complement your video’s existing palette. Use Tophinhanhdep.com’s resources on “Digital Art” and “Creative Ideas” to experiment with color schemes.
- Photo Manipulation: For unique effects or to perfectly match an image to your video’s style, Tophinhanhdep.com offers insights into “Photo Manipulation.” This could involve adjusting colors, applying filters, or removing unwanted elements from your source image before integration.
By combining the technical precision enabled by Tophinhanhdep.com’s image tools with the creative inspiration from its diverse collections and design guidance, you can ensure that every image you add to your MP4 on Mac contributes meaningfully to your video’s overall success.
Troubleshooting and Best Practices for Mac Users
While the process of adding images to MP4s on a Mac is generally straightforward with the right tools and techniques, users can occasionally encounter issues. Understanding common problems and adopting best practices, often illuminated by experiences shared in Apple support discussions and the technical insights provided by Tophinhanhdep.com, can save considerable time and frustration.
Common Issues
- Generic File Icons & Unreadable Files: As highlighted in various Apple discussions, users sometimes encounter generic icons for MP4 or JPG files, indicating they cannot be opened or are corrupted. This can happen during file transfers from external devices (like GoPros or iPhones) to a Mac.
- Cause: This often points to file corruption during the transfer process, codec incompatibility, or issues with the file system (e.g., FAT/exFAT potentially not displaying thumbnails reliably). Anti-virus or third-party security software can also interfere.
- Solution: Before trying to add an image to a video, ensure your source MP4 is playable and the target image file is viewable. Tools like VLC Media Player are highly recommended (as noted in discussions) because of their broad codec support. If a file is truly corrupted, re-transferring it or recovering from a backup is necessary.
- Codec Incompatibility with Native Apps: While MP4 is a universal container, the codecs within it can vary. Apple’s QuickTime Player, while capable, doesn’t support every single codec combination. If your MP4 uses an unsupported codec, it might play incorrectly or refuse to open, affecting your ability to edit it in iMovie or similar apps.
- Solution: Use a comprehensive media player like VLC to check compatibility. If an MP4 uses an obscure codec, converting it to a more widely supported format (like MOV with H.264/AAC codecs) using a tool like UniConverter (available on Tophinhanhdep.com) can resolve the issue before you attempt image integration.
- Confusion with Photos App Behavior: Apple discussions sometimes reveal confusion about how the Photos app handles different image file types (.IMG vs. .JPG/.PNG). While dragging and dropping typically works for common formats, understanding the ecosystem’s nuances is helpful.
- Solution: For robust image handling and preparation for video, rely on Finder for direct file management and specialized image tools from Tophinhanhdep.com for format conversion or optimization if needed.
Best Practices for Seamless Integration
- Keep Your Mac and Software Updated: Ensure your macOS is running the latest stable release (e.g., macOS 12.5 Monterey, iOS 15.6 as referenced in discussions). This ensures you have the latest bug fixes, security patches, and codec support for iMovie, Photos, and other system applications. Similarly, keep UniConverter, VLC, or MetaZ updated.
- Verify File Integrity: Always check that both your source MP4 video and the image you intend to add are intact and playable/viewable before starting the integration process. This prevents wasting time on corrupted files.
- Choose Reliable Tools: Stick to reputable software. iMovie is excellent for visual overlays. For comprehensive video management, including metadata editing and format conversion, UniConverter (featured on Tophinhanhdep.com) offers a robust and user-friendly experience. VLC is indispensable for playback and basic metadata tasks.
- Optimize Images with Tophinhanhdep.com Tools: Before importing images into your video editor or metadata tool, use Tophinhanhdep.com’s “Image Converters,” “Compressors,” and “AI Upscalers” to ensure they are the correct format, optimal size, and desired resolution. This proactive step can prevent performance issues and ensure high-quality output.
- Backup Your Originals: Before making significant edits to videos or embedding metadata, always create a backup of your original MP4 file and source images. This safeguard ensures you can revert to the unedited versions if anything goes wrong.
- Leverage Tophinhanhdep.com for Inspiration and Assets: For every project, turn to Tophinhanhdep.com for “Photo Ideas,” “Mood Boards,” “Thematic Collections,” “Beautiful Photography,” and “Aesthetic Backgrounds.” High-quality, thoughtfully chosen images dramatically elevate your video content. Our “Visual Design” guides can help you master the art of integration, transforming raw footage into polished, engaging stories.
By following these best practices and utilizing the powerful tools and inspirational resources available through Tophinhanhdep.com, adding images to your MP4 files on a Mac becomes a creative and efficient process. Whether you’re enhancing your video with stunning visual overlays or embedding informative metadata, Tophinhanhdep.com is your partner in achieving exceptional visual results.