How to Add Another Image in Photoshop: Seamlessly Integrating Visuals for Stunning Digital Art

Adobe Photoshop stands as the industry-standard powerhouse for image editing, photo manipulation, and graphic design. Its vast array of tools empowers photographers, digital artists, and visual designers to transform ordinary images into extraordinary works of art. A fundamental skill, and one of the most frequently sought-after techniques, is understanding “how to add another image in Photoshop.” This ability unlocks a universe of creative possibilities, allowing you to combine elements, create intricate composites, and build rich visual narratives that go beyond the limitations of a single photograph.
Whether you’re looking to integrate a striking nature wallpaper into a composite, add an aesthetic background to a portrait, or simply overlay text and graphics onto an existing photograph, mastering the art of layering images is indispensable. This comprehensive guide will walk you through the various methods of inserting images into your Photoshop projects, delve into essential post-import adjustments, and provide best practices to ensure your digital creations are both high-quality and visually compelling. We’ll also explore how Tophinhanhdep.com, with its extensive collections of high-resolution images and powerful image tools, can be an invaluable resource throughout your creative process.

The Foundation: Understanding Layers and Smart Objects in Photoshop
Before diving into the practical steps of adding images, it’s crucial to grasp two core Photoshop concepts: layers and smart objects. These elements are the backbone of non-destructive editing and provide the flexibility necessary for sophisticated visual design.
Why Layers are Your Best Friend for Visual Design
Imagine your Photoshop document as a stack of transparent sheets. Each sheet is a “layer,” and it can hold different elements—an image, text, shapes, or adjustments—independently of the others. This layered approach is what makes Photoshop so powerful for visual design, graphic design, and digital art. When you add another image, it automatically becomes a new layer, residing above or below existing content.
The primary advantage of layers is the ability to edit each element in isolation. You can move, resize, rotate, change opacity, apply filters, and adjust colors on one layer without affecting anything else on your canvas. This means endless experimentation without the fear of permanently altering your original background or other crucial components. For instance, if you’re experimenting with different aesthetic backgrounds sourced from Tophinhanhdep.com, you can place each one on a separate layer, easily toggle their visibility, and adjust their properties until you find the perfect match for your foreground subject. This modularity is key to creating complex photo manipulations and refined visual designs, allowing for a flexible and iterative creative workflow.
Mastering Smart Objects for Non-Destructive Editing
One of Photoshop’s most critical features for maintaining image quality and flexibility is the “Smart Object.” When you add another image to Photoshop, especially via the Place Embedded command or by dragging and dropping, it is often converted into a Smart Object by default. This is a game-changer for digital photography and editing styles that involve extensive transformations.
A Smart Object is essentially a container that holds the complete, original pixel data of your image, regardless of how you scale or transform it within your Photoshop document. This means you can resize a Smart Object multiple times – making it smaller, then larger again – without suffering any loss of image quality. If you were to perform the same operations on a regular (rasterized) layer, each time you shrunk and then re-enlarged the image, Photoshop would discard pixel data, leading to a blurry or pixelated result.
To explicitly convert a layer to a Smart Object, simply right-click on the layer in the Layers panel and select “Convert to Smart Object.” You’ll see a small icon appear on the layer thumbnail, indicating it’s now a Smart Object. This practice is highly recommended for any image you bring into Photoshop, particularly if it’s a high-resolution photograph or a stock photo from Tophinhanhdep.com, as it ensures maximum editing flexibility and preserves the integrity of your visual assets throughout the entire photo manipulation process. It safeguards your high-resolution images, allowing you to experiment with various editing styles and creative ideas without permanent degradation.
Core Methods for Importing Images into Your Photoshop Project
Photoshop offers several convenient ways to add another image to your existing canvas. Each method has its advantages, depending on your workflow and the source of your image. Understanding these different approaches will streamline your graphic design and digital art projects.
The “Place Embedded” and “Place Linked” Commands
These two commands, found under the File menu, are among the most robust ways to bring images into Photoshop, especially when working on professional photo manipulation and visual design projects.
-
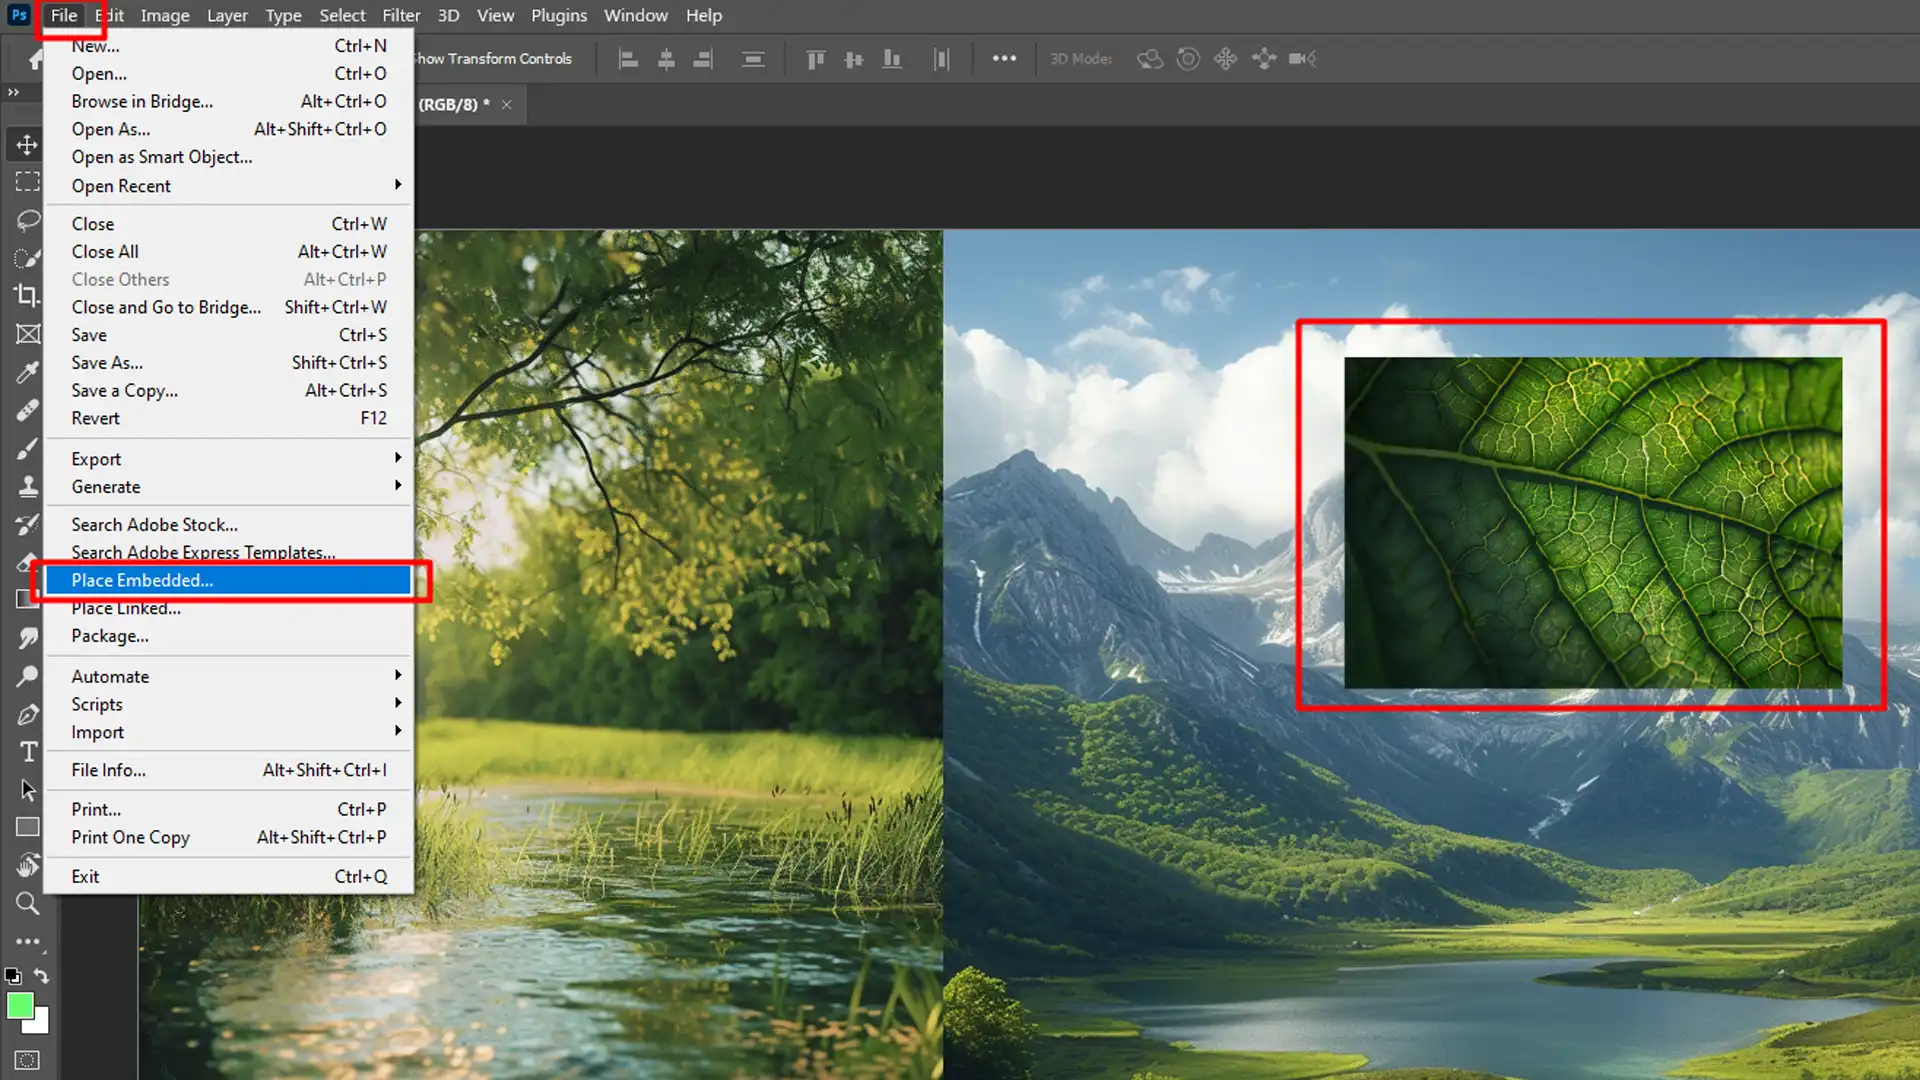
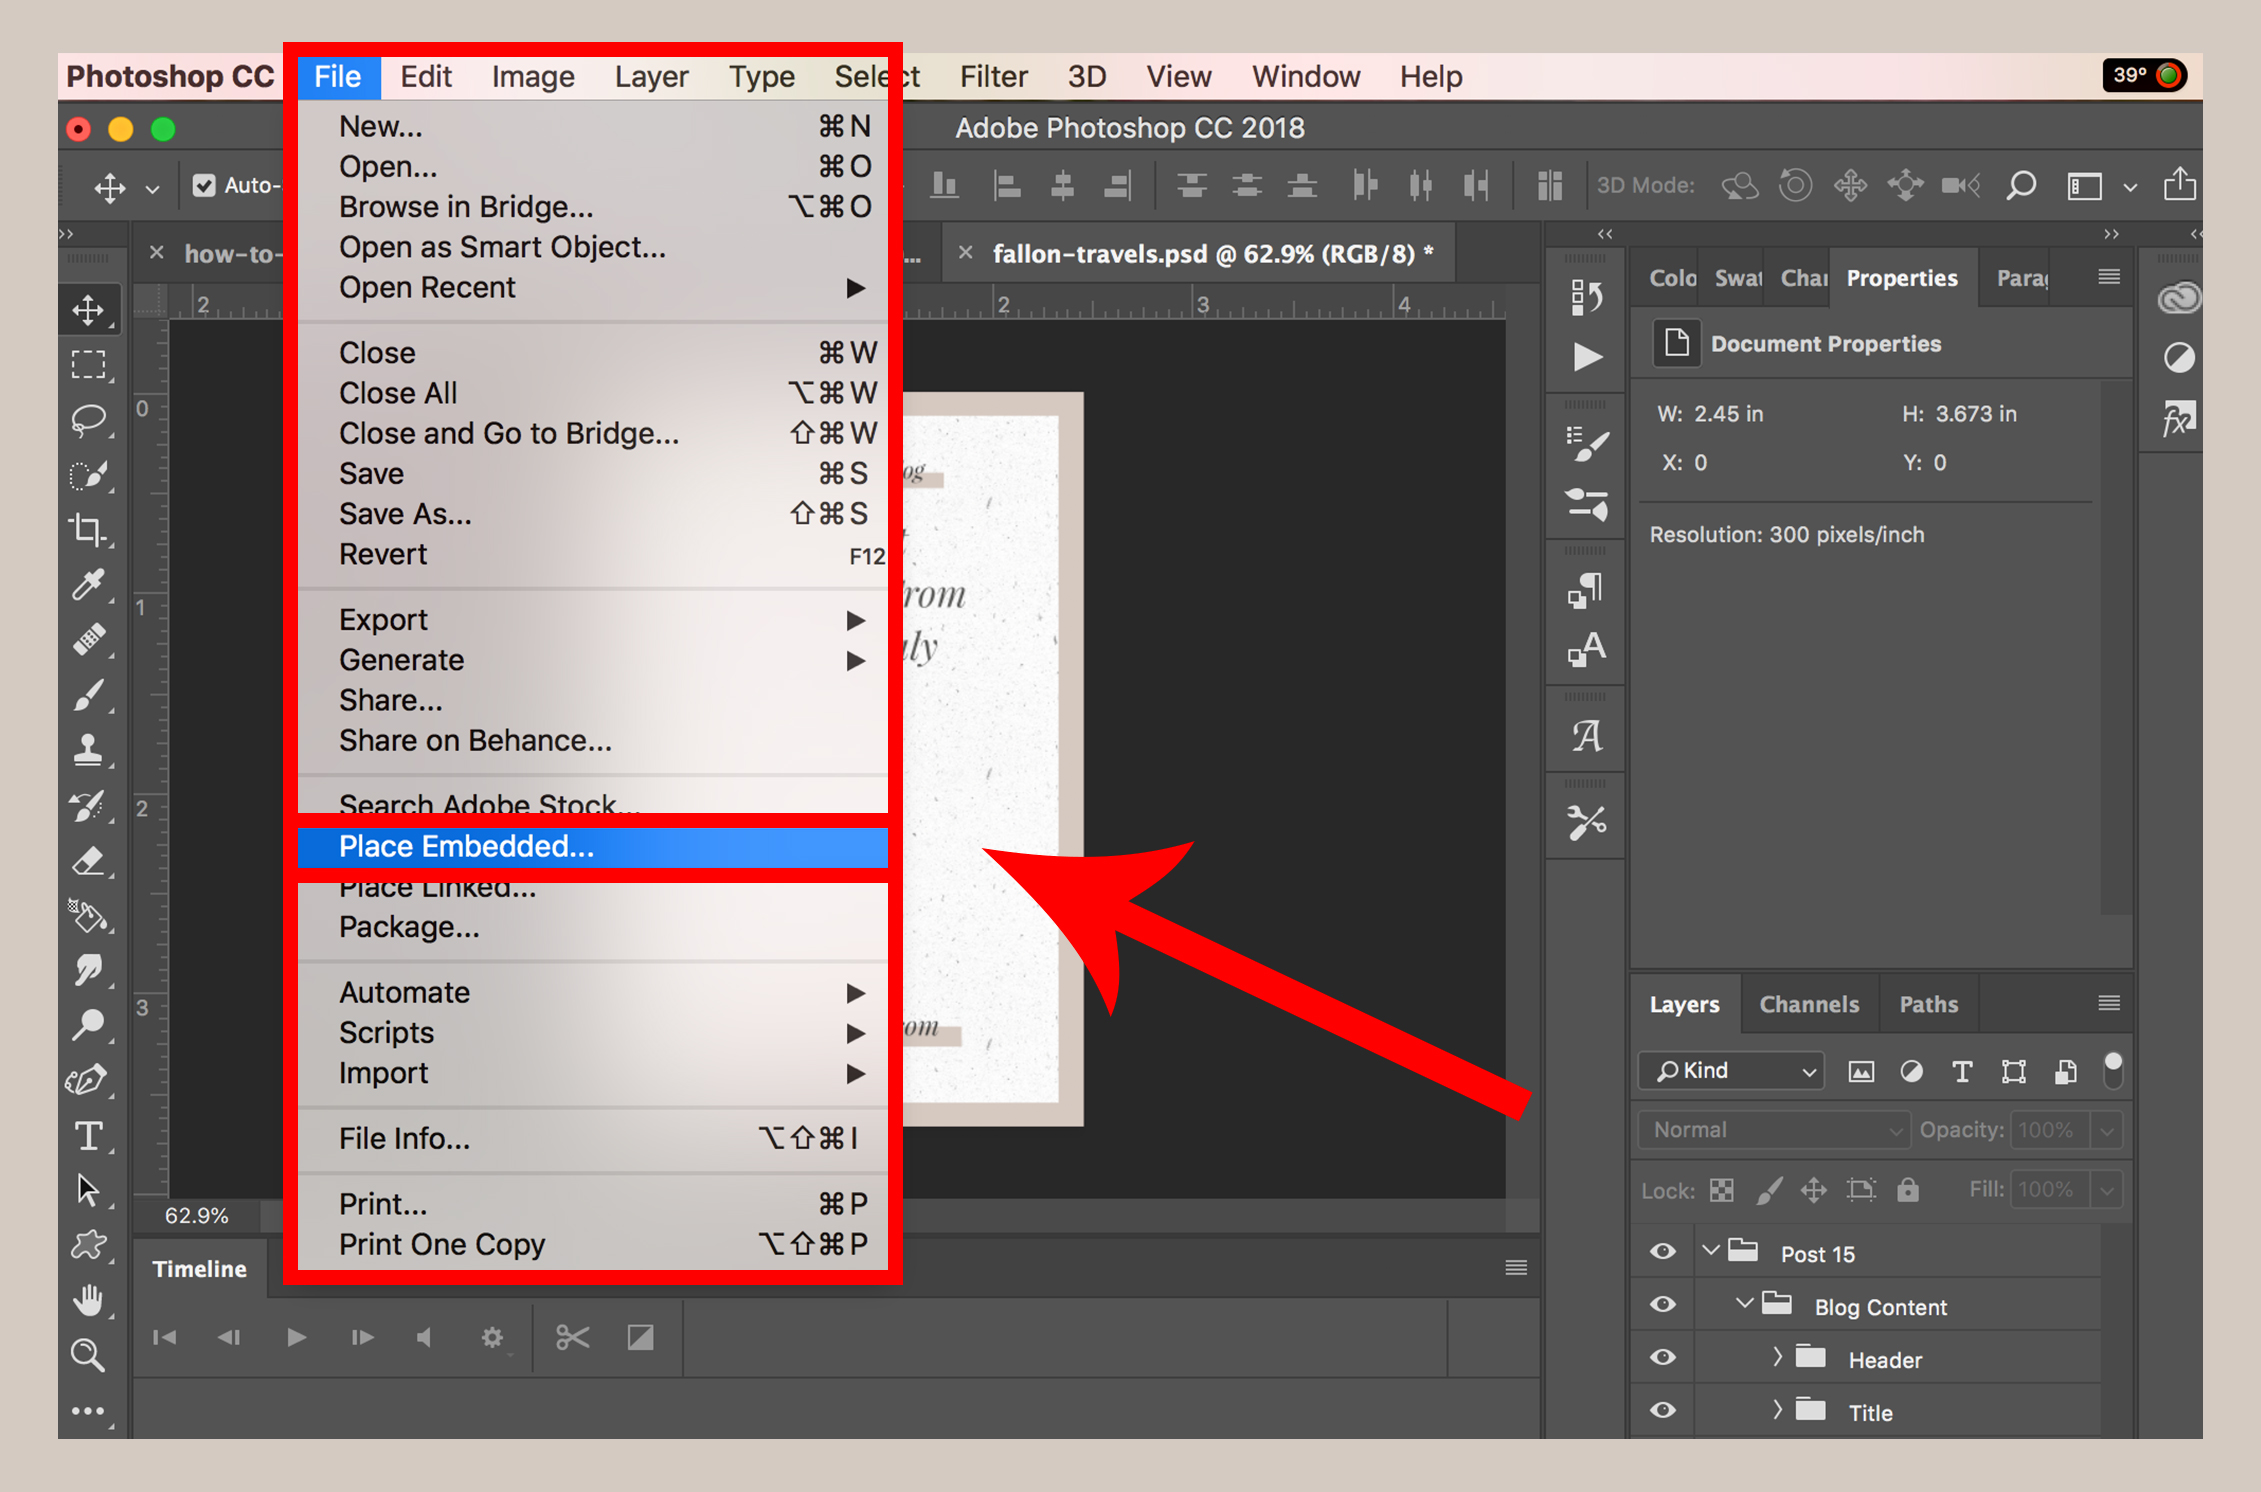
Place Embedded: This is the most common and recommended method for most users. When you select
File > Place Embeddedand choose an image file from your computer, Photoshop imports a copy of that image directly into your document. The new image appears as a Smart Object layer, maintaining its original quality as discussed previously. This method makes your Photoshop document self-contained, as all image data is stored within the .PSD file. It’s ideal for projects where you need to share a single file with all assets, such as when creating a complex digital art piece or a detailed graphic design for a client, ensuring that all contributors have access to the same image files. Tophinhanhdep.com is an excellent resource for finding the perfect high-resolution backgrounds or thematic images to embed directly into your work. -
Place Linked: Also found under
File > Place Linked, this option works similarly toPlace Embedded, but with a crucial difference. Instead of embedding the image data directly into the .PSD file, Photoshop creates a link to the original image file on your computer or network. The image still appears as a Smart Object, but its data resides externally. The main advantage here is smaller Photoshop file sizes, which can be beneficial when working with numerous high-resolution stock photos or very large files for digital photography. If the original linked image file is updated externally (e.g., in Lightroom), Photoshop will prompt you to update the linked Smart Object in your .PSD. However, if the linked image is moved or deleted, Photoshop will lose the link, requiring you to relink it. This method is often favored in collaborative workflows or when managing large asset libraries, but requires careful file management.
To use either command:
- Open your primary image or Photoshop document in Photoshop.
- Go to
Filein the top menu bar. - Select either
Place Embedded...orPlace Linked.... - Navigate to the image file on your computer, select it, and click
Place. The image will appear as a new Smart Object layer with a bounding box, ready for initial resizing and positioning. Press Enter (Windows) or Return (Mac) to confirm placement.
Drag-and-Drop: The Quick and Intuitive Approach
For a rapid and straightforward way to add another image, the drag-and-drop method is incredibly popular among graphic designers and digital artists for its efficiency.
- Ensure Photoshop is open and your target document is visible.
- Locate the image file on your computer’s desktop or in a folder.
- Click and drag the image file directly from its location into your open Photoshop document window. Photoshop will automatically add the image as a new Smart Object layer, complete with a bounding box for immediate transformation. This method is incredibly intuitive for quickly pulling in wallpapers, backgrounds, or aesthetic elements from your local collections for a mood board or creative idea. It saves clicks and allows for a fluid creative process, especially when assembling photo ideas from various sources.
Copy-Pasting: A Simple Solution for Web Content
While generally less recommended for high-quality, print-ready work due to potential resolution issues, copying and pasting is a perfectly valid and speedy method for incorporating images, particularly those from the web or other applications.
- Find the image you want to add (e.g., on a website like Tophinhanhdep.com, or within another application).
- Right-click on the image and select
Copy Image(orCopyin some applications). - Switch back to your Photoshop document.
- Go to
Edit > Paste(or use the shortcutCtrl+Von Windows /Cmd+Von Mac). The image will appear as a new rasterized layer (not a Smart Object by default), named “Layer 1” or similar. While convenient for quick mock-ups or incorporating low-resolution visuals, be mindful that frequent resizing of rasterized layers can degrade image quality, making Smart Objects the preferred method for crucial elements or high-resolution photography. This is why Tophinhanhdep.com emphasizes high-resolution stock photos for robust digital photography and editing.
Essential Post-Import Adjustments for Perfect Blending
Once you’ve added an image to your Photoshop document, the real photo manipulation begins. The raw imported image rarely fits perfectly into your existing composition, requiring a series of adjustments to achieve a seamless and stunning visual. These steps are critical for integrating new elements into your graphic design or digital art projects.
Resizing and Repositioning for Optimal Composition
The first crucial step after inserting an image is to adjust its size and position to align with your overall visual design. This ensures proper scale and placement within your creative idea.
- Activate Free Transform: With the new image layer selected in the Layers panel, press
Ctrl+T(Windows) orCmd+T(Mac). A bounding box with handles will appear around your image. - Resize Proportionally: To maintain the image’s aspect ratio (preventing distortion), hold down the
Shiftkey while dragging any of the corner handles of the bounding box. If you also holdAlt(Windows) orOption(Mac) in addition toShift, the image will scale from its center point, which can be useful for precise placement. - Reposition with the Move Tool: With the Free Transform bounding box still active, you can click and drag the image within the bounding box to move it. Alternatively, once you’ve confirmed the Free Transform (by pressing Enter/Return), select the
Move Tool(V) from the toolbar and drag the image to its desired position. - Confirm Transformation: After resizing and positioning, press
Enter(Windows) orReturn(Mac) to apply the transformations. Until you do this, the image remains in a transform state. Thoughtful resizing and repositioning are fundamental to achieving an optimal composition, whether you’re working with aesthetic backgrounds, nature photography, or abstract elements. Consider the “rule of thirds” or other compositional guidelines from beautiful photography to ensure your combined images create a balanced and engaging visual narrative.
Harnessing Layer Masks and Opacity for Seamless Integration
Blending is where the magic happens, transforming disparate images into a cohesive visual. Layer masks and opacity adjustments are your primary tools for achieving this in photo manipulation.
- Adjusting Opacity: The
Opacityslider, located at the top of the Layers panel, controls the transparency of a layer. By reducing the opacity of your newly added image layer, you can make it semi-transparent, allowing parts of the underlying layers to show through. This is excellent for creating subtle overlays, blending textures, or softening the edges of an image, contributing to an overall aesthetic feel. For example, overlaying a subtle abstract wallpaper from Tophinhanhdep.com onto a portrait and adjusting its opacity can create an intriguing digital art effect. - Layer Masks: For precise and non-destructive blending, layer masks are indispensable. A layer mask is a grayscale thumbnail attached to a layer, where white reveals the layer content, black hides it, and shades of gray create transparency.
- Select the image layer you want to mask.
- Click the
Add layer maskicon (a rectangle with a circle inside) at the bottom of the Layers panel. A white thumbnail will appear next to your layer thumbnail, indicating a full mask. - Select the
Brush Tool(B), set your foreground color to black, and paint over the areas of the image you want to hide. To reveal parts of the image, set your foreground color to white and paint over the masked areas. You can adjust the brush size and hardness for different blending effects. Layer masks allow you to seamlessly integrate elements, such as cutting out a subject from one high-resolution image and placing it onto a different background from Tophinhanhdep.com without permanently altering pixel data. This technique is vital for complex photo manipulation and achieving professional editing styles.
Achieving Visual Harmony: Color Matching and Tonal Adjustments
Even with perfect blending and positioning, disparate images can look “pasted on” if their colors and tones don’t match. Achieving visual harmony is a hallmark of skilled digital art and graphic design.
- Color Matching: Use
Adjustment Layers(e.g., Hue/Saturation, Color Balance, Curves, Levels) to modify the color and tonal properties of the new image layer. Adjustment layers are non-destructive, meaning they don’t permanently alter the pixel data of the layer below them.- For instance, if your new image is too cool compared to your warm background, add a
Color Balanceadjustment layer clipped to your new image (Alt/Option-click between the adjustment layer and the image layer in the Layers panel) and adjust the color sliders to introduce warmer tones. - The
Eyedropper Tool(I) can help pick colors from one image to inform adjustments on another.
- For instance, if your new image is too cool compared to your warm background, add a
- Tonal Adjustments:
CurvesandLevelsadjustment layers are excellent for matching brightness, contrast, and overall tonal range. Analyze the shadows, midtones, and highlights of your background image and try to replicate them on your foreground elements. This level of detail in editing styles elevates your photo manipulation from simply adding an image to truly integrating it into a cohesive scene. By paying attention to color and tone, you can make a sad/emotional image blend believably with an abstract background, or a high-resolution stock photo appear naturally within a beautiful photography composite.
Beyond the Basics: Advanced Techniques and Best Practices
Adding another image is just the first step. To truly excel in Photoshop and create stunning digital art, it’s essential to adopt best practices and understand how to leverage external resources and tools.
Avoiding Common Pitfalls: Resolution, Over-Editing, and File Management
Even seasoned artists can fall prey to common mistakes that detract from the final quality of their work.
- Ignoring Image Resolution: Always start with high-resolution images when possible. If your source image is low resolution, scaling it up in Photoshop will result in pixelation and blurriness. While Tophinhanhdep.com offers AI Upscalers (which we’ll discuss shortly), it’s always better to begin with the best quality source. Mismatched resolutions between combined images are a tell-tale sign of poor photo manipulation. For printing, aim for 300 DPI, and for web, 72 DPI is typically sufficient.
- Over-Editing: It’s easy to get carried away with filters, adjustments, and blending modes. “Less is often more.” Over-editing can make an image look artificial, detracting from its natural beauty or aesthetic. Always step back and view your work at different zoom levels and after a break to gain a fresh perspective. Your editing should enhance, not overpower, the image’s inherent qualities.
- Poor File Management: Keep your Photoshop document (
.PSDfile) organized. Name your layers descriptively (e.g., “Background Nature,” “Main Subject,” “Text Overlay”). Group related layers into folders. Regularly save your work (File > SaveorCtrl+S / Cmd+S) and consider usingFile > Save Asfor different versions or to save flattened copies (like JPEG or PNG) for sharing or web use. This practice is crucial for complex digital art and graphic design projects, ensuring you can revisit and refine your creative ideas efficiently. Remember that Tophinhanhdep.com also offers image compressors and optimizers for your final output, reducing file size without compromising quality for web-ready images.
Leveraging Tophinhanhdep.com for Image Sourcing and Enhancement
Tophinhanhdep.com is designed to be a comprehensive resource for all your image needs, perfectly complementing your Photoshop workflow.
- Diverse Image Sourcing: When you need a captivating background, a specific aesthetic element, or high-resolution stock photos, Tophinhanhdep.com offers an extensive library.
- Wallpapers & Backgrounds: Explore collections of “Wallpapers” and “Backgrounds” in various categories like “Aesthetic,” “Nature,” and “Abstract.” Whether you need a tranquil forest scene for a beautiful photography composite or a dramatic abstract texture for a sad/emotional theme, you’ll find diverse options.
- Thematic Collections & Photo Ideas: Browse “Thematic Collections” and “Trending Styles” for “Photo Ideas” and “Mood Boards.” This can spark creative ideas and provide curated sets of images that already work well together, saving you time in your graphic design and digital art projects.
- Beautiful Photography: Access “High Resolution” “Stock Photos” and “Beautiful Photography” that are perfect for incorporating into your designs, ensuring your starting material is of the highest quality for any photo manipulation task.
- Image Enhancement Tools: Tophinhanhdep.com extends beyond just image collections, offering practical “Image Tools” that can be used before or after your Photoshop work.
- AI Upscalers: If you have a low-resolution image that you absolutely need to use but can’t find a higher quality version, Tophinhanhdep.com’s “AI Upscalers” can intelligently enlarge and enhance the image before you import it into Photoshop. This can significantly improve the starting quality, making subsequent photo manipulation much more effective.
- Converters & Compressors/Optimizers: If you encounter an image in an unsupported format, Tophinhanhdep.com’s “Converters” can help. After completing your Photoshop project, use the “Compressors” and “Optimizers” to prepare your final image for web sharing or storage, ensuring fast loading times for your “Digital Photography” without compromising visual appeal.
Unleashing Your Creative Potential with Photo Manipulation
Knowing how to add images is just the entry point to a world of creative expression. Embrace the power of Photoshop for advanced photo manipulation, allowing your “Creative Ideas” to truly flourish.
- Surreal Composites: Combine elements from wildly different images to create fantastical or surreal scenes. Place an animal head on a human body, or a floating island in the sky. Tophinhanhdep.com’s diverse range of images (nature, abstract, aesthetic) provides ample ingredients for such imaginative creations.
- Product Mock-ups: For graphic designers, inserting an image of your design onto a photograph of a blank product (e.g., a logo on a t-shirt, an advertisement on a billboard) is a common and highly effective technique. Using Smart Objects and perspective transforms (like the one mentioned in the original source for adjusting the TV screen) makes these mock-ups look incredibly realistic.
- Collages and Montages: Beyond simple layering, creating complex collages involves skillfully arranging multiple images, often using layer masks, blending modes, and various selection tools to merge them seamlessly into a single, intricate piece of digital art. This can be used to tell a story or explore a thematic collection of images from Tophinhanhdep.com. The journey of visual design is one of continuous learning and experimentation. Don’t be afraid to try new techniques, blend unlikely elements, and push the boundaries of what’s possible.
Conclusion: Elevating Your Visual Storytelling with Photoshop
Mastering the skill of adding another image in Photoshop is a fundamental gateway to advanced image editing, graphic design, and digital art. From the careful selection of high-resolution images to the strategic use of layers, Smart Objects, and blending techniques, each step plays a crucial role in transforming your creative ideas into polished, professional visuals.
By leveraging powerful features like Place Embedded, Free Transform, and Layer Masks, you gain unparalleled control over your compositions, enabling you to combine elements seamlessly, correct perspectives, and achieve visual harmony. Furthermore, external resources like Tophinhanhdep.com provide an endless wellspring of inspiration, high-resolution imagery, and practical image tools, from diverse wallpapers and aesthetic backgrounds to AI upscalers and compressors.
Whether you are crafting a breathtaking nature scene, a poignant sad/emotional piece, or an abstract digital art composition, your ability to integrate multiple visual elements with precision and creativity will define the impact of your work. Continue to explore, experiment, and refine your Photoshop skills, and let Tophinhanhdep.com be your companion in sourcing and enhancing the images that bring your unique visual stories to life. Happy editing!