How to Add Another Image in Photoshop: Essential Techniques for Layering and Visual Design on Tophinhanhdep.com

Adobe Photoshop stands as the undisputed titan in the realm of image editing, a powerful tool transforming ordinary photographs into extraordinary visual narratives. For aspiring digital artists, seasoned photographers, and graphic designers alike, one of Photoshop’s most fundamental yet versatile features is the ability to seamlessly combine multiple images. This technique, often referred to as layering or photo manipulation, is the bedrock of countless creative endeavors, from crafting aesthetic backgrounds and compelling advertisements to constructing elaborate digital art pieces. On Tophinhanhdep.com, where we celebrate the art of visual storytelling through high-resolution images, stunning photography, and innovative visual design, mastering this skill is paramount.
When you’re first learning how to add another image in Photoshop, the sheer number of tools and options can feel overwhelming. Yet, with a clear, step-by-step approach, you’ll discover that integrating new elements into your projects is not only straightforward but also incredibly rewarding. This comprehensive guide will walk you through the essential methods for adding images, delve into the critical role of layers and smart objects, and explore techniques to ensure your combined visuals are stunning and cohesive. By the end, you’ll be equipped to elevate your digital photography and graphic design projects, turning your creative ideas into polished masterpieces ready for any mood board or thematic collection.
Understanding Photoshop Layers and Smart Objects
At the core of multi-image compositions in Photoshop lies the concept of layers. Imagine each image or element you add as a transparent sheet stacked one on top of the other. This layered structure allows you to manipulate individual components of your design independently, without affecting other parts of the composition. This non-destructive editing approach is a cornerstone of professional visual design, enabling flexibility and endless creative iterations.
When you bring a new image into an existing Photoshop document, it automatically becomes a new layer. The Layers Panel, typically located on the right side of your Photoshop interface, is your command center for managing these elements. Here, you can adjust the order of layers, control their visibility, apply blending modes, and fine-tune various properties to achieve your desired visual flow. Understanding how to effectively use this panel is crucial for any successful photo manipulation project.

The Power of Non-Destructive Editing with Smart Objects
While standard layers offer significant flexibility, Photoshop introduces an even more powerful concept for preserving image quality and facilitating non-destructive editing: Smart Objects. When an image is converted into a Smart Object, Photoshop essentially embeds or links the original image’s full resolution and pixel data within the layer.
Here’s why Smart Objects are indispensable for adding and manipulating images:
- Quality Preservation: The primary advantage of Smart Objects is that they maintain the original quality of your image, regardless of how many times you resize, rotate, skew, or warp them. If you repeatedly scale down a regular layer and then scale it back up, you’ll notice a significant degradation in quality. Smart Objects, however, retain their pixel integrity, ensuring your high-resolution photography remains pristine.
- Non-Destructive Transformations: All transformations (scaling, rotating, warping, etc.) applied to a Smart Object are non-destructive. This means you can always revert to the original transformation or adjust it at any point without loss of data. This is invaluable when experimenting with creative ideas or refining a digital art piece.
- Editable Filters and Adjustments: Filters and adjustments applied to Smart Objects become “Smart Filters,” which can be edited, toggled, or removed at any time. This offers unparalleled flexibility in developing unique editing styles for your images.
- Linked Instances: You can create multiple instances of the same Smart Object across your document. Editing one instance will automatically update all other linked instances, streamlining workflows for graphic design projects that reuse elements.
Pro Tip: Always use Smart Objects when inserting another image into Photoshop. To convert a regular layer to a Smart Object, simply right-click on the layer in the Layers panel and select “Convert to Smart Object.” This simple step can save you immense frustration and preserve the high quality of your image collections.
Step-by-Step Guide to Inserting Images in Photoshop
Integrating additional images into your Photoshop document is a fundamental skill for any visual design project, whether you’re crafting aesthetic backgrounds or complex photo manipulations. Photoshop offers several straightforward methods to achieve this, each suitable for different workflows and preferences.
Method 1: Drag and Drop for Quick Integration
This is often the quickest and most intuitive way to add another image.
- Open Photoshop and your base image: Start by opening the image you want to use as your background or base layer in Photoshop. If you’re starting a new project, create a new document via
File > New. - Locate the second image: Minimize Photoshop slightly so you can see your desktop or file explorer. Find the image file you wish to add.
- Drag and Drop: Click and drag the image file directly from your desktop or file explorer onto your open Photoshop document.
- Confirm Placement: The image will appear with a bounding box around it. You can resize and reposition it immediately. Once satisfied, press
Enter(Windows) orReturn(Mac) to confirm its placement. Photoshop will automatically create a new layer for this image and, depending on your preferences, often convert it into a Smart Object by default.
This method is ideal for rapidly assembling mood boards or thematic collections of images.
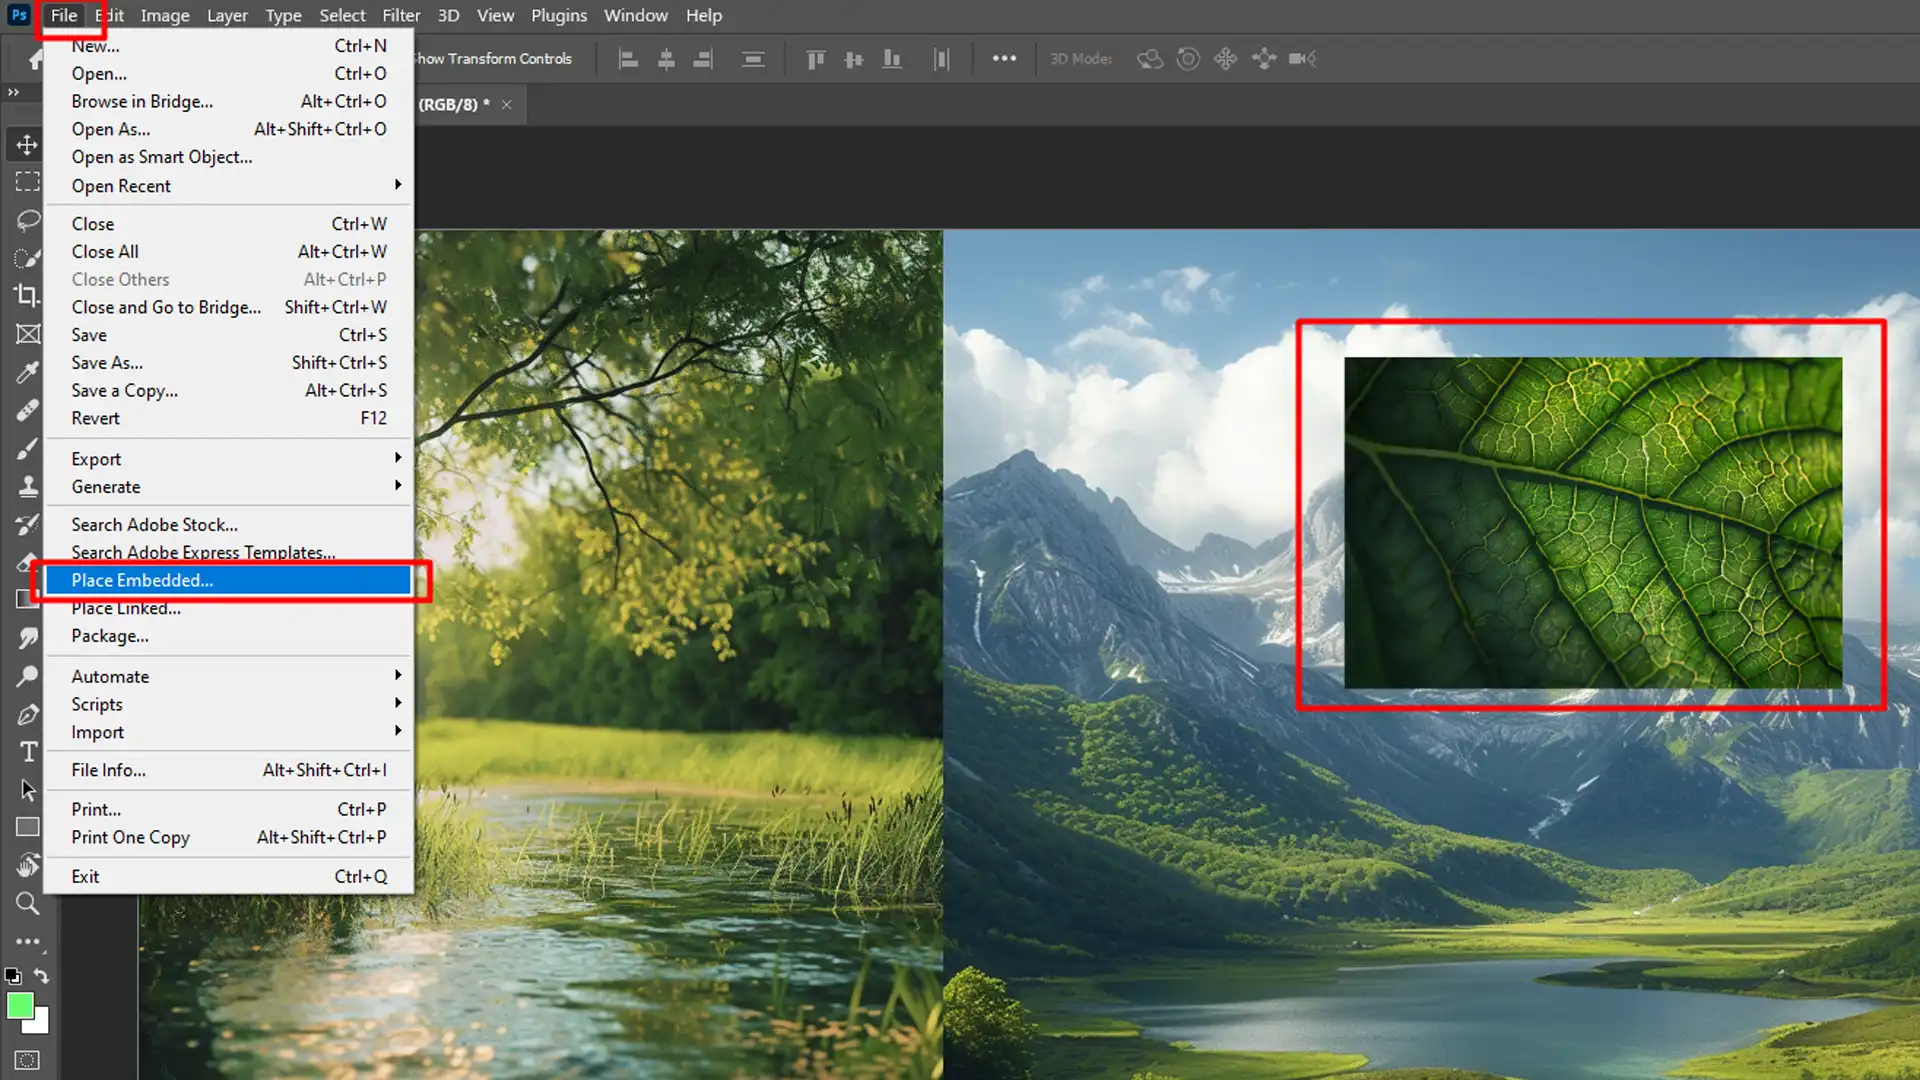
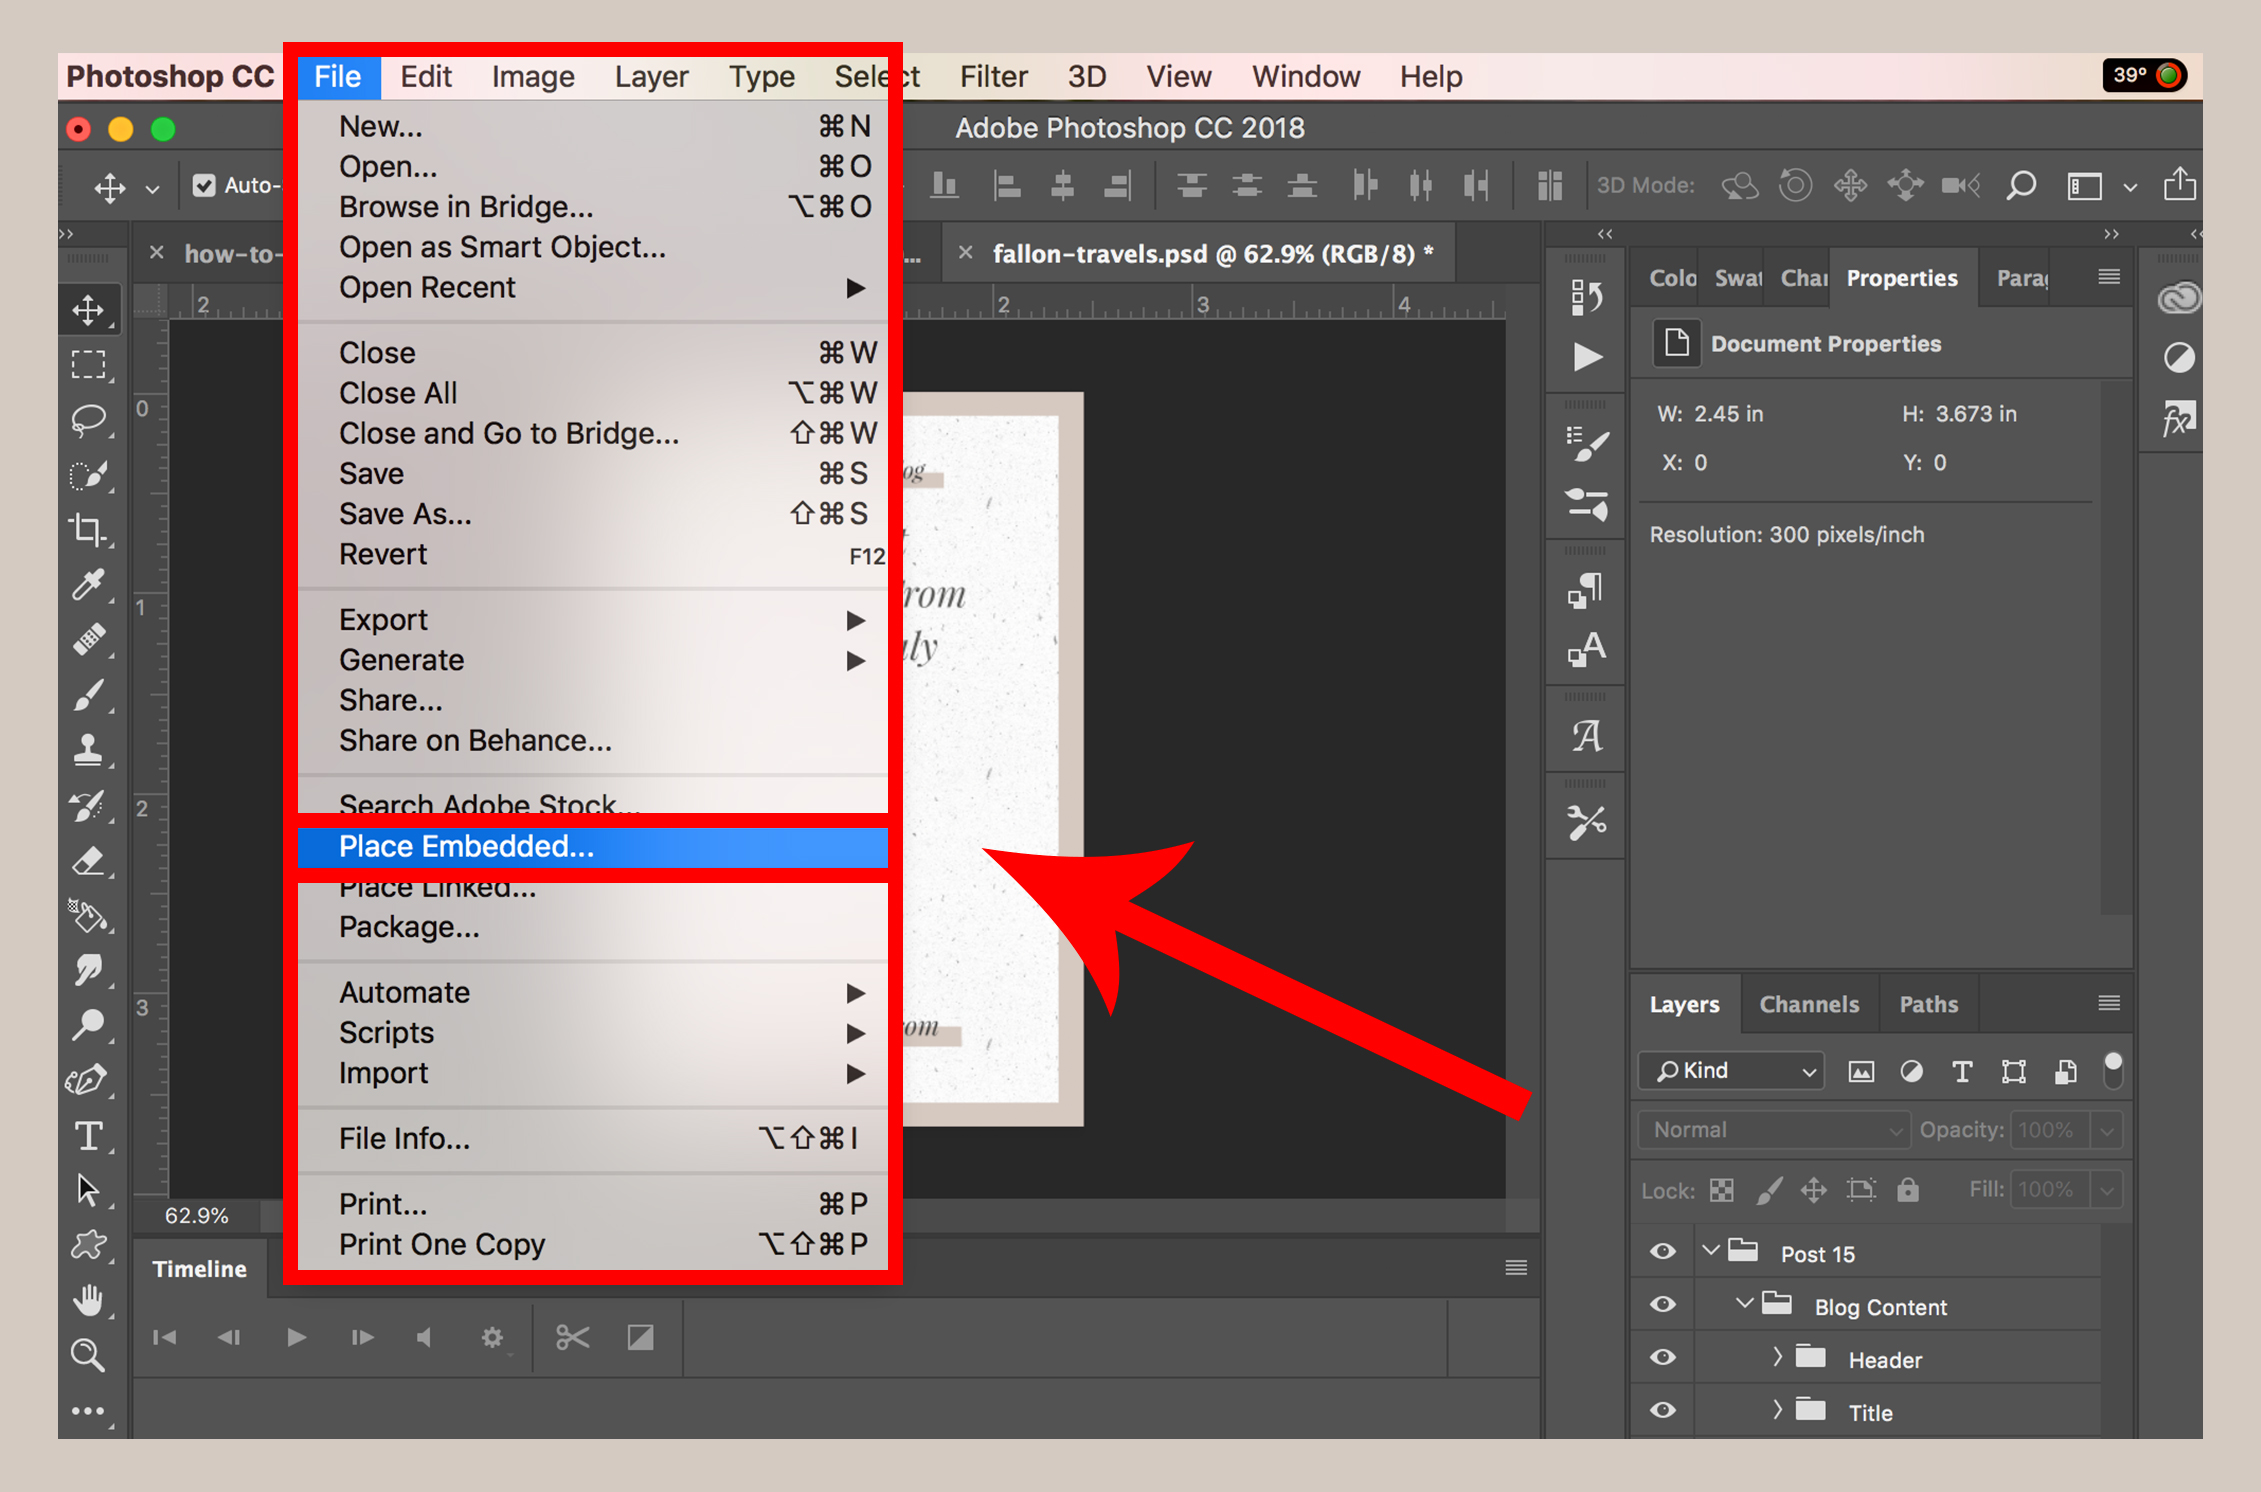
Method 2: The ‘Place Embedded’ Command
The ‘Place Embedded’ command is a highly recommended method, especially as it embeds the image as a Smart Object, protecting its quality from the outset.
- Open your base image or document: Open your primary Photoshop document or image.
- Go to File > Place Embedded…: From the top menu bar, select
File, then choosePlace Embedded.... - Select your image: A file browser window will appear. Navigate to the image you want to add, select it, and click
Place. - Position and confirm: The image will appear with a bounding box. Use the
Move Tool(V) to position it, and the bounding box handles (holdShiftwhile dragging a corner to maintain proportions) to resize it. Once satisfied, pressEnter(Windows) orReturn(Mac) to confirm.
This method is excellent for projects demanding high-resolution images and precise photo manipulation, ensuring the integrity of your digital photography.
Method 3: Copy and Paste for Flexibility
While sometimes less ideal for large, high-resolution images due to potential quality loss if not handled carefully, copy and paste remains a valid option for certain scenarios, especially when grabbing elements from other applications or web browsers.
- Copy the image:
- From the web: Right-click the image in your web browser and select
Copy Image. - From your computer: Open the image in an image viewer, then right-click (or Ctrl-click on Mac) and choose
Copy. Simply copying the file itself won’t work; you need to copy the image data.
- From the web: Right-click the image in your web browser and select
- Create a new document or open an existing one in Photoshop.
- Paste the image: Go to
Edit > Pastefrom the top menu, or use the keyboard shortcutCtrl+V(Windows) /Cmd+V(Mac). The copied image will appear as a new layer. - Convert to Smart Object (Highly Recommended): If you used this method, it’s strongly advised to right-click the newly pasted layer in the Layers Panel and select “Convert to Smart Object” to preserve its quality for further editing.
This method is particularly useful for quickly prototyping graphic designs or incorporating small aesthetic elements from diverse sources.
Method 4: Opening a New Image as a Base
Sometimes, you don’t want to add an image to an existing document, but rather open a second image to start a new composition from it, or to easily drag elements from it.
- Open Photoshop.
- Go to File > Open…: From the top menu bar, select
File, thenOpen.... - Select your image: Navigate to the image you want to open and click
Open. - New Tab: The image will open in its own new tab within Photoshop. From here, you can directly edit it, or use the
Move Tool(V) to drag it onto another open document, where it will automatically become a new layer.
This approach is perfect for beginning a new digital art piece or for working with high-resolution stock photos as your primary canvas.
Mastering Image Integration: Blending and Manipulation
Adding another image to Photoshop is just the first step. The true art lies in integrating it seamlessly, making it appear as if it was always part of the original composition. This involves a suite of techniques that fall under the umbrella of visual design and photo manipulation, transforming disparate elements into a unified, beautiful photograph.
Resizing, Rotating, and Positioning for Perfect Composition
Once your new image is placed, it rarely fits perfectly right away. Photoshop’s transformation tools are essential for achieving the right scale, orientation, and placement.
- Resizing and Scaling: After placing an image (or selecting a layer), you’ll often see a bounding box. To manually resize, go to
Edit > Free Transformor use the shortcutCtrl+T(Windows) /Cmd+T(Mac). Drag the corner handles of the bounding box while holdingShiftto maintain the image’s proportions. To scale from the center, holdAlt(Windows) /Option(Mac) in addition toShift. For precise dimensions, use theW(Width) andH(Height) fields in the Options bar at the top of the screen. Resizing accurately is crucial for any high-resolution photography project, especially when considering the final output for print or web. - Rotating: With Free Transform active, move your cursor slightly outside a corner handle until it turns into a curved double-headed arrow. Click and drag to rotate the image. For precise rotations (e.g., 90 degrees), hold
Shiftwhile rotating. - Positioning: Use the
Move Tool(V) to drag the image around your canvas until it’s in the desired spot. Ensure it aligns well with your base image, contributing to an overall balanced composition. - Perspective and Distort: For more complex blending, especially when combining images taken at different angles, use
Edit > Transform > PerspectiveorDistort. These tools allow you to manipulate the bounding box in ways that simulate depth and angle, making the inserted image conform to the perspective of the base image, as seen in the example of placing a football game onto a TV screen.
Achieving Seamless Blending with Opacity and Layer Masks
The key to realistic photo manipulation lies in seamlessly blending pictures. Opacity and layer masks are your primary tools for this.
- Adjusting Opacity: The
Opacityslider in the Layers Panel controls the transparency of a layer. Lowering the opacity allows the underlying image content to show through, creating subtle overlays or softening harsh edges. This is an excellent way to integrate aesthetic or abstract elements, allowing them to subtly influence the overall mood. - Layer Masks: Layer masks are powerful non-destructive tools that allow you to selectively hide or reveal parts of a layer. Instead of permanently erasing pixels (which destructive), a layer mask uses black, white, and shades of gray to control transparency.
- To add a layer mask, select the layer you want to mask and click the
Add Layer Maskicon (a rectangle with a circle inside) at the bottom of the Layers Panel. - Select the
Brush Tool(B), set your foreground color to black to hide parts of the layer, and white to reveal them. Gray shades create semi-transparent effects. - Layer masks are essential for intricate cut-outs, blending subjects into new backgrounds, and creating sophisticated digital art composites. If you make a mistake, simply paint over it with white to undo the concealment. This precision is vital for high-quality visual design.
- To add a layer mask, select the layer you want to mask and click the
Advanced Blending Techniques: Matching Lighting and Effects
Beyond basic blending, advanced photo manipulation often requires unifying the aesthetic properties of combined images.
- Matching Lighting and Color: For realistic composites, the lighting and color temperature of your inserted image must match the background.
- Use
Image > Adjustments(e.g.,Hue/Saturation,Color Balance,Levels,Curves) to fine-tune the colors and tones of the new layer. - Consider adding an adjustment layer (like
ExposureorGradient Map) clipped to your new image layer to subtly match brightness and contrast. - The
Eyedropper Tool(I) can help you sample colors from the background to inform your color adjustments on the new layer.
- Use
- Applying Filters: Filters, found under the
Filtermenu, can add effects, enhance textures, or subtly alter the appearance of your images to make them more cohesive. When working with Smart Objects, filters become “Smart Filters,” allowing you to modify their settings at any time. Experiment withBlur,Sharpen, andNoisefilters to match grain or focus between different photographic elements. For abstract or aesthetic images, artistic filters can add a unique flair. - Content-Aware Fill: For seamlessly removing unwanted elements or extending backgrounds, Photoshop’s
Content-Aware Fillfeature (often found underEdit > Content-Aware Fillor in conjunction with selection tools) can intelligently fill selected areas based on surrounding pixels. This is a powerful tool for tidying up composites before final adjustments.
Elevating Your Visual Design with Multi-Image Compositions
The ability to combine images in Photoshop isn’t merely a technical skill; it’s a gateway to unlocking immense creative potential in visual design. From simple collages to complex digital art and photo manipulation, mastering these techniques allows you to bring diverse elements into harmonious new creations.
From Basic Overlays to Complex Photo Manipulation
Starting with a basic understanding of layering, you can progress to sophisticated techniques that completely transform your images:
- Creating Aesthetic Backgrounds and Wallpapers: Combine elements from nature, abstract patterns, or beautiful photography to craft unique backgrounds for your desktop, mobile, or design projects. Layering subtle textures with soft-focus landscapes can create a serene aesthetic.
- Developing Thematic Collections: Use multi-image compositions to build compelling thematic collections. Imagine combining various elements for a “sad/emotional” visual, using contrasting images and blending modes to evoke a specific feeling. Or, creating a “trending styles” collage that showcases popular visual motifs.
- Digital Art and Photo Manipulation: The fusion of multiple images is fundamental to digital art. This can range from surreal composites that blend human subjects with fantastical landscapes to detailed graphic designs that incorporate logos, text, and imagery into a cohesive brand identity. Advanced photo manipulation often involves intricate masking, precise color grading, and meticulous attention to detail to make disparate elements appear as a single, believable scene. Tophinhanhdep.com encourages exploring creative ideas to push the boundaries of your digital artistry.
Optimizing Image Quality and Resolution
Maintaining image quality is paramount for professional results, especially when working with high-resolution images destined for various platforms.
- Start with High-Resolution Photography: Always begin with the highest quality source images available. Using low-resolution images, even if upscaled with AI Image Tools later, will inherently limit the fidelity of your final composition. Tophinhanhdep.com emphasizes stock photos and digital photography for this reason.
- Check Image Resolution: Before integrating, inspect the resolution of your images. Go to
Image > Image Sizeto view dimensions and DPI (dots per inch). For print, a general rule is 300 DPI; for screens, 72 DPI is common, though higher resolutions are increasingly used for modern displays. Ignoring resolution can lead to blurry, unprofessional results. - Leverage AI Upscalers: If you have a low-resolution image that you absolutely must use, consider processing it through an AI Upscaler (one of the image tools highlighted on Tophinhanhdep.com) before importing it into Photoshop. While not a magic bullet, these tools can intelligently add detail and increase resolution, making the image more suitable for manipulation.
- Smart Objects (Again!): As reiterated, Smart Objects are your best defense against quality degradation during resizing and transformations within Photoshop.
Common Pitfalls and Pro Tips for Multi-Image Projects
Even with a solid understanding of Photoshop’s tools, certain mistakes can undermine your multi-image projects. Being aware of these common pitfalls and adopting professional best practices will significantly enhance the quality and impact of your visual design work.
Avoiding Over-editing and Color Mismatches
One of the most frequent mistakes in photo editing is going too far, making the final image look artificial or clashing.
- The Trap of Over-editing: It’s easy to get carried away with filters, adjustments, and blending modes. While effects can add a “wow” factor, use them sparingly. Subtle changes often yield the best results, creating a natural and professional look rather than an “edited” one. The goal is enhancement, not obliteration of the original beauty. This is especially true when working with beautiful photography or delicate aesthetic elements.
- Overlooking Color Matching: When combining images, inconsistent colors or lighting can immediately break the illusion. Imagine a brightly lit subject composited onto a dusky background—it just won’t look right.
- Use Adjustment Layers: Apply color-correction adjustments (
Color Balance,Hue/Saturation,Curves) as separate adjustment layers, not directly to the image layer. This allows for non-destructive tweaking. - Eyedropper Tool for Consistency: Use the
Eyedropper Tool(I) to sample colors from the dominant background or base image. Then, use these sampled colors (or their complementary tones) to guide your color adjustments on the new layers. - Blending Modes: Experiment with blending modes (e.g.,
Multiply,Screen,Overlay,Soft Light) in the Layers Panel. These modes change how the colors of one layer interact with the colors of the layers beneath it, often helping to unify disparate color schemes.
- Use Adjustment Layers: Apply color-correction adjustments (
Best Practices for Saving and Exporting Your Work
After investing time and creativity in your multi-image composition, the final steps of saving and exporting are crucial for preserving your work and preparing it for its intended use.
- Save Frequently: It’s a fundamental rule:
File > SaveorCtrl+S(Windows) /Cmd+S(Mac) often! Save your project as a Photoshop Document (.PSD) file. This format retains all your layers, Smart Objects, masks, and adjustments, allowing you to return and make edits at any time. This is invaluable for complex digital art or graphic design projects. - Choose the Right Export Format: The choice of export format depends heavily on where your image will be used:
- JPEG (
.JPG): Excellent for web use (websites, social media, emails). It offers good compression, resulting in smaller file sizes, but is a “lossy” format, meaning some image data is discarded upon saving. - PNG (
.PNG): Ideal for web graphics that require transparency (e.g., logos, images with transparent backgrounds). It’s a “lossless” format, preserving image quality, but typically results in larger file sizes than JPEGs. - TIFF (
.TIF): Best for high-quality prints and archiving. It supports lossless compression and various color depths, making it suitable for professional photography. - WebP (
.WEBP): A modern format that offers superior lossless and lossy compression for images on the web, resulting in smaller file sizes than JPEG and PNG while maintaining quality.
- JPEG (
- Use
File > Export > Export As...: For fine-tuned control over your output, especially for web-optimized images, useFile > Export > Export As.... This dialog allows you to preview different formats, adjust quality settings, and see the resulting file size, ensuring your image loads quickly online without sacrificing visual appeal. - Consider Image Tools for Post-Processing: After exporting, if further optimization is needed for specific platforms, consider using image tools like compressors and optimizers (available on Tophinhanhdep.com) to reduce file size without noticeable quality loss for web delivery.
By diligently following these steps and embracing Photoshop’s powerful layering capabilities, you’ll be well on your way to creating captivating visual narratives. Tophinhanhdep.com is dedicated to providing you with the knowledge and inspiration to transform your images into stunning works of art, be they aesthetic backgrounds, high-resolution masterpieces, or innovative digital designs.