Mastering Background Removal: Techniques to Restore and Refine Your Images in Photoshop and Beyond

In the dynamic world of digital imagery, the ability to seamlessly separate a subject from its background is an indispensable skill. From creating stunning aesthetic photography for social media to crafting high-resolution stock photos for commercial use, background removal forms the cornerstone of many visual design projects. While powerful tools like Photoshop offer impressive automatic background removal features, the journey to a perfect cutout often requires a crucial next step: the art of “adding back” or refining those intricate areas that the automated process might have missed or over-removed. This guide, brought to you by Tophinhanhdep.com, delves into the essential Photoshop techniques and complementary tools that empower you to restore, refine, and achieve flawless image compositions, elevating your digital art and photo manipulation to new heights.
The Power and Pitfalls of Automated Background Removal
The evolution of image editing software has brought us remarkable one-click solutions for background removal. These tools, often powered by advanced AI, can quickly identify a subject and isolate it from its surroundings. However, even the most sophisticated algorithms aren’t always perfect, especially when dealing with complex edges, fine hair, transparent elements, or backgrounds that closely match the subject’s colors. This is where understanding how to effectively “add back” details and refine your selection becomes paramount.
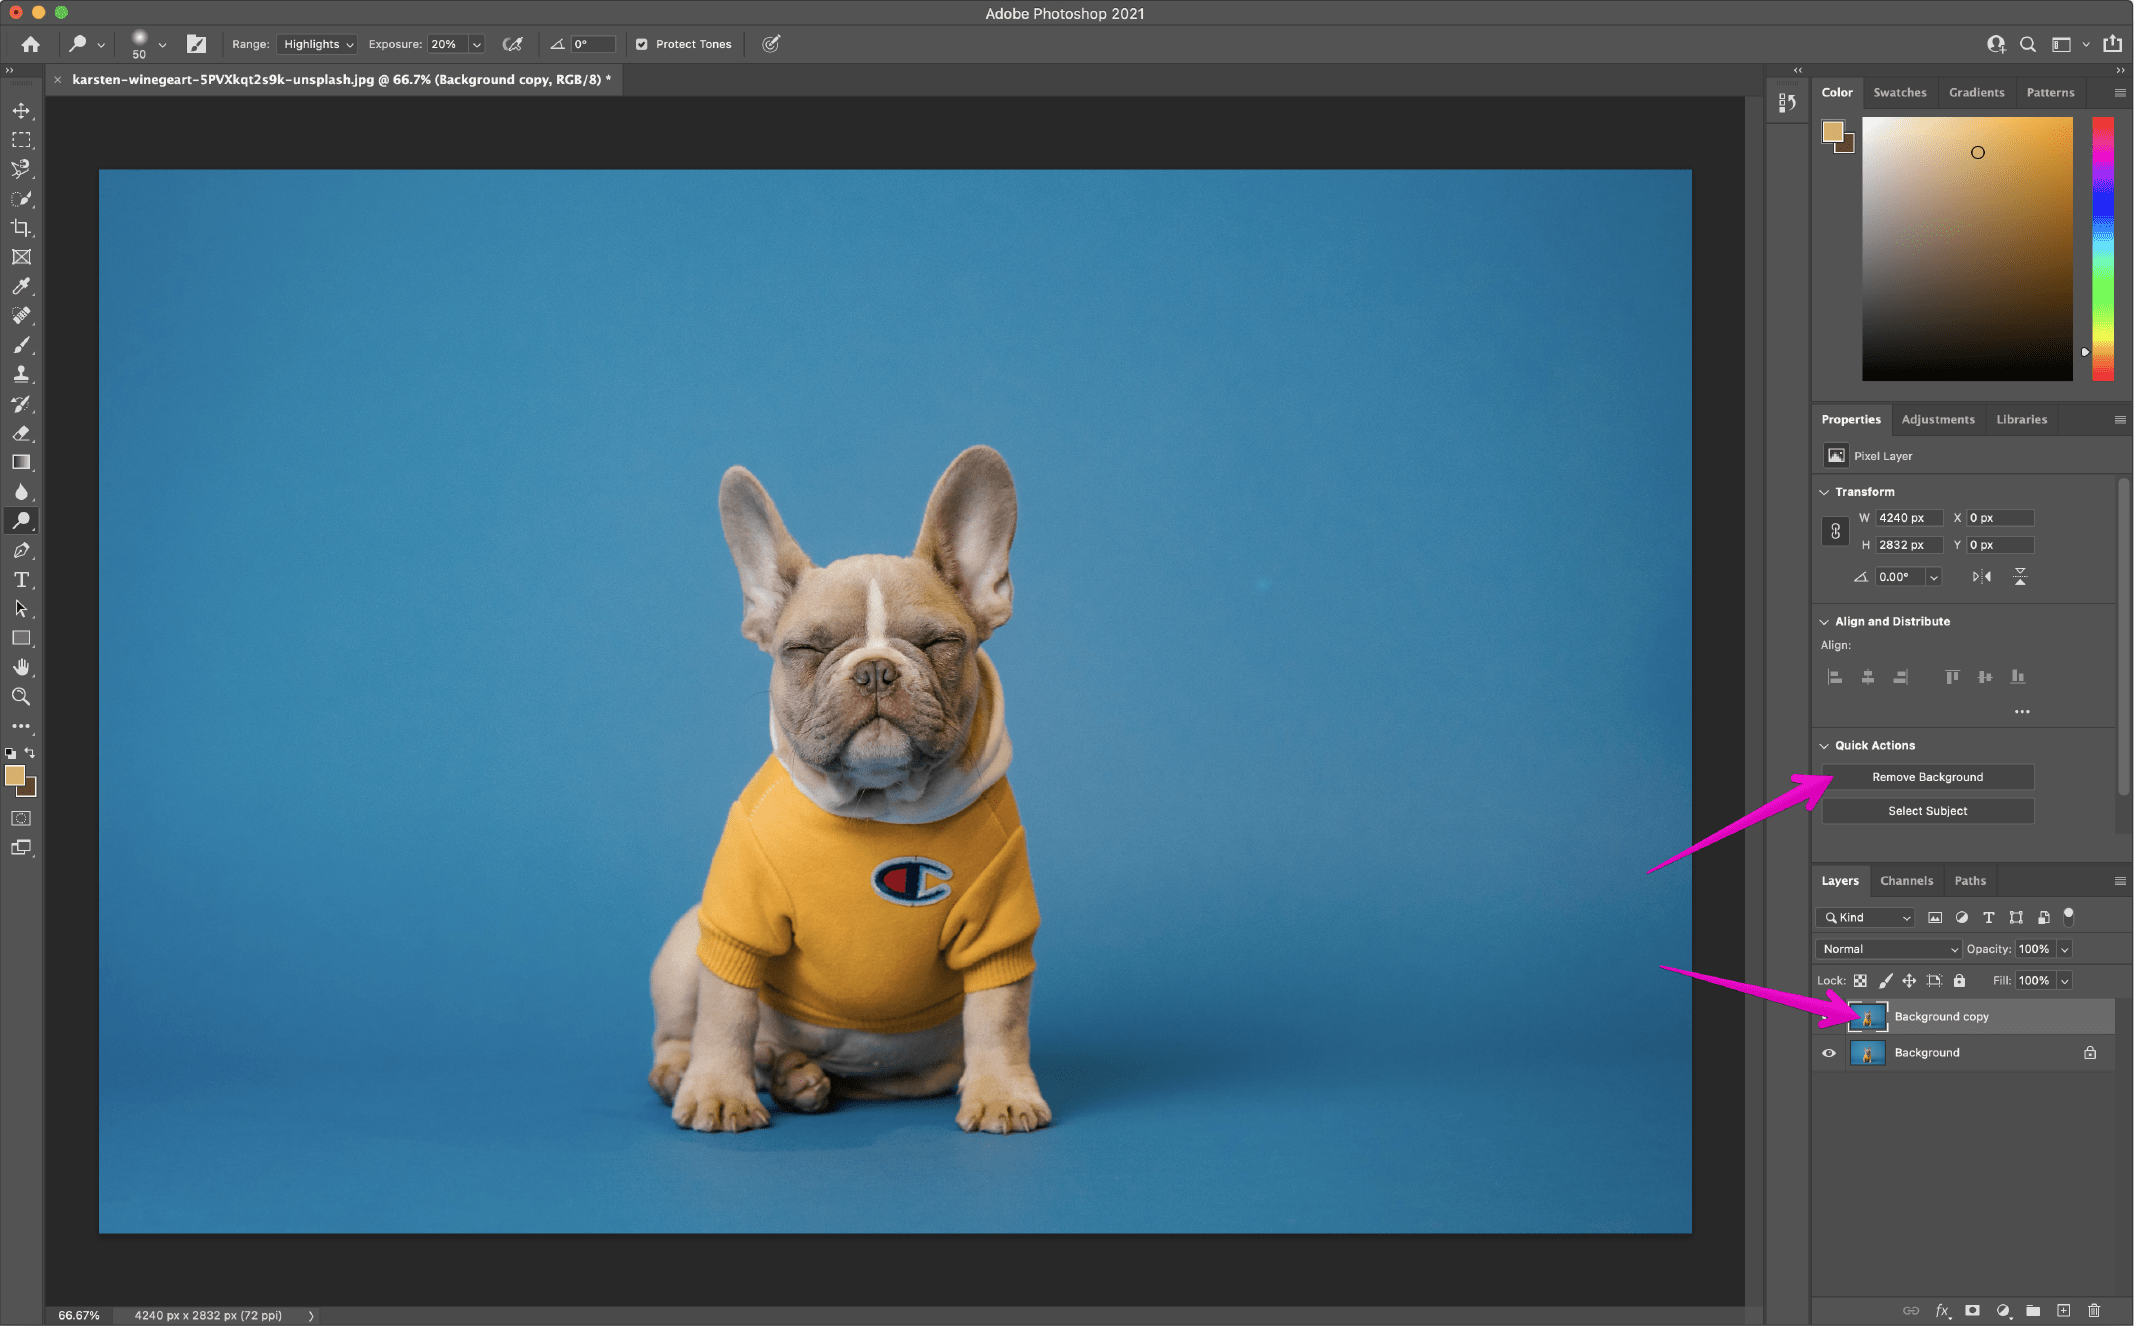
Photoshop’s “Remove Background” Quick Action
Photoshop’s built-in “Remove Background” feature, found in the Quick Actions panel, is a fantastic starting point for many users. It’s designed for speed and simplicity, making it ideal for those who aren’t overly concerned with absolute pixel-perfect edges.
To use it:
- Open your image in Photoshop.
- Duplicate the current layer (Command+J on macOS or CTRL+J on Windows) – a crucial non-destructive practice.
- Navigate to the Quick Actions panel and click “Remove Background.”
In mere seconds, Photoshop attempts to identify and strip away the background, leaving your subject isolated. For many straightforward images, this delivers a surprisingly good result. However, upon closer inspection, especially when dealing with intricate details, you might notice areas that were mistakenly removed or portions of the background that stubbornly remain. This is precisely where the need to “add back” or refine the mask arises.
Why Shooting on a White Background Often Simplifies the Process
Before diving into refinement, it’s worth noting a best practice in digital photography: shooting your subjects against a clean, contrasting background, particularly white. Tophinhanhdep.com recommends this approach for several reasons:
- Enhanced Contrast: White provides the highest contrast against most subjects, making it significantly easier for both automated tools and manual selections to accurately distinguish between the foreground and background. This reduces the initial errors and thus the amount of “adding back” you’ll need to do.
- Seasonal Versatility: A clean cutout allows you to repurpose images for various themes and seasons. Imagine a product shot: by removing the background, you can easily place it against a vibrant summer scene or a festive winter backdrop, aligning with trending styles and thematic collections for your visual content.
- Streamlined Editing: Less time spent on initial background removal means more time for creative ideas and sophisticated photo manipulation, contributing to efficient workflow for graphic design and digital art projects.
- Cost and Time Savings: Batch shooting products or models against a consistent white background eliminates the need for multiple on-location shoots, saving significantly on both time and resources, which is a key consideration for high-resolution photography and stock photos.
When a white background is removed, it’s typically replaced with a transparent layer, indicated by Photoshop’s grey and white chessboard pattern. This transparency is key to placing your subject onto a new background, be it a serene nature scene, an abstract design, or a custom wallpaper.
Essential Photoshop Tools for Refining and Restoring Selections
When the automated “Remove Background” falls short, Photoshop provides a robust suite of tools that allow you to precisely “add back” pixels that were mistakenly removed, clean up stray background elements, or soften harsh edges. These techniques are fundamental for achieving beautiful photography and professional-grade visual design.
Non-Destructive Editing with Layer Masks: The Ultimate “Add Back” Tool
The layer mask is arguably the most powerful and flexible tool for refining background removals because it allows for non-destructive editing. This means you’re not permanently deleting pixels; instead, you’re hiding or revealing them, giving you complete control to “add back” or adjust your selection at any point.
How it works: After an initial background removal (whether automatic or manual), Photoshop often creates a layer mask. This mask appears as a black and white thumbnail next to your image layer.
- White areas on the mask reveal the corresponding parts of your image.
- Black areas on the mask conceal (hide) the corresponding parts of your image.
- Grey areas create partial transparency.
To “add back” an image portion:
- Ensure your layer mask is selected (click its thumbnail in the Layers panel).
- Select the Brush Tool (B).
- Set your foreground color to white (press D then X).
- Paint over the areas where you want to reveal (add back) parts of your original image that were previously hidden.
- To hide (remove) more background, set your foreground color to black and paint over those areas.
Using a soft-edged brush (adjust hardness with Shift + [ or ]) is often best for blending, while a harder brush provides crisp edges. This technique is indispensable for detailed photo manipulation and ensuring your subject integrates seamlessly with its new background.
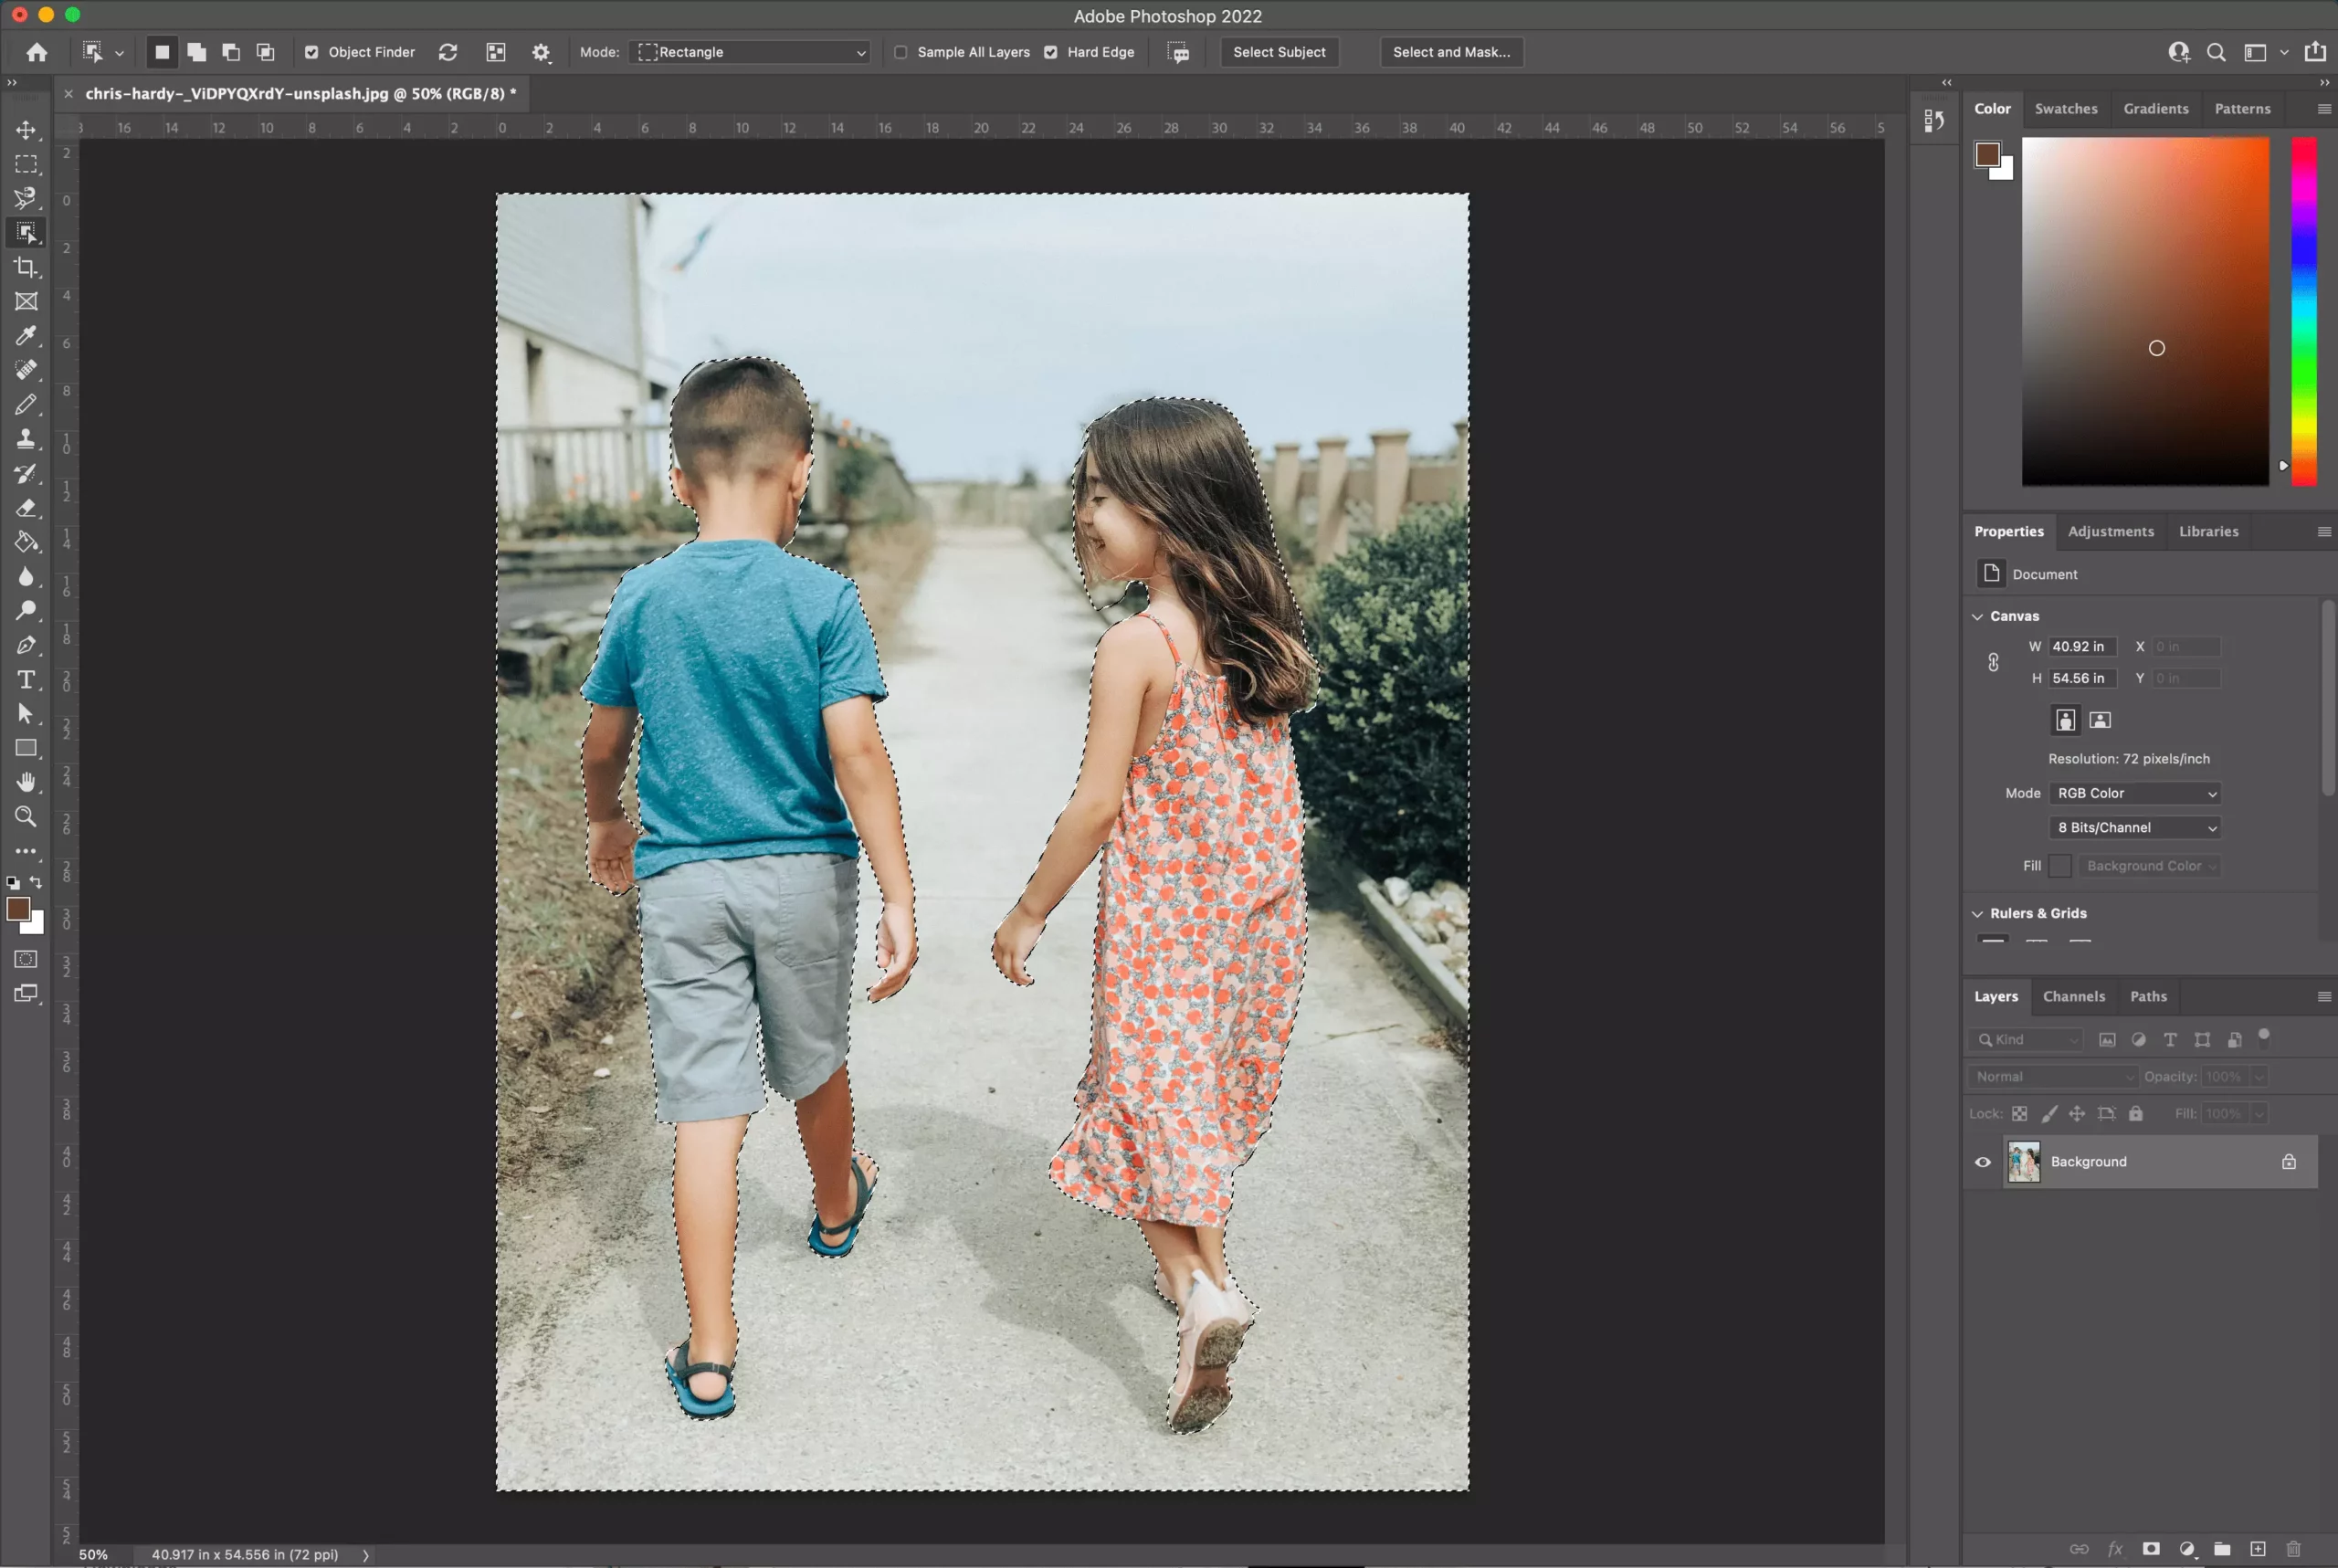
The Quick Selection Tool: Intelligent Selections with Manual Refinement
The Quick Selection Tool (W) leverages AI to intelligently detect edges as you paint over an area. While excellent for initial selections, it also offers intuitive ways to refine.
How to refine with Quick Selection:
- Select the Quick Selection Tool from the Photoshop Toolbox.
- To add to your selection, simply click and drag over the unselected areas you want to include.
- To subtract from your selection (e.g., if it selected too much background), hold down the Option key (macOS) or Alt key (Windows) and drag over the areas you want to deselect. Alternatively, you can toggle the tool to “Subtract from selection” in the options bar.
- Remember to check “Enhance Edge” in the options bar for smoother, higher-quality selection edges.
This tool is particularly useful when there’s a clear tonal difference between your subject and background. For intricate areas, a smaller brush size and zooming in significantly will help you “add back” or remove with precision.
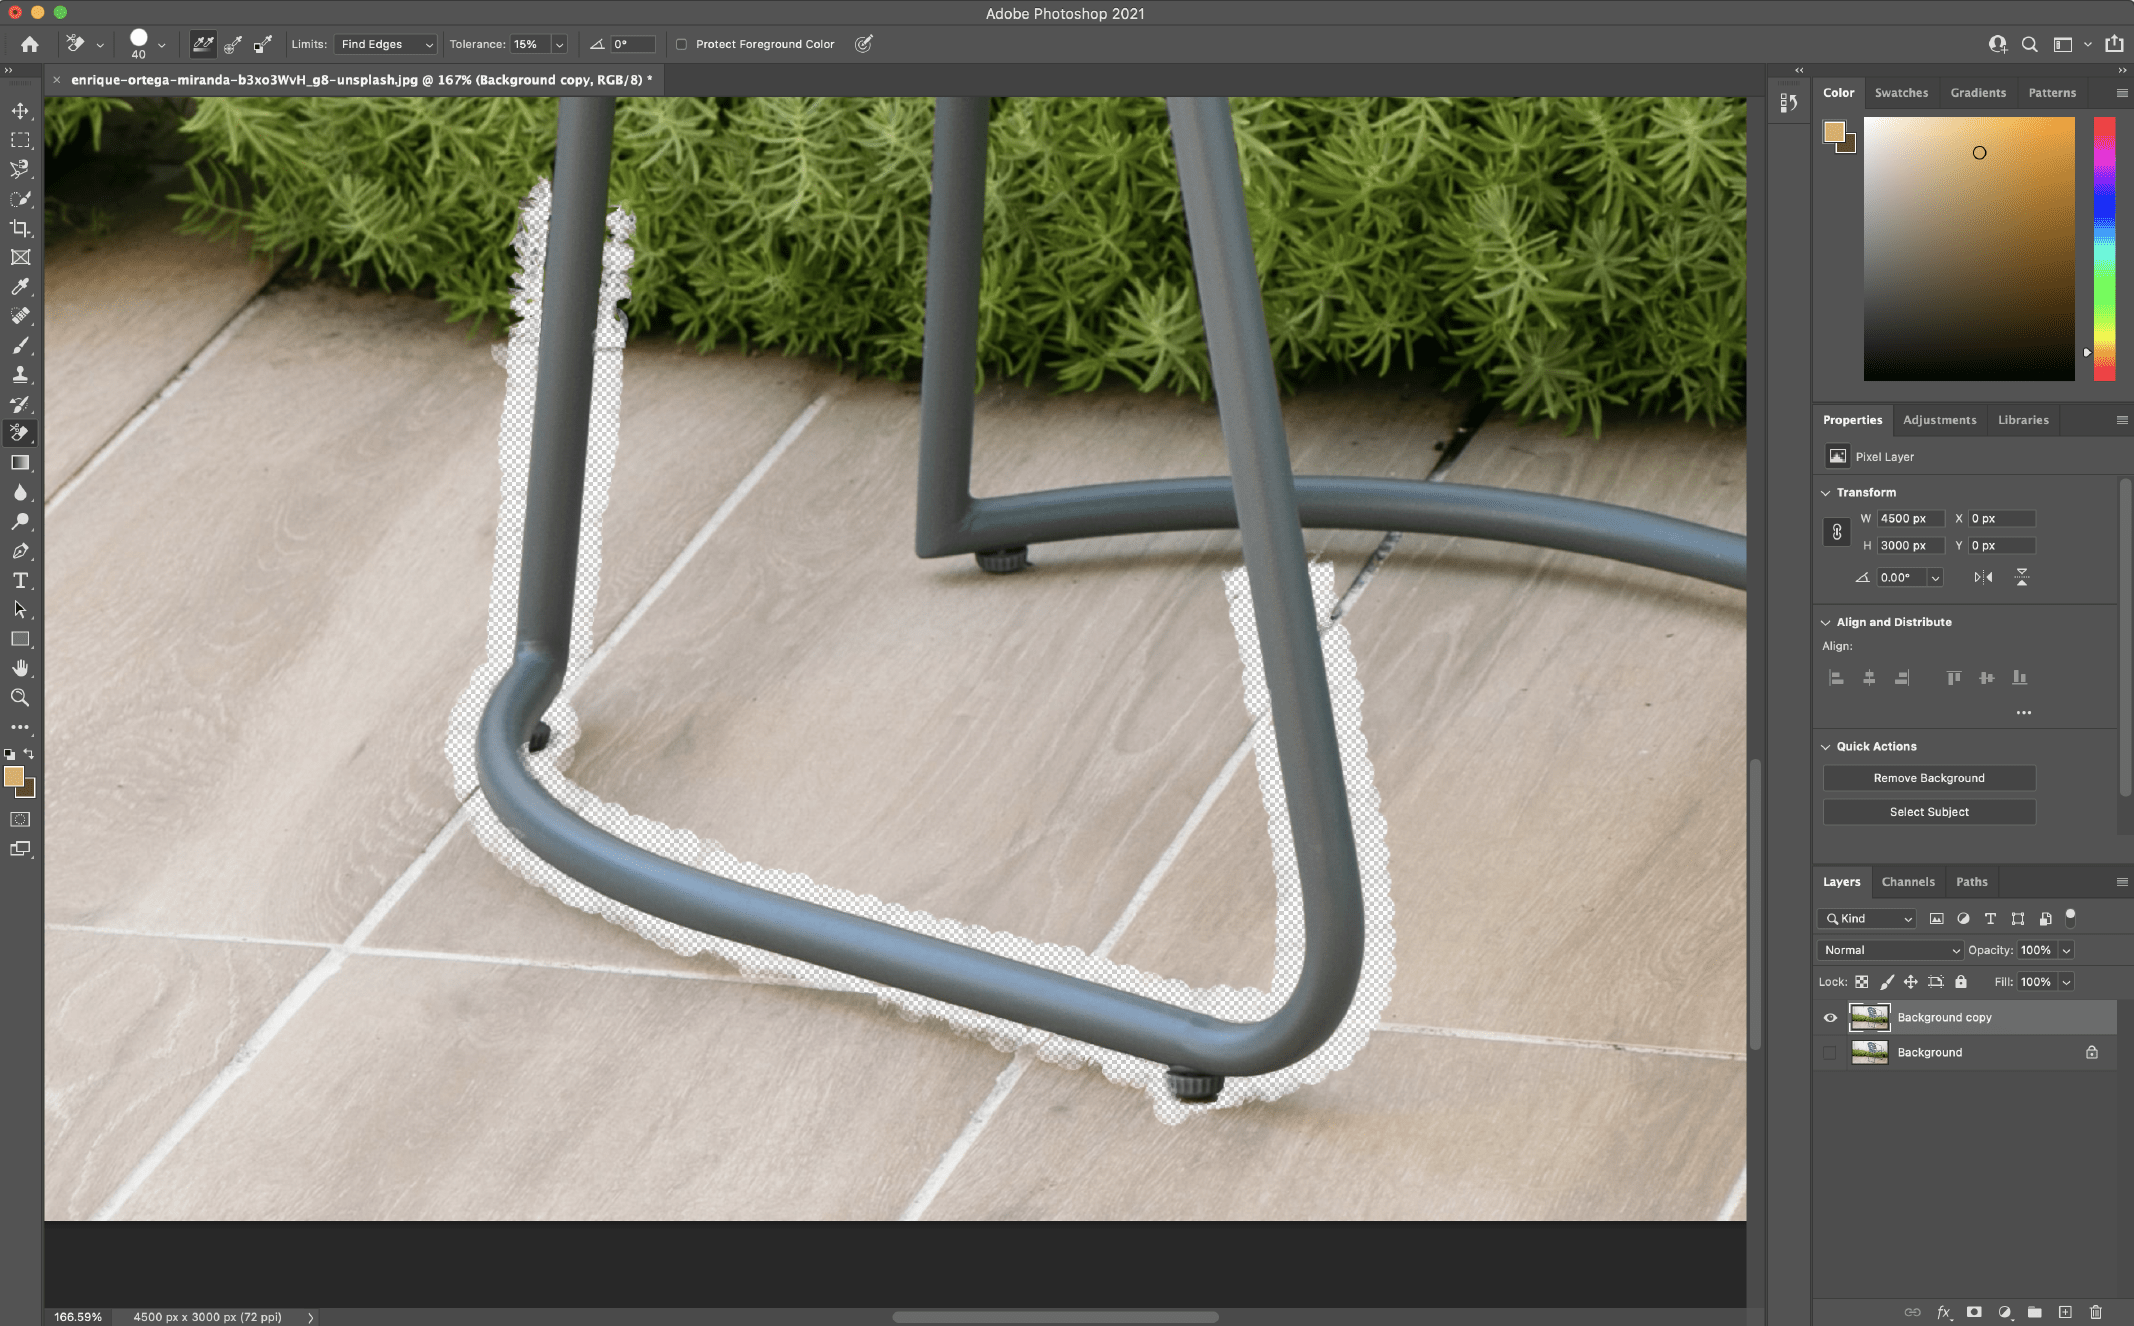
The Background Eraser Tool: Targeted Removal with Edge Detection
While primarily for removing backgrounds, the Background Eraser Tool (E) can be meticulously used to clean up tricky edges and, in some contexts, effectively “add back” by carefully removing surrounding unwanted elements. It works by sampling a color at the center of the brush and erasing similar-colored pixels as you move.
Using it for refinement:
- Select the Background Eraser Tool (it might be nested under the standard Eraser Tool).
- Adjust brush size ([ and ]) and hardness (Shift + [ and ]) for optimal control. A harder brush helps avoid artifacts.
- Set “Limits” to “Find Edges” in the options bar.
- Important for “adding back”: While it erases, its precision means you can carefully remove stray background colors right up to your subject’s edge, making the subject appear more “added back” into focus. Keep the crosshairs of the brush over the background color you want to erase.
- Use the “Tolerance” setting (start around 25%) to control the range of colors the tool will erase. Higher tolerance removes a wider range of similar colors.
- The “Protect Foreground Color” option is invaluable. If your subject has a color similar to the background you’re erasing, press Alt (Win) / Option (Mac) and use the eyedropper to sample the subject’s color. The tool will then try to protect that hue from being erased, preventing accidental removal of your desired image parts.
This tool excels with complex details like wispy hair against a busy background, allowing you to carefully carve out the subject and indirectly “add back” its clarity.
The Pen Tool: Unparalleled Precision for Complex Contours
For the highest level of precision in selection and “adding back” complex shapes, the Pen Tool (P) is unmatched. It creates vector paths that can be converted into selections, offering crisp, clean edges ideal for graphic design and high-resolution photography.
Creating and refining paths:
- Select the Pen Tool.
- Click to create anchor points for straight lines. Click and drag to create anchor points with bezier handles for smooth curves.
- To “add back” a specific contour, carefully trace around the desired area of your subject that was cut off or around a background element you want to meticulously remove.
- Once your path is complete, go to the Paths panel (usually next to Layers) and right-click on your path. Choose “Make Selection…”
- Consider adding a small “Feather Radius” (1-2 pixels) to the selection to prevent overly harsh, unnatural edges, especially for images intended for a new background or aesthetic compositions.
- With the selection active, you can then apply it to a layer mask, filling the selection with white to reveal (add back) or black to hide (remove).
Mastering the Pen Tool requires practice, but its ability to create perfectly smooth curves and sharp corners makes it invaluable for detailed photo manipulation, ensuring your images meet the standards of beautiful photography.
The “Select and Mask” Workspace: The Ultimate Refinement Hub
The “Select and Mask” workspace (previously “Refine Edge”) is Photoshop’s dedicated environment for fine-tuning selections, making it an indispensable tool for “adding back” and correcting problematic areas.
How to use “Select and Mask”:
- After making an initial selection (using any tool like Quick Selection, Magic Wand, or Pen Tool), click the “Select and Mask…” button in the options bar or go to Select > Select and Mask.
- Within this workspace, you gain access to several tools and sliders:
- Refine Edge Brush Tool (R): The star of the show. Paint over soft edges like hair or fur, and Photoshop intelligently distinguishes between foreground and background, “adding back” wisps of hair and softening transitions.
- Brush Tool (B): Directly paint on the mask to add (white) or subtract (black) from your selection. This is your primary “add back” brush within this mode.
- Lasso Tool (L) and Quick Selection Tool (W): For making more traditional selections within the mask.
- Object Selection Tool (W): Allows Photoshop to identify boundaries of discrete objects automatically.
- Global Refinements: Sliders for Smooth, Feather, Contrast, and Shift Edge allow you to universally adjust the selection’s characteristics.
- Decontaminate Colors: Helps remove color fringe or halos left over from the original background, often making your “added back” edges look cleaner.
- Choose an “Output To” option (e.g., Layer Mask, New Layer with Layer Mask) to preserve non-destructive editing.
The “Select and Mask” workspace is particularly powerful for tackling challenging areas like hair or transparent materials, effectively “adding back” fine details that are crucial for high-resolution images and professional visual design.
Beyond Photoshop: Enhancing Your Workflow with Tophinhanhdep.com’s AI Tools
While Photoshop offers unparalleled control, Tophinhanhdep.com provides AI-powered solutions that can significantly accelerate your workflow, acting as powerful complements or standalone alternatives for background removal and subsequent refinement.
Tophinhanhdep.com’s Photoshop Plugin: AI Precision within Your Editor
For users who prefer to stay within Photoshop but desire superior automated background removal, Tophinhanhdep.com offers a dedicated plugin. This tool harnesses sophisticated AI to isolate complicated elements and edges, such as individual strands of hair, often achieving results that surpass Photoshop’s native one-click function.
Benefits of the Tophinhanhdep.com Plugin:
- Enhanced Edge Isolation: Its AI excels at identifying and cleanly cutting out even the most challenging details, reducing the need for extensive manual “adding back.”
- One-Click Convenience: Despite its advanced capabilities, it maintains a simple “Remove Background” button for rapid processing.
- Layer Mask Integration: The plugin often generates a layer mask, allowing you to use Photoshop’s native tools (like the Brush Tool with white/black) to further “add back” or refine areas if desired, combining AI speed with manual control.
- Seamless Workflow: Stay within your familiar Photoshop environment, ensuring continuity in your digital photography and graphic design projects.
This plugin is especially beneficial for high-volume work or when dealing with images where precise hair isolation is critical for beautiful photography.
Tophinhanhdep.com’s Online Background Remover: Instant, Flawless Results
For those seeking the quickest and easiest way to remove backgrounds, or for users who find Photoshop’s learning curve daunting, Tophinhanhdep.com offers a robust online AI background remover.
Key Features:
- Instant Removal: Simply upload your image, and Tophinhanhdep.com’s AI automatically removes the background within seconds, delivering a transparent result.
- Flawless Edges: The AI is trained to handle even the most intricate details, providing clean cutouts without the need for manual “adding back” in most cases.
- Background Options: After removal, you can choose from a selection of preconfigured solid colors or artistic backgrounds, or even use an AI background generator to craft a new scene instantly.
- Accessibility: No software installation required; access it directly from your web browser, making it convenient for quick edits or those focusing on image inspiration and thematic collections.
Whether you’re removing a simple white background from a product shot or tackling a complex logo, Tophinhanhdep.com’s online tool streamlines the process, allowing you to quickly move to the next stage of your visual design or content creation. It’s an excellent resource for anyone looking for high-resolution stock photos or aesthetic image backgrounds without the heavy lifting of manual editing.
Creative Applications and Optimizing Your Image Workflow
Mastering the art of background removal and refinement unlocks a universe of creative possibilities, spanning across various aspects of digital imagery and visual design.
Integrating Removed Backgrounds into Visual Design and Digital Art
With a perfectly isolated subject, you can:
- Create Collages and Photo Manipulations: Combine different elements to build unique scenes or abstract designs.
- Design Marketing Collateral: Place products onto eye-catching backgrounds for advertisements, banners, and promotional materials.
- Personalized Creations: Make custom greetings cards, bespoke items, or personalized wallpapers for family and friends, showcasing your beautiful photography.
- Digital Art and Graphic Design: Use clean cutouts as foundational elements for complex digital paintings or graphic compositions. The ability to “add back” precise details ensures your subjects look natural within any new environment.
Tophinhanhdep.com’s rich collection of wallpapers, backgrounds, and aesthetic images provides endless inspiration for new settings once your subject is isolated.
Optimizing Your Images for Various Platforms
Beyond removal and refinement, Tophinhanhdep.com also champions the importance of optimizing your images for various uses. Once you’ve created your perfect composite:
- File Formats: Save images with transparency as PNG files. For web use where transparency isn’t needed, JPEG is often preferred for smaller file sizes.
- Compression and Optimization: Use image tools like compressors and optimizers to reduce file size without sacrificing quality, ensuring faster loading times for websites and social media platforms.
- AI Upscalers: If your original image is of lower resolution but you need a high-resolution output for print or large displays, Tophinhanhdep.com’s AI upscalers can intelligently enlarge your images while preserving detail, making them suitable for stock photos or professional digital photography.
- Image-to-Text: For accessibility or content generation, consider using image-to-text tools to extract information from your visual content.
These tools and practices ensure that your refined images are not only visually stunning but also technically optimized for their intended purpose, aligning with the highest standards of digital photography and visual content creation.
Inspiration for Aesthetic and Thematic Collections
A clean image with a removed background is a versatile asset. It allows you to freely experiment with different mood boards, create thematic collections, and explore trending styles. Whether you’re curating images for a nature-inspired collection, building an abstract art series, or conveying a specific sad/emotional narrative through photo ideas, the foundational skill of background removal and meticulous refinement provides the freedom to bring any creative vision to life. Tophinhanhdep.com serves as a hub for such image inspiration, offering a wealth of resources to spark your next great idea.
Conclusion
The journey from an original photograph to a perfectly isolated subject is a blend of automated efficiency and meticulous manual refinement. While Photoshop’s “Remove Background” and Tophinhanhdep.com’s AI tools offer incredible speed, the true mastery lies in knowing how to “add back” and refine details using layer masks, precision selection tools, and dedicated workspaces like “Select and Mask.”
By embracing these techniques, you transform what might initially appear as a flawed automatic cutout into a pristine image, ready for any creative endeavor. Whether you’re a seasoned graphic designer, an aspiring digital artist, or a photographer aiming for beautiful photography, these skills empower you to produce high-resolution, professional-grade images that truly stand out. Explore the vast possibilities for visual design, from creating stunning aesthetic backgrounds to crafting compelling photo manipulations, and let Tophinhanhdep.com be your guide in this exciting world of digital imagery.