Mastering Visual Storytelling: Adding Effects to Images and Videos in DaVinci Resolve

In today’s visually-driven world, capturing a high-resolution photograph or sourcing a stunning wallpaper is just the beginning. The true magic of visual storytelling, whether for digital art, graphic design, or cinematic productions, often lies in the post-production phase – the art of adding effects and dynamic enhancements. While Tophinhanhdep.com is a treasure trove of aesthetic, nature, and abstract images, alongside invaluable image tools like AI upscalers and compressors, the journey from a static picture to a captivating narrative often involves powerful video editing software. DaVinci Resolve, a professional-grade solution, might seem primarily geared towards video, but its robust suite of tools for color grading, visual effects, and motion graphics makes it an indispensable asset for anyone looking to bring their still images to life or to refine their photography projects with a cinematic touch.
This comprehensive guide will explore how to harness DaVinci Resolve’s capabilities to add breathtaking effects and dynamic changes to your visual projects, seamlessly blending the worlds of still imagery and moving pictures. By understanding its core functionalities – from applying basic filters to mastering intricate keyframe animations – you’ll transform your creative vision into compelling visual realities, elevating your digital photography and creative ideas far beyond the ordinary.
The Foundation: Importing and Applying Basic Effects
Every masterpiece begins with a canvas, and in DaVinci Resolve, that canvas is your timeline. Whether you’re working with a series of high-resolution stock photos to create a stunning slideshow, integrating a beautiful nature background into a composite shot, or aiming to add a touch of dramatic flair to a sad/emotional image, the process begins with proper preparation.
Setting the Stage: Importing Your Visual Assets
Before you can infuse your images with effects, they need to be imported into DaVinci Resolve’s media library. This step is straightforward:
- Launch DaVinci Resolve: Open the software and start a new project or open an existing one.
- Import Media: Navigate to the “Media” page (usually the first icon at the bottom of the interface). You can drag and drop your image files directly into the Media Pool or use the “File > Import > Media” menu option. DaVinci Resolve supports a wide array of image formats, making it versatile for integrating wallpapers, backgrounds, and various types of digital photography from Tophinhanhdep.com.
- Move to the Edit Page: Once your visual assets are imported, click on the “Edit” page icon at the bottom of the interface. This is where the bulk of your editing and effect application will take place.
- Assemble Your Timeline: Drag your desired image clips (or video clips) from the Media Pool onto the timeline. You can arrange them in any sequence, adjust their duration, and organize them across different video tracks. For still images, you can set their default duration in DaVinci Resolve’s preferences if you plan to create a photo montage.
With your images meticulously arranged on the timeline, you’re now poised to dive into the exciting world of effects.
Exploring DaVinci Resolve’s Extensive Effects Library
DaVinci Resolve boasts an impressive array of built-in effects, transitions, and titles, ready to be applied with a simple drag-and-drop. This library is your playground for experimenting with various visual design concepts, whether you’re aiming for a subtle aesthetic enhancement or a bold photo manipulation.
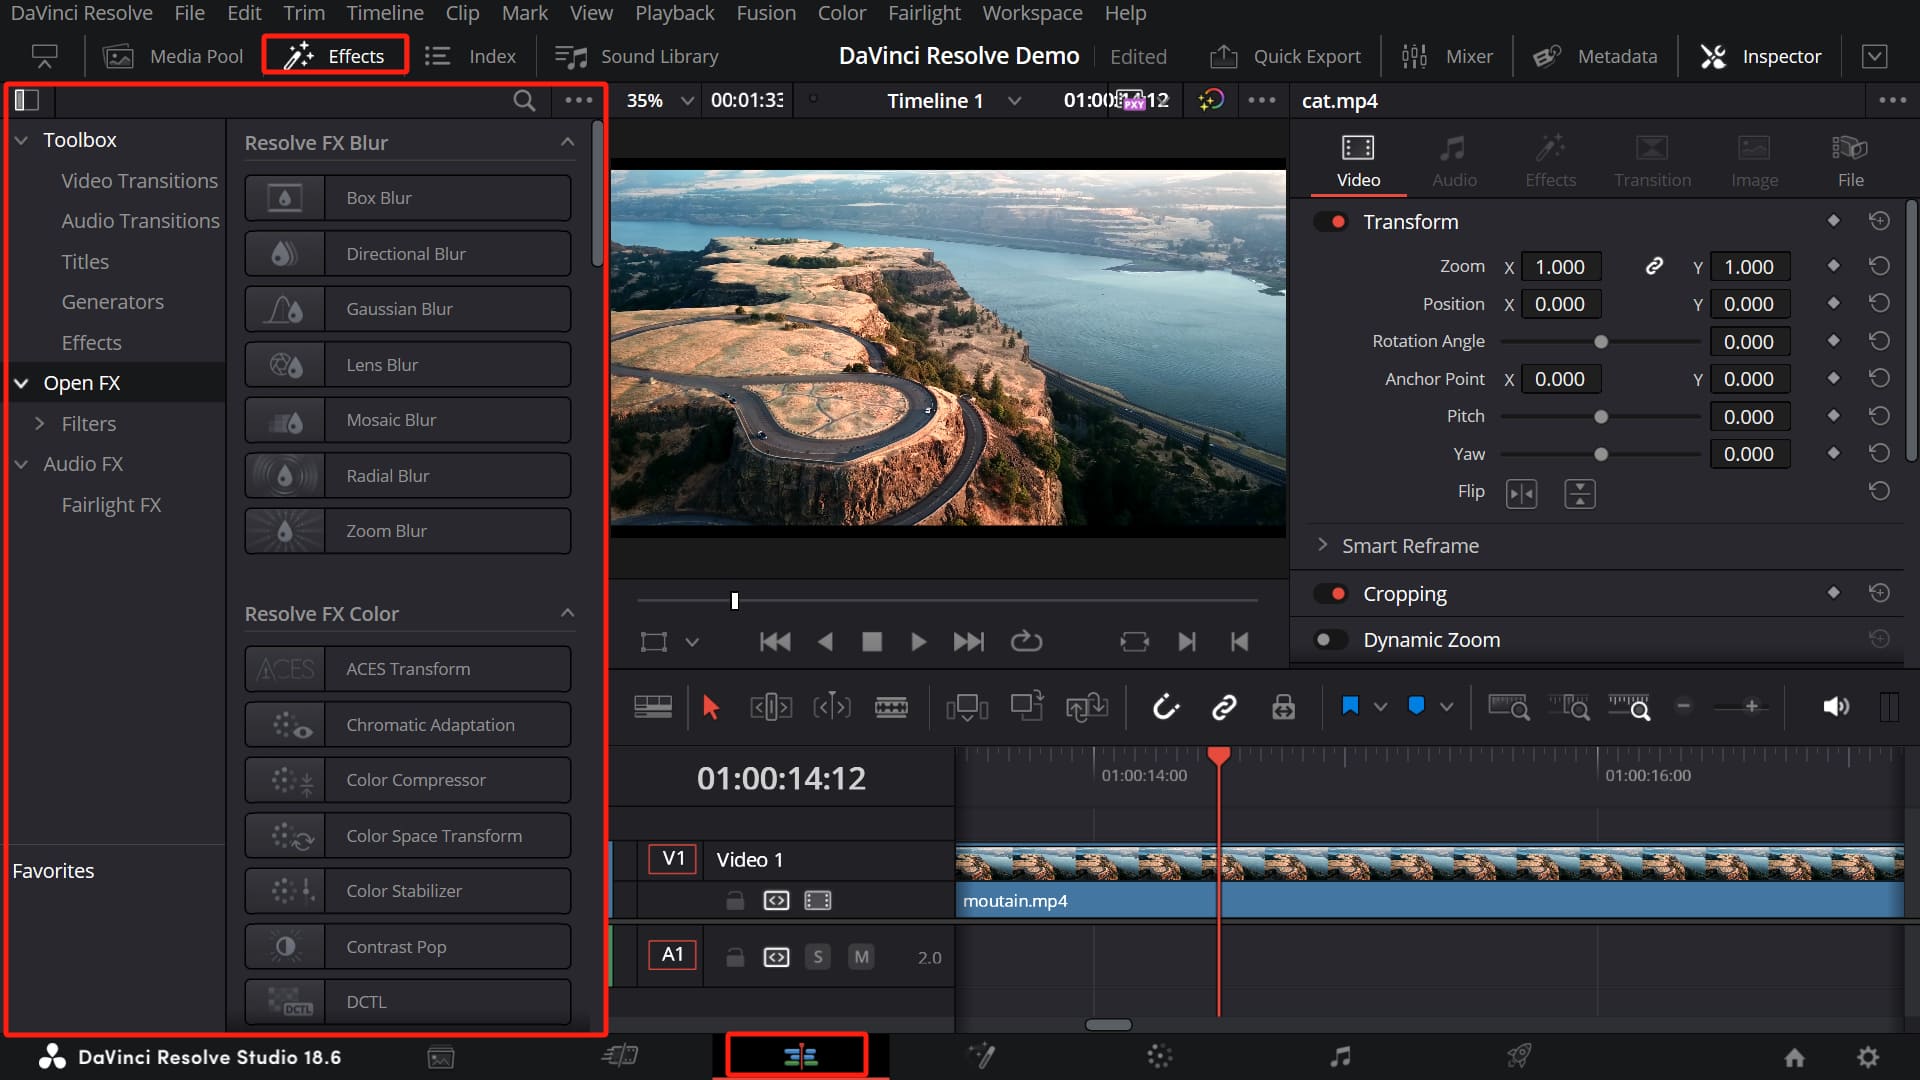
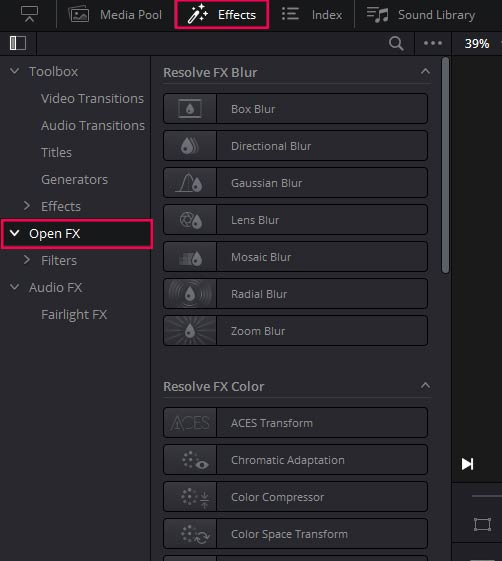
- Access the Effects Library: In the upper-left corner of the Edit page, locate and click on the “Effects” tab. This will open the Effects Library panel, revealing categories such as “Video Transitions,” “Video Effects” (including OpenFX), “Audio Effects,” and “Titles.”
- Browse and Preview: Take your time to explore the different categories.
- Video Effects (OpenFX): This section contains a vast collection of filters and enhancements. You’ll find everything from blurs, glows, and distortions to more artistic stylizations like film grain, mosaic, and lens flares. These are crucial for altering the mood of a beautiful photography piece or adding abstract qualities to a background image.
- Video Transitions: While primarily for moving between video clips, transitions can also be used effectively between still images in a slideshow to create smooth, professional-looking sequences.
- Titles: Integrate elegant text overlays or dynamic lower thirds to provide context or artistic flair to your images, aligning with various visual design ideas.
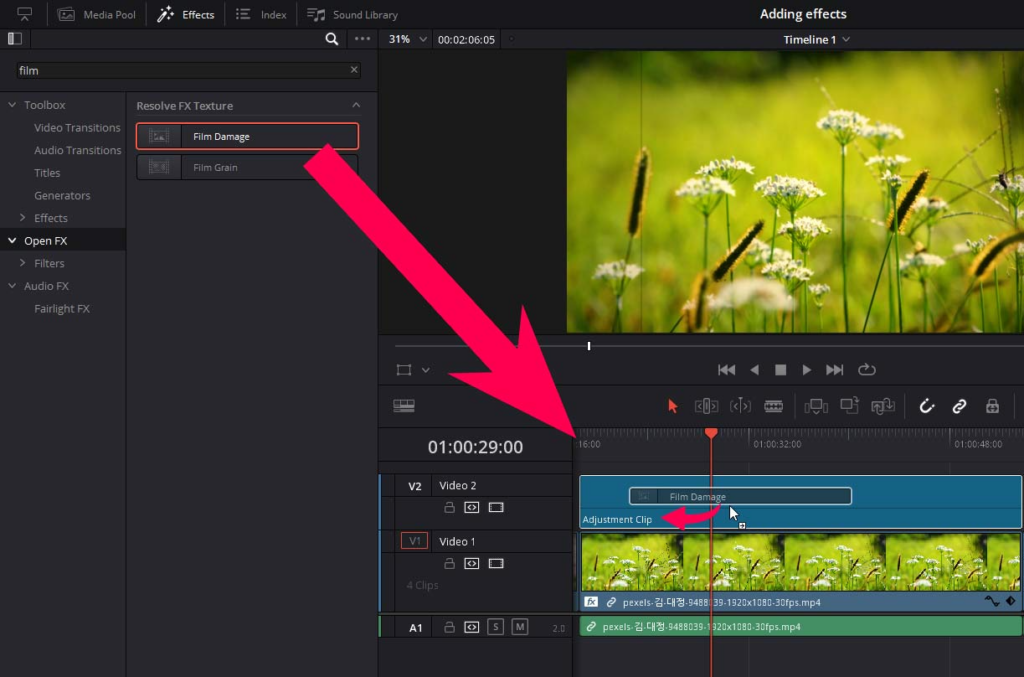
- Apply an Effect: Once you’ve identified an effect that aligns with your creative vision, simply drag it from the Effects Library directly onto the image clip (or video clip) on your timeline. For transitions, drag them between two clips. The effect will instantly apply, giving you an immediate visual feedback in the Viewer panel.
Customizing Effects for Impact
Applying an effect is just the first step; the real art lies in customizing it to perfection. DaVinci Resolve offers granular control over every effect, allowing you to fine-tune parameters to achieve precise aesthetic and narrative tones.
- Select the Clip: Click on the image or video clip on your timeline to which you’ve applied an effect.
- Open the Inspector Panel: In the upper-right corner of the screen, you’ll find the “Inspector” panel. This panel is dynamic, displaying controls specific to the selected clip and any effects applied to it.
- Adjust Parameters: Within the Inspector, scroll down to the “Effects” section (or “Transitions” section if you’ve applied one). Here, you’ll see a variety of sliders, checkboxes, and dropdown menus that allow you to modify the effect’s intensity, color, size, and other attributes. For instance, if you apply a blur, you can adjust its radius; for a color tint, you can change the hue and saturation.
- Observe in Viewer: As you make adjustments, watch the Viewer panel to see the changes in real-time. This iterative process allows you to experiment and refine until the effect perfectly complements your image or visual sequence.
Pro Tip: Free vs. Studio Version While the free version of DaVinci Resolve offers a substantial array of built-in Resolve FX effects, some high-end, professional-grade effects (e.g., advanced noise reduction, specific lens flares, or complex stylized looks) are exclusive to the paid DaVinci Resolve Studio version. If you encounter a watermark on an effect, it indicates it’s a Studio-only feature. For budding artists or those exploring digital photography and visual design, the free version is more than capable, but for those pursuing professional photo manipulation or intricate visual effects, upgrading might be a worthwhile investment. Furthermore, DaVinci Resolve supports third-party OpenFX (OFX) plugins, allowing you to extend its capabilities even further with effects from other developers, offering boundless creative possibilities for your image inspiration and thematic collections.
Beyond Static: Unleashing Dynamic Visuals with Keyframes
While static effects can transform an image, true visual storytelling often demands movement and change over time. This is where keyframes come into play. Keyframes are the backbone of animation in DaVinci Resolve, allowing you to create dynamic adjustments to effects, transformations, and almost any parameter over the duration of your image or video clip. Think of them as markers telling DaVinci Resolve: “At this point in time, the effect should be like this; at that point, it should be like that.”
Understanding Keyframes: Bringing Movement to Your Images
To add dynamic flair to your high-resolution images or stock photos, such as a slow zoom into a captivating detail or a gradual fade-in of an abstract element, keyframes are essential.
- Identify Keyframe-able Parameters: In the Inspector panel, next to most parameters (like position, scale, opacity, or effect intensity), you’ll notice a small diamond-shaped icon. This “keyframe toggle” indicates that the parameter can be animated over time.
- Set Your First Keyframe: Position your playhead (the vertical red line on the timeline) at the point where you want your animation to start. Adjust the desired parameter to its initial value. Then, click the diamond icon next to that parameter. It will turn red, indicating that a keyframe has been set at that specific point in time with the current parameter value.
- Set Your Second Keyframe (and subsequent ones): Move the playhead to a later point in time on the timeline where you want the animation to end. Now, change the parameter to its final desired value. DaVinci Resolve will automatically create a second keyframe at this new time point, interpolating the change between the two keyframes to create smooth motion.
- Playback and Observe: Play back your clip, and you’ll witness the animation you’ve just created. For example, if you keyframed the “Scale” parameter, your image might slowly enlarge or shrink, adding depth to your visual design.
Refining Animations with Curve Editors and Dynamic Zoom
Initial keyframe animations might appear rigid or linear. DaVinci Resolve provides powerful tools to refine these animations, giving them a natural, organic feel, much like the smooth transitions you’d expect in professional digital art or photo manipulation.
-
Adjusting Keyframe Timing on the Timeline:
- To view and manipulate your keyframes, expand the track of your clip on the timeline. You’ll see small diamond markings representing your keyframes.
- You can click and drag these keyframes along the timeline to adjust when an animation starts or ends, or how long it takes. Spreading them further apart slows down the animation; bringing them closer accelerates it.
- For more precise control, right-click on the clip and select “Show Keyframe Editor” or click the curve icon above the timeline. This opens a detailed graph showing how parameters change over time.
-
Harnessing the Curve Editor for Smoothness:
- The standard animation between two keyframes is linear, which can look abrupt. To introduce “ease-in” and “ease-out” effects (making animations start and end smoothly), use the curve editor.
- In the Keyframe Editor (or the curve control panel that pops out when you click the curve icon in the Inspector), you’ll see a line representing the parameter’s change over time.
- Select the keyframes on the curve. You can then use the small icons at the top of the curve panel to apply default animation curves (e.g., “Smooth,” “Ease In,” “Ease Out”).
- For ultimate control, drag the bezier handles (tangents) that appear on the curve. Manipulating these handles allows you to customize the acceleration and deceleration of your animation, making your motion look incredibly natural and refined. This level of detail ensures your aesthetic images transition with the grace of high-resolution stock photos in a dynamic sequence.
-
Dynamic Zoom: An Intelligent Shortcut:
- Often, you might want a simple, natural-looking pan or zoom across an image, akin to automatically setting keyframes from start to end. DaVinci Resolve offers “Dynamic Zoom” for this purpose, a practical feature for enhancing digital photography.
- Select your image or video clip on the timeline. In the Inspector panel, under the “Transform” section, activate the “Dynamic Zoom” option.
- Immediately, your footage will exhibit an automatic scaling or panning effect. You can adjust the speed of this effect by simply changing the length of your clip on the timeline.
- To customize the start and end positions and sizes of the dynamic zoom, navigate back to the Viewer panel. Click the dropdown option in the lower-left corner of the Viewer and select “Dynamic Zoom.” You’ll see two rectangular boxes: a green one for the start position/size and a red one for the end. Drag and resize these boxes directly in the viewer to define your desired animation path. This feature is perfect for bringing subtle, engaging movement to static wallpapers or backgrounds.
Precision and Enhancement: Advanced Tools for Visual Perfection
Beyond basic effects and keyframes, DaVinci Resolve offers a suite of advanced tools designed for precision editing, compositing, and AI-powered enhancements. These tools are invaluable for professional photo manipulation, creating complex digital art, and realizing ambitious visual design ideas with exceptional detail.
Cropping and Transforming Your Visuals with Finesse
Accurate cropping and transformation are fundamental to visual composition, ensuring your images fit perfectly within your frame or creatively interact with other elements.
- Basic Transformations in the Inspector:
- Select your clip on the timeline. In the Inspector panel, under the “Video” workspace, you’ll find controls for “Position,” “Zoom” (scale), and “Rotation.”
- You can input precise numerical values or drag the numbers with your mouse for visual adjustment. For even finer control, hold down the
Altkey (orOptionon Mac) while dragging to slow down the rate of change. This precision is vital when integrating high-resolution photography or abstract elements.
- Direct Manipulation with the Transform Tool:
- For an intuitive, hands-on approach, click the “Transform” button located in the lower-left corner of the timeline Viewer panel.
- This activates direct manipulation handles on your image in the preview window. You can then freely drag these handles to scale, rotate, and reposition your footage visually, making it easier to achieve the desired aesthetic.
- Cropping for Composition:
- To crop your footage, you have two primary methods:
- Inspector Cropping: With your clip selected, activate the “Cropping” function within the Inspector workspace. You’ll then be able to adjust parameters like “Left,” “Right,” “Top,” and “Bottom” to crop the edges of your image. You can also adjust “Softness” for feathered edges.
- Viewer Crop Tool: Alternatively, click the downward-facing triangle next to the “Transform” button in the Viewer panel and select the “Crop” tool from the dropdown menu. This allows you to directly drag handles on the viewer to define your crop area, offering immediate visual feedback. These cropping capabilities are essential for perfectly framing wallpapers or highlighting specific details in your digital photography.
- To crop your footage, you have two primary methods:
AI-Powered Magic: Smart Effects for Seamless Integration
DaVinci Resolve’s Neural Engine powers several intelligent effects that automate complex tasks, saving hours of manual work and opening new avenues for creative expression in visual design and photo manipulation. These features leverage artificial intelligence to understand and process visual information with remarkable accuracy.
- Magic Mask: Advanced Rotoscoping and Selection:
- The Magic Mask is a game-changer for precise masking and background removal, reminiscent of how advanced AI image tools on Tophinhanhdep.com can isolate elements. Found in the Color page, this tool can track and create masks around specific objects or people, allowing you to apply color grading or effects to only a selected area.
- You can choose between “Object” and “People” modes, even isolating specific body parts or clothing. Once you toggle the mask overlay and click “Tracking,” DaVinci Resolve analyzes the footage, creating a sophisticated mask. This is incredibly powerful for integrating a foreground element from one high-resolution image onto a different background from another, perfect for creating unique aesthetic compositions. You can even remove backgrounds by connecting the mask’s alpha output to reveal footage underneath.
- Depth Map: Selective Color Grading and Effects:
- For scenes where you want to apply effects or color grades differently to the foreground and background (e.g., making a blurry background pop while keeping the subject sharp), Depth Map is an invaluable tool.
- Apply the “Depth Map” effect as a new Node in the Color page (under Effects). DaVinci Resolve’s Neural Engine will analyze your footage to generate a depth map, which you can visualize. You can then adjust map levels to define your foreground and background, enabling isolated adjustments. This offers a quick and effective way to add artistic depth to nature photography or abstract images.
- Smart Reframe: Adaptive Aspect Ratios:
- With content consumed on various screen sizes, adapting your visuals to different aspect ratios without manually repositioning and tracking subjects is crucial. Smart Reframe, found on the Edit page, automatically analyzes and reframes your footage.
- If your image doesn’t fit a new screen size, you can zoom in to fill the frame, then click “Reframe.” DaVinci Resolve will intelligently track the main subject and adjust the composition. You can even specify an “Object of Interest” if the automatic detection isn’t quite right, ensuring your sad/emotional photography retains its impact across all platforms.
- Face Refinement: Automated Portrait Enhancement:
- For portraits or any footage featuring faces, Face Refinement (available in the Edit/Color page Effects) uses face recognition and tracking to identify human faces.
- After clicking “Analyze,” you gain access to a wide range of adjustments, including skin contrast, color correction, blemish retouching, and midtone adjustments. This automated tool saves considerable time in enhancing the beauty and impact of your digital photography, providing a level of polish that can elevate a simple portrait into a stunning piece of art.
Optimizing Your Workflow: Tools and Considerations
Integrating effects into your images and videos in DaVinci Resolve, especially when working with high-resolution assets and complex animations, demands an efficient workflow. Beyond the software’s features, external tools and an understanding of its capabilities can significantly enhance your creative process.
Free vs. Studio: Unlocking Professional Potential
As touched upon earlier, DaVinci Resolve comes in two versions: a robust free version and a more powerful Studio version.
- Free Version: Excellent for learning, personal projects, and even many professional tasks. It includes the core editing, color grading, Fusion (VFX), and Fairlight (audio) pages, along with a good selection of built-in Resolve FX. For those exploring image inspiration and creative ideas, this is an ideal starting point.
- Studio Version: Offers advanced features like the DaVinci Neural Engine, more Resolve FX plugins (e.g., advanced noise reduction, film grain, lens flares), support for higher resolutions and frame rates, multi-user collaboration, and hardware acceleration for better performance. If your visual design work involves complex digital art, demanding photo manipulation, or high-volume professional photography, the Studio version provides the ultimate toolkit and performance. Upgrading can truly unlock unlimited creative potential, particularly when dealing with the high demands of professional stock photos or intricate aesthetic compositions.
Streamlining Creativity with Dedicated Hardware
While DaVinci Resolve’s interface is highly functional, the process of repeatedly clicking, dragging sliders, and using keyboard shortcuts can sometimes interrupt the creative flow, especially when making precise, iterative adjustments to effects and keyframes. This is where dedicated creative controllers, like those from TourBox, come into play.
A creative console like the TourBox Elite or TourBox Lite is designed to simplify complex operations, making your editing experience more intuitive and convenient. Imagine:
- Intuitive Parameter Adjustment: Instead of dragging a mouse across a slider while holding down
Altfor precision, you could simply turn a dial or scroll wheel for minute adjustments to a blur radius, color temperature, or zoom level. - Customizable Shortcuts: Map frequently used effects, tools, or keyframe commands to physical buttons, dials, and scroll wheels. This allows you to navigate the Effects Library, apply an effect, open the Inspector, and fine-tune parameters without ever taking your hand off the controller.
- Enhanced Workflow for Visual Design: For tasks like color grading an aesthetic image or meticulously manipulating an abstract background, the tactile feedback and immediate control offered by a console can drastically speed up your workflow and foster a more immersive editing experience.
By integrating such a controller, you can focus more on the visual outcome – the mood, the drama, the cinematic flair – and less on the technical steps, allowing your creative vision to manifest with greater ease and efficiency. For anyone serious about digital photography, photo manipulation, or exploring new visual design frontiers, it’s a game-changer that complements DaVinci Resolve’s power, allowing you to achieve stunning results faster and with greater enjoyment.
In conclusion, DaVinci Resolve, often lauded for its video editing prowess, is an equally formidable platform for enhancing still images and expanding the horizons of visual design. From applying foundational effects and transitions to mastering dynamic changes with keyframes and leveraging AI-powered tools like Magic Mask and Smart Reframe, the possibilities are limitless. Whether you’re curating stunning wallpapers, refining high-resolution stock photos, or crafting intricate digital art, the techniques discussed here, combined with the rich resources of Tophinhanhdep.com for image inspiration and assets, will empower you to transform your visual ideas into captivating realities. Embrace the blend of static beauty and dynamic motion, and let your creativity soar.