How to Add an Image to Your Outlook Signature: A Comprehensive Guide by Tophinhanhdep.com to Professional Branding

In today’s fast-paced digital world, an email signature is far more than a mere formality; it’s a critical component of your personal and professional brand identity. A well-designed signature, particularly one that incorporates a visually appealing image, can transform every email you send into a powerful statement, a digital business card, and even a subtle marketing tool. Whether it’s a company logo, a professional headshot, or a call-to-action banner, an image instantly elevates your messages, adding a layer of professionalism and memorability that plain text simply cannot achieve.
At Tophinhanhdep.com, we understand the profound impact of visual elements in communication. From stunning wallpapers and backgrounds that set a mood, to aesthetic photography and high-resolution stock photos that capture attention, we explore the vast world of images. This expertise extends to how these visuals can be meticulously integrated into your daily digital interactions, such as your Outlook email signature.
This guide, presented by Tophinhanhdep.com, will walk you through the essential steps to add an image to your Outlook signature across various platforms. We’ll also delve into why incorporating an image is so vital, how to prepare your images for optimal display, and practical tips to troubleshoot common issues. Our goal is to empower you to create a signature that not only looks professional but also effectively communicates your brand and personality, leveraging the power of visual design and digital photography.
The Power of Visuals: Why Your Outlook Signature Needs an Image
Your email signature is a direct reflection of your attention to detail and professional standards. In an era where communication is predominantly digital, a visually engaging signature can significantly enhance your credibility and leave a lasting impression. Here are compelling reasons why integrating an image into your Outlook signature is a strategic move:
Creating a Professional First Impression
Just as a carefully chosen profile picture sets the tone for your online presence, an image in your email signature establishes immediate professionalism. When recipients spend mere seconds scanning an email, a striking logo or a friendly headshot can instantly differentiate your message from others. This “digital business card” approach, supported by beautiful photography or a well-designed graphic, signals professionalism and attention to detail, making your communications more impactful. Tophinhanhdep.com emphasizes the importance of selecting images that convey competence and trust, whether they are crisp, high-resolution corporate logos or expertly captured digital photography for a personal touch.
Enhancing Brand Awareness and Identity
For businesses, a company logo in every email signature is a non-negotiable branding asset. It reinforces brand recognition, ensures consistency across all communications, and subtly promotes your organization with every message sent. Beyond logos, incorporating brand colors or unique aesthetic elements through graphic design within your signature can further solidify brand identity. Tophinhanhdep.com offers a wealth of image inspiration and thematic collections that can guide you in choosing or designing signature elements that perfectly align with your brand’s visual language, ensuring that your emails act as miniature billboards for your enterprise. Considering that an average office worker sends hundreds of emails monthly, this consistent visual exposure is an invaluable marketing opportunity.

Boosting Marketing Campaigns and Engagement
An email signature can be an interactive marketing channel, offering versatility to adapt to your current priorities. Beyond static images, you can include clickable elements such as a link to a webinar signup, a special offer banner, or icons linking to your social media profiles. These visual cues, derived from effective visual design strategies and potentially enhanced by photo manipulation techniques, encourage recipients to engage further with your brand. For instance, a small, yet impactful banner featuring a product from a trending styles collection or an abstract background could draw clicks and drive traffic, making your signature a dynamic tool for outreach. Tophinhanhdep.com encourages thinking beyond just a logo, exploring creative ideas to turn your signature into a call-to-action hub.
Step-by-Step: Adding an Image to Your Outlook Desktop Signature
Adding an image to your Outlook signature is a straightforward process, especially within the classic desktop application. However, proper preparation of your image using suitable image tools is crucial for ensuring it looks crisp, loads quickly, and displays correctly for all recipients.
Preparing Your Image for Outlook
Before you even open Outlook, dedicate time to optimizing your image. A common pitfall is using oversized or unoptimized images, which can lead to slow loading times, poor display quality, or even having the image appear as an attachment instead of inline.
- Choose the Right Image: Select a clear, high-quality image. For a company logo, ensure it’s a vector graphic converted to a suitable raster format (like PNG or JPG) for web use, or a high-resolution version of the logo. For a professional headshot, opt for digital photography that is well-lit and professional.
- Size and Dimension: Aim for a relatively small image. Most professional logos in signatures are around 100-200 pixels wide and 50-100 pixels tall. Headshots might be slightly larger, perhaps 150x150 pixels.
- Optimize File Size: This is critical. Use an image compressor or optimizer tool to reduce the file size, ideally below 100KB, without compromising visual quality. Tools found on Tophinhanhdep.com can help you compress your image efficiently, ensuring fast loading times for your recipients. If your original image is low-resolution, consider using an AI upscaler tool (also found on Tophinhanhdep.com) to improve its quality before optimizing the file size.
- File Format: PNG is generally preferred for logos with transparency, while JPEG works well for photographic images due to its smaller file size.
Detailed Steps for Classic Outlook (Windows Desktop)
Once your image is prepared, follow these steps to integrate it into your Outlook signature:
-
Open Outlook and Access Signature Settings:
- Launch the Outlook application on your desktop.
- Go to the File tab in the top-left corner.
- Select Options from the sidebar menu.
- In the “Outlook Options” dialog box, navigate to Mail.
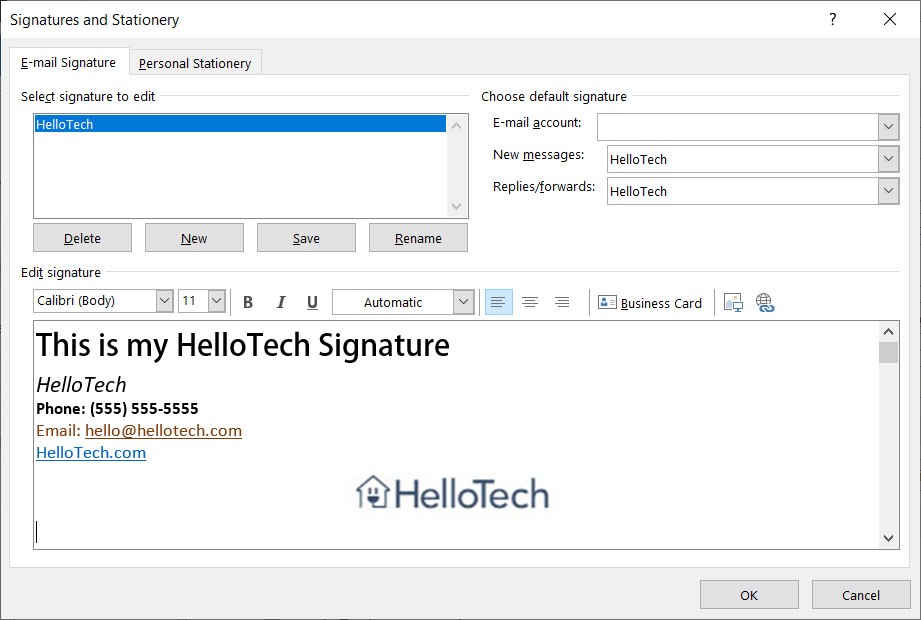
- Under the “Compose messages” section, click on the Signatures… button. This opens the “Signatures and Stationery” dialog box.
-
Create or Edit Your Signature:
- If you’re creating a new signature, click New, provide a descriptive name for your signature, and click OK.
- If you’re adding an image to an existing signature, select that signature from the “Select signature to edit” list.
- In the “Edit signature” text box, type any text you want to include (your name, title, contact info, etc.). Use the formatting toolbar to style your text.
-
Insert Your Image:
- Position your cursor in the “Edit signature” box exactly where you want the image to appear. Consider visual design principles for placement, perhaps to the left of your text using a two-column table (as Brian suggests in the comments of a reference article), a method often detailed on Tophinhanhdep.com in graphic design tutorials.
- Click the Insert Picture icon (it typically looks like a small picture of mountains with a sun).
- Navigate to the folder on your computer where you saved your optimized image file. Select the image and click Insert.
-
Adjust and Link Your Image (Optional):
- Once inserted, the image will appear in the signature editor. You can click on the image to select it. Small handles will appear at the corners, allowing you to drag and resize it if needed. Always drag from the corners to maintain aspect ratio.
- To add a hyperlink to your image (e.g., link your company logo to your website), select the image and then click the chain icon (Insert Hyperlink). Enter the desired web address and click OK.
-
Save Your Signature:
- After positioning and optionally linking your image, click OK in the “Signatures and Stationery” dialog box to save the changes.
- Click OK again in the “Outlook Options” dialog box to close it.
-
Set Default Signatures:
- Back in the “Signatures and Stationery” dialog box, under “Choose default signature,” select which signature you want to automatically apply to “New messages” and “Replies/forwards” for each email account. If you prefer to add signatures manually, select “(none).”
- Finally, click OK to complete the process.
Your new signature, complete with its integrated image, will now appear automatically (or be available for manual insertion) in your Outlook emails.
Mastering Signatures Across All Outlook Platforms
While the classic desktop Outlook provides a robust editor, many users now interact with Outlook across various platforms, including web browsers and mobile devices. Tophinhanhdep.com recognizes the importance of consistent visual design across all touchpoints. Fortunately, Microsoft has improved synchronization, though slight variations in the process exist for each platform.
Outlook.com (Web Version) and Outlook 365 Web App
The process for adding a signature in Outlook.com and the Outlook 365 web app is very similar and has become more streamlined.
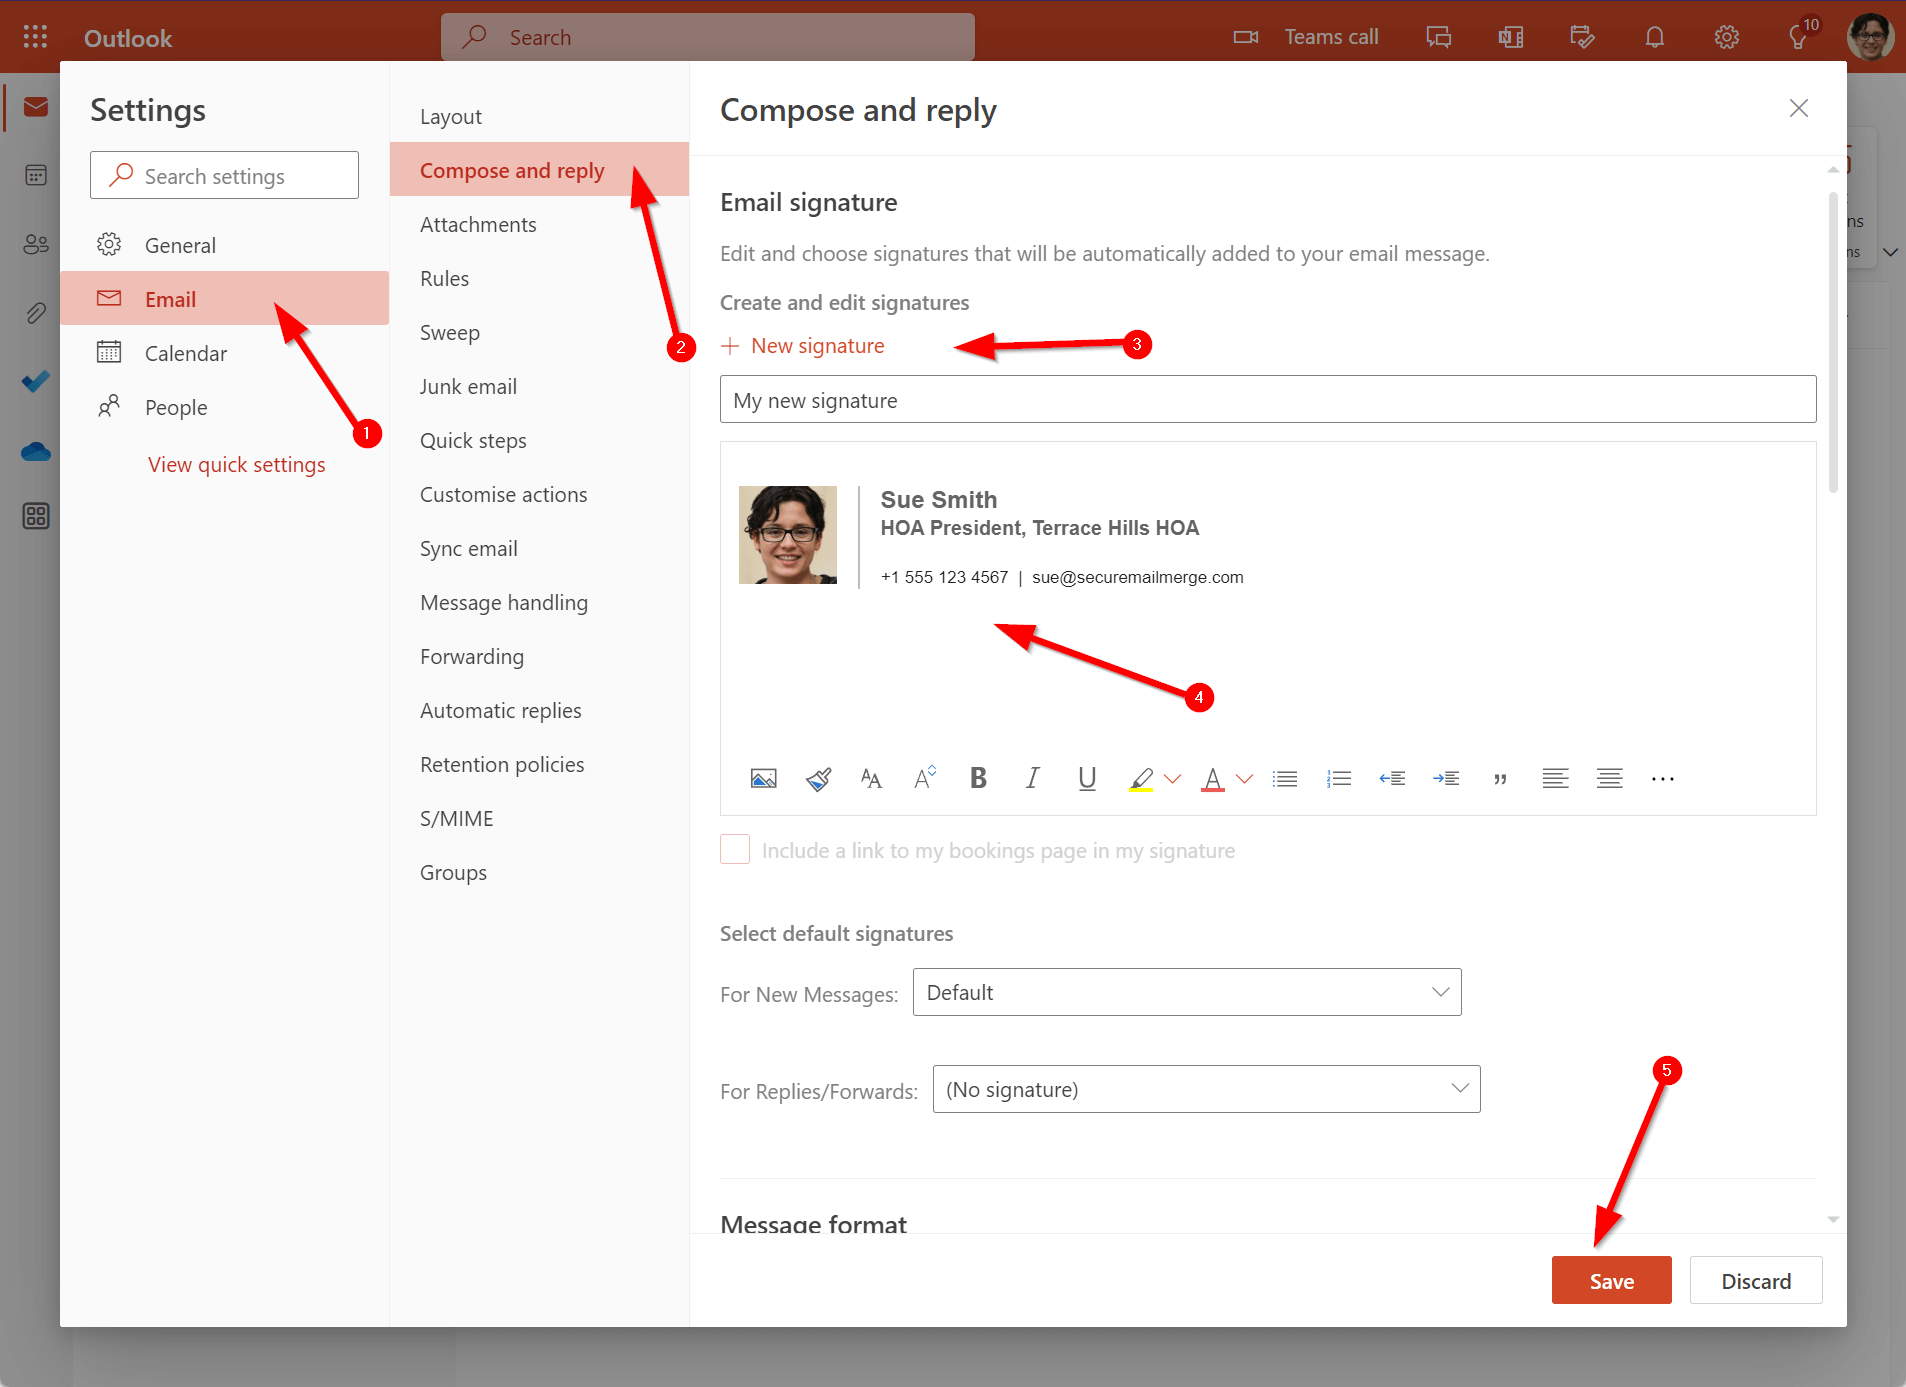
- Access Settings: Sign in to your Outlook account in a web browser. Click the Settings gear icon (usually in the top right corner).
- Navigate to Signatures: In the Settings pane, search for “Signatures” or go to Mail > Compose and reply.
- Create/Edit Signature: Under “Email signature,” click + New signature to create one or select an existing signature to edit.
- Add Image: Use the formatting toolbar within the signature editor to Insert image inline. Browse your computer for the optimized image you prepared.
- Format and Link: Once the image is inserted, you can resize it and add a hyperlink using the available options, similar to the desktop version. Ensure that the aesthetic and functionality are consistent with your brand.
- Set Defaults and Save: Choose whether to apply this signature to new messages and/or replies/forwards. Click Save.
Outlook for Mac
Adding an image to your signature on Outlook for Mac follows a similar logic to its Windows counterpart, though the menu navigation differs slightly.
- Open Outlook and Settings: Launch Outlook for Mac. Go to the Outlook menu in the top menu bar, then select Preferences (or Settings on newer versions).
- Access Signatures: In the Preferences window, click on Signatures.
- Create/Edit Signature: Click the + sign to create a new signature or select an existing one. Give your new signature a name.
- Insert Image: In the signature editor box, position your cursor. Click the Picture icon to insert an image from your files.
- Adjust and Save: Resize and link the image as needed. Set your default signature for new messages and replies/forwards. Click Save.
Outlook Mobile App (Android/iOS)
The mobile app offers a more basic editor but generally syncs signatures created on desktop or web versions.
- Open App and Settings: Launch the Outlook mobile app. Tap the hamburger icon (three horizontal lines) in the top-left corner, then scroll down and tap the Settings gear icon.
- Email Signature: Scroll down to the “Mail” section and tap Signature (or “Email Signature”).
- Edit/Create: If a signature already exists, you can edit it. If not, type your desired signature. While direct image insertion is limited here, the app typically syncs signatures, including images, that you’ve created on desktop or web versions.
- Save: Once satisfied, tap the checkmark or “Done” to save your signature.
It’s worth noting that while basic text and some simple formatting can be done directly in the mobile app, for complex signatures with multiple images or advanced visual design, it’s always best to create them on a desktop client or web version and let them sync. Tophinhanhdep.com emphasizes designing for responsiveness, ensuring your signature looks good even on smaller screens, using properly optimized images.
Optimizing Images and Troubleshooting Common Signature Issues
Even with careful planning, technical glitches can occur. Tophinhanhdep.com understands that perfect digital photography and visual design can be undermined by common issues. Here’s how to ensure your image-rich signature performs flawlessly and what to do when problems arise.
Best Practices for Image Optimization in Signatures
To preempt many issues, rigorous image optimization is key. This directly ties into the Image Tools category of Tophinhanhdep.com.
- File Size is Paramount: As mentioned, keep image files under 100KB. Larger files mean longer load times for recipients, potentially flagging your email as spam or simply annoying the receiver. Utilize image compressors and optimizers regularly.
- Dimensions Matter: Don’t rely on Outlook to perfectly resize a massive image. Resize your image to its intended display dimensions (e.g., 200x80 pixels for a logo) before inserting it. This ensures consistent quality and prevents distortion. Tophinhanhdep.com offers guides on how to properly crop and resize images for various digital uses, including email signatures.
- Web-Hosted Images vs. Embedded Images:
- Embedded Images: These are directly included in the email message. They work well for small, essential graphics like logos. They increase email file size.
- Web-Hosted Images: These images are stored on a web server (e.g., your company’s website, a dedicated image hosting service) and referenced in your signature by a URL. They don’t increase email file size and update automatically if the source image changes. However, they might not load if the recipient’s email client blocks external content by default, showing a broken link icon. For maximum reliability, especially for critical brand elements, embedded images are often preferred in signatures, meticulously prepared using image tools to minimize file size.
- Accessibility: Always consider adding “alt text” to your images. This text describes the image for recipients who have images blocked or use screen readers, a crucial aspect of inclusive visual design.
Resolving Common Outlook Signature Problems
Here are some frequent issues and their fixes, integrating advice from Tophinhanhdep.com’s focus on photography and visual design:
-
Image Not Displaying Correctly / Appears as Broken Link:
- Check File Path: If you used a local file path (e.g.,
C:\Users\Name\Pictures\logo.png), the image will only show for you. For others, it will be broken. Ensure images are either properly embedded (as per the steps above) or hosted online with a publicly accessible URL. - Image Hosting: If web-hosted, verify the URL is correct and the image is truly accessible online.
- HTML Issues: If you’re using a custom HTML signature, ensure the
<img>tags are correctly formed, and thesrcattribute points to a valid, accessible image. Tophinhanhdep.com’s guides on digital photography and graphic design often emphasize clean code for web elements. - Recipient’s Settings: Some email clients block images by default. Advise recipients to enable image loading.
- Check File Path: If you used a local file path (e.g.,
-
Image Quality Loss (Especially in New Outlook/Web Version):
- This is a known issue where Outlook sometimes re-compresses or downscales pasted images.
- Fix: Instead of copy-pasting an image directly from an email body or a web page, always save the optimized image file to your computer first, then insert it using Outlook’s “Insert Picture” button. This ensures Outlook handles the embedding process more predictably, maintaining the quality of your high-resolution source.
- Alternative: If issues persist, consider using a dedicated email signature generator (like those recommended by Tophinhanhdep.com for their superior visual design capabilities) and pasting the generated HTML, which often handles image embedding more robustly.
-
Signature Text Shifts / Layout Problems:
- This often occurs when trying to align text and images side-by-side using spaces or tabs, which email clients render inconsistently.
- Fix: The most reliable method, as suggested by a user in the reference content, is to create your signature layout in a program like Microsoft Word using a borderless 2-column table. Design your layout (image in one column, text in the other), then copy and paste the entire table into the Outlook signature editor. This Word-based graphic design approach provides better control over complex layouts. Tophinhanhdep.com offers visual design tutorials that demonstrate this technique.
- Avoid Excessive Formatting: Stick to standard fonts and avoid overly complex formatting within Outlook’s native editor to prevent unexpected rendering issues.
-
Signature Not Showing Up Automatically:
- Check Default Settings: Navigate back to the “Signatures and Stationery” dialog box (or equivalent settings in web/Mac) and ensure you have selected your desired signature for “New messages” and “Replies/forwards” for the correct email account.
Elevating Your Signature: Advanced Design and Tophinhanhdep.com Tools
Beyond simply adding an image, you can transform your Outlook signature into a truly compelling statement through advanced visual design and specialized image tools. Tophinhanhdep.com is a hub for creative ideas and resources to achieve this.
Crafting Sophisticated Layouts with HTML
While Outlook’s built-in editor is sufficient for basic signatures, HTML offers unparalleled control over visual design. This allows for:
- Complex Arrangements: Precisely position images (like a logo and social media icons) alongside text, create vertical dividers, and fine-tune spacing. This is where graphic design principles truly shine, allowing for intricate yet clean layouts.
- Custom Fonts and Colors: Implement brand-specific fonts and color palettes that might not be available in Outlook’s standard options.
- Interactive Elements: Embed dynamic content, custom buttons for calls to action, or even short animated GIFs (ensuring they are still optimized with image compressors to prevent excessive file size).
- Responsive Design: Design an HTML signature that adapts gracefully to different screen sizes, from desktop monitors to mobile phones, a core tenet of modern visual design.
Many users choose to design their HTML signatures using external generators (like those featured on Tophinhanhdep.com) or custom code it, then copy-paste the finished HTML into Outlook’s signature editor. This gives them a rich, custom design that far surpasses what the basic editor can accomplish.
Integrating Tophinhanhdep.com’s Expertise for Unique Signatures
Tophinhanhdep.com’s focus areas provide a wealth of resources to enhance your signature:
- Image Collections for Inspiration: Explore our image inspiration & collections for unique photo ideas for personal branding, or thematic collections that align with specific campaigns or industries. Whether you need an abstract background for a modern feel or nature photography for an eco-friendly brand, Tophinhanhdep.com has resources.
- Advanced Image Editing: Leverage image tools like AI upscalers to ensure any older, lower-resolution logos or headshots are brought up to a professional standard before inclusion. Use photo manipulation techniques to integrate your images seamlessly into complex signature designs, matching editing styles to your brand.
- Visual Design Best Practices: Our guides on graphic design and digital art can help you understand color theory, typography, and layout principles to ensure your signature is not just functional but also aesthetically pleasing and impactful. Create a mood board to conceptualize your ideal signature.
- Creative Ideas for Engagement: Tophinhanhdep.com encourages thinking outside the box. Could a small, optimized GIF from our trending styles section add a touch of personality? Could an image-to-text tool help you quickly grab a quote to include? The possibilities for creative ideas are vast.
By strategically applying the principles of visual design, harnessing high-resolution photography, and utilizing effective image tools, you can transform your Outlook signature from a simple closing remark into a powerful, professional, and visually compelling statement that perfectly aligns with your brand identity, all with the guidance of Tophinhanhdep.com.
In conclusion, adding an image to your Outlook signature is a straightforward yet highly effective way to enhance your professional presence. By following the step-by-step instructions, optimizing your images, and leveraging the comprehensive resources available at Tophinhanhdep.com, you can create a signature that truly stands out, reinforcing your brand, fostering credibility, and making every email count.