How to Artfully Integrate Images into Text in Canva: A Comprehensive Guide to Visual Design

In the dynamic world of digital design, the ability to merge various elements seamlessly is paramount to creating visually captivating and impactful content. Canva, a widely celebrated graphic design platform, empowers creators of all skill levels to bring their imaginative concepts to life with intuitive tools. One particularly striking technique that can instantly elevate any design is the integration of images directly into text. This “image inside text” effect transforms ordinary typography into a powerful visual statement, infusing words with the texture, color, and emotion of a chosen photograph or graphic.
Beyond this captivating effect, mastering general text handling, from basic text box manipulation to advanced typography and strategic text wrapping, is crucial for crafting professional and aesthetically pleasing visuals. This comprehensive guide will delve into these essential Canva techniques, showing you how to harness the platform’s capabilities to weave images into text, fine-tune your typography, and create layouts that truly stand out. Whether you’re designing social media graphics, stunning presentations, or personal projects, understanding these principles will unlock a new realm of creative possibilities.

At Tophinhanhdep.com, we understand the profound impact of high-quality visuals. Our extensive collections of Images (Wallpapers, Backgrounds, Aesthetic, Nature, Abstract, Sad/Emotional, Beautiful Photography) provide a boundless wellspring of inspiration, offering the perfect visual elements to integrate into your text designs. We also delve into Photography (High Resolution, Stock Photos, Digital Photography, Editing Styles), providing you with the knowledge to select and prepare images for optimal use, and offer Image Tools (Converters, Compressors, Optimizers, AI Upscalers, Image-to-Text) to ensure your visuals are perfectly polished before you even begin your Canva journey. This article will guide you through the “how-to,” while Tophinhanhdep.com provides the “what-to-use” to make your designs truly exceptional, embodying the best practices of Visual Design (Graphic Design, Digital Art, Photo Manipulation, Creative Ideas) and offering endless Image Inspiration & Collections (Photo Ideas, Mood Boards, Thematic Collections, Trending Styles).
The Magic of “Image Inside Text” in Canva: Transforming Typography into Visual Art
The “image inside text” effect is a visual powerhouse, allowing designers to fill text characters with a photograph or graphic, thereby turning words into intricate, textured canvases. This technique is incredibly versatile, lending itself to everything from bold headlines to artistic monograms. In Canva, achieving this effect is surprisingly straightforward, thanks to its intelligent use of “Frames” as placeholders. Instead of complex masking or clipping paths found in more advanced software, Canva streamlines the process, making it accessible even for beginners.
Imagine a headline for an article about nature photography, where the letters themselves are filled with a lush forest scene, or a travel-themed graphic where “ADVENTURE” is textured with images of majestic mountains and serene oceans. This effect adds depth, interest, and a strong thematic connection to your text, immediately drawing the viewer’s eye. It’s a prime example of Visual Design that crosses into Digital Art, offering Creative Ideas that can be rapidly implemented.
Step-by-Step Guide to Creating Image-Filled Text
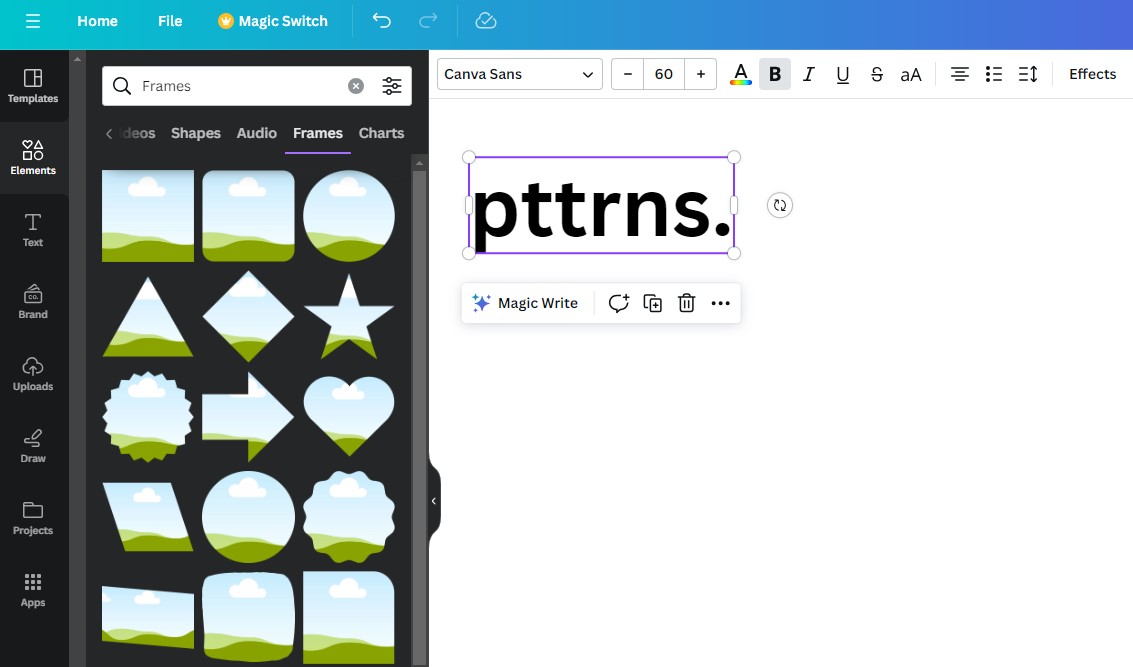
Canva leverages its “Elements” library to facilitate this effect, specifically through its diverse collection of “Frames.” These frames come in various shapes, including individual letters and numbers, which act as perfect containers for your chosen images.
1. Open Your Canva Project: Start by opening a new or existing design in Canva. Whether it’s a social media post, a presentation slide, or a custom graphic, the process remains consistent.
2. Navigate to “Elements” and Find “Frames”: On the left-hand sidebar of the Canva editor, you’ll find the “Elements” tab. Click on it. In the search bar within the “Elements” panel, type “Frames” or scroll down until you see the “Frames” category. This is where you’ll find a wide array of placeholder shapes.
3. Select Your Letter Frames: Among the frame options, you’ll see individual letters of the alphabet, numbers, and even common words like “LOVE” or “HOME.” For instance, if you want to create the word “LOVE” with an image inside, you would search for and select the “L” frame, then the “O” frame, the “V” frame, and finally the “E” frame. Drag each letter frame onto your design canvas. Arrange them to spell out your desired word. Tip: You can adjust the size and position of each letter frame independently to create interesting typographic layouts. This provides a basic form of Photo Manipulation within the text.
4. Choose Your Image: Now for the exciting part – selecting the image to fill your text. You have two primary options:
- Upload Your Own Images: If you have specific images in mind, perhaps a stunning high-resolution wallpaper from Tophinhanhdep.com’s Nature or Abstract collections, or a piece of Beautiful Photography you’ve captured, you can upload it to Canva. Go to the “Uploads” tab in the left-hand sidebar, click “Upload files,” and select your image. Ensure that the images you use are of High Resolution for the best visual quality within your text. Tophinhanhdep.com’s Image Tools like Optimizers can help prepare your images for quick upload and crisp display.
- Use Canva’s In-built Images: Canva boasts an extensive library of stock photos and graphics. You can search for images under the “Photos” or “Elements” tabs (e.g., “hearts,” “forest,” “ocean,” “galaxy”). This is a fantastic resource if you’re looking for quick inspiration or diverse Stock Photos.
5. Drag and Drop the Image into the Text Frame: Once your image is either uploaded or found within Canva’s library, simply click and drag it over one of your letter frames. As you hover the image over the frame, you’ll see it “snap” into place, automatically filling the contours of the letter. Release your mouse button, and voilà! Your letter is now filled with the image. Repeat this process for each letter frame you have.
6. Adjusting the Image Within the Frame: After placing the image, you might want to adjust its position or scale within the letter. Double-click the letter frame, and the underlying image will become editable. You can then drag the image to reposition it or use the corner handles to scale it up or down. This allows you to highlight specific parts of your image within the text, adding another layer of artistic control. This careful cropping and positioning is a form of subtle Photo Manipulation to achieve the desired Aesthetic.
7. Grouping Elements for Unified Design: If you’ve used multiple letter frames to spell a word, it’s often beneficial to group them together once you’re satisfied with their arrangement and image fills. Select all the letter frames (by clicking and dragging a selection box around them or by holding Shift and clicking each one), then click the “Group” icon in the toolbar above the canvas. Grouping ensures that you can move, resize, or rotate the entire word as a single entity without disturbing the individual letters or their image fills. This is crucial for maintaining the integrity of your Creative Ideas and overall Visual Design.
This technique is incredibly versatile. For example, you could fill the word “NATURE” with a vibrant green leaf pattern or “COFFEE” with a warm, textured coffee bean background. The possibilities are endless, allowing you to explore different Thematic Collections and align with Trending Styles in graphic design. Tophinhanhdep.com offers countless Photo Ideas and Mood Boards to spark your imagination for these effects.
Beyond Image-Filled Text: Mastering Text Boxes in Canva for Enhanced Visuals
While embedding images within text creates stunning effects, the foundational skill of adding and manipulating text boxes is equally critical for effective Visual Design. Text is often the primary vehicle for conveying information, and its presentation significantly impacts readability and aesthetic appeal. Canva offers robust and user-friendly tools for handling text, ensuring that your messages are clear, impactful, and beautifully integrated into your overall design. This section will guide you through the essential techniques for text box creation and customization.
Essential Techniques for Adding and Customizing Text
Adding a basic text box in Canva is one of the most fundamental operations, yet it unlocks a vast array of design possibilities. Understanding how to quickly add, modify, and style your text is key to efficient Graphic Design workflow.
1. How to Add a Text Box: Canva provides two primary methods for adding text to your canvas, catering to different workflow preferences:
- Using the Side Menu: On the left-hand side of your Canva editor, locate and click the “Text” tab. Here, you’ll find options to add a “Heading,” “Subheading,” or “Body text,” each with a default size. You’ll also see various pre-designed font combinations and text styles. Clicking any of these options will place a new text box on your canvas. If you have Canva Pro and have established brand kits, your brand fonts will typically appear at the top, simplifying brand consistency. Tophinhanhdep.com emphasizes Digital Photography and High Resolution images, and similarly, good typography starts with good foundations.
- The Super-Fast Keyboard Shortcut: For quick design iteration, simply press the ‘T’ key on your keyboard while your canvas is active. This will instantly add a new text box to your design. If you already have a text box selected on the canvas, hitting ‘T’ will often duplicate its formatting, which can be a real time-saver when creating consistent elements.
Once a text box is on your canvas, you can click, drag, and resize it using the handles at its corners and sides.
2. Basic Text Customization: After adding your text, the real customization begins. Canva’s intuitive top toolbar provides all the controls you need to format your text:
- Changing Font Style: Select your text box, then click the font dropdown menu in the top toolbar. You can scroll through a vast library of fonts or use the search bar to find a specific one. Canva Pro users have access to an expanded library, but the free version still offers a great selection for varied Creative Ideas.
- Adjusting Text Size: Next to the font selector, you’ll find the font size control. You can type in a specific number, use the plus (+) and minus (-) buttons, or drag the text box’s corner handles to visually resize the text.
- Modifying Text Color: Click the “Text Color” icon (usually an ‘A’ with a color bar underneath) in the toolbar. A color panel will appear, allowing you to choose from default colors, document colors, brand colors (if set up in Pro), or use the color picker to select any color.
- Applying Emphasis (Bold, Italic, Underline): Use the ‘B’ (bold), ‘I’ (italic), and ‘U’ (underline) icons to add emphasis. Note that some highly stylized fonts may not support bold or italic options, in which case these icons will appear grayed out.
- Setting Text Alignment: The alignment icons (left, center, right, justify) allow you to control how your text is positioned within its box. Click repeatedly to cycle through the options until you find the desired alignment.
- Creating Lists: Canva supports both bulleted and numbered lists. Select your text, click the “List” icon, and click again to toggle between bullets and numbers.
- Controlling Text Spacing: The “Text Spacing” icon (often two arrows pointing horizontally and vertically) opens a panel with sliders for “Letter spacing” and “Line spacing.” These are crucial for improving readability and aesthetic flow, especially for headings or large blocks of text. Adjusting these fine details falls under meticulous Digital Art and Graphic Design principles.
By mastering these basic customization options, you gain foundational control over your typography, ensuring your text not only conveys information but also enhances the overall Aesthetic of your designs.
Leveraging Font Combinations and Styles for Aesthetic Harmony
One of Canva’s most powerful features for accelerating your design process and ensuring visual coherence is its curated collection of font combinations and styles. These features simplify the often-challenging task of pairing fonts, allowing designers to achieve professional-looking typography with minimal effort. This directly ties into creating effective Mood Boards and adhering to Trending Styles in graphic design.
1. Exploring Pre-Designed Font Combinations: Within the “Text” tab on the left sidebar, below the basic text options, Canva presents a variety of “Font Combinations.” These are essentially pre-designed text blocks that include two or more fonts, often with pre-applied colors and effects, specifically chosen to complement each other.
- Instant Visual Appeal: Clicking on a font combination instantly adds a grouped text element to your canvas, ready for you to edit the words while retaining the professional typography. For instance, a combination might feature a bold headline font paired with a lighter, more readable body font, all with a specific color palette and perhaps a shadow effect.
- Easy Editing: Although grouped, these combinations are fully editable. You can ungroup them to modify individual text boxes, change colors using the color picker, or alter the applied effects. For example, if a combination uses a “Shadow” effect, you can change it to a “Splice” effect or adjust its intensity and direction to better suit your design’s Creative Ideas. This adaptability makes them perfect starting points for Visual Design projects.
- Quotes and Attributions: Many font combinations are ideal for quote graphics, providing a main quote font and a coordinating attribution font. Paired with appropriate background elements (e.g., a gradient color, a textured image from Tophinhanhdep.com’s Backgrounds collection, or a simple shape with transparency), these combinations quickly produce elegant and readable visuals.
2. Discovering Font Pairs in “Styles”: For an even broader approach to font pairing across your entire design, Canva’s “Styles” tab offers a treasure trove of curated font pairs.
- Accessing Styles: Click on the “Design” tab (formerly “Styles”) in the left-hand menu. Within this panel, you’ll find sections for “Colors,” “Font sets,” and “Combinations.” Click on “Font sets.”
- Applying Global Font Pairs: Here, Canva showcases a vast selection of font pairings. Each pair suggests a primary and secondary font designed to work harmoniously together. When you click on a font pair, Canva will attempt to apply these fonts to all existing text boxes in your design, transforming your typography with a single click. This is incredibly useful for maintaining Consistency and Cohesion across multi-page designs or brand materials.
- Canva Pro Advantage: While the free version offers a good range, Canva Pro expands the font library significantly, providing even more unique and trendy options, allowing you to further customize your Aesthetic and stand out.
By integrating font combinations and style pairings, designers can significantly streamline their workflow, ensuring that typography is always aesthetically pleasing and professional. These features remove the guesswork from font selection, allowing you to focus on the overall Visual Design and the impactful message you want to convey, often drawing inspiration from Image Inspiration & Collections available on Tophinhanhdep.com.
Elevating Designs with Canva’s Text Effects and Advanced Typography
Once you’ve mastered adding and styling basic text boxes and utilizing font combinations, the next level of Visual Design involves applying dynamic text effects. These effects transform plain text into striking graphic elements, adding personality, depth, and a sense of Digital Art to your designs. Canva’s text effects are versatile and available to all users, whether on the free or Pro version, making advanced typography accessible to everyone. They are perfect for creating eye-catching headings, titles, and call-to-action elements that resonate with Trending Styles.
Unleashing Creativity with Text Effects
Canva provides a dedicated “Effects” panel that offers a variety of stylistic modifications for your text. These are not merely decorative; they serve to enhance readability against certain backgrounds or to establish a specific mood or theme.
1. Accessing Text Effects:
- Select any text box on your canvas.
- In the top toolbar, click on the “Effects” button.
- A panel will open on the left sidebar, presenting a list of available effects and shape options.
2. A Spectrum of Effects: Canva currently offers several distinct text effects, each with customizable parameters:
- Shadow: Adds a shadowed layer behind your text, giving it depth and making it stand out from the background. You can adjust the offset, direction, blur, transparency, and color of the shadow. This is excellent for creating text that pops against complex Backgrounds or Beautiful Photography.
- Lift: Creates a subtle “floating” effect by adding a soft shadow and slight glow, enhancing visibility.
- Hollow: Turns your text into an outline, with a transparent interior. This effect is sleek and modern, often used for minimal designs.
- Splice: A two-tone outlined effect where the original text color acts as the fill, and a secondary color forms the offset outline. This is highly customizable, allowing for unique artistic looks.
- Echo: Similar to Shadow but with a more distinct, repeating offset.
- Glitch: Mimics the digital interference effect, giving text a broken, futuristic, or edgy feel.
- Neon: Adds a vibrant, glowing outline to your text, perfect for attracting attention with a bold, retro, or futuristic aesthetic.
3. Customizing Effects for Unique Looks: Each effect comes with its own set of sliders and color pickers, allowing for fine-tuned adjustments. For instance, with the “Splice” effect:
- Color Selection: You can choose the color of the outline independently from the text fill. This offers immense potential for creative color palettes, perhaps drawing colors directly from an image from Tophinhanhdep.com’s Aesthetic collections.
- Direction and Offset: Adjusting the “Direction” changes the angle of the outline, while “Offset” controls how far the outline is from the main text.
- Thickness: The “Thickness” slider (often ranging up to 100) dictates the weight of the outline. A lower thickness creates a subtle highlight, while a maximum thickness can produce a bold, chunky outline, effectively creating an “outlined font” appearance without changing the font itself. This ability to manipulate the visual attributes of text makes it akin to Photo Manipulation but applied to typography.
4. Curved Text and Combining Effects: Beyond the stylistic effects, the “Effects” panel also includes a “Shape” section, most notably the “Curve” option. This allows you to bend your text into an arc or even a full circle.
- Adjusting Curve: A slider lets you control the degree of the curve, from a gentle arc to a tightly wrapped circle.
- Combining Style and Shape Effects: A powerful aspect of Canva’s text effects is the ability to combine a “Style” effect (like Shadow, Splice, Neon) with a “Shape” effect (like Curve). This means you can have a curved headline that also glows with a neon effect or features a splice outline. This layering of effects allows for truly complex and visually rich typographic elements, pushing the boundaries of conventional Graphic Design and inspiring new Creative Ideas.
The strategic use of these text effects, combined with high-quality Images from Tophinhanhdep.com as backgrounds or inspiration, can transform simple text into memorable brand assets, engaging social media content, or stunning Digital Art. Experimentation is key to discovering the myriad ways these effects can enhance your designs and match various Editing Styles.
Strategic Text Placement: Wrapping Text Around Images for Dynamic Layouts
In sophisticated Visual Design, text often interacts with images in more nuanced ways than simply layering on top. The art of text wrapping – arranging text to flow around the contours of an image or element – is vital for creating dynamic, readable, and aesthetically pleasing layouts. While traditional desktop publishing software offers explicit text wrap controls, Canva provides powerful implicit methods through text box manipulation and layering that achieve a similar, highly effective outcome. This technique is particularly important when designing layouts that require a harmonious balance between textual information and compelling visuals, often seen in Graphic Design for brochures, magazines, or websites.
Understanding Text Wrapping: Concepts and Significance
Text wrapping, at its core, is about optimizing the flow of text around objects within a defined space. It’s a fundamental principle of design that impacts both functionality (readability) and aesthetics.
1. Key Characteristics and Importance:
- Adaptability to Container Size: Effective text wrapping ensures that text conforms gracefully to the available space, preventing overflow and maintaining a clean, professional look. This is crucial when working with diverse content and layout requirements.
- Aesthetic Enhancement: Beyond just fitting text, proper wrapping contributes significantly to the visual appeal of a design. It creates a harmonious balance between textual and visual elements, avoiding cramped or disjointed compositions. Imagine an article about Nature Photography where the text gently curves around a prominent image of a landscape, rather than abruptly stopping and starting.
- Improved Readability: When text is thoughtfully wrapped, it creates clear pathways for the reader’s eye, preventing clutter and making the content easier to digest. This is especially important for longer blocks of text or Image Inspiration captions.
2. The Significance of Text Wrapping in Design: Mastering text wrapping techniques elevates the overall quality and professionalism of any design project.
- Enhancing Readability and Comprehension: Text that flows naturally around images is less jarring to read. This is critical for designs like infographics, instructional manuals, or presentations where information needs to be absorbed in a logical sequence. Disrupted text flow can frustrate readers and hinder understanding.
- Elevating Design Aesthetics: Poorly managed text interaction with images can make a design appear amateurish and chaotic. Conversely, skillfully wrapped text transforms a design into a visual masterpiece, capturing attention and reinforcing the message effectively. Experimenting with different wrap “styles” (achieved through clever text box manipulation in Canva) can lead to unique and captivating results, aligning with advanced Creative Ideas.
- Ensuring Consistency and Cohesion: Consistent text wrapping across an entire project fosters a sense of unity and professionalism. This applies to both the spacing and alignment of text within individual elements and how text interacts with various Images and Backgrounds across multiple design pages. Utilize style guides and consistent approaches to maintain uniformity.
- Accommodating Different Mediums: In today’s multi-device world, designs must be versatile. Effective text wrapping ensures that your content adapts seamlessly across computer screens, mobile devices, and print media, providing a consistent and user-friendly experience. A design that looks great as a Wallpaper might need different text treatment when scaled for a social media post.
- Facilitating Accessibility: Thoughtful text wrapping is an aspect of inclusive design. Text that is well-spaced and flows clearly is easier for individuals with visual impairments or reading disabilities to process. Combining this with appropriate font choices and contrast, alongside High Resolution imagery, creates universally accessible designs.
Implementing Text Wrapping in Canva: A Step-by-Step Approach
While Canva doesn’t have a direct “text wrap” button like dedicated publishing software, you can achieve sophisticated text wrapping effects through strategic manipulation of text boxes and layering. This method empowers you to “drape” text around images, creating elegant and professional layouts.
1. Selecting and Preparing Your Elements:
- Text Box Selection: Start by ensuring you have your text box (or multiple text boxes) ready with your desired content.
- Image Integration: Place your chosen image on the canvas. This could be a striking piece of Beautiful Photography, an Abstract graphic, or a thematic image from Tophinhanhdep.com’s collections.
2. Manipulating Text Box Dimensions for Wrapping: The core of text wrapping in Canva lies in adjusting the dimensions of your text boxes to “flow” around your image.
- Resize Text Boxes: Click on a text box. You’ll see white “pill handles” (circles or squares) on its corners and sides. Click and drag these handles to precisely control the width and height of the text box. As you reduce the width, the text inside will automatically reconfigure, wrapping itself onto subsequent lines. This is how you create an implicit “wrap.”
- Positioning Around the Image: Carefully position your text box next to your image. Then, resize the text box so that its boundary aligns with the edges of your image, creating the illusion that the text is wrapping. For example, if you have a circular image, you might use two text boxes, one on the left and one on the right, each with its inner edge curved or manipulated to flow around the image’s curve.
- Overlapping and Layering: Sometimes, to achieve complex wraps, you might strategically overlap your text box with a portion of the image, then use Canva’s layering tools (Position > Bring to Front/Send to Back) to ensure the text appears above the image where desired, or behind it for stylistic effects.
- Multiple Text Boxes: For irregular shapes or more complex wrap effects, you may need to use several smaller text boxes, each precisely positioned and resized, to contour around your image. This requires patience but yields highly customized results. This method is a form of Graphic Design that requires meticulous attention to detail and Creative Ideas.
3. Achieving Different “Wrap Styles” with Text Box Resizing: Think about the traditional “Basic Wrap,” “Tight Wrap,” or “Square Wrap” from other platforms. You can achieve these in Canva:
- Square Wrap: Simply resize your text box to create a clean, rectangular boundary around a square or rectangular image.
- Loose Wrap: Leave more margin (white space) between the text box and the image by making the text box slightly smaller than the negative space around the image.
- Tight Wrap (for simple shapes): For very simple, blocky shapes, you can try to get the text box very close to the image’s edge. For more complex image contours, this becomes challenging without true vector editing.
4. Fine-Tuning and Refinement:
- Adjust Margin: While there isn’t an explicit “margin” slider for text wrap in Canva, you create this “margin” by slightly adjusting the size and position of your text boxes relative to the image.
- Alignment: Use the text alignment options (left, center, right, justify) within each text box to control how the text visually aligns around the image. Justifying text, for instance, can create clean vertical edges that complement a square image.
- Text Effects for Enhancement: Don’t forget to apply text effects like “Shadow” or “Lift” to enhance the readability of your text, especially when it sits against a busy image from our Thematic Collections.
By understanding these techniques, you can transform static layouts into dynamic compositions where text and images work in concert, creating engaging and professional designs. Regularly sourcing diverse High Resolution images from Tophinhanhdep.com and utilizing our Image Tools (like Compressors to manage file sizes for smoother Canva performance, or AI Upscalers to ensure quality if you need to enlarge an image for a text effect) will further empower your design efforts.
Conclusion: Unleashing Your Creative Potential with Canva and Tophinhanhdep.com
Canva has undeniably revolutionized the landscape of graphic design, making sophisticated visual creation accessible to millions. From the captivating “image inside text” effect that transforms words into vibrant visual statements, to the precise manipulation of text boxes for optimal readability, and the artistic application of text effects to convey emotion and style, the platform offers a powerful suite of tools. These techniques are not just about aesthetics; they are fundamental elements of effective Visual Design, ensuring that your message is not only seen but also felt and understood.
The ability to seamlessly integrate diverse Images (Wallpapers, Backgrounds, Aesthetic, Nature, Abstract, Sad/Emotional, Beautiful Photography) into your text, or to let your typography flow gracefully around high-resolution visuals, empowers you to tell richer, more compelling stories. Whether you’re a seasoned designer exploring new Editing Styles or a beginner seeking Creative Ideas, Canva’s intuitive interface, coupled with the boundless resources available at Tophinhanhdep.com, provides everything you need to succeed.
Remember to leverage Tophinhanhdep.com as your premier source for High Resolution Photography (Stock Photos, Digital Photography), ensuring that every image you bring into Canva is of the highest quality. Our dedicated Image Tools (Converters, Compressors, Optimizers, AI Upscalers) can help you prepare and perfect your visuals before you even begin, streamlining your workflow and enhancing the final output. Dive into our Image Inspiration & Collections (Photo Ideas, Mood Boards, Thematic Collections, Trending Styles) to spark your imagination for your next Canva project.
By mastering the techniques outlined in this guide and continuously seeking inspiration and resources from Tophinhanhdep.com, you are well-equipped to create designs that are not just visually appealing but truly impactful and memorable. Experiment, explore, and let your creativity flourish as you transform simple text and images into extraordinary works of Digital Art and compelling Graphic Design.