How to Add an Image to HTML: A Comprehensive Guide to Visual Web Design

In today’s digital landscape, the visual appeal of a website is paramount. Images transform plain text into engaging experiences, captivating visitors and conveying messages far more effectively than words alone. Whether you’re aiming for an “Aesthetic” layout, showcasing “Beautiful Photography,” or setting a mood with compelling “Backgrounds” and “Wallpapers,” knowing “how to add image to HTML” is a fundamental skill for any web developer or content creator. Tophinhanhdep.com understands the power of visuals, offering a vast array of “High Resolution” images, powerful “Image Tools” for optimization, and boundless “Image Inspiration & Collections” to elevate your online presence.

Adding an image to an HTML page might seem like a basic task, but mastering the nuances of image integration is crucial for performance, accessibility, and stellar “Visual Design.” From selecting the perfect “Stock Photos” or your own “Digital Photography” to ensuring they display flawlessly across devices, every step contributes to the overall user experience. This guide, drawing insights from leading web development practices and Tophinhanhdep.com’s expertise, will walk you through the essential methods and best practices for seamlessly incorporating images into your HTML, enabling you to create stunning and efficient web pages.
The Fundamentals: Using the <img> Tag for Direct Image Embedding
The most common and straightforward way to add an image to an HTML document is by using the <img> tag. This tag is an empty element, meaning it doesn’t require a closing tag, and its functionality is defined through attributes. It’s often one of the first lessons in HTML for novices, yet its proper implementation is key to unlocking a website’s full visual potential.
The primary attributes of the <img> tag are src (source) and alt (alternative text). The src attribute tells the browser where to find the image file, while the alt attribute provides a textual description of the image, crucial for accessibility and search engine optimization.
Preparing Your Images for the Web
Before you even touch your HTML code, preparing your images is a vital step. The quality and size of your images directly impact your website’s loading speed and overall performance. At Tophinhanhdep.com, we emphasize using “High Resolution” images, but it’s equally important to optimize them for web delivery.
-
Image Sourcing and Uploading:
- Own Photography: If using your “Digital Photography,” ensure it’s high quality and relevant to your content.
- Stock Photos: Leverage platforms like Tophinhanhdep.com for an extensive library of “Stock Photos” covering “Nature,” “Abstract,” “Sad/Emotional,” and more thematic categories.
- Image Hosting: For self-hosted websites, upload images to a dedicated directory (e.g.,
/images/) on your server using an FTP service. This keeps your files organized and easily manageable, a best practice in “Graphic Design” and web development. Many blog and CMS platforms also offer built-in image uploaders. - Permission: Always obtain permission if using images from other websites. Once permitted, download the image and upload it to your own hosting to avoid “hotlinking,” which consumes the source website’s bandwidth and can lead to broken images.
-
Image Optimization:
- File Format: Choose the appropriate format. JPEG is ideal for “Beautiful Photography” with complex color gradients, while PNG excels with transparency and sharp lines, suitable for logos or “Digital Art.” GIF works well for simple animations or logos with limited colors. Tophinhanhdep.com’s “Image Tools” offer “Converters” to help you select the best format.
- Compression: Large image files can significantly slow down your page. Utilize “Image Tools” like “Compressors” and “Optimizers” (available at Tophinhanhdep.com) to reduce file size without sacrificing visual quality. This ensures that your “High Resolution” images load quickly.
- AI Upscalers: For images that might be too small but are essential, Tophinhanhdep.com’s “AI Upscalers” can enhance resolution, ensuring your visuals remain crisp and professional, fitting into any “Visual Design” project.
Essential Attributes for Image Display
Once your image is prepared and accessible, you can embed it into your HTML.
-
The
<img>Tag Structure: Start by placing the<img>tag where you want the image to appear in your HTML document.<img > -
Defining the Image Source (
src): Thesrcattribute specifies the path to your image file. This can be a relative path (for images on your server) or an absolute URL (for images hosted elsewhere).-
Relative Path: If your image (
my-dog.jpg) is in animagesfolder in the same root directory as your HTML file, the path would be:<img src="images/my-dog.jpg"> -
Absolute Path (URL): If the image is hosted online, you’ll use its full URL. For instance, an image from Tophinhanhdep.com might be:
<img src="https://www.Tophinhanhdep.com/my-cute-dog.jpg">
-
-
Providing Alternative Text (
alt): Thealtattribute is crucial. It provides a text description of the image, which serves several purposes:- Accessibility: Screen readers use
alttext to describe images to visually impaired users, making your content accessible to a wider audience. - SEO: Search engines use
alttext to understand the content of your images, helping them appear in image search results and improving your page’s overall ranking. When describing “Nature” or “Abstract” images, be precise yet concise. - Fallback: If the image fails to load (due to a broken link, slow connection, or browser error), the
alttext is displayed in its place.
<img src="https://www.Tophinhanhdep.com/my-cute-dog.jpg" alt="A fluffy golden retriever puppy happily eating a tangerine in a sunny garden">If an image is purely decorative and not essential to content (e.g., a spacer GIF), you can use an empty
altattribute:alt="". - Accessibility: Screen readers use
-
Setting Dimensions (
widthandheight): While it’s often recommended to control image dimensions using CSS for responsiveness, you can also setwidthandheightattributes directly in the<img>tag. This informs the browser how much space to reserve for the image before it fully loads, preventing layout shifts.<img src="image.jpg" alt="Description" width="600" height="400">Specifying only one dimension (e.g.,
width="100%"orwidth="300") often allows the browser to maintain the image’s aspect ratio, which is crucial for preserving the integrity of your “Beautiful Photography” and “Digital Art.” However, for precise “Visual Design” control and responsiveness, CSS is preferred. -
Adding a Tooltip (
title): Thetitleattribute provides supplementary information that typically appears as a tooltip when a user hovers their mouse over the image. This can be used for credits, additional context, or subtle “Creative Ideas.”<img src="image.jpg" alt="Description" title="Photograph by Jane Doe">
By following these fundamental steps, you can effectively embed images, ensuring they are not only visually striking but also performant and accessible, aligning with Tophinhanhdep.com’s commitment to quality “Visual Design.”
Enhancing Visuals with CSS Background Images
Beyond directly embedding images with the <img> tag, CSS offers powerful capabilities for adding “Backgrounds” and “Wallpapers” to HTML elements. This method is particularly useful for design elements that aren’t part of the main content flow, such as decorative textures, full-page backgrounds, or section dividers. CSS allows for greater control over how the image behaves, including its size, position, and repetition, which is critical for creating an appealing “Aesthetic” and sophisticated “Visual Design.”
Mastering Background Image Properties
To add a background image using CSS, you typically define the background-image property within a <style> tag in your HTML’s <head> section (internal stylesheet) or, for better practice, in an external .css file.
-
Basic
background-imageApplication: You can apply a background image to almost any HTML element, most commonly the<body>tag for a full-page background, or<div>,<section>,<header>for specific content blocks.<style> body { background-image: url('https://www.Tophinhanhdep.com/images/nature-background.jpg'); } </style>Or for a local image within your project structure:
<style>
  .hero-section {
    background-image: url('../assets/hero-wallpaper.webp');
  }
</style>
Remember that the URL path for CSS backgrounds is relative to the CSS file itself, not the HTML file.
-
Controlling Repetition (
background-repeat): By default, background images repeat both horizontally and vertically to fill the entire element. You can modify this behavior:no-repeat: Prevents the image from repeating. Ideal for “High Resolution” “Beautiful Photography” meant to be displayed once.repeat-x: Repeats horizontally. Useful for banners or horizontal patterns.repeat-y: Repeats vertically. Good for side borders or vertical patterns.repeat: (Default) Repeats both horizontally and vertically, perfect for subtle “Aesthetic” textures or seamless “Abstract” patterns available in Tophinhanhdep.com’s collections.
body { background-image: url('https://www.Tophinhanhdep.com/images/pattern.png'); background-repeat: repeat-x; /* Repeats horizontally */ } -
Adjusting Position (
background-position): This property allows you to specify where the background image is placed within the element. You can use keywords (e.g.,center,top,bottom,left,right), percentages, or pixel values. Centering a prominent image is often key for compelling “Visual Design.”.banner { background-image: url('https://www.Tophinhanhdep.com/images/main-banner.jpg'); background-repeat: no-repeat; background-position: center top; /* Centers horizontally, aligns to top vertically */ } -
Sizing the Background (
background-size): This is critical for responsive design, ensuring your “Wallpapers” and “Backgrounds” look good on all screen sizes.auto: (Default) Displays the image at its natural size.cover: Scales the image to cover the entire container, cropping if necessary, while maintaining its aspect ratio. This is excellent for full-width “Photography” and “Nature” scenes.contain: Scales the image to fit within the container, showing the entire image while maintaining its aspect ratio. This might leave empty space.- Specific values (e.g.,
50%,200px): Allows precise control over width and height.
body { background-image: url('https://www.Tophinhanhdep.com/images/aesthetic-backdrop.jpg'); background-size: cover; /* Image will cover the entire background */ background-position: center; background-repeat: no-repeat; } -
Fixed Backgrounds (
background-attachment): Thebackground-attachmentproperty determines whether a background image scrolls with the rest of the page or stays fixed in the viewport.scroll: (Default) The background image scrolls with the element’s content.fixed: The background image remains fixed in relation to the viewport, creating a parallax-like effect. This can add a dynamic and “Creative Idea” to your “Visual Design.”
.parallax-section {
  background-image: url('https://www.Tophinhanhdep.com/images/abstract-design.jpg');
  background-attachment: fixed;
  background-size: cover;
  background-position: center;
}
Dynamic Backgrounds and Creative Effects
CSS allows you to go beyond static images, introducing exciting “Visual Design” concepts and “Creative Ideas” for your backgrounds.
-
Multiple Background Images: You can layer multiple background images on a single element by separating them with commas in the
background-imageproperty. The first image listed will be on top, with subsequent images layering behind it. This is excellent for combining textures, patterns, and primary images, drawing from Tophinhanhdep.com’s “Thematic Collections” for rich effects..layered-background { background-image: url('https://www.Tophinhanhdep.com/images/overlay-texture.png'), url('https://www.Tophinhanhdep.com/images/base-image.jpg'); background-repeat: no-repeat, no-repeat; background-position: top left, center center; background-size: 100% 100%, cover; } -
Gradient Overlays: To improve text readability over busy “Backgrounds” or “Photography,” you can add a semi-transparent gradient overlay. This is achieved by combining a
linear-gradientorradial-gradientwith yourbackground-imageproperty. This technique adds depth and ensures your content remains legible, a critical aspect of thoughtful “Visual Design.”.hero-banner { background-image: linear-gradient(rgba(0, 0, 0, 0.5), rgba(0, 0, 0, 0.5)), url('https://www.Tophinhanhdep.com/images/sad-emotional-image.jpg'); background-size: cover; color: white; /* For text on top */ } -
Video Backgrounds: While technically not a CSS background image, modern web design often uses
<video>elements as engaging “Backgrounds” on landing pages. You embed the video and then use CSS to position it behind content, ensuring it’s muted and autoplaying for optimal user experience. Tophinhanhdep.com’s “Digital Art” and cinematic “Photography” collections could inspire such video content.<div class="video-background"> <video autoplay muted loop id="bg-video"> <source src="background-video.mp4" type="video/mp4"> </video> <div class="content-overlay"> <h1>Your Engaging Content Here</h1> </div> </div>.video-background video { position: fixed; right: 0; bottom: 0; min-width: 100%; min-height: 100%; width: auto; height: auto; z-index: -100; background-size: cover; }
By utilizing these CSS techniques, you can transform simple <img> elements into dynamic and visually captivating components, significantly enhancing your website’s “Aesthetic” and reflecting Tophinhanhdep.com’s commitment to “Visual Design” excellence.
Advanced Image Integration: Links and Uploaders
Beyond static display and background decoration, images can serve as interactive elements or be part of user-generated content workflows. Integrating images as clickable links or providing tools for users to upload their own images adds layers of functionality and engagement to any website, further connecting with the themes of “Visual Design,” “Creative Ideas,” and “Image Tools.”
Turning Images into Interactive Links
Making an image clickable is a common and effective way to navigate users, highlight products, or direct attention to “Thematic Collections” and “Photo Ideas.” This is achieved by nesting the <img> tag within an anchor (<a>) tag.
-
Basic Image Link Structure: The
<a>tag requires anhrefattribute, which specifies the destination URL.<a href="https://www.Tophinhanhdep.com/nature-photography-collection"> <img src="https://www.Tophinhanhdep.com/images/thumbnail-nature.jpg" alt="View our Nature Photography Collection"> </a>This creates a clickable thumbnail that, when activated, takes the user to the specified URL. It’s a fundamental part of creating engaging “Image Inspiration & Collections.”
-
Styling Image Links: By default, browsers might apply a border to linked images. To remove this and achieve a cleaner “Visual Design,” you can use CSS:
img {
  border: 0; /* Removes default border */
  text-decoration: none; /* If there's any default underline on the link */
}
This ensures your “Beautiful Photography” or “Digital Art” is presented without unnecessary visual clutter.
Building User-Friendly Image Uploaders
For websites that rely on user-generated content, such as social media platforms, forums, or online portfolios showcasing “Digital Photography” and “Creative Ideas,” implementing an image uploader is essential. HTML provides the basic structure, while JavaScript often handles the dynamic interaction and server-side scripts process the files. Tophinhanhdep.com’s “Image Tools” like “Compressors” and “AI Upscalers” are invaluable for processing these uploaded images.
-
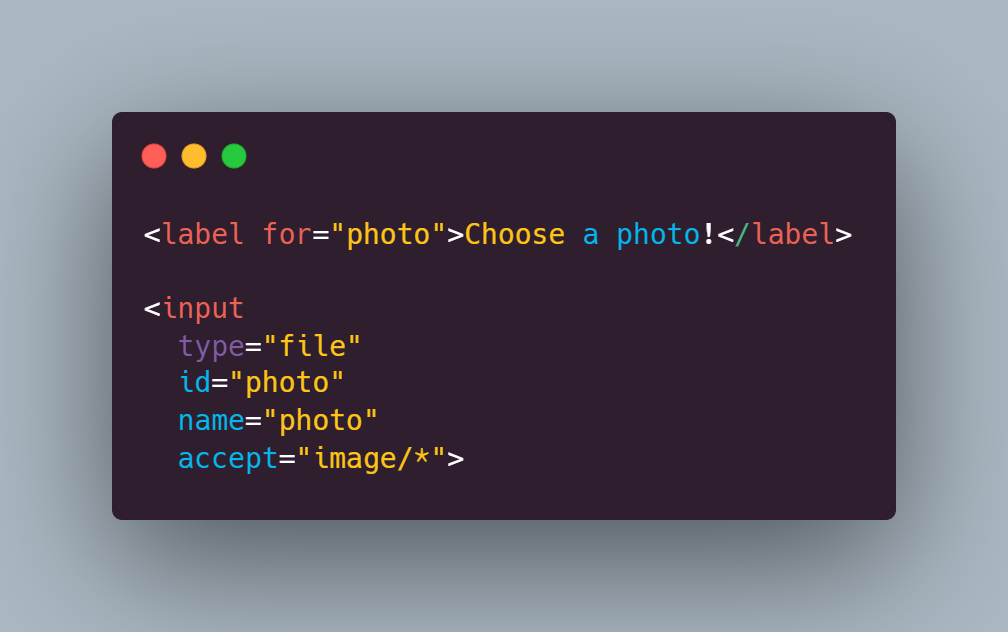
The Basic HTML File Input: The foundation of any image uploader is the
<input type="file">element.<input type="file">This creates a simple “Choose File” button. To specify that only image files should be accepted, you can add the
acceptattribute:<input type="file" accept="image/png, image/jpeg, image/gif">This guides the user and improves the experience, preventing uploads of irrelevant file types for “Photography” contests or “Digital Art” portfolios.
-
Customizing the Uploader’s Appearance: The default file input button is often plain and doesn’t fit well with modern “Visual Design” aesthetics. Developers commonly hide the default input and trigger it with a custom-designed button or area using CSS and JavaScript.
<label for="imageUpload" class="custom-upload-button"> Upload Your Best Photography </label> <input type="file" id="imageUpload" accept="image/*" style="display: none;">.custom-upload-button { display: inline-block; padding: 10px 20px; background-color: #007bff; color: white; border-radius: 5px; cursor: pointer; font-family: 'Arial', sans-serif; } .custom-upload-button:hover { background-color: #0056b3; }A JavaScript function would then listen for clicks on
.custom-upload-buttonand programmatically click the hiddenimageUploadinput. -
Real-Time Previews with JavaScript: For a better user experience, it’s common to show a preview of the selected image before it’s uploaded to the server. This involves reading the file with JavaScript’s
FileReaderAPI and displaying it in an<img>tag.<input type="file" id="imageUpload" accept="image/*"> <img id="imagePreview" src="#" alt="Image preview" style="max-width: 300px; display: none;"> <script> document.getElementById('imageUpload').addEventListener('change', function(event) { var reader = new FileReader(); reader.onload = function() { var output = document.getElementById('imagePreview'); output.src = reader.result; output.style.display = 'block'; }; reader.readAsDataURL(event.target.files[0]); }); </script>This allows users to verify their “Digital Photography” selection, ensuring they are uploading the correct “High Resolution” image for their “Mood Boards” or “Thematic Collections.”
-
Leveraging Tophinhanhdep.com’s Advanced Uploader (Filestack-like features): For robust file handling, especially with “High Resolution” images, large volumes, or specific “Editing Styles,” integrating a dedicated file uploading service like the one offered by Tophinhanhdep.com (similar to Filestack) is highly beneficial. These services simplify the entire process for developers by providing:
- High-capacity uploading: Efficiently handle large image files.
- Drag-and-drop interfaces: Enhance user experience, making it intuitive to upload “Beautiful Photography.”
- Direct integrations: Connect with social media (e.g., Instagram, Facebook) or cloud storage (Dropbox) for diverse image sources.
- Built-in optimization: Automatically compress and convert images to optimal web formats (e.g., WebP) using Tophinhanhdep.com’s “Image Tools” like “Compressors” and “Converters.”
- Image transformations: On-the-fly resizing, cropping, watermarking, and applying “Editing Styles” without manual intervention, a boon for “Photo Manipulation” and “Digital Art.”
- AI-powered features: Utilize “AI Upscalers” for low-res images or “Image-to-Text” for advanced content analysis and tagging, contributing to richer “Thematic Collections.”
- Secure storage: Ensure uploaded images are safely stored and managed.
By using Tophinhanhdep.com’s comprehensive image solutions, developers can abstract away the complexities of server-side image processing, focusing instead on creative “Visual Design” and developing compelling “Photo Ideas” and user experiences.
Best Practices for Image Optimization and Accessibility
Integrating images effectively goes beyond just displaying them; it involves ensuring they contribute positively to user experience, website performance, and accessibility. Adhering to best practices, many of which are supported by Tophinhanhdep.com’s offerings, is crucial for any successful web project.
Ensuring Responsive Image Display
In a multi-device world, images must adapt seamlessly to different screen sizes.
-
Fluid Images with CSS: The simplest way to make images responsive is using
max-width: 100%andheight: autoin CSS.img { max-width: 100%; height: auto; display: block; /* Removes extra space below image */ }This ensures your “Beautiful Photography” scales down proportionally within its container, maintaining its “Aesthetic” on smaller screens.
-
srcsetand<picture>for Art Direction and Performance: For advanced control and performance, HTML5 offerssrcsetfor serving different image resolutions based on device pixel density or viewport width, and the<picture>element for “art direction” (serving entirely different images for different contexts, e.g., a cropped version of a “Nature” shot for mobile).<picture> <source media="(min-width: 1024px)" srcset="large-nature.jpg"> <source media="(min-width: 768px)" srcset="medium-nature.jpg"> <img src="small-nature.jpg" alt="A serene mountain landscape"> </picture>This ensures that users receive the most appropriate image size, reducing bandwidth and improving load times, especially important for “High Resolution” “Photography.”
Ethical Sourcing and Performance Considerations
Maintaining a high-performing and ethical website requires careful consideration of how images are acquired and delivered.
-
Avoid Hotlinking: As mentioned, always host images on your own server or use a reputable CDN. Hotlinking steals bandwidth from other sites and can result in broken images or even unexpected image changes if the source site owner detects it. Tophinhanhdep.com offers robust image hosting and delivery solutions to prevent such issues.
-
Choose Appropriate Formats: Reiterate the importance of JPEG for photos, PNG for graphics with transparency, and GIFs for simple animations. Modern formats like WebP offer superior compression and quality, and Tophinhanhdep.com’s “Image Tools” can convert your existing “Digital Photography” into these formats.
-
Lazy Loading: Implement lazy loading for images that are not immediately visible on page load (e.g., images further down the page). This defers loading until the user scrolls them into view, significantly improving initial page load performance. Modern browsers offer native lazy loading with
loading="lazy".<img src="placeholder.jpg" data-src="actual-image.jpg" alt="Description" loading="lazy"> -
Descriptive Filenames: Use clear, descriptive filenames for your images (e.g.,
beautiful-nature-wallpaper.jpginstead ofIMG001.jpg). This aids SEO and makes your assets easier to manage, particularly within large “Image Inspiration & Collections.” -
Regular Audits: Periodically review your website’s images for broken links, outdated content, or performance bottlenecks. Tophinhanhdep.com’s platform helps you manage your “Thematic Collections” efficiently, ensuring all your visuals are up-to-date and optimized.
By embracing these best practices, you not only learn “how to add image to HTML” but also how to do so responsibly and effectively, creating a website that is fast, accessible, and visually stunning.
Conclusion
Images are the soul of the web, transforming a static page into a dynamic, immersive experience. Mastering “how to add image to HTML” is a foundational skill that opens up a world of “Visual Design” possibilities, from crafting captivating “Backgrounds” and “Wallpapers” to curating rich “Image Inspiration & Collections” of “Beautiful Photography.”
This guide has explored the core methods: the versatile <img> tag for direct embedding, CSS properties for sophisticated background styling, and advanced techniques for creating interactive image links and user-friendly uploaders. We’ve emphasized the importance of image preparation, optimization through “Image Tools” like “Compressors” and “AI Upscalers,” and adherence to best practices for responsiveness and accessibility.
At Tophinhanhdep.com, we are dedicated to empowering creators and developers with the resources needed to bring their “Creative Ideas” to life. Our extensive library of “High Resolution” images, coupled with powerful “Image Tools” and expert guidance, ensures that your website not only looks professional but also performs flawlessly. By applying the knowledge gained from this guide, you can confidently integrate images that enhance your message, engage your audience, and truly distinguish your digital presence. Start exploring Tophinhanhdep.com today to find the perfect visuals and tools to elevate your next web project.