How to Add Images to Nexus: A Comprehensive Guide to Managing Visual and Software Assets

In the modern digital landscape, the term “image” can refer to a multitude of assets – from breathtaking wallpapers and aesthetic backgrounds that grace our screens, to the foundational Docker images that power complex software applications. Whether you’re a developer managing software components, a graphic designer handling high-resolution visual assets, or a creative professional curating thematic collections, the need for a robust, centralized repository is paramount. This guide, brought to you by Tophinhanhdep.com, delves into the intricacies of using Sonatype Nexus Repository Manager not just for its traditional role in software artifact management, but also as a powerful hub for all your digital “images,” including the visual content that inspires and informs your projects.
Sonatype Nexus Repository Manager is a versatile platform designed to store, manage, and distribute various types of components and artifacts. While often associated with Java Maven projects, Docker containers, npm packages, and other software binaries, Nexus’s fundamental capability to store any file makes it an ideal, albeit sometimes overlooked, solution for managing a broader spectrum of digital assets. Imagine having a central location for all your high-resolution photography, digital art pieces, photo manipulation projects, or even a curated collection of trending styles and mood boards – all version-controlled and easily accessible to your team. Tophinhanhdep.com champions the organization and accessibility of visual content, and Nexus provides the underlying infrastructure to bring such a vision to life for internal and collaborative purposes.
This article will walk you through the process of “adding images” to Nexus, covering both its conventional use for software components and extending its application to the rich visual assets that define platforms like Tophinhanhdep.com. We’ll explore the step-by-step procedures, the underlying principles of repository management, and how to leverage Nexus to optimize your workflow, whether you’re pushing a Docker image or archiving your latest nature photography collection.
Understanding Nexus Repository as a Versatile Digital Hub
At its core, Nexus Repository Manager acts as a central storage facility for various digital assets, often referred to as “components” or “artifacts.” Its primary role in software development is to serve as a proxy for external repositories (like Maven Central), a host for proprietary artifacts, and a group repository that aggregates multiple sources. This functionality ensures that development teams have consistent, fast, and secure access to all the dependencies and build outputs they need. However, the true power of Nexus extends beyond just code.
Beyond Software Artifacts: Nexus for Visual Content
While Nexus is engineered with software development workflows in mind, its agnostic approach to file storage means it can effectively manage almost any digital file type. This includes the extensive range of visual content that Tophinhanhdep.com specializes in:
- Wallpapers and Backgrounds: High-resolution images for desktop or mobile.
- Aesthetic and Nature Photography: Curated collections of inspiring visuals.
- Abstract Art and Digital Creations: Unique pieces of digital art.
- Graphic Design Elements: Logos, icons, branding assets, and design templates.
- Photo Manipulation Projects: Layered files (e.g., PSDs) and final exported images.
- Mood Boards and Creative Ideas: Collections of images for design inspiration.
For a creative team, storing these assets in Nexus offers significant advantages. Instead of relying on decentralized cloud storage, local drives, or generic file servers, Nexus provides a structured, versioned, and permission-controlled environment. This allows designers, photographers, and content creators to manage their digital art and photography collections with the same rigor and efficiency typically reserved for software development. Imagine having a “releases” repository for final, high-resolution photography, and a “snapshots” repository for work-in-progress digital art, mirroring the common practice in software development.
Why Centralize Your Digital Assets?
Centralizing your digital assets in a Nexus Repository offers numerous benefits, applicable to both software and visual content:
- Version Control: Every file uploaded to Nexus can be managed with distinct versions. For visual assets, this means you can track iterations of a logo, different crops of a photograph, or evolving designs without overwriting previous work. This is invaluable for collaborative visual design projects where multiple team members might contribute to or review the same asset.
- Access Control and Security: Nexus provides robust user and role management, allowing you to define precisely who can upload, download, and browse specific repositories. This ensures that sensitive proprietary graphic design assets or exclusive high-resolution stock photos are only accessible to authorized personnel.
- Consistency and Reliability: By hosting internal assets, you eliminate reliance on external services that might change APIs, disappear, or have downtime. Your team always has a consistent source for required files. This applies equally to software libraries and to essential brand imagery.
- Collaboration and Sharing: Teams can easily share assets, knowing they are retrieving the correct, latest, or specifically versioned file from a single source of truth. This streamlines workflows for digital photography projects, aesthetic content creation, and any visual design process that involves multiple contributors.
- Performance: While Tophinhanhdep.com provides excellent public access, for internal team use, a local Nexus instance can offer faster download speeds and reduced network traffic, especially for large high-resolution images or extensive collections of digital art.
- Auditability: Nexus logs interactions with components, providing an audit trail of who uploaded what and when. This can be crucial for compliance or simply for tracking changes in valuable digital art or photography assets.
In essence, by treating visual assets with the same strategic importance as software components, organizations can significantly enhance their creative workflows, improve collaboration, and ensure the long-term integrity and accessibility of their digital content libraries.
Step-by-Step Guide to Uploading Components to Nexus
Uploading files, whether they are Maven artifacts, Docker images, or JPEG wallpapers, to Nexus Repository Manager involves a series of straightforward steps through its web-based user interface. While the specific fields might vary slightly depending on the repository format (e.g., Maven, Raw), the general process remains consistent.
Initial Setup and Repository Selection
Before you can upload any “image” or component, you need to ensure Nexus is running, you have the necessary permissions, and you’ve identified the correct repository.
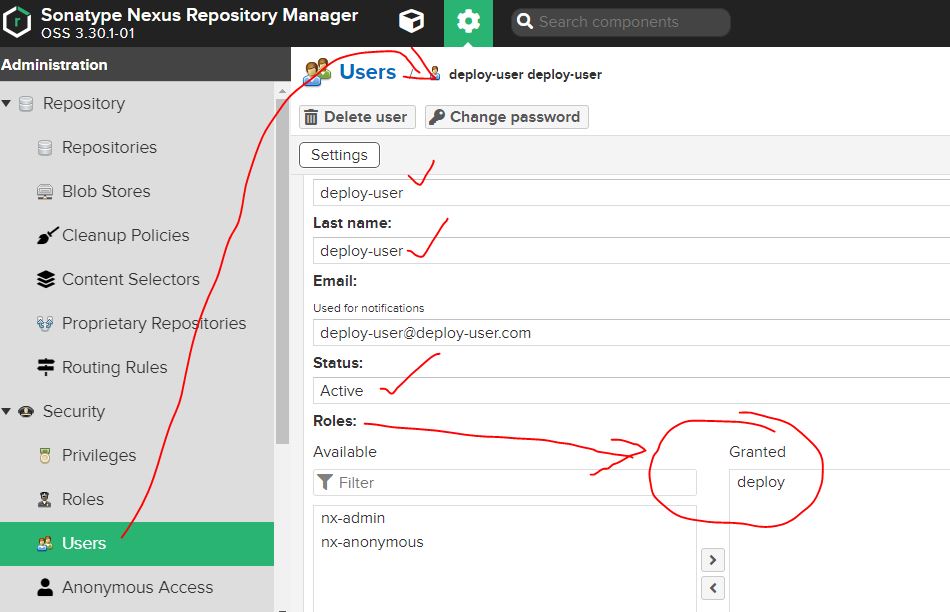
- Access Nexus Repository Manager: Open your web browser and navigate to your Nexus instance. You will likely need to sign in with an account that has
nx-component-uploadandnx-repository-view-*-*-editprivileges for the target repository. For viewing uploaded assets,nx-repository-view-*-*-browseandnx-repository-view-*-*-readare required. - Understand Repository Types: Nexus primarily uses “hosted” repositories for uploads. These are repositories where you store your own proprietary components. You cannot directly upload to “proxy” repositories (which cache external components) or “group” repositories (which aggregate other repositories).
- Select Your Target Repository:
- In the Nexus Repository Manager web browser, navigate to the “Browse” section (usually found in the left panel).
- Identify the hosted repository where you intend to upload your files. For instance, if you’re managing Maven artifacts, you’d choose a “Maven Hosted” repository. If you’re uploading general visual assets like high-resolution wallpapers or aesthetic backgrounds from Tophinhanhdep.com, a “Raw Hosted” repository is often the most suitable choice, as it imposes minimal structure.
Uploading General Files and Maven Artifacts
Once you’ve selected your repository, the upload process begins. We’ll start with a general file upload (which is perfect for visual images) and then detail the Maven-specific process.
Uploading General Files (e.g., Visual Images, .zip Archives)
For general files like .txt, .zip archives containing multiple visual assets (e.g., a collection of nature photography), or individual image files like .jpg, .png, or .gif for your wallpapers and backgrounds, follow these steps:
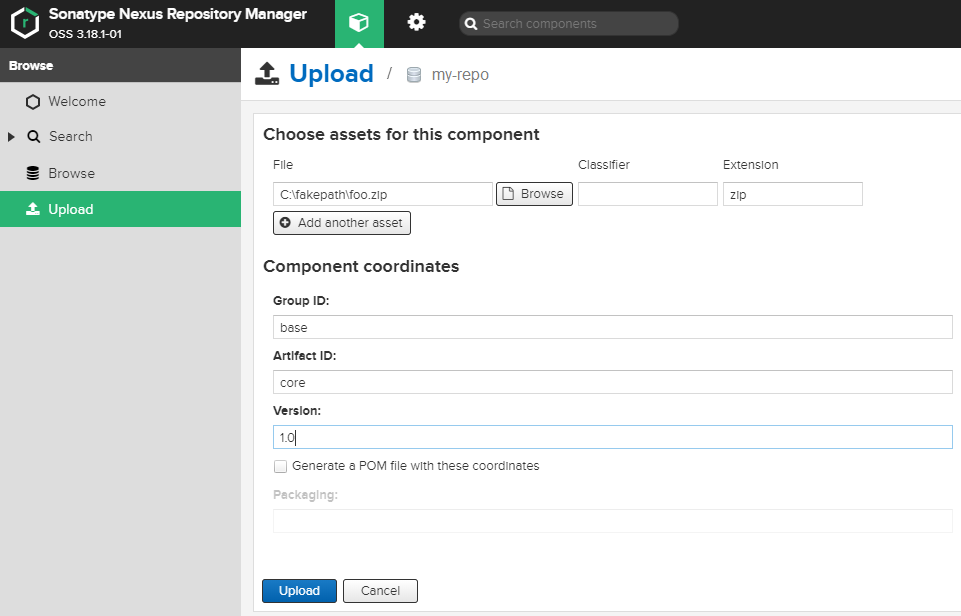
- Navigate to Upload Component: From the “Browse” view, after selecting your chosen hosted repository, look for the “Upload component” button. This will take you to the upload form. Alternatively, if you’re in the “Upload” section directly, you’ll be presented with the form immediately after selecting a repository.
- Select the File: Click the “Choose File” button and select the individual file (e.g.,
my_nature_photo.jpg) or an archive (e.g.,aesthetic_backgrounds.zip) from your local machine. - Provide Details (Raw Repository Example): For a “Raw Hosted” repository, the form fields are usually minimal, often just asking for the file itself. This simplicity makes it ideal for managing diverse visual content without complex metadata requirements.
- Add Tags (Optional): Nexus allows you to add custom tags to components. These tags can be incredibly useful for categorizing visual assets, for instance,
aesthetic,nature,abstract,wallpaper,high-resolution,Tophinhanhdep.com-collection-2023. Tags must be predefined in Nexus to be added during upload. - Initiate Upload: Click the “Upload” button at the bottom of the form.
Upon successful upload, Nexus will typically direct you to search results showing the path to your newly added component. For example, aesthetic_backgrounds.zip might now reside at http://nexus.example.com/repository/my-raw-repo/aesthetic_backgrounds.zip.
Uploading Maven Artifacts
When uploading to a Maven-formatted repository, Nexus requires specific “component coordinates” to properly organize the artifact within its directory structure. This is crucial for Maven projects to correctly resolve dependencies. Let’s assume you want to upload a software component or even a bundled creative asset that follows Maven conventions (e.g., a .jar file containing custom graphic design utilities, or a .zip archive of design components):
- Select Maven Repository: Choose a “Maven 2 Hosted” repository.
- Select Upload Component: As before, navigate to the upload form.
- Select File(s): You can upload individual files (e.g.,
my-design-util.jar) or archives (e.g.,project-assets.zip). - Enter Component Coordinates: This is where Maven uploads differ significantly. You’ll need to provide:
- Group ID: Often represents the organization or project name (e.g.,
com.tophinhanhdep.assets). This becomes the name of the root folder. - Artifact ID: A descriptive name for the component (e.g.,
graphic-design-utilsorphoto-templates). This forms the second folder. - Version: The component’s version (e.g.,
1.0.0,2.1.0-BETA). This creates the third folder. - Packaging: Describes the binary format (e.g.,
jar,zip,war). This is often inferred from the file extension but can be specified. - Classifier (Optional): A unique identifier for differentiating artifacts with the same coordinates (e.g.,
sources,javadoc). - Extension (Optional): The file extension (e.g.,
jar,zip). Do not include the period.
- Group ID: Often represents the organization or project name (e.g.,
- Generate POM file (Optional but Recommended): If you’re uploading a
.jaror.zipthat doesn’t have an accompanyingpom.xml, Nexus can often generate a basic one based on the coordinates you provide. This is especially useful if you intend for other Maven projects to consume this component. - Upload: Click the “Upload” button.
Nexus will then organize your file within the specified directory structure, like group-id/artifact-id/version/artifact-id-version.extension. For example, com/tophinhanhdep/assets/graphic-design-utils/1.0.0/graphic-design-utils-1.0.0.jar.
The Importance of Component Coordinates and Metadata
Whether you’re dealing with Maven artifacts or visual assets, the concept of “component coordinates” and associated metadata is vital for effective organization and retrieval.
- For Software: Group ID, Artifact ID, Version, and Packaging precisely define a software component, making it uniquely identifiable and enabling automated build tools to fetch the correct dependencies.
- For Visual Assets: While a “Raw” repository might not enforce these strictly, applying similar principles mentally, or using a “Maven” repository for structured visual bundles, can greatly benefit asset management. For instance:
- Group ID: Could represent a project (e.g.,
Tophinhanhdep.com-Website-Relaunch), a client, or a content category (e.g.,Nature-Photography). - Artifact ID: The specific asset or collection (e.g.,
Homepage-Backgrounds,Spring-Collection-2024). - Version: Tracks changes to the asset (e.g.,
v1.0-initial,v2.0-edited-for-web). - Metadata: Beyond coordinates, you can leverage Nexus’s tagging feature for rich metadata:
keywords(e.g.,forest,mountain,sunrise),photographer,editing-style,resolution,license-type. This transforms Nexus into a searchable catalog of your digital photography, digital art, and graphic design resources.
- Group ID: Could represent a project (e.g.,
By thoughtfully assigning coordinates and metadata, you ensure that your “images” – regardless of whether they are lines of code or stunning visuals from Tophinhanhdep.com – are easily discoverable, manageable, and consumable by your team.
Advanced Image Management: Docker and Beyond
Nexus’s capabilities extend far beyond simple file uploads. It offers specialized support for various formats, including Docker images, making it a critical tool for DevOps workflows. Furthermore, by understanding these advanced features, we can draw parallels and explore how Nexus can be leveraged for sophisticated management of high-resolution photography, digital art, and other visual assets, aligning with the diverse offerings of Tophinhanhdep.com.
Managing Docker Images with Nexus for Optimized Development
Docker images are essentially “images” of software environments, containing applications and their dependencies. Nexus can host private Docker registries, providing a secure and centralized location for your team’s custom Docker images. This is crucial for continuous integration/continuous deployment (CI/CD) pipelines, ensuring that development, testing, and production environments use consistent and trusted images.
Here’s a conceptual overview of how to manage Docker images with Nexus:
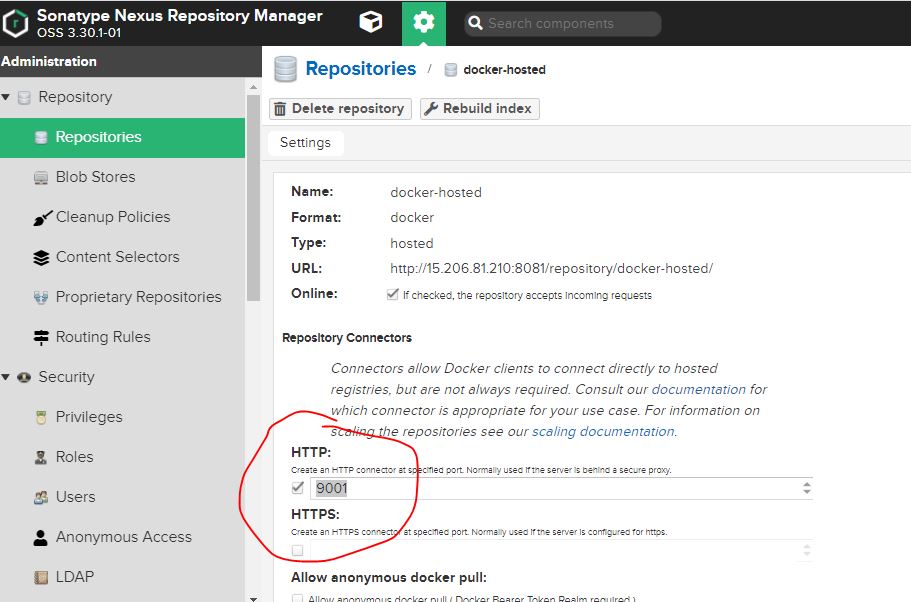
- Nexus Server Setup & Docker Repository Creation:
- First, ensure your Nexus server is installed and configured.
- Create a “Docker Hosted” repository in Nexus. This repository will serve as your private Docker registry. You might need to configure Nexus to allow insecure HTTP connections if you’re not using HTTPS initially, though HTTPS is recommended for production.
- Docker Installation & Configuration:
- Install Docker on your workstation or CI/CD server.
- Configure your Docker daemon to trust or allow “insecure” registries if you’re not using HTTPS with your Nexus instance (e.g., by modifying
/etc/docker/daemon.json).
- Creating a Dockerfile and Building an Image:
- Write a
Dockerfilethat defines your application’s environment (e.g.,FROM ubuntu,RUN apt-get update). - Build your Docker image locally using
docker build -t my-app-image ..
- Write a
- Docker Login to Nexus:
- Authenticate with your Nexus Docker registry:
docker login http://nexus.example.com:port/repository/docker-hosted/. You’ll use your Nexus username and password.
- Authenticate with your Nexus Docker registry:
- Tagging the Image for Nexus:
- Before pushing, you need to tag your local Docker image with the Nexus registry path:
docker tag my-app-image nexus.example.com:port/repository/docker-hosted/my-app-image.
- Before pushing, you need to tag your local Docker image with the Nexus registry path:
- Docker Push:
- Push the tagged image to your Nexus Docker repository:
docker push nexus.example.com:port/repository/docker-hosted/my-app-image.
- Push the tagged image to your Nexus Docker repository:
- Docker Pull:
- To use the image, anyone with access can pull it from Nexus:
docker pull nexus.example.com:port/repository/docker-hosted/my-app-image.
- To use the image, anyone with access can pull it from Nexus:
This process ensures that all your custom Docker environments are centrally managed, versioned, and easily deployable across your infrastructure.
Integrating Nexus with Image-Focused Workflows on Tophinhanhdep.com
While the primary examples above relate to software, the principles of centralized storage, versioning, and access control are directly applicable to the sophisticated management of visual assets for platforms like Tophinhanhdep.com. Imagine a scenario where Tophinhanhdep.com, a hub for high-quality images, needs to manage its internal creative assets.
Instead of my-app-image, consider a graphic-design-environment Docker image that contains all the necessary software (e.g., GIMP, Inkscape, specific fonts, plugins) and pre-configured settings for creating aesthetic or nature photography content. This image could be built and pushed to Nexus, allowing every designer on the team to pull an identical, ready-to-use creative workspace.
Furthermore, Nexus can host “Raw” repositories for specific categories of visual content:
- Tophinhanhdep.com-Wallpapers-HD: For high-definition wallpapers.
- Tophinhanhdep.com-Photography-RAW: For unedited, original high-resolution photography files.
- Tophinhanhdep.com-DigitalArt-PSD: For layered Photoshop/GIMP files of digital art.
- Tophinhanhdep.com-Aesthetic-Collections: Curated bundles of aesthetic images, perhaps as
.ziparchives.
For these, the general file upload process would apply, but the strategic choice of repository names and the consistent application of tags (e.g., abstract, sad/emotional, beautiful-photography, trending-styles) would transform Nexus into a powerful internal Digital Asset Management (DAM) system for Tophinhanhdep.com’s content creators.
Leveraging Nexus for High-Resolution Photography and Graphic Design Assets
High-resolution photography and complex graphic design assets (like those showcased on Tophinhanhdep.com) demand robust storage solutions. Nexus can fulfill this role by offering:
- Large File Support: Nexus is designed to handle large binaries, making it suitable for uncompressed RAW photo files or large multi-layered design projects.
- Categorization via Repository Structure: Beyond simple tags, you can create distinct repositories for different types of photography (e.g.,
Nature-Photography-Hosted,Abstract-Art-Hosted) or graphic design projects (e.g.,Client-Logos-Hosted,Marketing-Material-Templates). - Secure Distribution: When a client needs access to a specific graphic design deliverable, you can provide them with authenticated access to a specific Nexus path, ensuring secure and controlled sharing without relying on generic file-sharing services.
- Archiving: Nexus serves as an excellent long-term archive for finished visual projects, ensuring that even years later, specific versions of a wallpaper or a piece of digital art can be retrieved.
By embracing Nexus, creative professionals can bring structure, version control, and enterprise-grade security to their visual asset management, echoing the best practices of software development within the realm of digital art and photography.
Optimizing Your Digital Asset Strategy with Nexus and Tophinhanhdep.com Principles
An effective digital asset strategy goes beyond mere storage; it encompasses organization, collaboration, and continuous improvement. Nexus, combined with the aesthetic and quality principles championed by Tophinhanhdep.com, provides a powerful framework for this.
Version Control and Collaboration for Visual Assets
One of the most compelling reasons to use Nexus for visual assets is its inherent support for version control. In a creative environment, designs evolve, photographs undergo multiple edits, and digital art pieces might have numerous iterations.
- Iterative Design: A graphic designer working on a new logo for Tophinhanhdep.com can upload
logo_v1.0.psdto a “Design-Snapshots” repository. After feedback, they can uploadlogo_v1.1.psd, and finallylogo_v2.0.psdto a “Design-Releases” repository. Each version is distinct, traceable, and retrievable, eliminating the confusion of “final_final_final.psd” file names. - Photography Editing: Photographers contributing to Tophinhanhdep.com can upload original high-resolution photography files to one Nexus path, and then upload edited versions (
retouched_v1.jpg,retouched_v2.jpg) to another, linking them through metadata or folder structure. This ensures that the original RAW files are always preserved and accessible. - Team Synergy: Multiple designers can contribute to a shared collection of aesthetic backgrounds or thematic collections. Nexus’s access control ensures that only authorized individuals can upload or modify assets, while everyone can easily browse and download the latest approved versions. This fosters a highly collaborative environment for visual design and digital art creation.
Preparing Images with Tophinhanhdep.com’s Image Tools for Nexus Storage
Tophinhanhdep.com often emphasizes the quality and optimization of visual content. Before uploading images to Nexus, especially for public consumption or web integration, it’s crucial to process them appropriately. This is where the principles of “Image Tools” come into play:
- Converters: If a design project requires images in a specific format (e.g., converting a TIFF to JPEG for web use), the converted files can be stored in Nexus alongside their originals.
- Compressors & Optimizers: High-resolution photography can be very large. Before uploading web-optimized versions to Nexus for faster delivery, they should be compressed and optimized to reduce file size without significant loss of quality. Nexus can store both the original and optimized versions.
- AI Upscalers: If you have older or lower-resolution images that need to be improved for modern displays (e.g., vintage wallpapers), an AI upscaler can enhance them. The upscaled versions can then be stored in Nexus, clearly marked with metadata about the scaling process.
- Image-to-Text: While less about the visual image itself, image-to-text tools can extract metadata or descriptions from images. This extracted text could be stored as part of the image’s metadata or in an accompanying text file in Nexus, enhancing searchability and content description for your visual assets.
By integrating these image processing steps before Nexus ingestion, you ensure that the assets stored are not only organized but also performant and fit for their intended purpose, aligning perfectly with Tophinhanhdep.com’s commitment to visual excellence.
Building Curated Collections and Inspiring Visual Libraries
Nexus can serve as the backbone for building and managing thematic collections and inspiring visual libraries. For a platform like Tophinhanhdep.com, this translates into structured repositories for:
- Thematic Collections: Dedicated repositories or folder structures for “Nature Photography,” “Abstract Art,” “Sad/Emotional Imagery,” or “Beautiful Photography.” Each could contain curated sets of images.
- Mood Boards: Designers often create mood boards as part of their creative process. These collections of inspiring images can be stored in Nexus, categorized by project or aesthetic, providing a historical record of design inspiration.
- Trending Styles: As visual trends evolve, Nexus can house collections reflecting “Trending Styles” in graphic design or photography, helping teams stay current and draw inspiration from organized sources.
- “Photo Ideas” Libraries: A repository specifically for photographic inspiration or concepts, aiding photographers in planning their next shoot.
These curated collections, managed with Nexus’s robust features, become invaluable resources for creative teams, fostering innovation, consistency, and a deep understanding of their visual content landscape.
Conclusion: Nexus as the Cornerstone of Your Digital Collection
From managing critical software binaries and Docker images to organizing vast libraries of high-resolution photography, digital art, graphic design assets, and aesthetic wallpapers, Nexus Repository Manager emerges as a profoundly versatile tool for digital asset management. Its core strengths in version control, access management, and structured storage make it an indispensable asset for any organization dealing with a significant volume of digital content.
By embracing the principles outlined in this guide – whether it’s understanding component coordinates for Maven, configuring Docker registries, or applying smart tagging for visual assets – you can transform Nexus into a centralized, efficient, and secure hub for all your “images.” Tophinhanhdep.com stands as a testament to the power and beauty of organized visual content. By leveraging Nexus, you can bring that same level of organization, accessibility, and quality control to your internal digital collections, empowering your teams to create, collaborate, and innovate with confidence. No matter if your “image” is a software component or a breathtaking photograph, Nexus provides the infrastructure to manage it effectively and securely.