The Definitive Guide to Adding Images in Photoshop: Unlock Your Creative Potential

Adobe Photoshop is the undisputed industry standard for image manipulation, graphic design, and digital art. Whether you’re a seasoned professional or just beginning your journey into the world of visual creation, mastering the fundamental skill of adding images to your Photoshop documents is paramount. This seemingly simple action is the gateway to complex compositions, stunning photo manipulations, and impactful digital designs. From creating compelling social media graphics to designing intricate digital paintings, every project starts with bringing your visual assets into the workspace.
At Tophinhanhdep.com, we understand the importance of high-quality imagery and efficient workflows. Our vast collections of images—including wallpapers, backgrounds, aesthetic visuals, nature photography, abstract art, and sad/emotional or beautiful photography—provide the perfect starting point for any Photoshop project. Coupled with our powerful image tools like converters, compressors, optimizers, and AI upscalers, you have everything you need to prepare your images for seamless integration into Photoshop and beyond.
This comprehensive guide will walk you through various methods of adding images to Photoshop, transforming you from a novice to a confident user. We’ll cover everything from opening a single image to embedding multiple layers, ensuring you understand the ‘how’ and ‘why’ behind each technique. By the end, you’ll not only know how to insert an image but also how to optimize it for your creative vision, leveraging the high-resolution photography and stock photos available at Tophinhanhdep.com to elevate your visual design projects and inspire creative ideas.
Fundamental Methods for Bringing Images into Photoshop
Getting your images into Photoshop is the first step towards unleashing your creative potential. There are several straightforward methods, each suited for different scenarios and offering varying degrees of control. Understanding these foundational techniques is crucial for efficient digital art, photo manipulation, and graphic design workflows.
Opening an Image as a New Document: The Standalone Approach
This is often the most basic way to start working with an image in Photoshop, opening it as its own independent document. It’s ideal when your primary goal is to edit a single photograph or use it as a foundational piece before combining it with other elements.
How to do it:

- Launch Photoshop: Start Adobe Photoshop on your computer. You’ll typically be greeted by the home screen displaying recent files.
- Access the “Open” Command:
- From the Home Screen: On the left side of the home screen, you’ll see an “Open” button. Clicking this will immediately bring up a file explorer window.
- From the Menu Bar (after creating a new document or opening an existing one): If you’re already in the Photoshop workspace, navigate to the top menu bar, click “File,” and then select “Open…” (Keyboard shortcut:
Ctrl+Oon PC,Cmd+Oon Mac).
- Navigate and Select: A file explorer (Finder on Mac, Explorer on Windows) window will appear. Browse to the folder containing the image you wish to open.
- Confirm Selection: Click on your chosen image file to select it, then click the “Open” button in the dialog window.
Your image will now appear in a new Photoshop document. By default, Photoshop might treat this image as a “Background” layer, which is often locked to prevent accidental movement. To gain full editing flexibility, you can unlock it by double-clicking the “Background” layer in the Layers panel and clicking “OK” in the New Layer dialog box. This converts it into a regular, editable layer, ready for digital photography enhancements or complex photo manipulation.
Seamless Integration with Drag and Drop: Speed and Simplicity
The drag-and-drop method is arguably the fastest and most intuitive way to add an image to your Photoshop canvas. It’s perfect for quickly importing multiple visual assets from your desktop or a file folder into an ongoing graphic design project.
How to do it:
- Prepare Your Workspace: Open your Photoshop document or create a new one. Ensure both your Photoshop window and the file explorer (or your desktop) containing the image are visible on your screen. You might need to resize windows to achieve this.
- Locate Your Image: Find the image file you want to add. Consider browsing Tophinhanhdep.com’s extensive collections for the perfect background, wallpaper, or aesthetic image to drag into your project.
- Drag and Drop: Click and hold the image file. While still holding the mouse button, drag the image directly into your open Photoshop document. Release the mouse button to drop it.
Upon dropping, the image will appear as a new layer within your active Photoshop document, typically framed with a bounding box for immediate transformation. This method automatically converts the image into a Smart Object, which is a significant advantage for preserving image quality, as discussed in a later section.
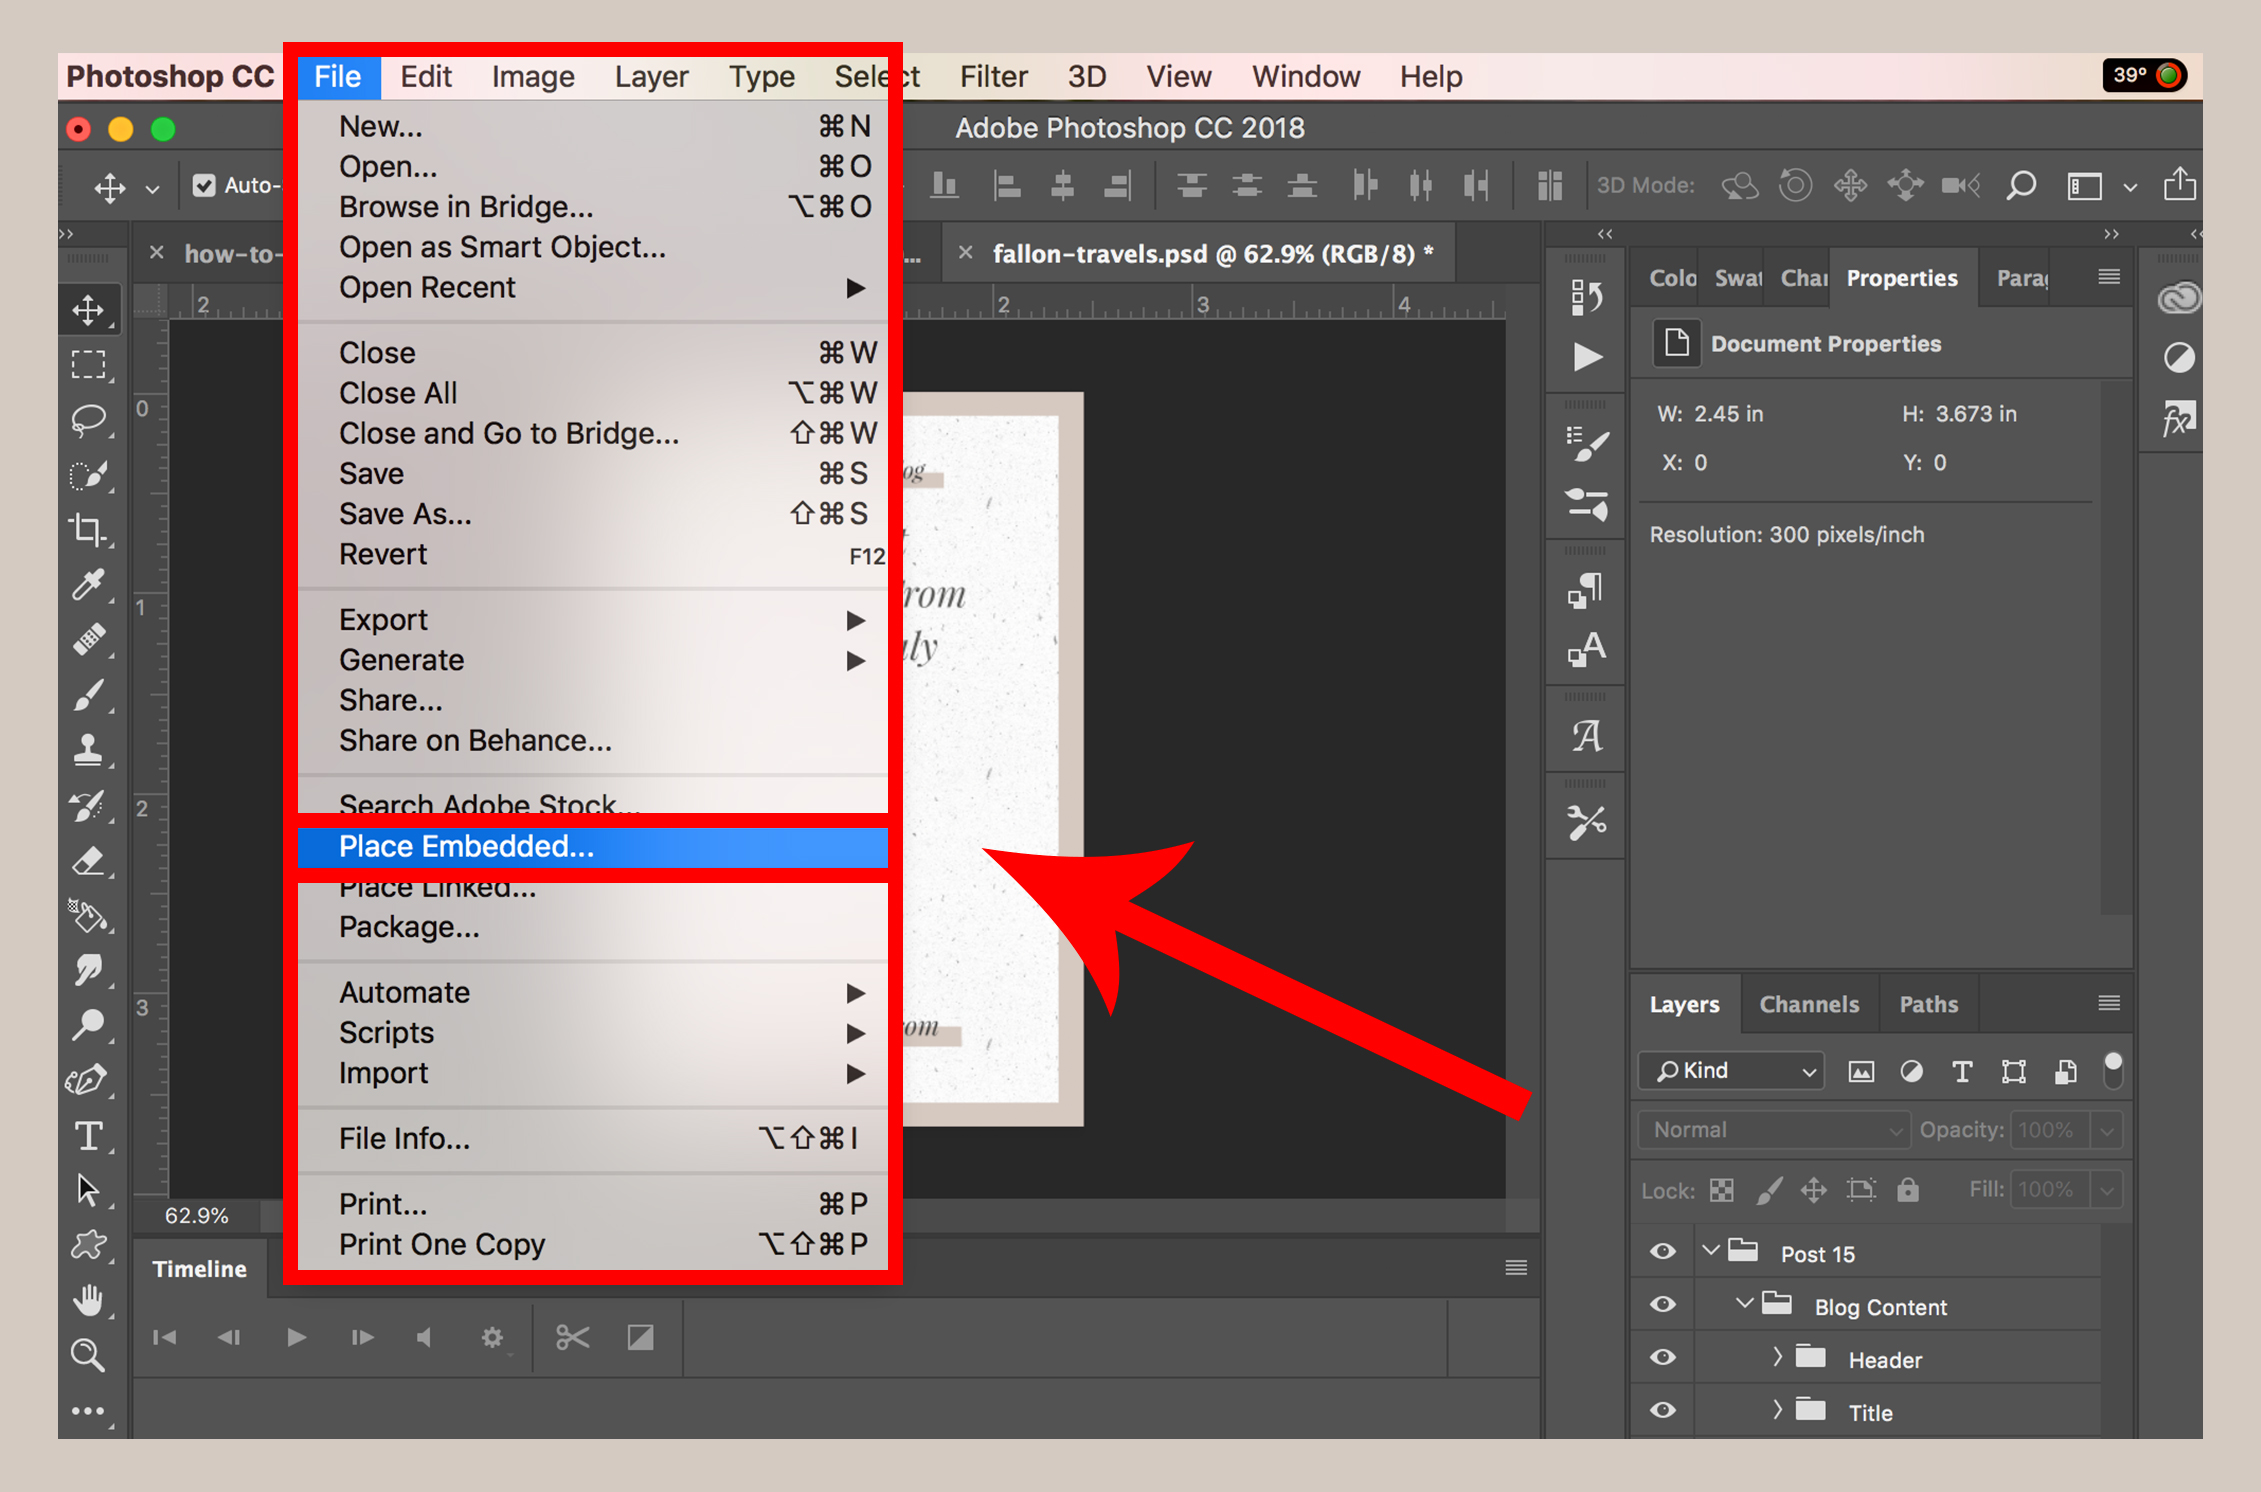
Placing Images with “Place Embedded”: Control and Smart Objects
The “Place Embedded” command is a powerful feature that gives you explicit control over how an image is imported and ensures it’s treated as a Smart Object from the outset. This method is highly recommended for professional workflows, especially when working on detailed digital art or complex photo manipulation where image integrity is paramount.
How to do it:
- Open Your Document: With your Photoshop document open (or a new one created), navigate to the top menu bar.
- Select “Place Embedded”: Click “File,” then choose “Place Embedded…” from the dropdown menu.
- Browse and Select: A file explorer window will open. Navigate to your desired image, select it, and click “Place.”
- Confirm Placement: The image will appear on your canvas with a bounding box. You can scale, rotate, and position it immediately. Once satisfied, press
Enter(PC) orReturn(Mac) or click the checkmark in the options bar to confirm its placement.
This method is particularly useful when you’re building a multi-layered composition using high-resolution images or stock photos, as it encourages non-destructive editing right from the start.
Quick Asset Transfer with Copy and Paste
For quick transfers of visual content, especially from web browsers or other applications, the copy-and-paste method offers immediate gratification. While less robust than “Place Embedded” for maintaining quality, it’s incredibly convenient for gathering reference images or small graphic elements.
How to do it:
- Copy the Image:
- From the Web: Right-click (or Ctrl-click on Mac) on an image in your web browser and select “Copy image” (not “Copy image address”). If you found a captivating nature background or an abstract wallpaper on Tophinhanhdep.com, this is a quick way to grab it.
- From Your Computer: Open the image in your operating system’s image viewer, then right-click (or Ctrl-click on Mac) and choose “Copy.” Simply copying the file itself from a folder won’t work; you need to copy the image data.
- Switch to Photoshop: Open your Photoshop document.
- Paste the Image: Go to “Edit” > “Paste” in Photoshop’s menu bar (Keyboard shortcut:
Ctrl+Von PC,Cmd+Von Mac).
The copied image will appear as a new layer in your document. Depending on the source and Photoshop’s settings, it might or might not be automatically converted into a Smart Object. Always verify the layer type in the Layers panel for critical elements.
Advanced Placement Techniques and Workflow Enhancement
Beyond the basic methods, Photoshop offers functionalities that significantly enhance your workflow, especially when dealing with complex digital photography, photo manipulation, or graphic design projects. Mastering these techniques ensures flexibility, scalability, and efficiency.
Understanding Smart Objects: Preserving Image Quality
Smart Objects are a cornerstone of non-destructive editing in Photoshop and are especially relevant when inserting images. When an image is placed as a Smart Object, Photoshop essentially embeds the original image file within your Photoshop document.
Why Smart Objects matter:
- Preserved Quality: You can scale, rotate, warp, and apply filters to a Smart Object repeatedly without any loss of original image data or quality. Every transformation is recorded, and the original pixels remain untouched. This is crucial when working with high-resolution images or stock photos from Tophinhanhdep.com, as it ensures your aesthetic vision is maintained.
- Non-Destructive Editing: Filters and adjustments applied to Smart Objects become “Smart Filters” which can be easily edited, hidden, or deleted at any time. This offers immense flexibility for experimenting with different editing styles.
- External Content: Smart Objects can link to external files. If the original image file (e.g., a beautiful landscape from Tophinhanhdep.com’s nature collection) is updated outside Photoshop, the Smart Object in your PSD can be automatically updated.
Converting to a Smart Object (if not already):
- Right-click on the desired layer in the Layers panel.
- Select “Convert to Smart Object.” Conversely, if you need to perform pixel-level edits that aren’t possible on a Smart Object, you can “Rasterize Layer” by right-clicking the Smart Object layer. However, be aware that rasterizing is a destructive action and sacrifices the non-destructive benefits.
Working with Linked Images: Dynamic and Efficient Editing
“Place Linked” is a variation of “Place Embedded” that’s particularly useful for collaborative projects or when managing very large files. Instead of embedding the entire image file into your Photoshop document, “Place Linked” creates a link to the external image file.
How to do it:
- Select “Place Linked”: In your Photoshop document, go to “File” > “Place Linked…”
- Browse and Select: Navigate to your image file (perhaps a high-resolution abstract background from Tophinhanhdep.com), select it, and click “Place.”
- Confirm Placement: Adjust the bounding box as needed, then press
Enter(PC) orReturn(Mac).
Benefits of Linked Images:
- Smaller File Size: Your Photoshop document remains smaller because it only stores a reference to the image, not the image data itself. This is invaluable for projects with many large visual elements.
- Automatic Updates: If the original linked image file is modified (e.g., a photographer makes final color corrections to a digital photography asset), the changes will automatically reflect in your Photoshop document the next time you open it or update the link.
- Collaborative Workflows: Multiple designers can work on different parts of a project, updating linked assets without needing to send around massive PSDs.
Considerations: Ensure the linked image file is always accessible at its original location. If the link is broken (e.g., the file is moved or deleted), Photoshop won’t be able to display it correctly.
Integrating Images into Existing Templates: A Designer’s Advantage
Many graphic designers and visual artists use pre-made Photoshop templates for consistency and efficiency, especially for branding elements or recurring design formats. Inserting images into these templates often involves interacting with existing Smart Objects.
How to do it (for templates with Smart Object placeholders):
- Open Template: Open the
.PSDtemplate file in Photoshop. - Locate Placeholder: In the Layers panel, find the layer designated as a placeholder for an image. This is almost always a Smart Object, often labeled clearly (e.g., “YOUR IMAGE HERE,” “Double Click to Edit”).
- Edit Smart Object: Double-click the Smart Object thumbnail (the icon on the layer, not the layer name). This will open the Smart Object’s contents in a new, separate Photoshop document (
.PSBfile). - Insert Your Image: In this new
.PSBdocument, use any of the methods described earlier (drag and drop, Place Embedded, copy-paste) to add your chosen image. Scale and position it as desired to fit the canvas of this.PSBfile. For best results, use high-resolution images from Tophinhanhdep.com that match the template’s aesthetic. - Save and Close: Save the
.PSBdocument (File > SaveorCtrl/Cmd+S). Then, close the.PSBdocument (simply close its window,Ctrl/Cmd+W).
Your image will now appear perfectly scaled and positioned within the original template’s placeholder, often inheriting any effects or masks applied to the Smart Object layer. This is an incredibly efficient way to maintain design consistency across multiple visual design outputs.
Optimizing Your Images and Mastering Post-Placement Adjustments
Inserting an image is just the beginning. The real magic of photo manipulation and digital art happens through thoughtful selection, preparation, and precise adjustments after placement. This final section focuses on best practices and essential techniques for refining your newly added images.
Selecting High-Quality Images from Tophinhanhdep.com
The quality of your final output is directly proportional to the quality of your source images. Tophinhanhdep.com offers an unparalleled library of high-resolution images suitable for any project.
Tips for selection:
- Resolution is Key: Always aim for the highest possible resolution. While Tophinhanhdep.com’s AI Upscalers can improve low-resolution images, starting with a pristine source is always better for professional graphic design and digital photography work.
- Relevance to Theme: Explore Tophinhanhdep.com’s thematic collections, mood boards, and trending styles. Whether you need a calming nature background, an inspiring aesthetic wallpaper, or a striking abstract visual, choosing images that align with your creative ideas will save you significant editing time.
- Licensing for Stock Photos: When using stock photos, be mindful of their licensing terms, even from Tophinhanhdep.com. Ensure they are appropriate for your intended commercial or personal use.
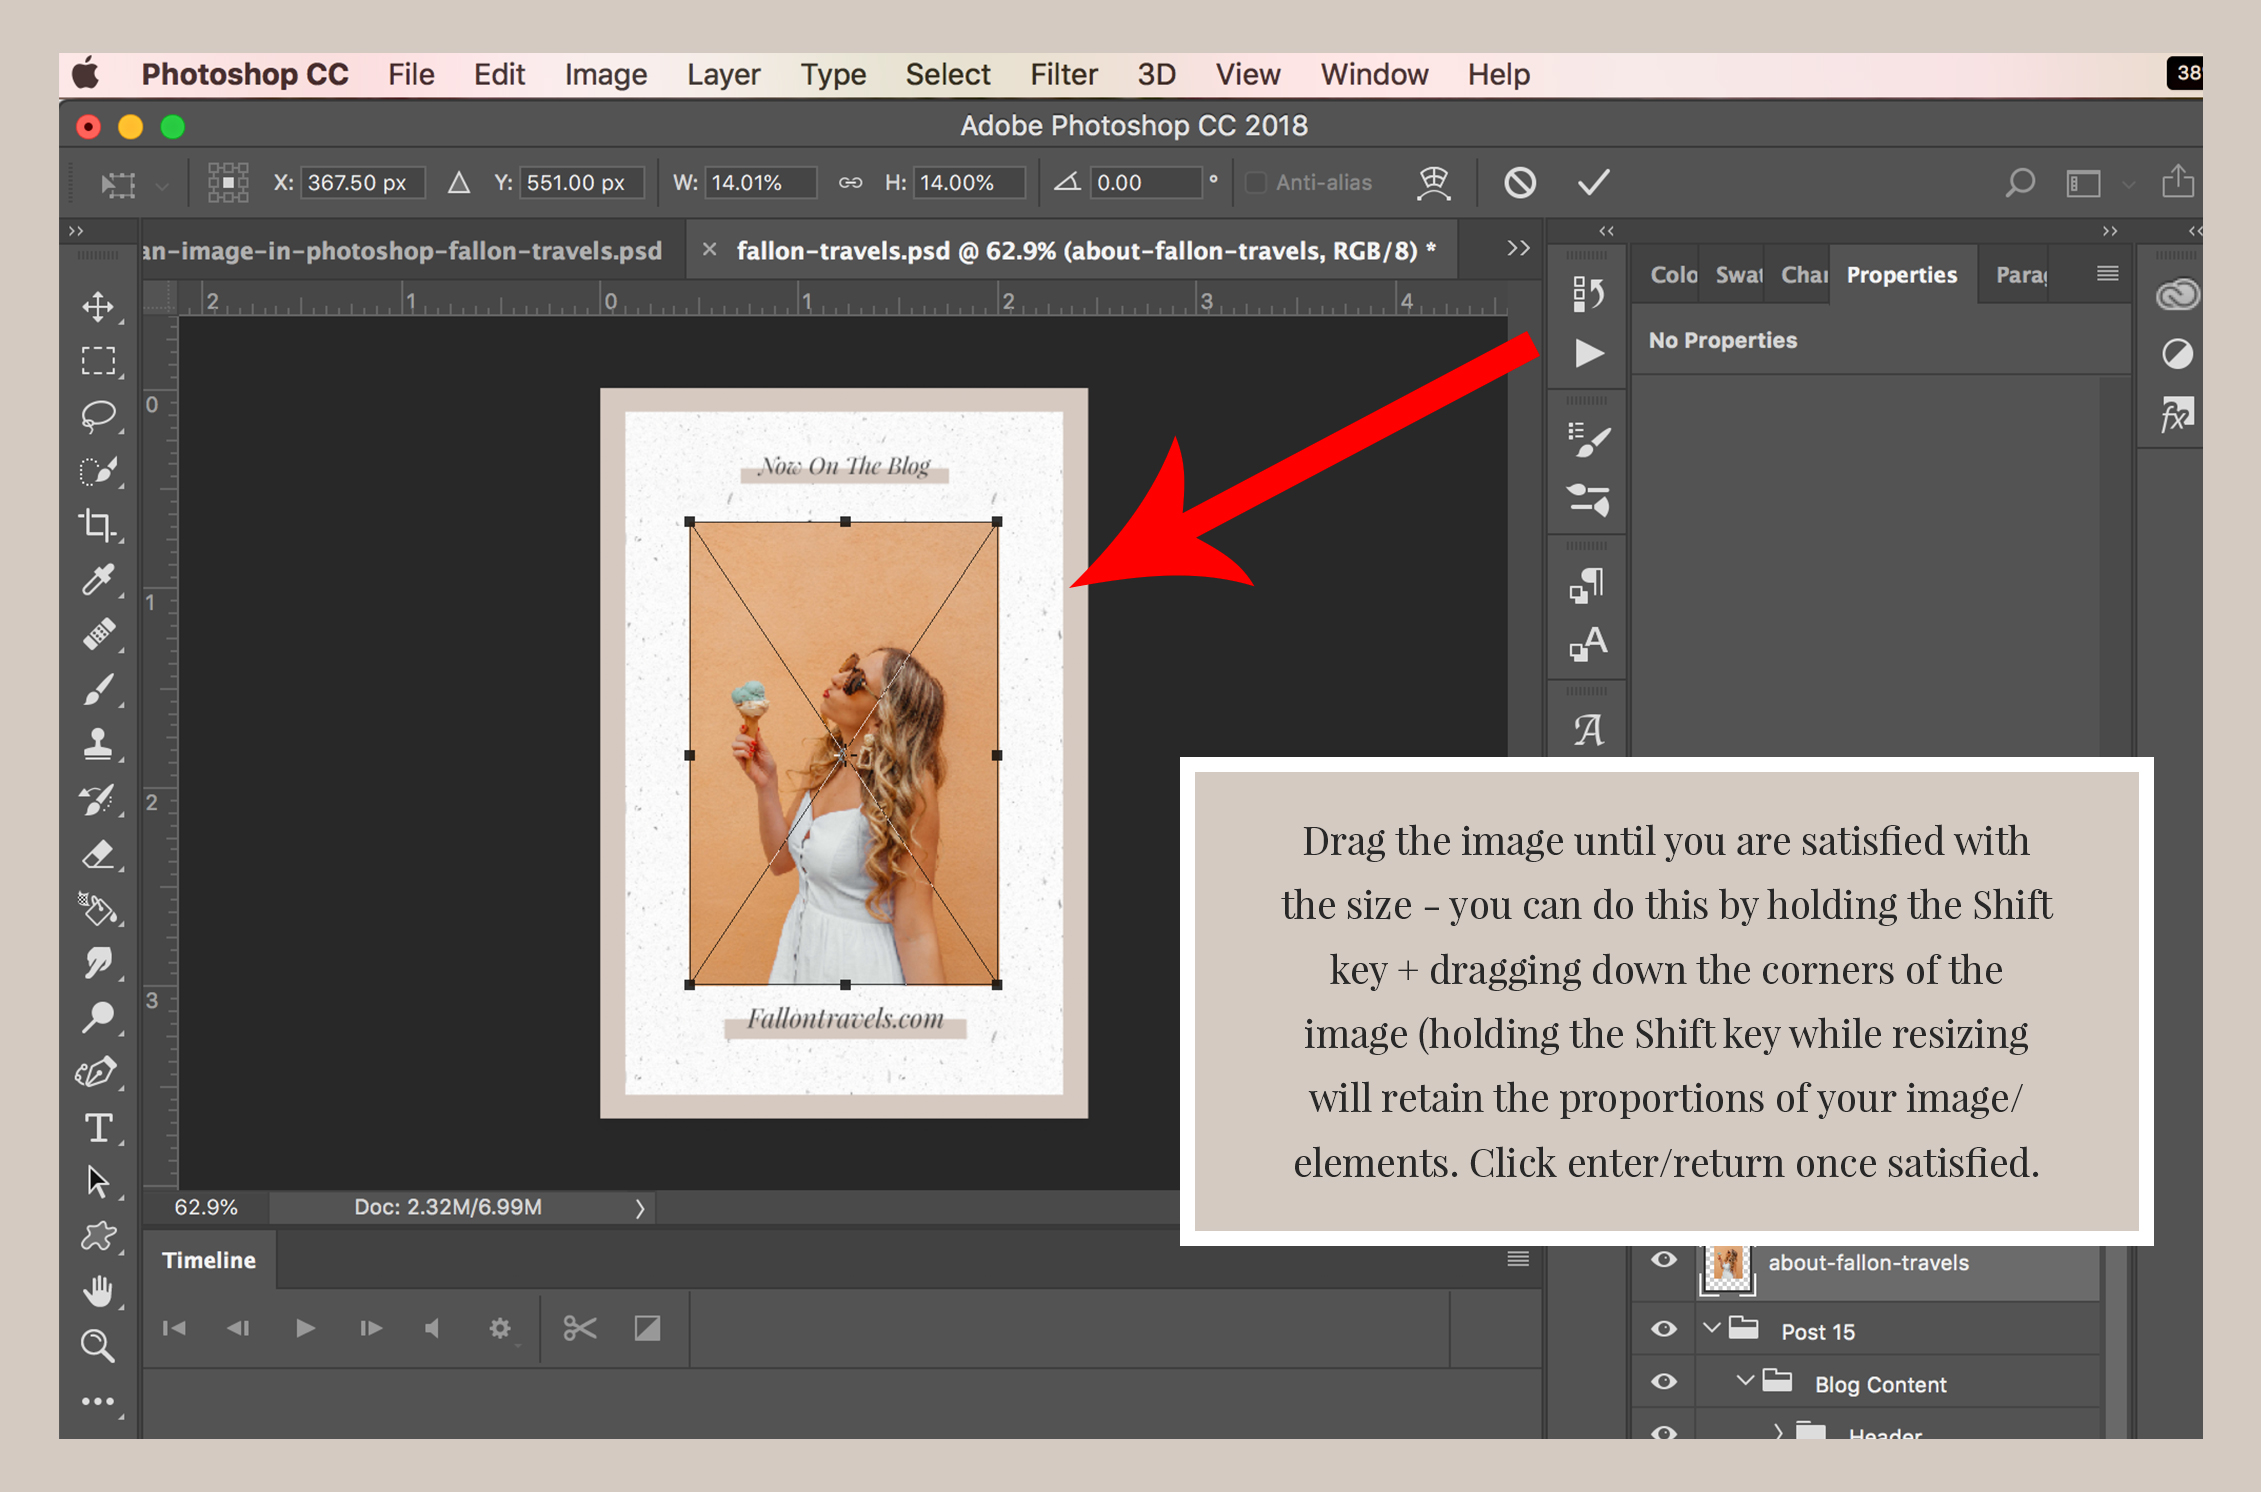
Essential Post-Placement Manipulations: Resizing and Positioning
Once an image is in your Photoshop document, it rarely arrives in the perfect size or position. Mastering transformation tools is vital.
Resizing and Scaling:
- Select Layer: Ensure the image layer is selected in the Layers panel.
- Free Transform: Go to “Edit” > “Free Transform” (
Ctrl+Ton PC,Cmd+Ton Mac). A bounding box will appear around your image. - Maintain Aspect Ratio: Critically, hold down the
Shiftkey while dragging a corner handle of the bounding box. This prevents distortion and maintains the image’s original proportions. In newer Photoshop versions, the aspect ratio is locked by default; holdingShiftdisables it. Look for the “Maintain Aspect Ratio” link icon in the options bar (chain link icon) and ensure it’s selected. - Confirm: Press
Enter(PC) orReturn(Mac) to apply the transformation.
Positioning:
- Select Move Tool: Select the Move tool (
V) from the toolbar. - Drag and Drop: Click and drag the image directly on the canvas to reposition it. For precise adjustments, use the arrow keys.
Preparing Images with Tophinhanhdep.com’s Image Tools
Before even bringing an image into Photoshop, pre-processing with Tophinhanhdep.com’s specialized image tools can save you time and optimize your workflow.
- AI Upscalers: If you have a beautiful photograph or an aesthetic image that’s too low-resolution for your project, Tophinhanhdep.com’s AI Upscalers can intelligently increase its size without significant loss of detail, making it suitable for high-resolution output.
- Compressors and Optimizers: For web-based graphic design or digital art projects, you might want to optimize images to reduce file size without compromising visual quality. Use Tophinhanhdep.com’s image compressors and optimizers after your Photoshop work, but sometimes also before if you are dealing with excessively large raw files for minor elements.
- Converters: If you have an image in an incompatible format, Tophinhanhdep.com’s image converters can quickly change it to a Photoshop-friendly format like JPEG, PNG, or TIFF.
- Image-to-Text: While less about image insertion, Tophinhanhdep.com’s image-to-text tools can be invaluable for extracting text from visual references or scanned documents, which you can then integrate into your graphic designs.
Beyond Insertion: Cutting, Layer Masks, and Creative Composition
Once your images are placed, Photoshop offers a myriad of tools for further manipulation, crucial for intricate photo manipulation and digital art.
- Cutting and Selections: Use Photoshop’s selection tools (Lasso, Quick Selection, Pen Tool) to isolate parts of an image. For instance, to cut a subject out of a background (like a person from a nature background from Tophinhanhdep.com):
- Make a precise selection around the area you want to keep.
- Go to “Select” > “Inverse” to select the background.
- Press
Deleteto remove the background (if it’s a regular layer) or apply a Layer Mask.
- Layer Masks: These are non-destructive ways to hide or reveal parts of a layer. Instead of permanently cutting pixels, a mask allows you to paint with black (to hide) or white (to reveal) on the mask thumbnail. This is ideal for seamlessly blending multiple images (e.g., merging an abstract wallpaper with a subtle sad/emotional overlay).
- Blending Modes: Experiment with blending modes in the Layers panel to create unique interactions between layers, essential for achieving diverse editing styles and compelling visual designs.
By combining these insertion techniques with advanced manipulation tools and the rich resources available at Tophinhanhdep.com, you are well-equipped to transform your creative ideas into stunning visual realities. Whether you’re crafting a professional graphic or exploring digital art for personal expression, Tophinhanhdep.com provides the foundation for limitless photographic and design possibilities.