Mastering Image Integration in Photoshop: A Comprehensive Guide for Tophinhanhdep.com Users

Adobe Photoshop stands as the undisputed titan in the realm of digital image editing and graphic design. For anyone venturing into digital art, photography, or visual communication, the ability to seamlessly add images into a Photoshop document is not just a skill, but a fundamental gateway to endless creative possibilities. Whether you’re an aspiring digital artist seeking to compose intricate scenes, a photographer looking to enhance your captures, or a graphic designer building compelling visuals, understanding the various methods of image integration is paramount.
At Tophinhanhdep.com, we understand the power of stunning visuals. Our extensive collections of high-resolution images, ranging from breathtaking wallpapers and serene nature backgrounds to captivating abstract art and aesthetic photography, serve as a rich wellspring of inspiration. This guide will walk you through the essential techniques for adding images into Photoshop, transforming your creative ideas into tangible digital art. We’ll explore several practical methods, offer crucial tips, and show you how to leverage your skills to bring the vibrant imagery from Tophinhanhdep.com directly into your next masterpiece.
Fundamental Approaches to Opening Images in Photoshop
Before you can manipulate or integrate an image into a complex design, you first need to get it into the Photoshop environment. There are primary methods that treat an image as a new, standalone document, setting the stage for direct editing or later integration into other projects. These approaches are often the first step when you’ve sourced a beautiful, high-resolution background or an exquisite piece of stock photography from Tophinhanhdep.com and want to begin working on it immediately.
Method 1: The ‘Open’ Command
The most straightforward and widely recognized way to introduce an image to Photoshop is through the “Open” command. This method is ideal when you’re starting a new project with a single image as your canvas, perhaps a stunning landscape from our nature photography collection or an abstract wallpaper that caught your eye on Tophinhanhdep.com.
Steps:
- Launch Photoshop: Begin by opening Adobe Photoshop on your computer. You’ll typically be greeted by the home screen, which offers options to “Create new” or “Open” existing files.
- Access the ‘Open’ Dialog:
- From the home screen, simply click the “Open” button on the left panel.
- Alternatively, if you already have a document open or are within the Photoshop workspace, navigate to the top menu bar, click “File,” and then select “Open…” from the dropdown menu.
- Navigate and Select Your Image: A file explorer (Finder on Mac, Explorer on Windows) window will appear. Browse through your computer’s folders to locate the image file you wish to open. This might be a carefully curated photo from your digital photography archives or a high-resolution download from Tophinhanhdep.com.
- Confirm Selection: Once you’ve found and clicked on your desired image, click the “Open” button in the lower-right corner of the file explorer window.
Implications and Tips: When you use the “Open” function, Photoshop typically treats the imported image as a locked “Background” layer. This protective measure prevents accidental movement or edits that could affect the entire image. If your intention is to edit, transform, or combine this image with other elements, you’ll need to unlock it. To do this, simply double-click on the “Background” layer in the Layers panel (usually located on the right side of the Photoshop interface), and then click “OK” in the subsequent dialog box. This converts it into a regular layer, allowing full manipulation and preparing it for advanced photo manipulation techniques.
Method 2: The Right-Click ‘Open With’ Shortcut
For quick access, especially when you’re browsing through a folder full of potential backgrounds or aesthetic images downloaded from Tophinhanhdep.com, the “Open With” shortcut can be a real time-saver. This method bypasses the initial Photoshop launch screen and directly opens the chosen image within the application.
Steps:
- Locate Your Image: Using your operating system’s file explorer, navigate to the folder containing the image you want to open.
- Right-Click (or Ctrl-Click) the Image: Right-click on the image file. If you’re on a Mac without a right-click mouse, hold down the Control key and click.
- Select ‘Open With’: From the contextual menu that appears, hover over “Open With.”
- Choose Adobe Photoshop: A sub-menu will display a list of compatible applications. Select “Adobe Photoshop” to open your image directly in a new Photoshop document.
Benefit: This method is incredibly efficient for photographers and designers who frequently open individual images for quick edits or previews. It streamlines the workflow, getting you straight to the image and ready to apply digital photography editing styles or prepare it for broader visual design projects.
Integrating Images into Existing Photoshop Documents
While opening an image as a new document is fundamental, the true power of Photoshop often lies in its ability to composite multiple images into a single, cohesive design. This is where you’ll combine a beautiful background from Tophinhanhdep.com with elements from other images, creating complex digital art, rich photo manipulations, or dynamic graphic designs. These methods seamlessly add new images as distinct layers within an already open Photoshop project.
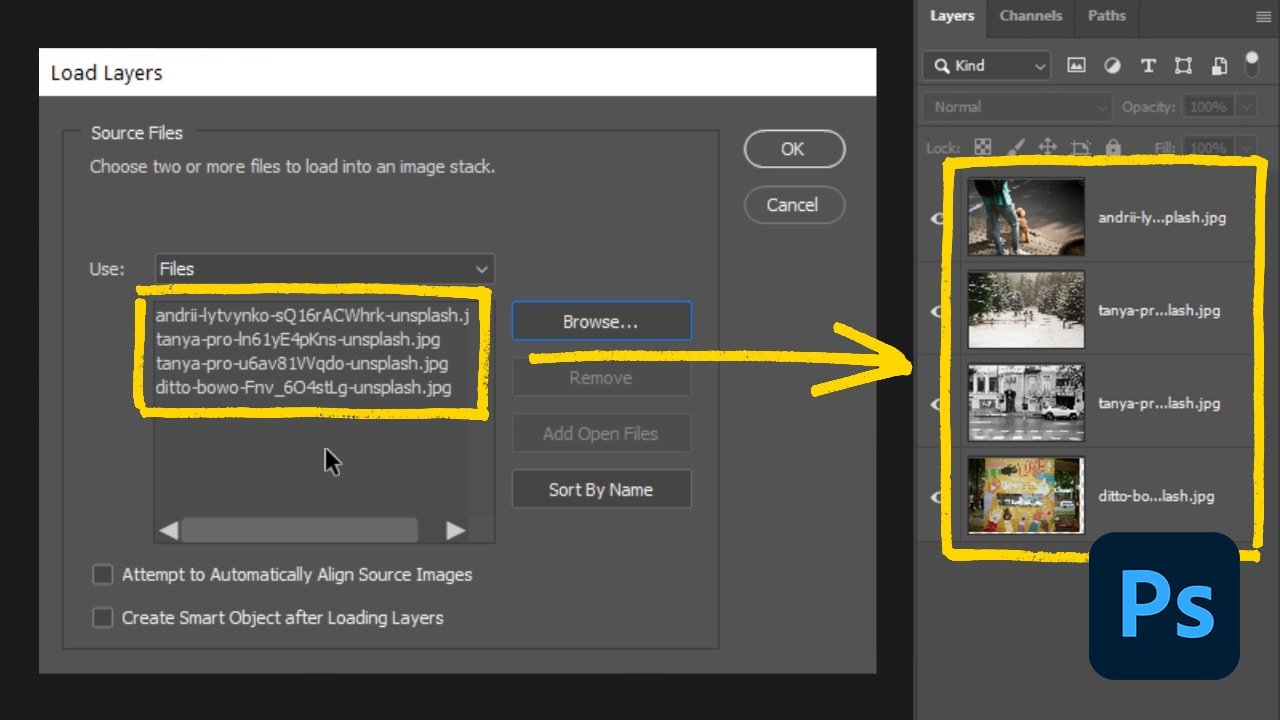
Method 3: Drag-and-Drop for Seamless Integration
The drag-and-drop method is undeniably one of the quickest and most intuitive ways to add an image to an existing Photoshop document. It’s perfect when you have multiple image assets—such as various elements for a mood board or trending styles for a thematic collection from Tophinhanhdep.com—and you want to rapidly bring them into your workspace.
Steps:
- Prepare Your Workspace: Ensure you have your target Photoshop document open. Simultaneously, open your operating system’s file explorer (e.g., Finder for Mac, Explorer for Windows) and navigate to the folder containing the image you wish to import. Arrange your windows so both Photoshop and your file explorer are visible on your screen.
- Initiate the Drag: Click and hold the image file in your file explorer.
- Perform the Drop: While still holding the mouse button, drag the image over to the active Photoshop window. Release the mouse button when your cursor is positioned over the canvas of your Photoshop document.
Implications and Tips: Upon dropping, the image will appear as a new layer, automatically transformed into a Smart Object. This is a powerful feature that encapsulates the original image data, allowing for non-destructive editing. You’ll see the newly placed image framed by a bounding box with transformation handles. You can immediately resize, rotate, or skew the image by dragging these handles. Holding the Shift key while dragging a corner will maintain the image’s aspect ratio, preventing distortion—a crucial tip for preserving the integrity of high-resolution photography. Once satisfied with the initial placement and transformation, press Enter (Windows) or Return (Mac) to commit the changes.
The automatic conversion to a Smart Object is particularly beneficial when working with high-resolution stock photos or wallpapers from Tophinhanhdep.com. It ensures that no matter how much you scale the image down and then back up, its original quality is preserved. If, however, you need to perform pixel-level edits (like using a brush or eraser) that Smart Objects restrict, you can easily “Rasterize” the layer by right-clicking it in the Layers panel and selecting “Rasterize Layer.” Just be aware that once rasterized, scaling up the image beyond its initial placed size may result in pixelation.
Method 4: ‘Place Embedded’ for Controlled Layer Addition
The “Place Embedded” command provides a structured and controlled method for inserting images, also automatically converting them into Smart Objects. This is often preferred in professional workflows where preserving image quality and linking capabilities are critical for complex graphic design or digital art projects. It’s an excellent choice when you’re incorporating elements from a thematic collection on Tophinhanhdep.com, such as specific aesthetic images or abstract patterns.
Steps:
- Open or Create Document: Start with an existing Photoshop document open, or create a new one to serve as your canvas.
- Access ‘Place Embedded’: Go to the top menu bar, click “File,” and then select “Place Embedded…” from the dropdown menu.
- Select Your Image: A file explorer window will open. Navigate to the desired image file on your computer. This could be a high-resolution background, a unique aesthetic image, or any other visual asset. Select the image and click the “Place” button in the lower-right corner.
- Transform and Confirm: The image will appear on your canvas, enclosed within a bounding box, just as with the drag-and-drop method. Adjust its size, position, and rotation as needed. Press Enter (Windows) or Return (Mac) to finalize the placement.
Advantages: “Place Embedded” explicitly reinforces the use of Smart Objects, which is a cornerstone of non-destructive editing in Photoshop. This is particularly valuable when you’re experimenting with different layouts or applying complex photo manipulation techniques, as it allows you to return to the original image data at any point. For images sourced from Tophinhanhdep.com, especially high-resolution photography or digital art pieces, using “Place Embedded” is highly recommended to maintain their pristine quality throughout your editing process.
Method 5: ‘Copy and Paste’ for Quick Transfers
The “Copy and Paste” method is a universal command familiar to most computer users, offering a fast way to transfer images from virtually any source into Photoshop. While it might not offer the same “Smart Object” benefits as “Place Embedded” or drag-and-drop by default, it’s incredibly convenient for quickly adding elements, such as small graphics, textures, or portions of images found online.
Steps:
- Copy the Image:
- From the Web: Right-click (or Ctrl-click on Mac) an image in your web browser and select “Copy image.” (Note: “Copy image address” will only copy the URL.)
- From Your Computer: Open the image in an image viewer or another application. Right-click the image and choose “Copy.” Simply copying the file itself from the file explorer will not work; you need to copy the image data.
- Open Photoshop Document: Ensure you have your target Photoshop document open.
- Paste into Photoshop: Navigate to the top menu bar, click “Edit,” and then select “Paste” (or use the keyboard shortcut: Ctrl+V on Windows / Cmd+V on Mac).
Considerations: Images pasted this way generally come in as regular pixel layers, not Smart Objects. This means they are immediately editable at a pixel level but will lose quality if scaled up significantly after being placed. For this reason, while quick, it’s often best suited for images that are already at or near their final desired size, or for elements that you intend to heavily raster-edit immediately. When working with critical high-resolution backgrounds or stock photos from Tophinhanhdep.com, “Place Embedded” or drag-and-drop are usually preferred for their quality preservation features.
Advanced Considerations & Optimizing Your Workflow
Mastering the basic insertion methods is just the beginning. To truly unlock Photoshop’s potential for visual design and digital photography, you need to understand the underlying principles of image handling and adopt practices that streamline your workflow. This includes smart utilization of Photoshop’s features and potentially integrating image tools that complement your creative process.
Understanding Smart Objects and Rasterization
The distinction between Smart Objects and rasterized layers is fundamental to non-destructive editing and maintaining image quality, especially when working with diverse image types like aesthetic backgrounds, artistic abstract pieces, or high-resolution photography from Tophinhanhdep.com.
- Smart Objects: As discussed, Smart Objects embed or link the original image data. This means you can scale, rotate, warp, or apply filters to a Smart Object multiple times without permanently degrading the image’s quality. Photoshop always refers back to the original pixel data when rendering the Smart Object. This is invaluable for photo manipulation, allowing you to experiment freely with transformations. For instance, if you import a high-resolution wallpaper from Tophinhanhdep.com as a Smart Object, you can resize it for a thumbnail preview and later scale it back up for a full-size print, all without losing fidelity.
- Rasterization: Converting a Smart Object to a rasterized layer (right-click layer > “Rasterize Layer”) transforms it into a standard pixel-based layer. Once rasterized, Photoshop considers its current pixel dimensions as the definitive image data. While this enables pixel-level editing with tools like brushes, erasers, and dodge/burn, it also means that if you later scale the image up, it will pixelate and lose quality, as Photoshop attempts to invent new pixel data. It’s a trade-off: flexibility in pixel manipulation versus flexibility in transformation. Many graphic design projects benefit from the early stages being Smart Objects, with rasterization occurring only when specific pixel edits are necessary, or at the very end of the process.
For optimal workflow, especially when dealing with high-resolution images, start with Smart Objects. Only rasterize a layer when a specific pixel-based editing task requires it, or when you are absolutely certain about the final size and resolution of that image element.
Efficient Image Management & Visual Design Principles
Beyond simply adding images, effective management within Photoshop is key to organized and efficient visual design.
- Layer Organization: As you add more images, your Layers panel can quickly become crowded. Develop a habit of naming your layers descriptively (e.g., “Main Background - Nature,” “Subject - Product,” “Abstract Overlay”). Group related layers into folders (Ctrl+G on Windows / Cmd+G on Mac) to keep your workspace tidy, especially in complex photo manipulation projects. This makes it easier to navigate, select, and adjust specific elements, saving precious time.
- Precise Transformations: When resizing or moving images, holding the Shift key during a drag operation (with the Free Transform tool active, Ctrl/Cmd + T) maintains proportions. In the options bar at the top, you’ll also find a “Maintain Aspect Ratio” link icon; clicking this locks the width and height ratio, ensuring proportional scaling even without holding Shift. These techniques are vital for preserving the aesthetic and integrity of beautiful photography.
- Streamlining with Creative Consoles: For professionals and serious enthusiasts, dedicated creative consoles like the TourBox (as seen in some references, though we’ll refer to it generally as a “creative console”) can significantly enhance efficiency. These devices offer customizable dials, scroll wheels, and buttons that can be mapped to frequently used Photoshop functions—such as adjusting image size, rotating, zooming, or switching tools. This allows for a more fluid and tactile interaction with Photoshop, reducing reliance on keyboard shortcuts and mouse clicks, thus speeding up complex photo manipulation and graphic design tasks.
Furthermore, remember that the quality of your input images matters. Before even bringing images into Photoshop, consider using Tophinhanhdep.com’s Image Tools like Compressors and Optimizers to manage file sizes while maintaining quality, or AI Upscalers to enhance the resolution of smaller images you might want to use. If you have images in incompatible formats, Tophinhanhdep.com’s Converters can prepare them for Photoshop, ensuring a smooth start to your creative journey.
Elevating Your Creations with Tophinhanhdep.com Resources
The act of adding images to Photoshop is merely the first stroke on a vast canvas of creative expression. Tophinhanhdep.com is designed to be your ultimate partner in this journey, offering not just guidance on tools but also the very fuel for your imagination.
Sourcing Inspiring Imagery for Your Projects
The foundation of any compelling visual design project is often the quality and relevance of the images you use. Tophinhanhdep.com is curated to provide an unparalleled resource for all your image needs:
- Diverse Collections: Explore our vast categories to find the perfect visual elements. Whether you need a serene Nature backdrop, a dynamic Abstract pattern, an emotionally resonant Sad/Emotional image, or simply a stunning Wallpaper to build upon, our collections are meticulously organized.
- Aesthetic and Thematic Imagery: For those delving into Visual Design and seeking specific moods, our Aesthetic images and curated Thematic Collections offer a wealth of options. Build captivating Mood Boards directly from our site, ensuring your Photoshop creations resonate with current Trending Styles and capture the desired feel.
- High-Resolution & Stock Photos: We prioritize quality. Our platform provides High Resolution images and Stock Photos perfect for any digital photography or graphic design project, ensuring your Photoshop composites are crisp, clear, and professional-grade. These high-quality assets become invaluable Smart Objects in Photoshop, preserving their detail no matter your design ambition. From Beautiful Photography that can stand alone, to versatile Backgrounds that set the scene, Tophinhanhdep.com offers the foundational imagery to spark your Creative Ideas.
Beyond Insertion: Editing Styles and Creative Manipulation
Once you’ve skillfully integrated images into your Photoshop document using the methods outlined above, the true magic of Digital Photography and Photo Manipulation begins. The images sourced from Tophinhanhdep.com are not just static elements; they are raw materials waiting to be transformed through your unique Editing Styles.
- Developing Your Style: Experiment with Photoshop’s myriad tools to apply filters, adjust colors, and blend layers, shaping the images to fit your vision. This could involve subtle enhancements to a Beautiful Photography piece or drastic alterations to an Abstract background.
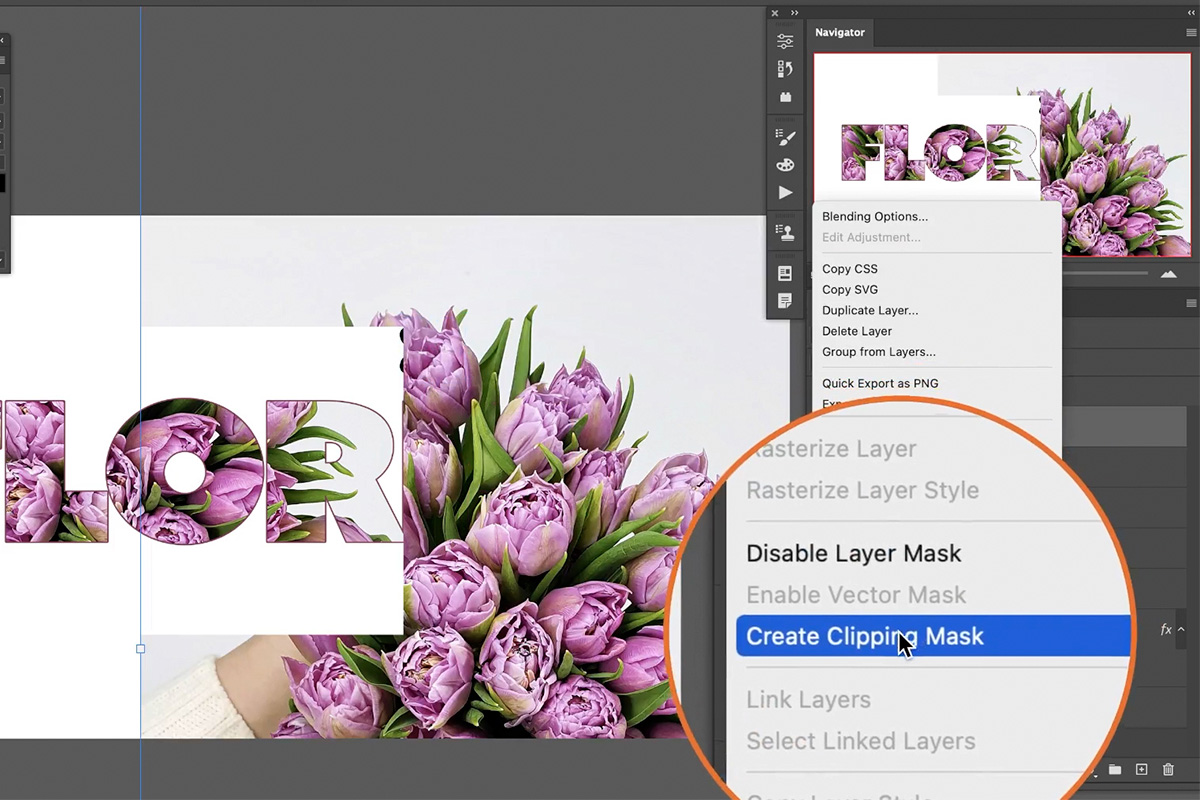
- Creative Manipulation: Learn techniques like masking, blending modes, and compositing to seamlessly combine elements and create entirely new realities. Turn individual elements from our Image Collections into a cohesive piece of Digital Art that tells a story or evokes a specific emotion.
- Leveraging Image Tools: Remember that the journey doesn’t start and end in Photoshop. Tophinhanhdep.com also offers Image Tools that can be used pre- and post-Photoshop. Use our AI Upscalers to boost the resolution of smaller components before importing, ensuring all parts of your composite are equally sharp. Explore Converters to handle various file formats efficiently, and even consider Image-to-Text tools for creative inspirations or data extraction if relevant to your project. These tools help you prepare and refine your assets, making your Photoshop experience even more powerful.
Conclusion
The ability to add images in Photoshop is a foundational skill that underpins nearly every creative endeavor within the program. From simply opening a standalone Wallpaper to intricately compositing multiple Stock Photos into a complex piece of Digital Art, the methods discussed—using the ‘Open’ command, the ‘Open With’ shortcut, drag-and-drop, ‘Place Embedded,’ and ‘Copy and Paste’—provide a versatile toolkit for any artist or designer.
By understanding the nuances of each method, particularly the power of Smart Objects for non-destructive editing and the importance of efficient Image Management, you lay a strong groundwork for advanced Photo Manipulation and Graphic Design. At Tophinhanhdep.com, we are committed to fueling your creative journey. Our extensive collections of High Resolution imagery, curated Aesthetic and Thematic Collections, and inspiring Photo Ideas serve as the perfect starting point for your Photoshop projects. We encourage you to explore, experiment with different Editing Styles, and transform the stunning visuals from Tophinhanhdep.com into your own unique masterpieces. The canvas awaits – start adding, creating, and inspiring today!