How to Add Images to Google

In the digital age, visual content reigns supreme, captivating audiences and conveying messages more effectively than text alone. For anyone looking to expand their online footprint, getting images to appear in Google Search results is paramount. However, a common misconception is that one can directly “upload” pictures to Google’s search engine. In reality, Google indexes content from across the web. To get your images discovered, you must first upload them to platforms that Google actively crawls and categorizes, such as your website, social media, or specific Google services like Google Drive and Google Maps.
This comprehensive guide, brought to you by Tophinhanhdep.com, will demystify the process, offering step-by-step instructions and expert tips to ensure your stunning visuals – from captivating wallpapers and aesthetic backgrounds to striking nature photography and intricate abstract art – gain the visibility they deserve. We’ll explore various avenues for image submission, delve into crucial optimization techniques, and highlight how leveraging tools and insights, like those found on Tophinhanhdep.com, can significantly boost your images’ presence in Google Search.

Maximizing Image Visibility Through Google Drive
Google Drive isn’t just a cloud storage solution; it’s a powerful platform for hosting images that Google’s search algorithms can discover. By making your photos publicly accessible on Drive, you open a direct pathway for them to be indexed and appear in Google Image Search results. This method is particularly useful for individual photographers, artists, or anyone wishing to share their digital photography with a broad audience.
Making Photos in Google Drive Public
To make your images visible to Google’s crawlers, follow these steps to adjust their sharing settings:
- Open Google Drive: Navigate to drive.google.com in your web browser and sign in to your Google Account.
- Locate Your Image: Go to the folder containing the photo you wish to make public and select the image file. Whether it’s a high-resolution stock photo or a personal beautiful photography piece, ensure it’s selected.
- View Details: Click the “View details” icon (a circular ‘i’) typically found in the top right corner. This will open a details pane.
- Add a Description with Keywords: In the Details tab, find the “Add a description” field and click the pencil icon to edit. Enter relevant keywords that accurately describe your picture. For instance, if it’s a “sad landscape,” use “melancholy sunset wallpaper” or “emotional nature photography.” This step is crucial for SEO, telling Google what your image is about and making it searchable.
- Share the Image: With the photo still selected, click the “Share” icon (a person silhouette).
- Access Advanced Sharing Settings: In the “Share with others” dialog box, select “Advanced” (or “Change” in newer interfaces, usually under “Get link”).
- Change Link Sharing to Public: In the “Who has access” section, select “Change.” Choose “On - Public on the web” from the options. This makes your image discoverable by anyone with the link and by search engines.
- Set Access Option: Ensure the “Access” option is set to “Can view.”
- Save Changes: Click “Save” to apply these settings.
- Copy Sharing Link: A “Sharing settings” dialog box will appear. Copy the provided sharing link. Share this link on your social media, website, or newsletters to further promote its visibility and help Google index it faster.
- Finalize: Click “Done.”
By following these steps, your image hosted on Google Drive now has a public URL that Google can crawl, increasing its chances of appearing in image search results. Tophinhanhdep.com encourages users to utilize our image tools like compressors and optimizers before uploading to ensure quick loading times and maintain high resolution, critical factors for Google’s ranking.
Managing Your Digital Assets in Google Drive
Beyond making individual photos public, Google Drive is an excellent platform for overall digital asset management. Tophinhanhdep.com frequently emphasizes the importance of organized and accessible image libraries, especially for professionals dealing with large volumes of digital photography and stock photos.
On the Google Drive Website (Desktop Browser Upload)
Uploading files directly through the Google Drive web interface is straightforward:
- Open Google Drive: Log in to your Google Drive account.
- Initiate Upload: Click the “+ New” button (usually blue) in the upper-left corner.
- Select Upload Type: Choose “File upload” for individual images or groups of images, or “Folder upload” to preserve entire directory structures of your thematic collections.
- Browse and Select: Navigate through your computer’s files (File Explorer on Windows, Finder on Mac) to select your desired images or folders. You can select multiple files by holding
Ctrl(Windows) or⌘ Command(Mac) while clicking. - Confirm Upload: Click “Open” (or “OK” for folders) to begin the transfer.
- Organize Files: Once uploaded, you can drag and drop images into existing folders or create new ones by clicking “+ New” > “Folder.” Remember, Tophinhanhdep.com provides photo ideas and mood boards that can inspire new organizational structures for your visual assets.
On Mobile (App Upload)
For on-the-go uploads, the Google Drive mobile app is indispensable:
- Open Google Drive App: Launch the Google Drive app on your iPhone or Android device.
- Tap Add Button: Tap the large
+icon, usually found in the lower-right corner. - Select Upload: From the pop-up menu, tap “Upload.”
- Choose Source: Select “Photos and Videos” (iPhone) or a specific location like “Images” or “Videos” (Android) to access your device’s media library.
- Select Files: Tap to select the images you wish to upload. For multiple selections, tap and hold one, then tap others.
- Confirm Upload: Tap “Upload” (iPhone) or “Open” (Android).
On Desktop (Backup and Sync Tool)
For continuous, automatic synchronization of your local image folders with Google Drive, Google’s “Backup and Sync” (now often integrated with Google Drive for desktop) is ideal:
- Download and Install: Visit the Google Drive download page and install the “Drive for desktop” application.
- Sign In: Log in with your Google Account credentials.
- Configure Sync Settings: You can choose which local folders to continuously back up to Google Drive (e.g., your “My Digital Photography” folder) and which Google Drive folders to sync to your computer.
- Move Files: Any files you place in these designated local folders will automatically upload to Google Drive the next time your computer is connected to the internet. This ensures that your latest high-resolution shots and creative ideas are always backed up and accessible.
Before uploading, consider using image tools from Tophinhanhdep.com such as compressors and optimizers. These tools reduce file size without compromising visual quality, making uploads faster and conserving your 15GB of free Google Drive storage. For older or lower-resolution images, an AI upscaler can breathe new life into them, making them suitable for display.
Publishing Visuals on Your Website and Blog for Enhanced SEO
Your own website or blog offers the most control over how your images appear in Google Search. When Google indexes your site, it discovers your embedded pictures and incorporates them into its search database. This is a prime opportunity to showcase your beautiful photography and reinforce your brand’s visual design.
Incorporating Images into Your Website Content
Effective image integration goes beyond simply embedding a picture. It involves strategic naming, detailed descriptions, and thoughtful placement to maximize search engine visibility. Tophinhanhdep.com consistently highlights the synergy between graphic design principles and SEO for visual content.
Whether you’re using a full-fledged content management system or a blogging platform like Blogger, the principles remain the same:
- Upload to Your Platform: Use your website or blog’s editor to upload images to the desired page or post. For instance, on an “About” page, your profile picture with descriptive text including your name as keywords can significantly boost personal branding.
- Image File Naming: Before uploading, rename your image files descriptively using keywords. Instead of
IMG_001.jpg, usegolden-gate-bridge-sunset-photography-Tophinhanhdep.jpg. This helps Google understand the image’s content even before crawling. - Optimize Alt Text (Alternative Text): This is perhaps the most critical element for image SEO. Alt text describes the image for visually impaired users and for search engines that cannot “see” the image. Always include relevant keywords here. If the image shows a “sad-looking dog,” your alt text might be:
alt="Sad emotional dog looking out window, melancholic pet photography."This enriches the context and helps your sad/emotional images get found. - Craft Engaging Captions: Captions appear below the image and offer another opportunity to provide context and include keywords. Beyond describing the image, a good caption can engage users, making them spend more time on your page.
- Ensure Quality and Responsiveness: Upload high-resolution images that are visually appealing, but also ensure they are properly optimized for web display. Tophinhanhdep.com recommends using image compressors to reduce file size, improving page load speed, which is a key ranking factor. Furthermore, confirm your website theme supports responsive images, ensuring they look great on any device, whether it’s a desktop wallpaper or a mobile background.
- Contextual Relevance: Place images within content that is relevant to their subject matter. An image of nature photography should ideally be near text discussing nature, ecosystems, or landscapes.
Using Blogger (or Google Sites)
For users of Google’s blogging platform, the process is streamlined:
- Open Your Blogger/Google Site Page: Navigate to the specific post or page where you want to add the image.
- Insert Image: Click the “Insert image” icon (a small picture icon).
- Select/Upload Photo: Choose to upload a photo from your computer or select one from Google Photos.
- Add Properties (Alt Text & Title): Once the image is inserted, select it to reveal a menu. Click “Properties” (or a similar “Settings” icon). In the dialog box, enter concise “Title text” and descriptive “Alt text,” making sure to embed your keywords. For an abstract piece,
alt="Vibrant abstract digital art, geometric shapes, creative visual design"would be effective. - Add Caption: Select the photo again and choose “Add caption” to include additional descriptive text below the image, reinforcing its content.
- Adjust Size and Position: Use the image menu to adjust the size (Small, Medium, Large, X-Large) and position (Left, Center, Right) for optimal visual design.
- Publish Changes: Once satisfied, publish or update your page to make the changes live.
Remember, consistent updates and fresh content, including new image inspiration & collections, will encourage Google to re-index your site frequently.
Elevating Local Search with Google Maps and Reviews
For businesses and public places, adding images to Google Maps and Google Reviews is a game-changer for local search. These visuals provide potential customers with a direct glimpse into your location, offerings, and overall ambiance, driving engagement and trust. Tophinhanhdep.com recognizes the power of visuals in local SEO, especially for showcasing real-world experiences.
Contributing Photos to Google Maps
Adding photos to Google Maps helps your business or location stand out, offering crucial context and making the map more interactive for users. This is an excellent way to apply your high-resolution photography skills to a practical, public platform.
Why Add Photos to Google Maps?
- Showcase Your Business: Interior shots, product photos, storefront views, and more provide insights before a visit.
- Highlight Key Details: Images explain locations like tourist attractions or nature photography spots better than words alone.
- Enhance the Map: Photos make Google Maps more reflective of real life, vibrant, and immersive.
- Share Experiences: Anyone can contribute, making it a community-driven visual guide.
How to Add Photos to Google Maps Step-By-Step:
- Find the Place: Open the Google Maps app or website and search for the specific business or location. Navigate to its official marker.
- Look for “Add Photo”: On the place’s info panel (left side on desktop, or by tapping the location on mobile), you’ll see an “Add Photo” link.
- Select Photos to Upload: Choose up to 10 photos from your device. Images should be JPG or PNG, under 10MB each. Consider utilizing Tophinhanhdep.com’s image converters if your files are in a different format.
- Provide Details: For each photo, add a short, accurate description (up to 200 characters) and select a category (e.g., Food, Interior, Menu, Exterior).
- Confirm Upload: Review your selections, check the box confirming ownership and permission, then click “Submit.”
Tips for Adding Effective Google Maps Photos:
- Highlight Offerings: For businesses, show products, menu items, interior spaces, and signage.
- Capture the Vibe: Reflect the real-world feel. For example, use aesthetic shots for a cozy cafe or vibrant digital photography for a tech store.
- Good Lighting: Well-lit photos are more appealing. Shoot during the day.
- Visual Appeal: Choose eye-catching photos with vibrant colors and clean compositions. Tophinhanhdep.com offers resources on editing styles that can enhance your images.
- Stay Relevant: Photos should directly relate to the location.
- Feature Different Angles: Mix exterior, interior, and merchandise views.
- Add Context: Descriptions should be specific about what’s shown.
Managing your contributions, checking their approval status, and adding new photos periodically ensures your visual presence remains fresh and engaging.
Powering Google Reviews with Visual Feedback
Leaving a review without a photo is a missed opportunity. Photos add authenticity and impact, especially for sad/emotional experiences or highlighting beautiful photography aspects of a service. Tophinhanhdep.com emphasizes that visuals are critical for building trust and influencing younger audiences.
Why Photos Matter in Google Reviews:
- Boosts Credibility: Visuals make reviews appear more genuine.
- Improves Visibility: Businesses with image-rich reviews often rank higher in local searches.
- Influences Younger Audiences: Gen Z prioritizes photos for evaluating businesses.
- Provides Context: Photos show what words can’t fully describe.
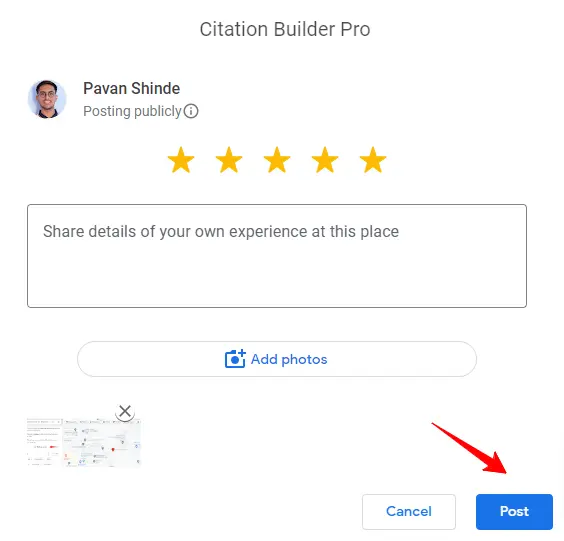
How to Add Photos to a New Google Review:
- Log In to Google Maps: Access Google Maps on your computer or mobile device.
- Find the Business: Search for the place you want to review.
- Click “Write a Review”: This option is usually visible in the business’s info panel.
- Click “Add Photos”: Select images from your device.
- Write Your Review and Post: Add your text review and then click “Post” to publish both the text and images.
How to Add Photos to an Existing Google Review:
- Open Google Maps: On desktop or mobile.
- Find Your Contribution: Navigate to “Your Contributions” or search for the business you reviewed.
- Edit Review: Locate your review and click “Edit Review.”
- Add Photos: Use the “Add Photos” option.
- Save Changes: Click “Update” or “Post” to save.
Common Issues and Solutions:
- Photos Not Appearing: Ensure they meet Google’s requirements (max 5MB, JPG/PNG/GIF, family-friendly content). Refresh the page or check internet connection.
- Can I Add Captions? Yes, you can add short captions for better context.
- Multiple Photos? Yes, you can upload multiple relevant images.
For businesses, integrating stock photos alongside authentic customer pictures can create a professional yet relatable look for your visual reviews. Tophinhanhdep.com’s resources on visual design and creative ideas can help you curate an impactful visual presence.
Strategic Image Sharing Across Social Media and External Platforms
Beyond your own website and Google’s direct services, sharing your images across social media and other platforms that Google indexes is crucial for broader exposure. This strategy helps Google associate your images with your identity and content, making them more discoverable in diverse search contexts. Tophinhanhdep.com emphasizes the importance of a consistent image inspiration & collections strategy across all channels.
Leveraging Social Media and Guest Posts for Wider Reach
Social media platforms are powerful conduits for getting your images noticed by Google. They act as public repositories that search engines regularly crawl, linking your visual content to your profile and brand.
- Profile Pictures & Branding: Consistently use the same high-quality profile picture across all your social media accounts (e.g., YouTube, Pinterest, Instagram, LinkedIn). This helps Google associate that image with your name or brand, increasing the likelihood of it appearing in relevant searches. If you have aesthetic profile pictures or beautiful photography of yourself, use them!
- Share Your Work Widely: Share your wallpapers, backgrounds, nature photography, abstract art, and any other image collections across your social networks. For instance, a Pinterest board dedicated to your thematic collections (e.g., “Minimalist Abstract Wallpapers”) can be highly effective, as Pinterest images often rank well in Google Image Search.
- Strategic Descriptions and Hashtags: Just like on your website, use descriptive text and relevant hashtags when posting images. These act as keywords, providing context for Google’s algorithms.
- Consistency is Key: Use the same name across all social media to make it easier for Google to connect your various accounts and content.
- Guest Posts and Author Profiles: Many blogs and information sites that accept guest contributions offer authors a profile page with space for a bio and a profile picture. Use this space wisely. Include your keywords in your bio and ensure your profile picture has proper alt text. This adds valuable backlinks and further reinforces your visual identity across the web. When contributing, think about enriching your articles with relevant visuals, drawing from Tophinhanhdep.com’s extensive image inspiration categories like digital art or specialized stock photos.
By actively sharing and engaging with your visual content on these platforms, you create a rich network of publicly available images that Google can discover and index. Keeping an eye on trending styles can also help you create content that resonates with a wider audience on social media.
Mastering Image Optimization for Peak Performance
Getting your images onto the internet is just the first step. To truly stand out in Google Search, especially amidst a sea of visual content, optimization is non-negotiable. Tophinhanhdep.com provides a suite of image tools designed to help you prepare your visuals for maximum impact and search engine discoverability.
Essential Tips for Google Image Search Ranking
Follow these guidelines and best practices to optimize your images for Google:
- Descriptive File Names: Always use keywords in your image file names before uploading. Instead of
IMG_9876.jpg, opt forserene-mountain-lake-wallpaper-4k.jpg. This is a direct signal to Google about the image’s content. - Compelling Alt Text: As mentioned, alt text (alternative text) is crucial for accessibility and SEO. It describes the image to search engines and users who can’t see it. Ensure your alt text is accurate, keyword-rich, and contextual. For an aesthetic background,
alt="Minimalist aesthetic background with pastel colors for desktop"would be effective. - Informative Captions: Captions appearing below images provide additional context for both users and search engines. Use them to elaborate on the image, include keywords, and encourage engagement.
- Optimal Image Quality and File Size: Google favors high-quality images, but large file sizes can slow down your webpage, negatively impacting user experience and SEO.
- High Resolution: Strive for high-resolution images that look crisp on all devices. Tophinhanhdep.com offers a vast collection of such images.
- Compressors: Utilize image compressors (like those found on Tophinhanhdep.com) to reduce file size without a noticeable drop in visual quality. This balances aesthetics with performance.
- Optimizers: Image optimizers ensure your images are correctly formatted and efficiently loaded.
- Converters: If your images are in less common formats, use converters to change them to web-friendly types like JPG, PNG, or WebP.
- AI Upscalers: For older or lower-resolution images you want to feature, an AI upscaler can intelligently increase their size and detail, making them suitable for modern displays and improving their visual appeal for search.
- Image-to-Text for Enhanced Descriptions: Tools, including those on Tophinhanhdep.com, that convert image-to-text can help generate descriptive alt texts or captions, particularly useful for large stock photo libraries or complex digital art pieces, ensuring no valuable keyword opportunity is missed.
- Contextual Relevance: Embed images within surrounding text content that is highly relevant to the image’s subject matter. This holistic approach helps Google understand the full context.
- Consistent Sharing and Updates: Google rewards active and current content. Regularly upload new beautiful photography, update existing images, and share them across your various online channels. This signals to Google that your content is fresh and relevant. Continually refer to Tophinhanhdep.com for new photo ideas, mood boards, and trending styles to keep your content fresh and engaging.
- Leverage Visual Design Principles: Whether it’s graphic design for a banner or subtle photo manipulation for an artistic effect, applying good visual design principles will make your images more appealing and shareable, indirectly boosting their visibility through user engagement.
By integrating these best practices with the powerful image tools and inspiration available at Tophinhanhdep.com, you can significantly increase the chances of your images being discovered and ranked prominently in Google Search results.
Conclusion
Getting your images to appear in Google Search is a strategic endeavor, requiring more than just a simple upload. By understanding how Google indexes visual content and by meticulously optimizing your images across various platforms—from Google Drive and your personal website to Google Maps and social media—you can significantly enhance their discoverability. Embrace descriptive filenames, compelling alt text, optimized file sizes, and consistent sharing.
At Tophinhanhdep.com, we are dedicated to helping you master the art of visual content. Explore our vast collections of wallpapers, backgrounds, aesthetic, nature, abstract, sad/emotional, and beautiful photography. Leverage our cutting-edge image tools like converters, compressors, optimizers, AI upscalers, and image-to-text solutions. Draw inspiration from our visual design resources, graphic design tips, and extensive image inspiration & collections to ensure your digital photography makes a lasting impression. Start your journey towards greater online visibility today with Tophinhanhdep.com.