Mastering Image Integration: A Comprehensive Guide to Adding Images in Photoshop

Adobe Photoshop stands as the industry standard for image editing and graphic design, offering an unparalleled suite of tools for creative professionals and enthusiasts alike. At the heart of any Photoshop project, whether it’s crafting stunning digital art, manipulating photographs, or designing compelling graphic layouts, lies the fundamental step of adding images. This guide, brought to you by Tophinhanhdep.com, will walk you through various methods of incorporating images into your Photoshop documents, ensuring you gain a solid understanding of each technique and how to leverage them for your visual design endeavors.
From sourcing exquisite wallpapers and backgrounds to optimizing high-resolution photography, Tophinhanhdep.com is your ultimate resource for all things visual. We understand that the journey of digital creation begins with quality assets and efficient workflows. That’s why we’ve meticulously compiled this tutorial, integrating insights from our extensive collections of aesthetic, nature, abstract, sad/emotional, and beautiful photography, alongside our powerful image tools and inspiration guides, to empower your Photoshop projects.
Whether you’re looking to compose a complex photo manipulation, lay down a striking background for a new design, or simply open a single image for retouching, mastering the art of image import in Photoshop is indispensable. We’ll explore direct opening, seamless embedding, quick drag-and-drop techniques, and the efficiency of copy-pasting, all while emphasizing best practices that align with our commitment to high-quality digital photography and visual excellence.
Fundamental Methods for Image Import
Understanding the different ways to bring images into Photoshop is crucial for efficient and flexible design work. Each method serves a specific purpose, offering varying degrees of control and integration with your existing document. Tophinhanhdep.com recommends exploring each technique to determine which best suits your current creative need, whether you’re starting a new project with a captivating image from our wallpaper collections or integrating a high-resolution stock photo into an ongoing visual design masterpiece.
Opening an Image as a New Document
The simplest way to work with an image in Photoshop is to open it directly as a new document. This method is ideal when you intend to edit a single photograph or use a standalone image, such as a high-resolution background or a beautiful piece of digital art sourced from Tophinhanhdep.com, as the primary canvas for your project.
Step-by-Step Process:
- Launch Photoshop: Begin by opening Adobe Photoshop on your computer. You’ll usually be greeted by the home screen, displaying recent projects and options to create new or open existing files.
- Access the ‘Open’ Command:
- From the Photoshop home screen, click the “Open” button on the left panel.
- Alternatively, if you’re already in the Photoshop workspace, navigate to the top menu bar, click on “File,” and then select “Open…” from the dropdown menu. This is a universal command found across most software, making it intuitive for new users.
- Browse and Select Your Image: A file explorer window (Finder on Mac, File Explorer on Windows) will appear. Use this window to navigate through your computer’s folders to locate the image file you wish to open. Tophinhanhdep.com recommends preparing your images in a dedicated folder, perhaps after utilizing our image compressors or AI upscalers to ensure optimal quality and file size.
- Confirm Selection: Click on your chosen image file to highlight it, then click the “Open” button (usually in the lower-right corner of the file explorer window).
- Image Displayed: Your selected image will now open in Photoshop as a brand-new document. Photoshop typically treats this initial image as a “Background” layer, which is often locked to prevent accidental modifications.

Tophinhanhdep.com Insight: When selecting images for a new document, consider the vast array of options available on Tophinhanhdep.com. Whether you need a serene nature wallpaper, an abstract background, or a deeply emotional image, starting with a high-resolution file will provide the best foundation for any digital photography or graphic design project. Our curated collections offer endless photo ideas and thematic content to spark your creative ideas.
Extra Tip: Unlocking the Background Layer: If you wish to freely manipulate the image (e.g., move, resize, apply filters) as a regular layer rather than a locked background, simply double-click on the “Background” layer in the Layers panel. A “New Layer” dialog box will appear; click “OK” to convert it into a standard layer.
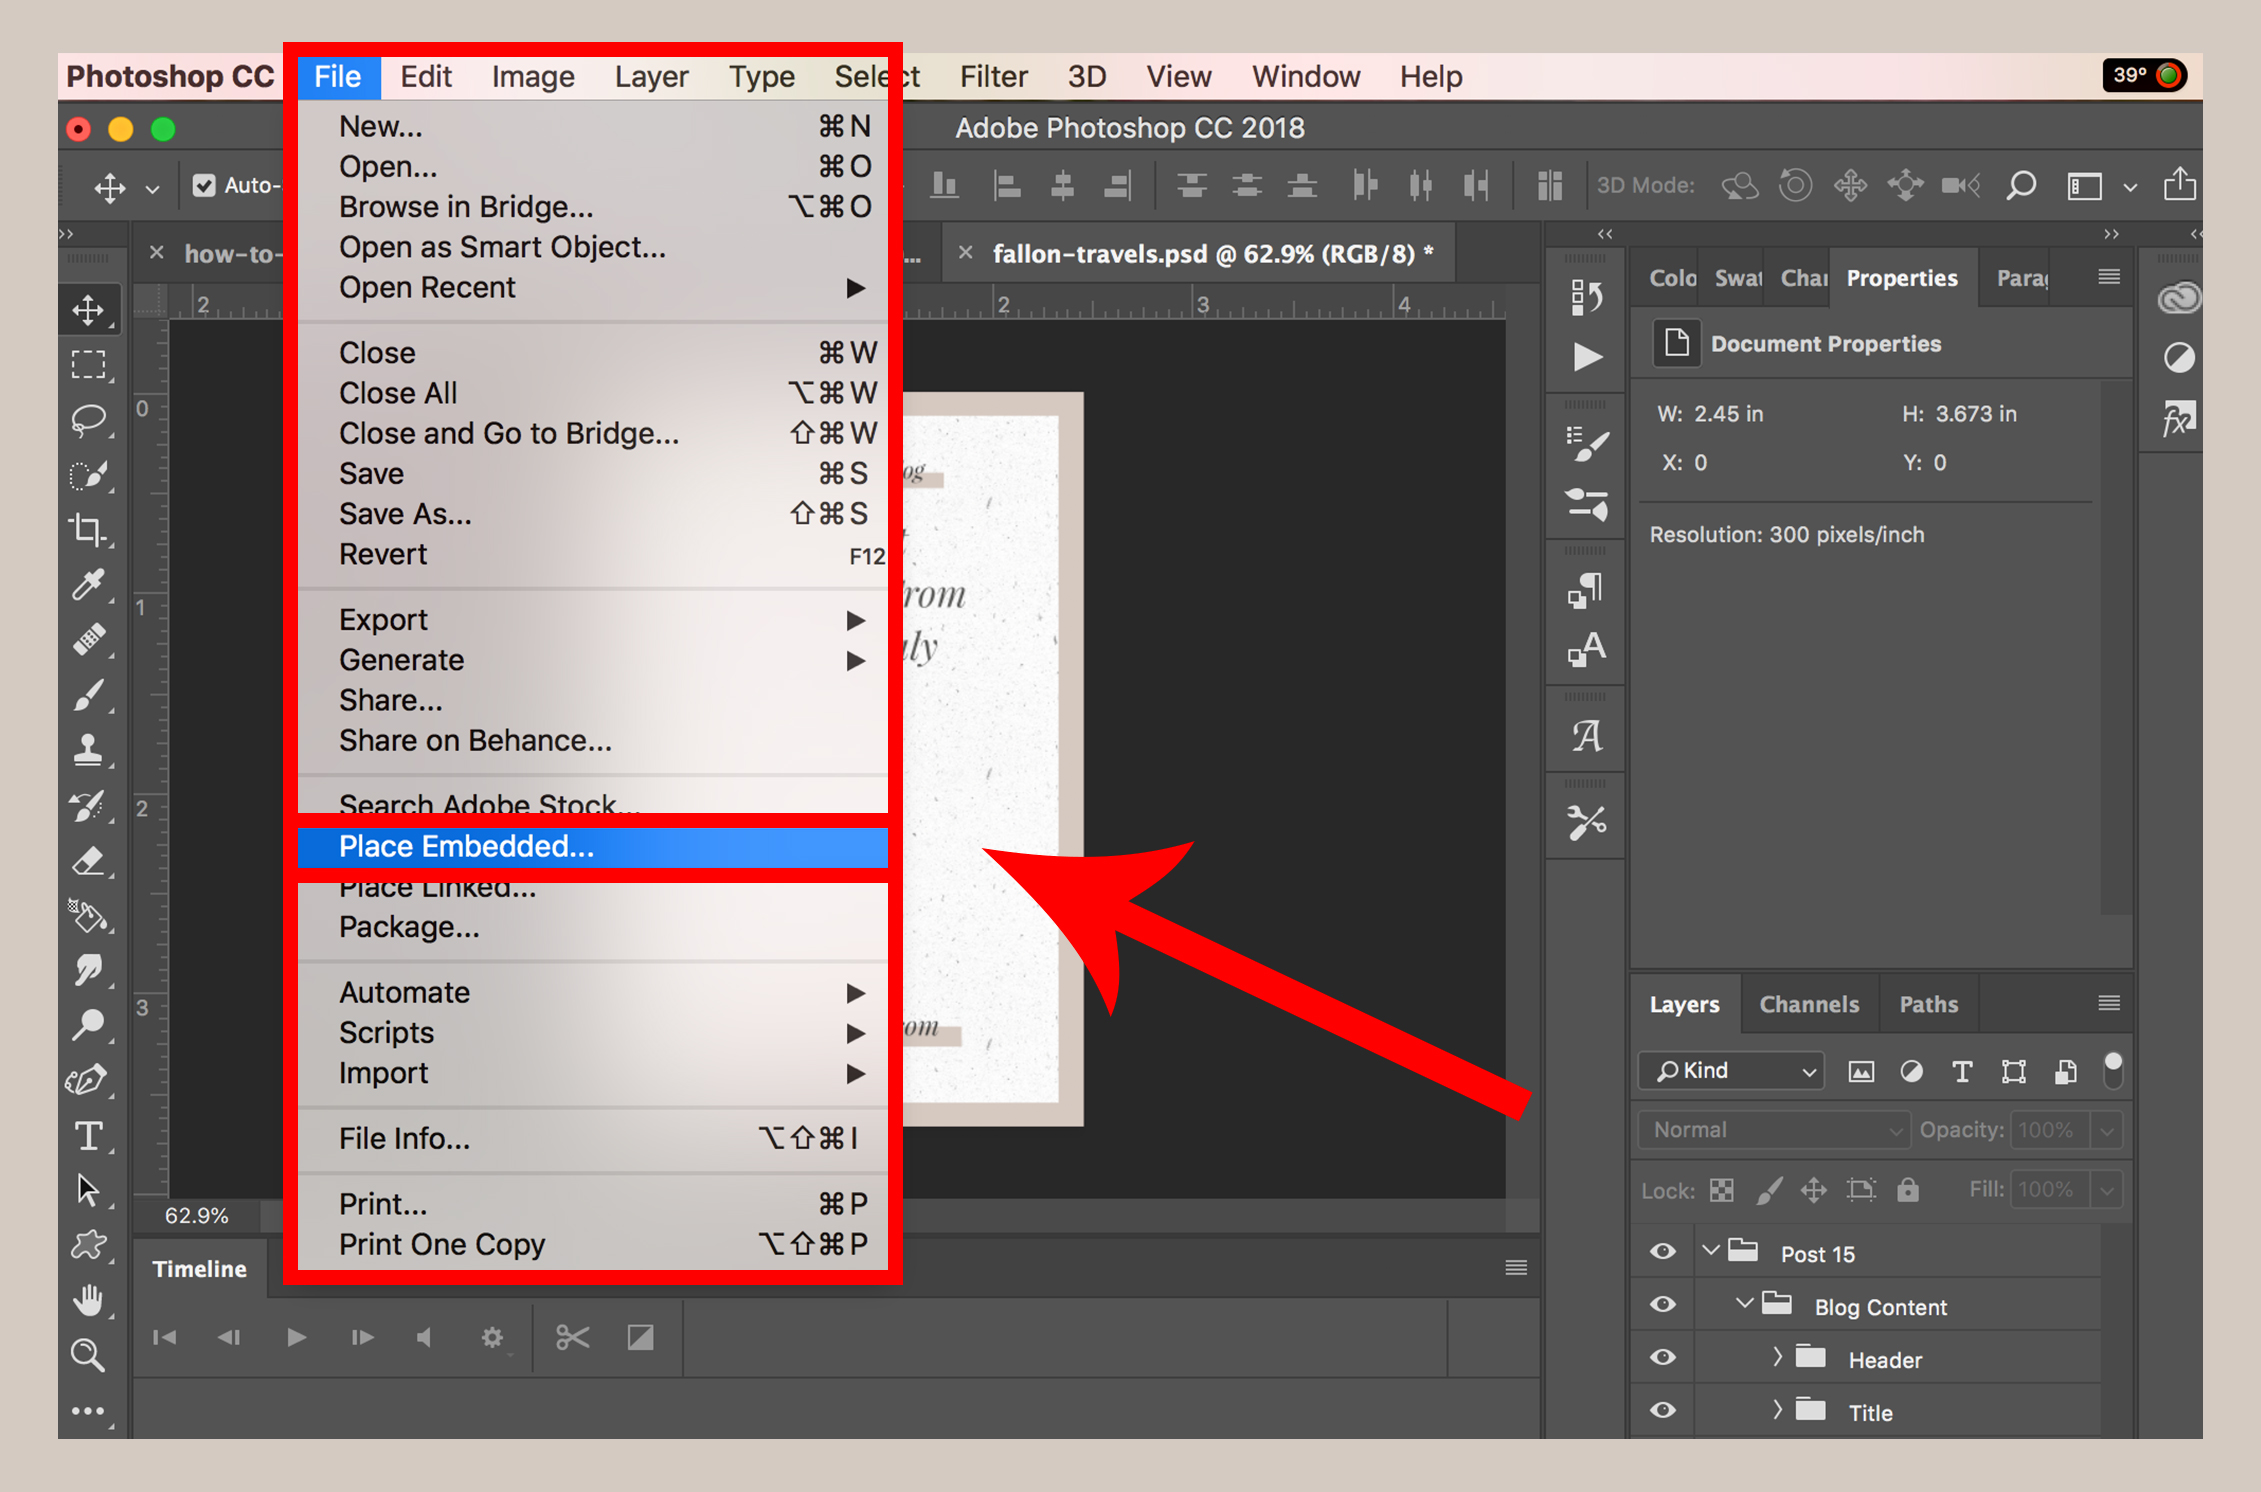
Placing Embedded Images for Seamless Integration
When you need to add an image to an already existing Photoshop document, the “Place Embedded” command is your go-to method. This technique inserts the image as a new layer within your current project, making it an indispensable tool for photo manipulation, digital art, and complex visual design. The placed image arrives as a Smart Object, a feature Tophinhanhdep.com highly endorses for non-destructive editing.
Step-by-Step Process:
- Open or Create Your Primary Document: Ensure you have the Photoshop document open where you want to add the new image. This could be a graphic design layout, a digital painting, or a photograph you’re actively manipulating.
- Initiate ‘Place Embedded’: Go to the top menu bar, click “File,” and then select “Place Embedded…” from the dropdown menu.
- Select Your Image: Similar to the “Open” method, a file explorer window will appear. Navigate to your desired image file. This could be a high-resolution stock photo, a branding element, or a visual asset that fits your creative ideas.
- Confirm Placement: Select the image and click “Place.”
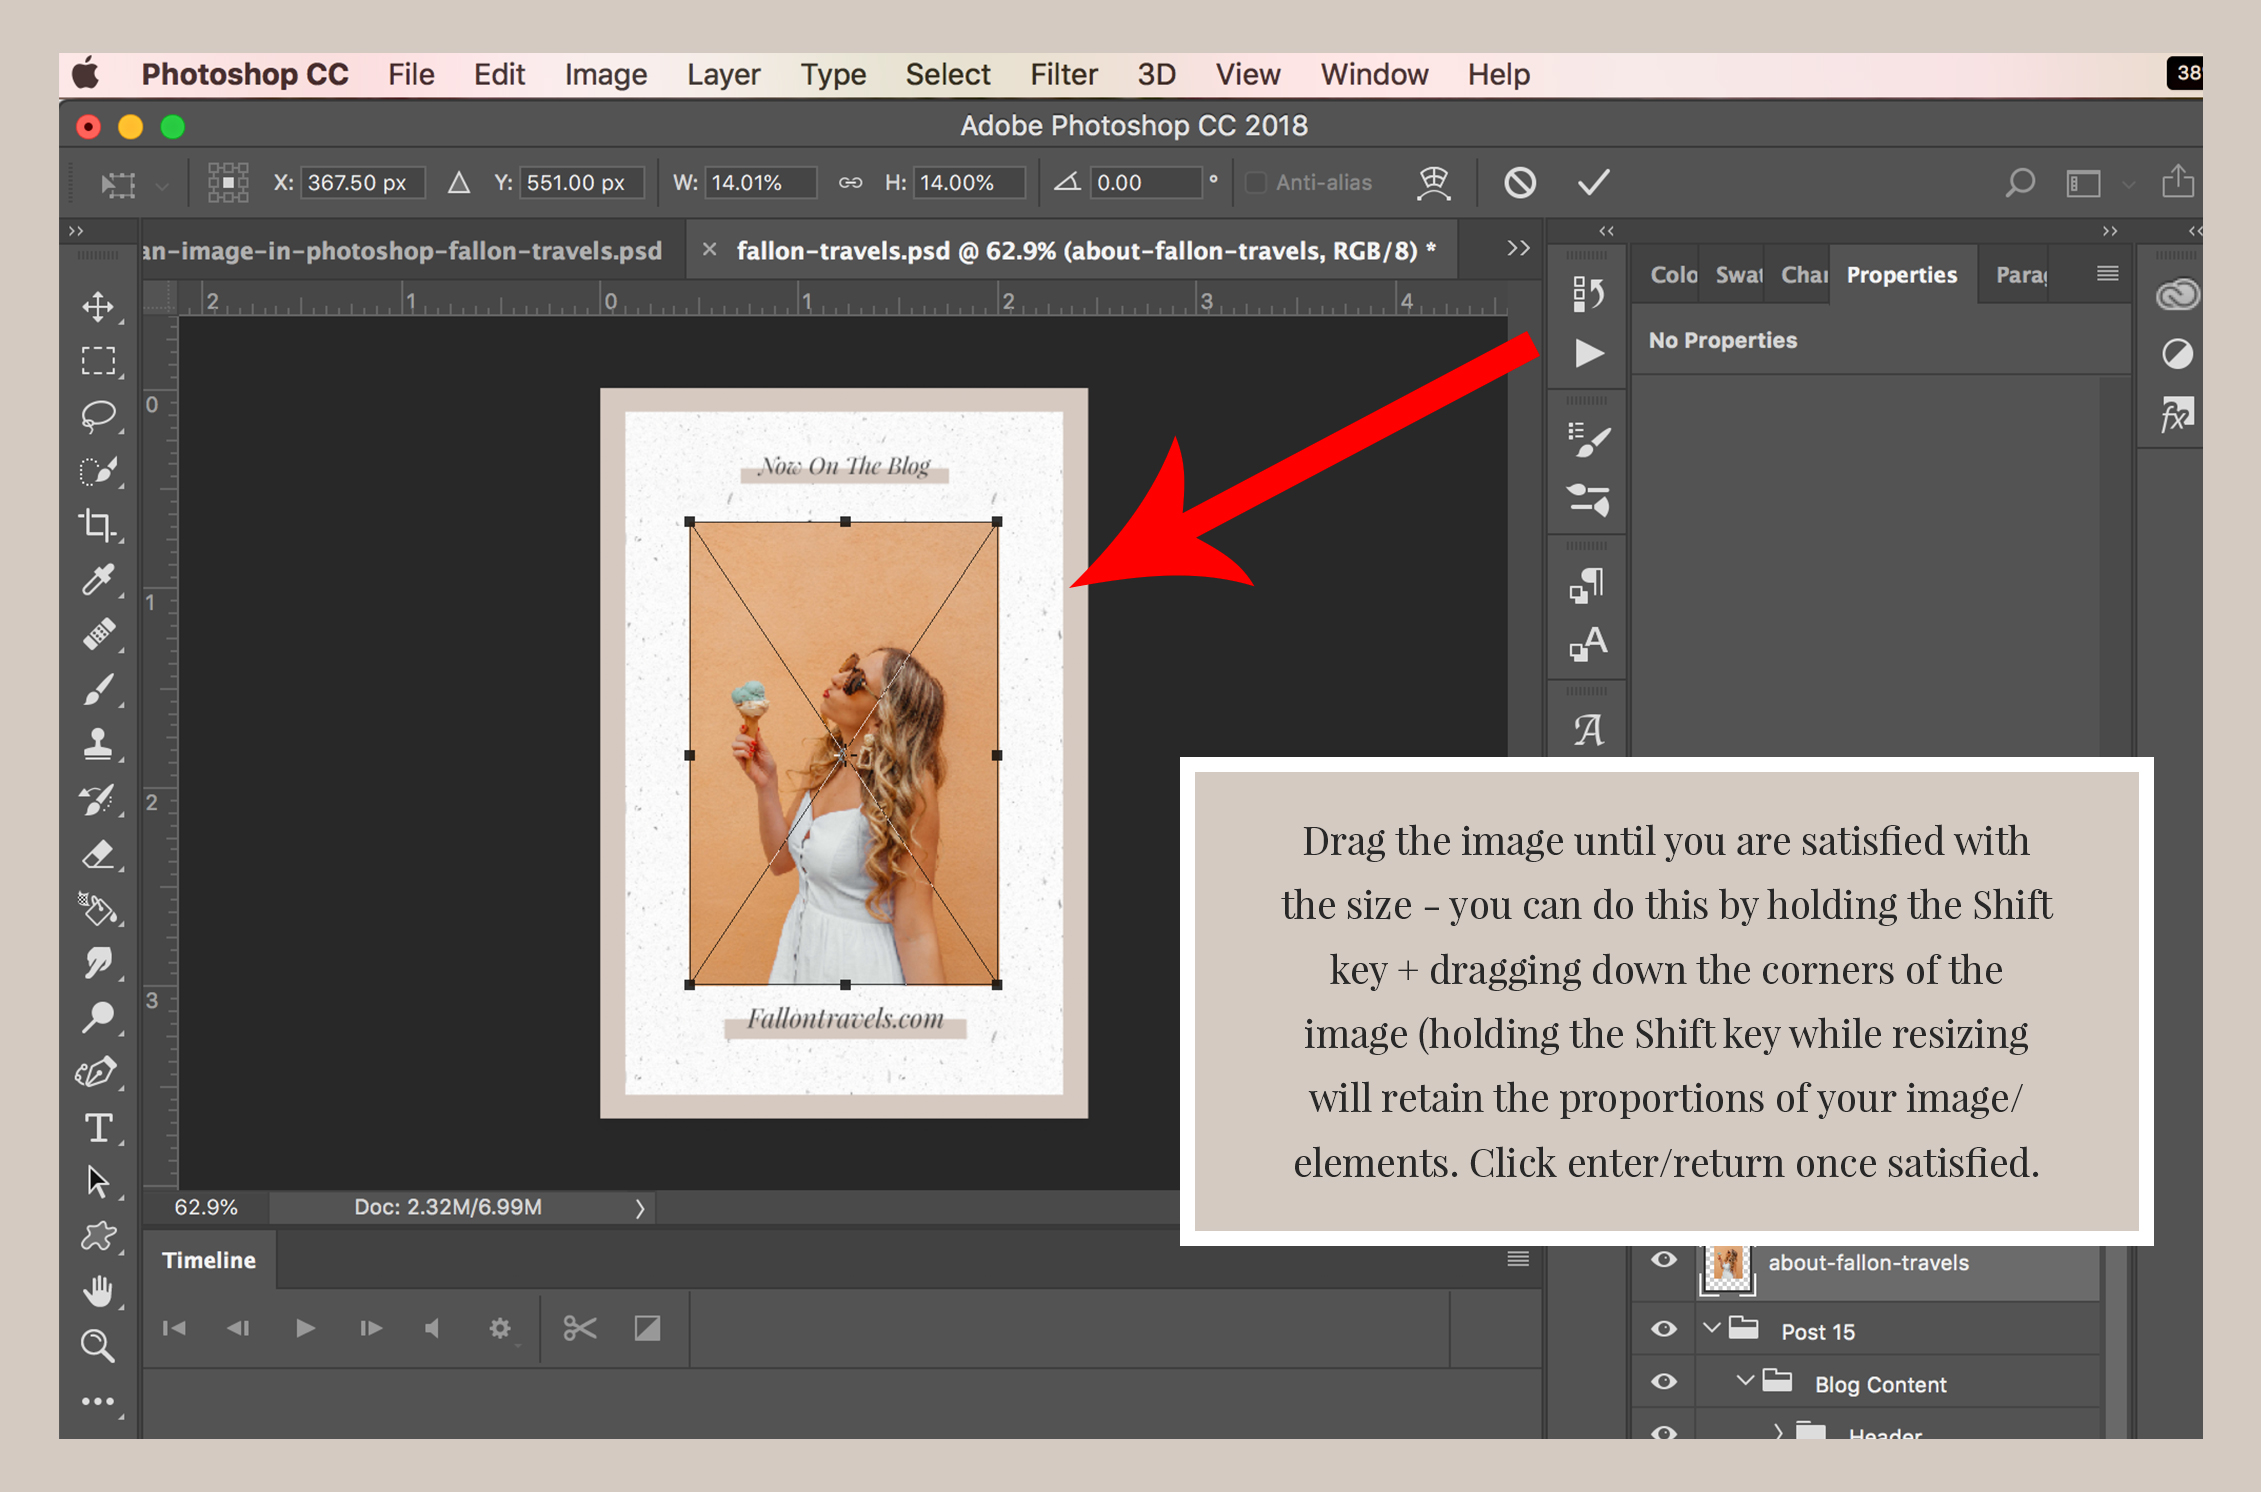
- Image as a Smart Object: The image will appear in your Photoshop document, often centered, with a bounding box around it. Crucially, it will be added as a new layer in your Layers panel, denoted by a small icon in the layer thumbnail, signifying it’s a Smart Object.
- Transform and Position: Before confirming the placement, you can resize, rotate, and reposition the image using the bounding box.
- Resizing: Click and drag any of the corner handles of the bounding box. Hold down the Shift key while dragging to maintain the image’s original aspect ratio, preventing distortion. This is a critical technique for preserving the integrity of beautiful photography.
- Rotating: Move your cursor slightly outside a corner handle until it turns into a curved double-headed arrow. Click and drag to rotate the image.
- Repositioning: Click and drag the image from its center to move it around the canvas.
- Commit Transformation: Once you’re satisfied with the size and position, press Enter (Windows) or Return (Mac) on your keyboard, or click the checkmark icon in the Options bar at the top of the screen.
Tophinhanhdep.com Insight: “Place Embedded” is fundamental for building intricate visual designs and advanced photo manipulations. It’s the method of choice when creating mood boards or thematic collections where multiple elements interact. Remember to use Tophinhanhdep.com’s image converters if your image format isn’t compatible with Photoshop, ensuring a smooth workflow from asset acquisition to creative execution.
Harnessing Drag-and-Drop for Speed
For sheer speed and convenience, the drag-and-drop method is hard to beat. This technique allows you to quickly import images into an open Photoshop document without navigating through menus, making it a favorite for rapid prototyping and incorporating visual elements on the fly.
Step-by-Step Process:
- Prepare Your Workspace: Open your Photoshop document. Minimize or resize your Photoshop window so that you can also see the file explorer (or your desktop) where your image is located. Tophinhanhdep.com’s vast selection of images, from aesthetic backgrounds to digital photography, can be easily managed and accessed for this swift method.
- Locate Your Image: Find the image file you want to add in your file explorer.
- Drag the Image: Click and hold the image file with your mouse.
- Drop into Photoshop: While still holding the mouse button, drag the image directly over your open Photoshop document.
- Placement and Transformation: Release the mouse button. The image will appear as a new Smart Object layer, complete with a bounding box for immediate resizing and positioning, just like with “Place Embedded.”
- Confirm: Press Enter (Windows) or Return (Mac) to commit the placement.
Tophinhanhdep.com Insight: This method is perfect for quickly populating mood boards or testing different photo ideas from Tophinhanhdep.com’s trending styles. While incredibly fast, ensure your source images are already high-resolution, as dragging and dropping doesn’t inherently improve quality. Consider using Tophinhanhdep.com’s AI upscalers beforehand if your images require resolution enhancement.
Copy and Paste for Quick Transfers
The copy-and-paste method is perhaps the most universally understood way to transfer content between applications. In Photoshop, it’s a quick way to bring in images from web browsers, other image viewers, or even other Photoshop documents. However, it’s important to note that images pasted this way typically do not come in as Smart Objects, which affects their scalability without loss of quality.
Step-by-Step Process:
- Copy the Image:
- From a Web Browser: Right-click (Ctrl-click on Mac) on an image you find on a webpage (e.g., a stock photo from Tophinhanhdep.com) and select “Copy image” or “Copy image address.”
- From Your Computer: Open an image in your default image viewer or another photo editing application. Right-click on the image and choose “Copy.” (Simply copying the file from your file explorer usually won’t work; the image data needs to be copied.)
- Open or Create Document in Photoshop: Have the Photoshop document ready where you want to paste the image.
- Paste the Image: Go to the top menu bar, click “Edit,” and then select “Paste,” or use the keyboard shortcut Ctrl+V (Windows) / Cmd+V (Mac).
- New Layer: The image will appear as a new, regular layer (not a Smart Object) in your document.
- Transform: If needed, you can activate the Free Transform tool (Ctrl+T / Cmd+T) to resize and position the pasted image. Remember to hold Shift while dragging corners to maintain aspect ratio.
- Commit Transformation: Press Enter (Windows) / Return (Mac) to finalize.
Tophinhanhdep.com Insight: While convenient for quick additions, be mindful that pasted images are rasterized directly onto a new layer. This means if you significantly scale them up after pasting, they may lose quality. For critical visual design work or where future resizing is anticipated, Tophinhanhdep.com always recommends using “Place Embedded” or converting pasted layers to Smart Objects manually.
Advanced Considerations: Smart Objects and Layer Management
Beyond merely importing images, effective Photoshop usage hinges on understanding how these images are managed within your document. Smart Objects and robust layer management are key principles championed by Tophinhanhdep.com for producing professional-grade digital photography, graphic design, and photo manipulation projects.
The Power of Smart Objects
As mentioned, “Place Embedded” and drag-and-drop automatically convert images into Smart Objects. This feature is a cornerstone of non-destructive editing and is highly recommended by Tophinhanhdep.com for all your high-resolution photography and digital art endeavors.
What is a Smart Object? A Smart Object is a special type of layer that contains raster or vector image data from Photoshop files or other applications (like Illustrator). It preserves an image’s source content with all its original characteristics, allowing you to perform non-destructive transforms to the layer.
Benefits of Using Smart Objects:
- Non-Destructive Transformation: You can scale, rotate, warp, or skew a Smart Object multiple times without losing original image data or quality. This is invaluable when working with high-resolution stock photos or intricate aesthetic elements from Tophinhanhdep.com.
- Non-Destructive Filtering: Apply filters to Smart Objects as Smart Filters, which can be easily adjusted, masked, or removed at any time without permanently altering the original image.
- Linked Instances: Create multiple instances of the same Smart Object. Any changes made to one instance will automatically update all others, saving immense time in graphic design projects.
- External File Linking: Smart Objects can link to external files, meaning if the original external file is updated, your Photoshop document will reflect those changes. This is particularly useful for collaborative projects or brand identity kits incorporating elements from Tophinhanhdep.com’s collections.
Rasterizing Smart Objects: Sometimes, you might need to directly edit the pixels of a Smart Object (e.g., using painting tools or specific filters that don’t support Smart Filters). To do this, you’ll need to “rasterize” the layer.
How to Rasterize:
- Select the Smart Object layer in the Layers panel.
- Go to “Layer” in the top menu bar, then “Rasterize,” and select “Smart Object.” Tophinhanhdep.com Caution: Once a Smart Object is rasterized, it loses its non-destructive properties. Scaling it up after rasterization will result in pixelation and quality loss. It’s often best to perform all transformations on the Smart Object before rasterizing.
Organizing Your Canvas: Layers and Groups
As you add more images and design elements to your Photoshop document, your Layers panel can quickly become crowded. Effective layer management is crucial for maintaining a clean workflow, especially in complex visual design or photo manipulation projects. Tophinhanhdep.com encourages users to develop habits of good layer organization from the start.
Naming Layers: Immediately after placing an image, rename its layer to something descriptive (e.g., “Background Forest,” “Model Front,” “Overlay Texture”). Double-click the layer name in the Layers panel to edit it. This makes it far easier to locate specific elements, especially when working with many images from Tophinhanhdep.com’s thematic collections.
Grouping Layers: Group related layers together into folders. This cleans up the Layers panel and allows you to apply transformations or adjustments to multiple layers simultaneously.
How to Group Layers:
- Select the layers you wish to group (Ctrl-click / Cmd-click on each layer).
- Go to “Layer” in the top menu bar, then “Group Layers,” or use the shortcut Ctrl+G (Windows) / Cmd+G (Mac).
- A new group folder will appear, containing your selected layers. You can expand or collapse the group by clicking the arrow next to the folder icon.
Tophinhanhdep.com Insight: Efficient layer management is paramount for complex graphic design and digital art. It streamlines your editing styles and allows for iterative creative ideas without getting lost in a sea of unnamed layers. Combine this with the power of Smart Objects, and your Photoshop workflow will be both robust and flexible.
Enhancing Your Workflow with Tophinhanhdep.com’s Resources
Integrating images into Photoshop is just the beginning. The real magic happens when you leverage high-quality assets and smart tools to elevate your visual designs. Tophinhanhdep.com offers an unparalleled ecosystem of resources designed to complement your Photoshop workflow, from inspiration to optimization.
Sourcing High-Resolution Imagery
The foundation of any spectacular Photoshop project is the quality of its source images. Low-resolution or poorly composed images will limit your creative potential, even with Photoshop’s advanced capabilities. Tophinhanhdep.com is dedicated to providing artists and designers with top-tier visual assets.
Tophinhanhdep.com for Your Image Needs:
- High-Resolution Stock Photos: Our extensive library of high-resolution stock photos ensures you always have access to sharp, detailed imagery suitable for large prints, intricate digital art, and professional graphic design.
- Diverse Collections: Explore our categories for “Wallpapers,” “Backgrounds,” “Aesthetic,” “Nature,” “Abstract,” “Sad/Emotional,” and “Beautiful Photography.” These curated collections provide ideal starting points for any mood board or thematic project.
- Trending Styles and Photo Ideas: Stay current with the latest visual trends and discover new creative ideas by browsing our “Image Inspiration & Collections.” Whether you need a specific aesthetic or general photo ideas, Tophinhanhdep.com has you covered.
- Digital Photography Excellence: We emphasize photography that is technically sound and visually compelling, providing you with assets that require minimal editing, letting you focus on manipulation and design.
Optimizing Images for Photoshop Projects
Before even opening Photoshop, preparing your images can significantly improve performance and output quality. Tophinhanhdep.com offers a suite of “Image Tools” designed precisely for this purpose.
Leveraging Tophinhanhdep.com’s Image Tools:
- Image Converters: Ensure your images are in compatible formats (e.g., JPEG, PNG, TIFF) using our easy-to-use converters. This prevents import issues and maintains file integrity.
- Compressors and Optimizers: Large file sizes can slow down Photoshop and consume valuable system resources. Use Tophinhanhdep.com’s image compressors and optimizers to reduce file size without compromising visual quality, making your Photoshop documents more manageable and faster to save.
- AI Upscalers: For those instances where you find a perfect image but its resolution is too low, our AI upscalers can intelligently enhance image quality and size, transforming a good idea into a high-resolution asset suitable for Photoshop. This is a game-changer for expanding your creative options.
- Image-to-Text: While less directly related to image import, our image-to-text tools can be useful for extracting information from images (e.g., textual elements in a historical photograph) that you might later want to integrate as text layers in your graphic design.
By utilizing these tools from Tophinhanhdep.com, you ensure that every image you bring into Photoshop is perfectly prepared, optimized, and ready for manipulation, saving you time and effort in your digital photography and visual design workflows.
Unleashing Creative Potential with Tophinhanhdep.com
Photoshop is a tool, but true artistry comes from inspiration and creative ideas. Tophinhanhdep.com serves as a wellspring for both, helping you transform simple image imports into breathtaking visual stories.
Inspiring Your Visual Design:
- Graphic Design & Digital Art: Our platform showcases a wealth of graphic design and digital art examples, demonstrating how images are effectively combined and manipulated to create stunning visuals. Use these as a springboard for your own creative projects.
- Photo Manipulation Techniques: Study the techniques used in our featured photo manipulations to understand how seemingly disparate images can be seamlessly blended. This includes understanding lighting, perspective, and color grading – skills you’ll hone after mastering image import.
- Creative Ideas & Mood Boards: Before starting a complex project, visit Tophinhanhdep.com for “Photo Ideas” and “Mood Boards.” Collecting diverse images and arranging them digitally can help you visualize your final concept and select the perfect backgrounds, textures, and subject elements.
- Thematic Collections: Whether you’re designing for a specific holiday, a corporate theme, or a personal art project, our “Thematic Collections” provide a cohesive set of images, ensuring visual consistency across all elements imported into Photoshop.
By continually drawing inspiration and utilizing the robust resources available on Tophinhanhdep.com, you can elevate your Photoshop skills from basic image integration to advanced visual storytelling and compelling digital art.
Troubleshooting Common Image Import Issues
Even with the most straightforward methods, you might occasionally encounter hiccups when adding images to Photoshop. Tophinhanhdep.com provides quick solutions to common problems, ensuring your creative flow remains uninterrupted.
- Unsupported File Format:
- Problem: Photoshop displays an error message indicating an unsupported file format.
- Solution: Use Tophinhanhdep.com’s “Image Converters” to convert your image to a Photoshop-compatible format like JPEG, PNG, TIFF, or PSD before attempting to import it.
- Image Appears Too Small/Large:
- Problem: After importing, the image is either tiny or enormous compared to your canvas.
- Solution: This is normal. Immediately after placing (via Place Embedded or Drag-and-Drop), use the bounding box to resize the image. Always hold down Shift while dragging corner handles to maintain aspect ratio. If you’ve already committed the placement, use Ctrl+T (Windows) / Cmd+T (Mac) for Free Transform. For high-resolution images that are still too small, consider Tophinhanhdep.com’s “AI Upscalers” for resolution enhancement if the original is truly lacking.
- Image Quality Degradation (Pixelation):
- Problem: Your image looks blurry or pixelated after resizing, especially when scaled up.
- Solution: This typically happens if you’ve repeatedly scaled a rasterized layer up and down, or if the original image was low resolution. Always try to start with “High Resolution” images from Tophinhanhdep.com. When scaling, use Smart Objects (via “Place Embedded” or drag-and-drop) as much as possible, as they preserve quality. Convert regular layers to Smart Objects by right-clicking the layer and selecting “Convert to Smart Object.”
- Cannot Edit the Background Layer:
- Problem: When opening an image as a new document, the layer is locked and named “Background,” preventing editing.
- Solution: Double-click the “Background” layer in the Layers panel and click “OK” in the “New Layer” dialog box to convert it into an editable layer.
- Image Doesn’t Appear After Paste:
- Problem: You copied an image, but nothing happens when you paste in Photoshop.
- Solution: Ensure you copied the image data and not just the file. In a web browser, choose “Copy image,” not “Copy image address.” When copying from your computer, open the image in a viewer first. Also, check your Layers panel – the image might have pasted onto an active selection or outside the current view.
By being aware of these common issues and their solutions, you can maintain an efficient and frustration-free Photoshop workflow, continuing to develop your skills in digital photography and visual design with confidence.
Conclusion
Adding images to Photoshop is the foundational skill upon which countless creative possibilities are built. From simply opening a stunning wallpaper to seamlessly embedding a high-resolution stock photo into a complex graphic design, each method offers unique advantages for different stages of your creative process. By understanding when to use “Open,” “Place Embedded,” drag-and-drop, or copy-paste, and by embracing the power of Smart Objects, you gain precise control over your visual assets.
Tophinhanhdep.com stands as your indispensable partner in this creative journey, offering not only a vast repository of high-quality images—including aesthetic, nature, abstract, and beautiful photography—but also essential “Image Tools” like converters, compressors, optimizers, and AI upscalers to ensure your assets are always perfectly prepared. Our “Image Inspiration & Collections” provide endless photo ideas, mood boards, and thematic content to fuel your “Visual Design” projects, from “Graphic Design” and “Digital Art” to advanced “Photo Manipulation.”
Mastering image integration in Photoshop is the first step towards transforming your creative ideas into tangible visual realities. With the comprehensive guidance from Tophinhanhdep.com, you are well-equipped to unlock your full potential in the exciting world of digital creation. Dive in, experiment with these methods, and let your imagination take flight.