Mastering Photoshop: How to Add Multiple Image Files with Ease

In the dynamic world of digital art and photography, Adobe Photoshop stands as an indispensable tool for creators. Whether you’re a seasoned graphic designer, an aspiring digital artist, or simply someone looking to create a beautiful collage of personal memories, the ability to efficiently manage and import multiple image files is a fundamental skill. At Tophinhanhdep.com, we understand the importance of a streamlined workflow when dealing with everything from stunning high-resolution photography to aesthetic wallpapers and abstract backgrounds. Opening a multitude of images as individual documents can quickly become a frustrating, time-consuming task, hindering your creative flow and consuming precious system resources.
Imagine you’re building a complex photo manipulation project, blending elements from a collection of nature photography, or assembling a mood board with trending visual styles. The traditional method of opening each image separately and then dragging it into your main document is simply not sustainable. This article will unveil the most efficient methods for adding multiple image files into Photoshop, transforming a potentially tedious chore into a seamless part of your creative process. We’ll explore techniques that not only save time but also lay the groundwork for sophisticated visual design, empowering you to bring your creative ideas to life with unparalleled ease and precision.
Streamlining Your Workflow: Importing Multiple Images as Layers
The cornerstone of efficient image handling in Photoshop lies in understanding how to import multiple files directly as layers within a single document. This approach is invaluable for a wide array of projects, from creating intricate composites to designing multi-element layouts, ensuring that each image is immediately ready for editing and manipulation on its own dedicated layer. This section will guide you through the primary methods, making your Photoshop experience far more productive.
The “Load Files into Stack” Method (For Multiple Images)
When your project demands bringing in several images simultaneously, the “Load Files into Stack” command is your most powerful ally. This function not only loads your chosen images but also conveniently creates a new Photoshop document with each image residing on its own layer, perfectly stacked and ready for your artistic touch. This is especially useful for assembling collections of images for a portfolio, creating thematic collections from Tophinhanhdep.com’s extensive library, or compiling elements for a digital art piece.
Here’s a step-by-step guide to mastering this essential feature:
-
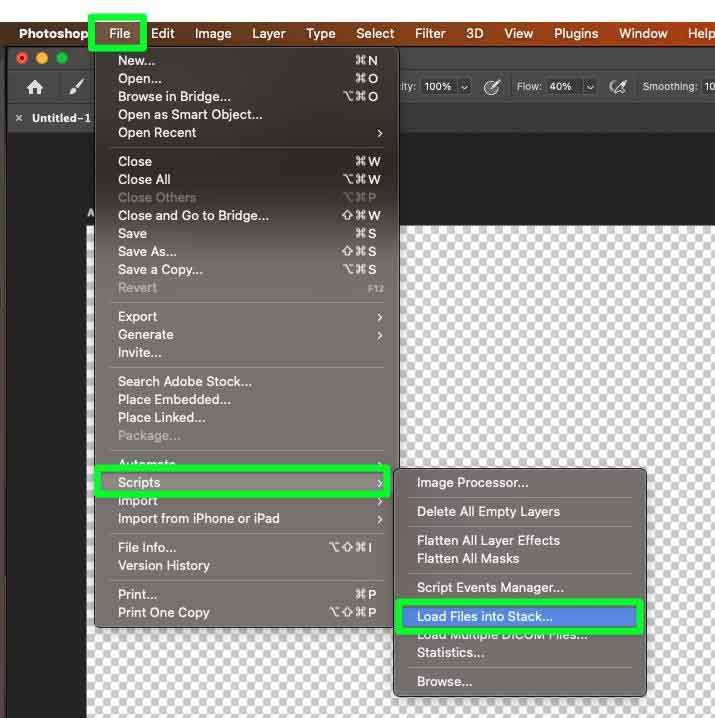
Initiate the Command: Open Adobe Photoshop. Navigate to the top menu bar, click on File, hover over Scripts, and then select Load Files into Stack… This action will open a dedicated dialog box.
-
Select Your Image Sources: In the “Load Layers” dialog box, you’ll see a “Use” dropdown menu. You have two primary options here:
- Files: Choose this option if you want to hand-pick specific individual images from various locations within a folder or even across different folders. This offers granular control over which assets are included.
- Folder: Opt for this if you intend to import every image file contained within a particular directory. This is incredibly efficient when you’ve pre-organized all your desired images into a single folder, perhaps a collection of abstract backgrounds or high-resolution stock photos from Tophinhanhdep.com.
-
Browse and Choose: After selecting either “Files” or “Folder,” click the Browse… button. This will open your system’s file explorer (Finder on Mac, File Explorer on Windows). Navigate to the location of your images.
- If you chose “Files,” select multiple images by holding down the Ctrl (Windows) or Command (Mac) key while clicking on each desired image. Alternatively, you can click on the first image, then hold Shift and click on the last image to select a continuous range.
- If you chose “Folder,” simply select the folder itself.
- Pro Tip: Rename your image files descriptively before importing (e.g., “portrait_main.jpg”, “sunset_overlay.jpg”, “texture_detail.jpg”). Photoshop will automatically use these file names as your layer names, making organization in the Layers panel much easier, especially when working with vast image collections from Tophinhanhdep.com.
-
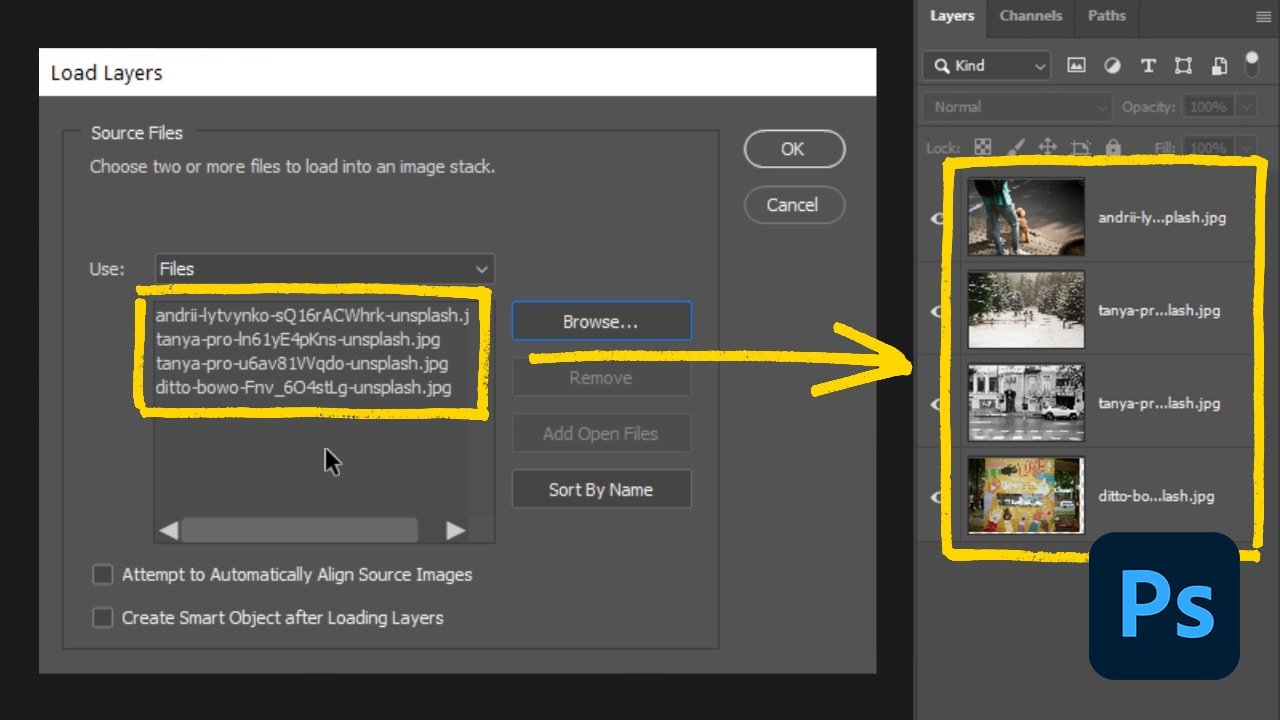
Confirm Your Selection: Once you’ve made your selections, click Open (or Select Folder if you chose the “Folder” option). The chosen file names will appear in a list within the “Load Layers” dialog box. If you accidentally included an image, simply select its name in the list and click the Remove button.
-
Finalize Import Settings: At the bottom of the “Load Layers” dialog box, you’ll see two checkboxes: “Attempt to Automatically Align Source Images” and “Create Smart Object after Loading Layers.” For most initial import scenarios, it’s best to leave both of these unchecked. We’ll discuss Smart Objects and alignment options later, but for a straightforward import, unchecking them provides maximum flexibility.
-
Execute the Import: Click OK. Photoshop will now create a new document and systematically import each selected image, placing it on its own distinct layer. You’ll observe the Layers panel populating with layers named after your original files, giving you immediate control over each visual element.
This method is a game-changer for anyone dealing with bulk image imports, laying a solid foundation for complex visual design projects, from digital photography composites to rich photo manipulation.
Incorporating Single Images: The “Place Embedded” Command
While “Load Files into Stack” is ideal for starting a new project with multiple images, you’ll often find yourself needing to add an additional image to an already open Photoshop document. For this purpose, the “Place Embedded” command is the go-to solution. This method seamlessly integrates new visual elements into your existing creative work, whether it’s a beautiful landscape image or a unique abstract design from Tophinhanhdep.com.
Let’s walk through how to use “Place Embedded”:
-
Select Your Destination Document: Ensure the Photoshop document you wish to add the image to is open and active.
-
Access the Command: Go to File in the top menu bar, and then choose Place Embedded… (Note: There’s also “Place Linked…”, which links to the original file on your computer. “Place Embedded” embeds a copy directly into your Photoshop document, making it self-contained.)
-
Choose Your Image: A file explorer window will open. Navigate to the image you want to import and click Place.
-
Free Transform Initial Placement: Upon selection, Photoshop will automatically activate the Free Transform tool around your newly placed image. This allows you to immediately resize, rotate, or reposition the image within your canvas.
- Accept Transformation: If the image appears as desired, or if you simply want to accept the default placement, click the checkmark icon in the Options Bar at the top, or press Enter (Windows) / Return (Mac) on your keyboard.
-
Understanding Smart Objects: A key characteristic of the “Place Embedded” command is that it typically imports the image as a Smart Object. You’ll notice a small icon in the lower-right corner of the layer thumbnail in the Layers panel, signifying a Smart Object.
- Advantages of Smart Objects: Smart Objects are incredibly powerful. They preserve the original image data, allowing you to scale, rotate, and transform the image multiple times without any loss of quality. This is crucial for maintaining the high resolution of images, which Tophinhanhdep.com frequently provides.
- Limitations of Smart Objects: The trade-off is that Smart Objects are not directly editable in the same way a standard pixel layer is. For example, you cannot paint directly on them, or apply destructive filters. If you try, Photoshop will prompt you with a warning.
-
Converting to a Normal Layer (Rasterizing): If your workflow requires direct pixel-level editing, you’ll need to “rasterize” the Smart Object:
- Right-click (Windows) / Control-click (Mac) on the Smart Object layer thumbnail in the Layers panel.
- From the context menu, select Rasterize Layer. The Smart Object icon will disappear, and the layer will become a standard pixel layer, fully editable. Remember that once rasterized, scaling the image up may result in quality loss, so it’s generally best to perform transformations while it’s still a Smart Object if possible.
By combining “Load Files into Stack” for batch imports and “Place Embedded” for individual additions, you gain complete control over how images enter your Photoshop projects, paving the way for intricate photo manipulation and digital photography composites.
Optimizing Photoshop Preferences for Faster Imports
Beyond the direct import commands, Photoshop offers several preference settings that can significantly enhance your workflow, especially when dealing with frequent image imports. These adjustments are particularly beneficial for visual designers and photographers who rely on efficient tools to manage their projects, from simple image collections to complex graphic design.
Customizing Placement Behavior
Photoshop’s preferences allow you to fine-tune how images behave immediately after they are placed into a document, cutting down on repetitive steps and streamlining your creative process.
-
Accessing Preferences:
- Windows: Go to Edit > Preferences > General.
- Mac: Go to Photoshop > Settings > General.
-
“Skip Transform when Placing”: This is a key setting for speeding up your workflow.
- Option: Located in the “General” preferences panel.
- Function: When enabled, this option will prevent Photoshop from automatically opening the Free Transform command every time you place an image using “Place Embedded” or drag-and-drop. This means the image will be placed directly into your document without an immediate need to hit “Enter” or click the checkmark.
- Benefit: Ideal for designers who prefer to place multiple images quickly and then handle transformations in a separate, dedicated step or who know their images are already correctly sized. This setting significantly accelerates the import of stock photos and other digital photography assets.
-
“Always Create Smart Objects when Placing”: This preference dictates whether placed images are automatically converted into Smart Objects.
- Option: Also found in the “General” preferences.
- Function: If checked (which is often the default), images placed via “Place Embedded” or drag-and-drop will become Smart Objects. If unchecked, they will be imported as standard pixel layers.
- Benefit: Keeping this checked is generally recommended for non-destructive editing, as it preserves image quality during transformations. However, if your workflow frequently requires immediate pixel-level adjustments without intermediate rasterization, you might consider unchecking it. For high-resolution images found on Tophinhanhdep.com, Smart Objects are excellent for maintaining crispness.
-
“Resize Image During Place”: This preference helps Photoshop manage image dimensions relative to your canvas size.
- Option: You’ll find this in the “General” preferences.
- Function: By default, if you place an image larger than your current canvas, Photoshop will automatically scale it down to fit. Unchecking this option means images will be placed at their original pixel dimensions, even if they extend beyond the canvas boundaries.
- Benefit: This gives you more control over the initial scale. For example, if you’re working with very high-resolution images and want to maintain their full detail for later cropping or scaling, unchecking this might be preferred. Conversely, for quick prototyping or collage creation, having it checked saves an initial resizing step.
After adjusting these preferences to suit your personal editing styles and workflow, click OK to close the Preferences dialog box. These small changes can cumulatively save a considerable amount of time, especially when you’re deeply engrossed in visual design or photo manipulation projects.
Leveraging Drag-and-Drop for Quick Integration
With your Photoshop preferences optimally configured, the simple act of dragging and dropping files from your computer directly into an open Photoshop document becomes incredibly powerful and efficient. This method is a favorite for many artists seeking quick ways to incorporate images.
-
Prepare Your Files: Open your computer’s file explorer (Finder or File Explorer) and locate the image files you wish to import. These could be aesthetic images, nature backgrounds, or any digital photography assets from Tophinhanhdep.com.
-
Drag and Drop:
- For a single image: Click and drag one image file from your file explorer directly into your open Photoshop document window.
- For multiple images: Select several image files in your file explorer (using Ctrl/Command + click or Shift + click), then drag the entire selection into your Photoshop document.
-
Instant Integration:
- If “Skip Transform when Placing” is enabled, the images will appear instantly as new layers (either Smart Objects or pixel layers, depending on your “Always Create Smart Objects when Placing” setting), ready for immediate manipulation without the Free Transform bounding box appearing first.
- If “Skip Transform when Placing” is disabled, the Free Transform bounding box will appear around each image sequentially, allowing you to adjust each one before confirming its placement. While this adds a step for each image, it offers immediate visual feedback.
The drag-and-drop method, especially when paired with optimized preferences, is a phenomenal time-saver for busy professionals and hobbyists alike. It seamlessly integrates into your workflow, making it effortless to build intricate visual designs or quickly assemble photo ideas for a mood board. When you’re dealing with numerous elements for a large-scale project, such as assembling a wallpaper collection or creating a complex digital art piece, these efficiency gains are invaluable.
Creative Applications and Advanced Techniques with Layered Images
Once you’ve mastered the art of importing multiple images as layers, Photoshop opens up a universe of creative possibilities. This foundational skill is the gateway to sophisticated visual design, enabling you to blend, transform, and manipulate images in ways that go far beyond simple adjustments. Tophinhanhdep.com’s rich collections of images—from emotional photography to abstract art—provide the perfect raw material for these advanced techniques.
Crafting Stunning Composites and Collages
Layered images are the building blocks of composites and collages, allowing you to merge disparate elements into a cohesive and imaginative scene. This is where your photo manipulation skills truly shine, transforming individual images into captivating narratives or striking aesthetic visuals.
-
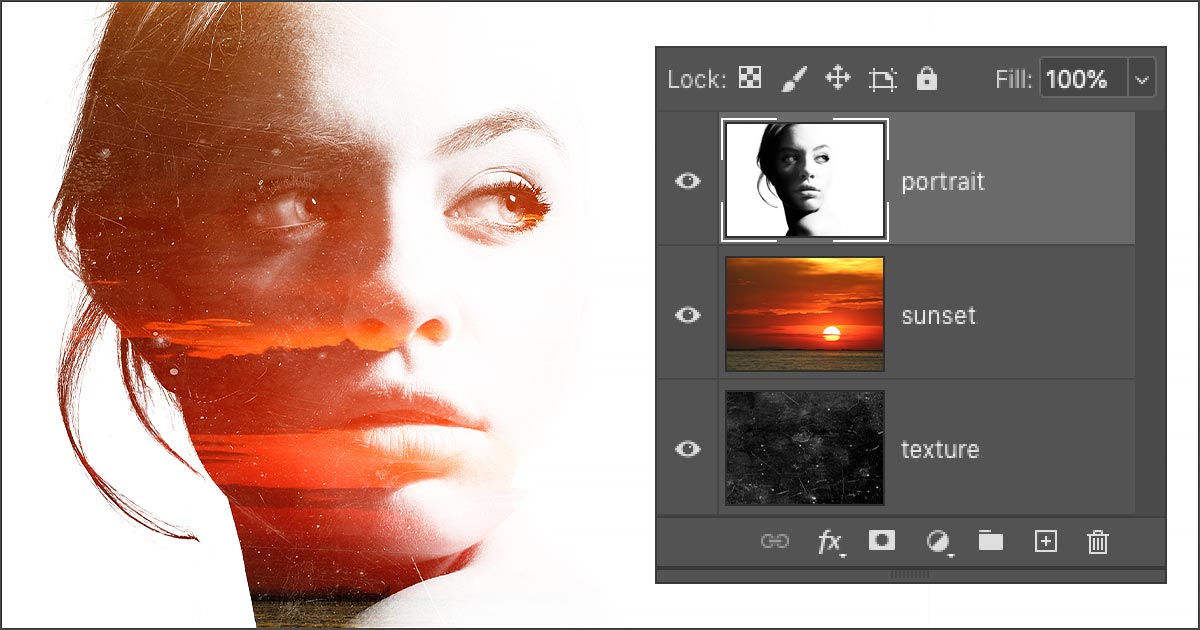
Setting the Scene: Start by importing all your desired images into a single Photoshop document using the “Load Files into Stack” method. For instance, you might combine a portrait, a dramatic sunset, and a subtle texture image to create a unique effect. Ensure your layers are named clearly for easy identification (e.g., “Main Portrait,” “Sky Background,” “Grunge Texture”).
-
Arranging Layers: The order of layers in the Layers panel is crucial. Layers at the top of the stack appear in front of those below them. Drag and drop layers in the panel to arrange them in a logical or aesthetically pleasing sequence. For a double exposure, you might place the portrait at the bottom, the sunset above it, and a texture layer on top.
-
Exploring Blend Modes: Blend modes dramatically change how layers interact with each other. Select a layer (e.g., your sunset layer) and experiment with the Blend Mode dropdown menu in the Layers panel.
- Screen: Often used for double exposures, “Screen” blend mode brightens the image, making darker areas transparent and allowing lighter areas of the layer below to show through. This is perfect for blending a bright sky with a darker subject.
- Multiply: Darkens the image, making lighter areas transparent. Great for adding shadows or overlays that enrich darker tones.
- Overlay / Soft Light: These modes increase contrast and saturation, blending the luminance of the top layer with the color of the layer below. Excellent for creating atmospheric effects or enhancing emotional photography.
- Opacity: Alongside blend modes, adjusting a layer’s Opacity (also in the Layers panel) allows for subtle blending. Lowering the opacity makes a layer semi-transparent, revealing more of the layers beneath it.
-
Utilizing Layer Masks for Seamless Blending: Layer masks are non-destructive tools that allow you to selectively hide or reveal parts of a layer, making integration seamless without permanently altering the original image data.
- Select the layer you want to mask.
- Click the Add Layer Mask icon (a rectangle with a circle inside) at the bottom of the Layers panel. A white thumbnail will appear next to your layer thumbnail.
- With the mask thumbnail selected, use a black brush to paint over areas you want to hide, and a white brush to reveal them. This technique is invaluable for precise photo manipulation, ensuring that elements from different images blend naturally, creating a unified composition.
By combining these techniques, you can transform a collection of beautiful photography assets into a singular, breathtaking piece of digital art, perfect for sharing as a unique wallpaper or a striking graphic design element.
Enhancing Depth and Visual Storytelling
Beyond composites, layered images provide the means to create a profound sense of depth and narrative within your visuals. This is particularly relevant for nature and abstract photography, where conveying spatial relationships and atmospheric qualities can elevate an image from good to extraordinary.
-
Building Multi-Dimensional Scenes: Utilize foreground, middle ground, and background elements on separate layers to create a sense of three-dimensionality. For example, a landscape image from Tophinhanhdep.com can be enhanced by placing foreground elements (like flowers or rocks) on a layer above the main landscape, and then adding distant elements (like atmospheric haze or far-off mountains) on layers further down the stack, but above the absolute background.
-
Atmospheric Effects with Adjustment Layers: Adjustment layers offer non-destructive ways to modify the color and tonal values of layers beneath them, contributing to depth and mood.
- Add a Hue/Saturation adjustment layer to desaturate distant elements, mimicking atmospheric perspective.
- Use a Curves or Levels adjustment layer to lighten or darken specific areas, guiding the viewer’s eye and emphasizing focal points.
- Experiment with Color Balance or Photo Filter adjustment layers to introduce subtle color shifts that enhance the emotional tone, whether it’s a sad/emotional theme or a vibrant, joyful scene.
-
Organizing with Layer Groups: As your projects become more complex with dozens of layers, effective organization is paramount. Grouping related layers keeps your Layers panel tidy and manageable.
- Select multiple layers (hold Ctrl/Command and click).
- Press Ctrl+G (Windows) / Command+G (Mac) or click the Folder icon at the bottom of the Layers panel to create a new group.
- Name your groups logically (e.g., “Foreground Elements,” “Background Sky,” “Adjustments”). This structured approach is vital for intricate graphic design projects and large photo manipulation tasks, making it easier to revisit and refine your creative ideas.
These advanced techniques empower you to move beyond simple image editing to become a true visual storyteller. By thoughtfully layering and manipulating your images, you can craft captivating scenes that evoke emotion, communicate complex ideas, and push the boundaries of digital art, all built upon the efficient foundation of importing multiple files as layers.
Troubleshooting Common Import Issues and Best Practices
Even with the most streamlined methods, you might occasionally encounter hiccups when importing images into Photoshop. Understanding how to troubleshoot these common issues, along with adopting some best practices, will ensure a smoother workflow for all your visual design projects, from high-resolution digital photography to extensive image collections sourced from Tophinhanhdep.com.
Addressing File Compatibility and Performance
Import errors and performance slowdowns can disrupt your creative momentum. Here’s how to tackle them:
-
File Format Mismatch or Corruption:
- Symptom: Images fail to import, appear corrupted, or Photoshop displays an error message about an unsupported file format.
- Cause: You might be trying to import an uncommon file type, or the file itself is damaged. While Photoshop supports a vast array of formats (JPEG, PNG, TIFF, RAW, PSD, etc.), some specialized formats might not be directly compatible.
- Solution:
- Check File Extension: Ensure the file extension is correct and recognized by Photoshop.
- Convert Formats: If necessary, convert the images to a widely accepted format like JPEG or TIFF using an external tool or a dedicated image converter from Tophinhanhdep.com’s Image Tools section. Tophinhanhdep.com also offers compressors and optimizers that can help prepare your images for efficient import.
- Test Individual Files: If importing a batch, try importing a single image at a time to identify any problematic files. A parsing error in one image can sometimes halt the entire “Load Files into Stack” process.
- Source Integrity: Always ensure your source images are complete and not corrupted before attempting import.
-
Performance Overload:
- Symptom: Photoshop becomes slow, unresponsive, or crashes during or after importing a large number of images.
- Cause: Importing too many high-resolution images, especially into a single document, can strain your computer’s RAM and processor.
- Solution:
- Reduce Batch Size: If you’re importing hundreds of images, try breaking them into smaller batches. Import 50 at a time, save your work, and then import the next 50.
- Check System Resources: Monitor your computer’s RAM usage and CPU activity. Ensure you have enough free memory. Close other demanding applications if Photoshop is struggling.
- Optimize Images Pre-Import: For web-based projects or digital art that doesn’t require extreme print resolution, consider using Tophinhanhdep.com’s image compressors or optimizers before importing. Reducing file size can make a significant difference without compromising visual quality for specific uses.
-
Outdated Software:
- Symptom: General instability, new features not working, or compatibility issues with newer file types.
- Cause: An outdated version of Photoshop or your operating system can lead to unexpected errors.
- Solution: Always keep your Adobe Photoshop and your operating system updated to the latest versions. Updates often include bug fixes, performance enhancements, and support for new file formats and hardware.
Organizing Your Image Assets for Seamless Integration
Good organization starts even before you open Photoshop. Thoughtful management of your image assets is a best practice that pays dividends in efficiency and reduces frustration. This is particularly crucial when curating visual assets for mood boards, thematic collections, or large-scale digital photography projects.
-
Structured Folder Hierarchy:
- Practice: Create a logical folder structure on your hard drive for your projects. Instead of dumping all images into one folder, categorize them (e.g., “Project X > Backgrounds,” “Project X > Characters,” “Project X > Textures”).
- Benefit: Makes it easier to navigate when using the “Browse” function in Photoshop, especially with the “Load Files into Stack” method where you can select an entire folder. This is invaluable when dealing with vast collections of aesthetic, nature, or abstract images.
-
Descriptive File Naming:
- Practice: Adopt a consistent and descriptive naming convention for your image files (e.g.,
landscape_mountain_fog.jpg,portrait_female_studio_v2.psd). - Benefit: As Photoshop uses file names for layer names, this makes your Layers panel immediately understandable, reducing the need to constantly preview layers to identify content. This is a game-changer for photo manipulation and complex visual design.
- Practice: Adopt a consistent and descriptive naming convention for your image files (e.g.,
-
Leveraging Smart Objects (and Rasterizing When Necessary):
- Practice: Understand when to embrace Smart Objects and when to convert them to pixel layers. For non-destructive transformations and scaling, keep them as Smart Objects. Only rasterize when direct pixel editing is absolutely essential.
- Benefit: Preserves image quality, especially important for high-resolution images and stock photos from Tophinhanhdep.com.
-
Regular Saving and Version Control:
- Practice: Save your Photoshop document frequently (Ctrl/Command + S). Consider using “Save As” periodically to create iterative versions of your work (
project_v1.psd,project_v2.psd). - Benefit: Prevents loss of work due to crashes and allows you to revert to earlier stages of your visual design project if needed.
- Practice: Save your Photoshop document frequently (Ctrl/Command + S). Consider using “Save As” periodically to create iterative versions of your work (
By integrating these troubleshooting tips and best practices into your routine, you can ensure that your image import process into Photoshop remains smooth, efficient, and free from common frustrations. This allows you to focus more on the creative aspects of your work, whether you’re generating stunning wallpapers, crafting intricate photo manipulations, or simply exploring creative ideas.
Conclusion
The ability to efficiently add multiple image files into Adobe Photoshop is more than just a technical skill; it’s a fundamental aspect of effective digital photography, visual design, and creative art. As we’ve explored, tools like “Load Files into Stack” revolutionize batch importing, turning what could be a tedious chore into a seamless beginning for any project. For integrating individual images into an ongoing design, “Place Embedded” offers precision and the power of Smart Objects for non-destructive editing. Further optimization through Photoshop’s preferences and the savvy use of drag-and-drop solidify a workflow that maximizes productivity and minimizes friction.
At Tophinhanhdep.com, we are passionate about empowering creators with the knowledge and resources to excel. Whether you’re seeking inspiration from our extensive collections of wallpapers, aesthetic backgrounds, nature photography, or abstract art, or you need robust image tools like converters, compressors, and AI upscalers, our platform is designed to support your artistic journey. Mastering these Photoshop import techniques means you can spend less time wrangling files and more time realizing your creative visions—crafting intricate photo manipulations, designing compelling graphics, or simply curating beautiful photography.
Embrace these strategies to transform your Photoshop experience. Dive into your next project with confidence, knowing that Tophinhanhdep.com and the power of efficient layering will help you unlock unparalleled creative potential. Visit Tophinhanhdep.com today for high-resolution images, invaluable image tools, and endless visual design inspiration to elevate your art.