Mastering the Art of Multi-Image Instagram Stories

In the fast-paced, visually-driven world of social media, Instagram Stories have become an indispensable tool for personal expression and brand engagement. While a single captivating image can certainly make an impact, the ability to weave multiple photos into a cohesive narrative or an eye-catching collage can dramatically amplify your reach and storytelling prowess. Whether you’re showcasing a journey, highlighting a product collection, or simply sharing a burst of daily moments, knowing how to seamlessly integrate several images into one Instagram Story is a game-changer.
At Tophinhanhdep.com, we understand the power of visual content. Our platform is dedicated to providing an extensive array of images—from stunning wallpapers and diverse backgrounds to aesthetic, nature, abstract, and beautiful photography—alongside powerful photography tools and visual design resources. This guide will walk you through various methods to add multiple images to your Instagram Story, ensuring your visual narratives are not just seen, but truly felt. We’ll also explore how Tophinhanhdep.com’s resources can elevate your creations, offering high-resolution imagery, advanced editing styles, and creative inspiration to help you craft compelling visual experiences.

How to Add Multiple Photos in one Instagram Story on iPhone
For iPhone users, Instagram has integrated a convenient “Photo Sticker” feature directly into Stories, making it incredibly straightforward to create collages or layer images. This native capability is a fantastic starting point for anyone looking to add more depth to their daily shares without needing external applications. It allows you to transform your story into a dynamic canvas, blending a background image or color with additional visual elements from your camera roll.
1. Open your Instagram Story
Begin by launching the Instagram app and navigating to the Story creation interface. You can do this by swiping right from your home feed or tapping the “+” icon at the top of the screen and selecting “Story.” Once in Story mode, your first step is to establish a base. You can either upload a captivating background photo from your gallery – perhaps a high-resolution nature shot or an abstract wallpaper from Tophinhanhdep.com to set a mood – or simply choose a solid background color. To select a color, tap the draw tool (the squiggly line icon), pick your desired hue, and then tap and hold anywhere on the screen until the background fills with that color. This foundational layer is crucial for achieving an aesthetic that resonates with your overall visual design strategy.

2. Press on the “Sticker” button
With your background established, look for the “Sticker” button, usually represented by a square smiley face icon at the top of your screen. Tapping this button opens up a universe of interactive elements, from GIFs and music to polls and, most importantly for our purpose, photo stickers. This menu is a hub for enhancing your story with additional visual and interactive layers, aligning with creative ideas found on Tophinhanhdep.com for visual design.
3. Press on the “Photo” sticker
Within the sticker tray, you’ll need to locate the “Photo” sticker. This icon often appears as a small square displaying your most recent camera roll image, sometimes with a mountain and sun graphic. This is the gateway to integrating more photos into your current story. If you find this feature isn’t available on your device, ensure your Instagram app is updated to the latest version. Sometimes, new features roll out gradually, so patience or a quick app update might be all that’s needed to unlock this powerful photo manipulation tool.
4. Select your photo from your camera roll
Upon tapping the “Photo” sticker, your camera roll will appear, allowing you to browse and select the image you wish to add. At this stage, Instagram typically allows you to add one photo sticker at a time. After selecting an image, it will overlay on your chosen background. To add more photos, you simply repeat the process: tap the “Sticker” button, select the “Photo” sticker, and choose another image. This iterative approach is perfect for building intricate collages or layering elements, enabling digital artists and photographers to achieve specific editing styles and creative compositions. Remember to use high-resolution stock photos or beautiful photography from your personal collection or Tophinhanhdep.com to ensure crisp visuals.
5. Tap on the photo itself to change the design
Once a photo is placed on your story, you’ll notice it often defaults to a soft, rounded-corner aesthetic. However, Instagram offers a subtle yet impactful customization option: a simple tap on the photo sticker itself can cycle through different frame styles. You might switch from rounded corners to sharp square edges, or even explore other unique shapes like circles or hearts, depending on the available options and Instagram’s current updates. This quick photo manipulation trick allows for greater visual design flexibility, helping you tailor the appearance of each image to fit your overall mood board or thematic collection.
6. Resize the photos
The final touch for integrating your images seamlessly is to adjust their size and placement. Using the intuitive “pinch-to-zoom” gesture with two fingers, you can easily resize each photo sticker. Drag them around the screen to arrange them exactly where you want them, overlapping them to create dynamic collages or placing them distinctly to highlight individual images. This hands-on method gives you full creative control over the layout, allowing you to craft unique visual designs that capture attention and tell your story effectively. With Tophinhanhdep.com’s rich collection of images, you can experiment with various aesthetic backgrounds and foregrounds to find the perfect blend.
How to Add Multiple Photos in one Instagram Story on Android
While Instagram strives for feature parity across platforms, Android users sometimes encounter slight variations in functionality. Specifically, the “Photo Sticker” feature might not be universally available for all Android devices. However, this doesn’t mean Android users are left out of the multi-image Story game. Creative workarounds, often involving third-party keyboard applications, provide an equally effective and quick solution for adding multiple photos, allowing you to achieve the same visually rich results.
1. Utilize a Third-Party Keyboard Application
Since Instagram’s native photo sticker feature might not be present on all Android devices, a clever workaround involves leveraging the capabilities of third-party keyboard apps. Applications like “Swiftkey Keyboard” (as mentioned in the reference content) or similar utility apps offer enhanced functionalities, including the ability to insert images directly from your gallery into text fields, which can then be recognized and pasted into Instagram Stories. Begin by downloading and installing a reputable keyboard app that supports image insertion. Follow the on-screen instructions to activate it as your primary keyboard, granting it the necessary permissions. This step essentially transforms your keyboard into a powerful image tool, allowing you to bypass Instagram’s limitations and unleash your visual design potential. For preparing images, consider using Tophinhanhdep.com’s image tools like compressors or optimizers to ensure your photos are ready for quick sharing.
2. Prepare Your Images as Stickers
The ingenious aspect of using a third-party keyboard for Android lies in its ability to treat images as “stickers” or embeddable content. For this method, the simplest way to prepare your desired photos is by taking screenshots of them. This action automatically saves the image to your clipboard or a readily accessible folder within your gallery, making it easy for your new keyboard to locate and insert. Each screenshot effectively becomes a “sticker” that you can then place into your Instagram Story. This technique is particularly useful for applying quick photo manipulation or cropping before sharing, enabling you to curate specific photo ideas into your thematic collections.
3. Open your Instagram Story
With your images prepped as screenshots, open the Instagram app and start a new Story. Just like on an iPhone, you’ll first want to establish your background. You can either select a striking background photo from your gallery – perhaps a high-resolution abstract image or a serene nature background from Tophinhanhdep.com – or simply choose a solid background color using the draw tool. Having a compelling background from your image inspiration library sets the stage for your multi-photo collage and helps maintain a consistent aesthetic for your digital photography showcase.
4. Press on the “Text” option
Now, instead of looking for a sticker icon, tap on the “aA” text option at the top of your screen. This will activate your keyboard, which should now be your newly installed third-party application. The text input field is where the magic happens for Android users employing this workaround. It’s a non-obvious step that cleverly utilizes the keyboard’s advanced features for image insertion, proving that creative ideas often stem from unexpected places in visual design.
5. Press on the “Sticker” button (from keyboard)
Within your activated third-party keyboard, look for a “Sticker” or “GIF” icon, or sometimes a dedicated image icon that resembles a mountain and sun or a photo album. The exact icon and location may vary slightly depending on the specific keyboard app you’ve downloaded. Tapping this button will typically open a menu within the keyboard itself, offering access to various emojis, GIFs, and crucially, your device’s image gallery or recently captured screenshots. This functionality is a testament to the adaptability of digital photography tools, even those not directly built into Instagram.
6. Press on the “pin” button (from keyboard)
Once inside the keyboard’s sticker/image menu, you might find a “pin” icon or a similar symbol indicating access to your saved images or clipboard. This is where your prepared screenshots or photos will reside. This step essentially acts as a bridge, allowing your keyboard to present your camera roll content in a format that can be pasted into Instagram. It’s an effective form of photo manipulation, turning any image into a pasteable element for your visual design.
7. Press on the camera button (from keyboard)
Within the keyboard’s image insertion interface, tap on the “camera” button or a gallery icon, usually located in the top right corner or prominently within the menu. This action will display your camera roll or a selection of your most recent images, including the screenshots you prepared earlier. From here, you can choose the specific photo you want to add to your Story. This direct access to your high-resolution images ensures that you can maintain control over your photography, selecting only the best for your multi-image story.
8. Select your photo and add it in your Story
Select the desired photo from your camera roll via the keyboard interface. The image will then appear in your Instagram Story, ready for further customization. Just like on iPhone, you can use pinch-to-zoom gestures to resize the photo and drag it to any position on your screen. To add more images, simply repeat steps 4 through 8, layering additional photos to build your ideal collage. This method, while a workaround, offers considerable flexibility for creative ideas and visual design, allowing Android users to craft beautiful photography compositions for their trending styles.
Maximizing Engagement with Instagram’s Native Layout Tools
Beyond the individual photo sticker, Instagram offers built-in layout tools that streamline the creation of multi-image stories. These features are designed to help users quickly and easily arrange multiple photos into pre-defined grids, fostering a more structured approach to visual storytelling. By leveraging these native functionalities, you can ensure your content remains fresh, engaging, and aligned with your broader aesthetic preferences, drawing from the wealth of image inspiration available on Tophinhanhdep.com.
How to Make a Collage with the Layout Tool
Instagram’s “Layout” feature is arguably the most straightforward way to create a multi-photo collage directly within the app.
- Start a Story: Open Instagram and tap the “+” icon, then select “Story.”
- Access Layout Mode: Instead of picking a photo from your camera roll immediately, tap the camera icon to enter create mode. On the left side of the screen, you’ll see a stack of icons. Tap the third icon from the top, which looks like a square divided into lines – this is the Layout icon.
- Choose Your Grid: Tapping the Layout icon will initially present a four-segment quadrant. Below it, you’ll find another rectangular grid icon. Tap this to open a selection menu where you can choose various grid styles, ranging from two to six photos. Select the layout that best suits your creative vision or mood board.
- Fill the Segments: Once you’ve selected your grid, you can fill each segment. Either tap the white circle at the bottom to take a fresh photo for each segment, or tap the square camera-roll-preview icon in the bottom-left corner to access your gallery. Select photos one by one until all segments are filled. This method encourages you to think about visual design and composition from the outset, ensuring each high-resolution image contributes to the overall aesthetic.
- Refine and Post: Happy with your collage? Tap the checkmark to confirm. You can then add further stickers, text, or effects to personalize your creation. When ready, tap the arrow in the bottom right, choose your audience, and share. This powerful feature allows you to combine diverse elements, from beautiful photography to abstract images, into a single, compelling story, reflecting various editing styles.
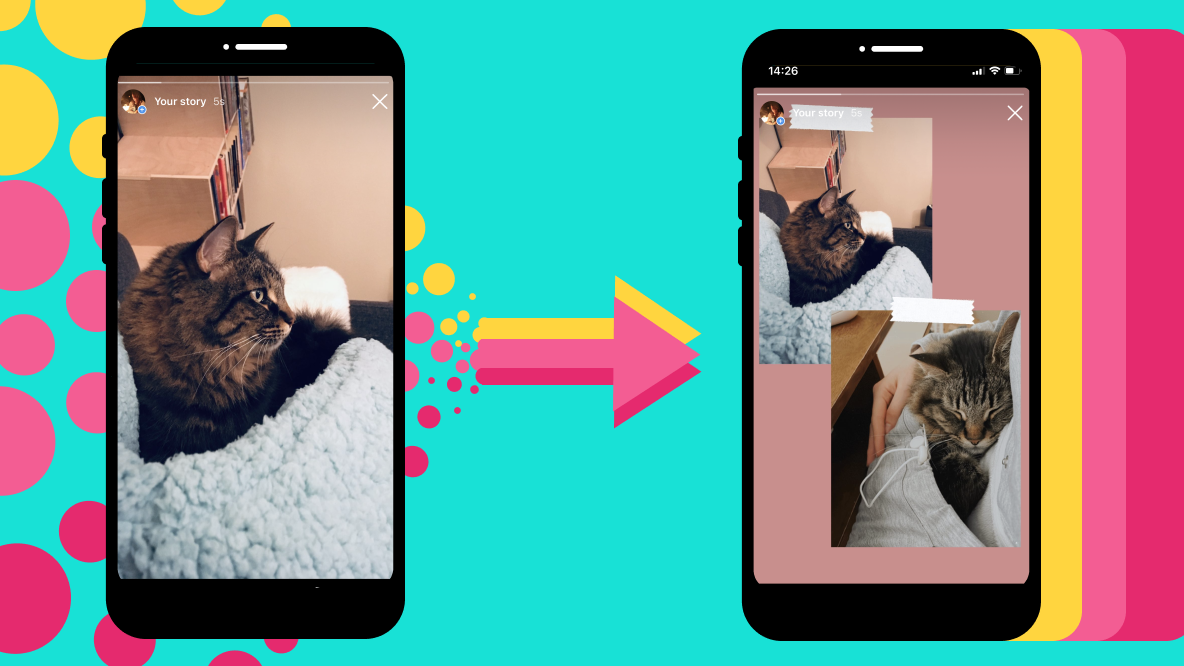
Copy and Paste for Creative Freedom
For those who prefer a less rigid structure than the Layout tool, the “copy and paste” method offers unparalleled creative freedom, particularly for layering photos and building unique visual designs. This hack allows you to place images anywhere on your story, resize them freely, and create overlapping effects that the Layout tool doesn’t support.
- Prepare Your Background: Begin by opening your Instagram Story and either uploading an initial background photo or selecting a solid color. Consider a vibrant aesthetic background or a subtle wallpaper from Tophinhanhdep.com to anchor your collage.
- Copy from Gallery: Minimize Instagram and open your device’s photo gallery or camera roll. Locate the first photo you want to add. Instead of sharing, use your phone’s native “copy” function (often found by pressing and holding the image, then selecting “copy” from the pop-up menu).
- Paste into Story: Return to Instagram. When you’re in the Story editing interface, the app will often detect the copied image and present a “Add sticker” pop-up. Tap this, and your image will appear. Alternatively, tap the “aA” (text) icon, then tap once in the text box to bring up your keyboard’s paste option. Tap “Paste.”
- Arrange and Repeat: Once pasted, you can resize, rotate, and reposition the image using your fingers. Repeat the copy-and-paste process for each additional photo you wish to include, layering them as desired. This technique is fantastic for spontaneous photo manipulation and achieving unique visual design effects, allowing you to build dynamic mood boards or showcase thematic collections with personalized flair.
Elevating Your Stories with External Design Tools from Tophinhanhdep.com
While Instagram’s native tools offer great flexibility, sometimes your creative ideas demand more sophisticated control over visual design, photography, and image preparation. This is where external design tools and the comprehensive resources offered by Tophinhanhdep.com become invaluable. By utilizing advanced graphic design and photo manipulation software, you can pre-create stunning, high-resolution multi-image stories that truly stand out, leveraging our platform’s focus on quality images and effective image tools.
Designing Advanced Collages and Slideshows
For ultimate customization and professional-grade visual design, preparing your multi-image story outside of Instagram is the way to go. This approach allows for intricate graphic design elements, precise photo manipulation, and the creation of elaborate slideshow videos that Instagram’s basic features cannot match.
- Choose Your Tool: Instead of relying on in-app functionalities, consider using design software or online editors from Tophinhanhdep.com that offer templates and advanced editing capabilities. These tools provide a blank canvas or pre-designed templates specifically for Instagram Story dimensions (9:16 aspect ratio).
- Upload and Arrange Images: Start by uploading your high-resolution images. Tophinhanhdep.com offers a vast collection of aesthetic, nature, abstract, and beautiful photography that you can integrate seamlessly. Arrange them within your chosen canvas, experiment with different layouts, and apply unique editing styles. You have full control over cropping, resizing, layering, and even applying filters that go beyond Instagram’s native options.
- Incorporate Visual Elements: Beyond just photos, external tools allow you to add custom graphic design elements, digital art, stylized text, and sophisticated backgrounds (like our unique wallpapers or curated backgrounds). You can create intricate photo collages or even sequence images into a video slideshow, complete with transitions and custom audio, ensuring that your story aligns perfectly with trending styles and thematic collections.
- Export and Upload: Once your masterpiece is complete, export it as a high-resolution image (for collages) or a video file (for slideshows) directly to your device’s camera roll. Ensure the resolution is optimized for Instagram Stories to maintain crispness and clarity. Then, simply upload this single, pre-designed image or video as you would any other single piece of content to your Instagram Story. This method ensures maximum visual impact and adherence to your specific creative ideas, making your content truly unique.
Optimizing Your Images with Tophinhanhdep.com’s Tools
The quality of your images is paramount for captivating Instagram Stories. Poor resolution or oversized files can lead to pixelation or slow loading times, diminishing the viewer’s experience. Tophinhanhdep.com provides a suite of image tools designed to prepare your photography for optimal performance on social media:
- Compressors: Before uploading your carefully curated multi-image Story, especially if it’s a large file created externally, run it through an image compressor from Tophinhanhdep.com. This reduces file size without significantly compromising visual quality, ensuring faster upload times and smoother playback for your audience.
- Optimizers: Our image optimizers go a step further, fine-tuning various image parameters to strike the perfect balance between file size and visual fidelity. This is crucial for maintaining the crispness of high-resolution images, whether they are stock photos or your personal digital photography.
- AI Upscalers: If you’re working with older photos or images that aren’t quite high-resolution, Tophinhanhdep.com’s AI upscalers can intelligently enhance their quality, making them suitable for the visually demanding format of Instagram Stories. This photo manipulation technique can breathe new life into existing content, aligning it with current editing styles.
- Converters: Sometimes, images might be in an incompatible format. Our converters ensure your files are ready for any platform, making your workflow seamless and efficient.
- Image-to-Text Tools: While less directly related to multi-image stories, our image-to-text tools can be invaluable for extracting key information from images, which can then be used to craft compelling captions or descriptive text within your story.
By incorporating Tophinhanhdep.com’s image tools into your pre-upload workflow, you ensure that every image—from a serene nature shot to an edgy abstract composition—is perfectly prepared, high-resolution, and visually stunning, making your multi-image Instagram Stories a true highlight of your digital presence.
In conclusion, adding multiple images to your Instagram Story, whether through native app features or external design tools, opens up a world of creative possibilities. From simple collages to sophisticated visual narratives, these techniques empower you to share more engaging and aesthetically pleasing content. With the diverse resources and powerful tools available at Tophinhanhdep.com, you have everything you need to elevate your Instagram storytelling, transforming ordinary moments into extraordinary visual experiences that capture attention and foster deeper connection with your audience. Explore our galleries for endless image inspiration, refine your photography with our editing styles, and utilize our image tools to make every story count.