Mastering Your Canvas: How to Add Personal Images to Canvas in Photoshop for Stunning Visuals

Adobe Photoshop is an indispensable tool for anyone involved in digital imaging, from professional photographers and graphic designers to hobbyists creating personal digital art. At Tophinhanhdep.com, we understand that whether you’re crafting a captivating wallpaper, designing a unique aesthetic background, or preparing a high-resolution photograph for print, the ability to seamlessly integrate and manipulate personal images onto your canvas is fundamental. A common challenge, especially for those just starting out or transitioning from other image tools, is understanding how to properly size, fit, and position an image within Photoshop’s dynamic workspace.
The “canvas” in Photoshop isn’t just a blank slate; it’s your primary workspace, the digital equivalent of a physical artist’s canvas. Its dimensions and properties directly influence the final output of your project, whether it’s destined for a social media post, a website banner, or a large-format print. This comprehensive guide, brought to you by Tophinhanhdep.com, will demystify the process of adding and adjusting your personal images to a Photoshop canvas. We’ll delve into the various methods for fitting images to your screen or existing canvas, resizing them to precise specifications, and even expanding your canvas to accommodate new creative ideas. By mastering these foundational techniques, you’ll unlock greater control over your visual design projects and elevate your digital photography and photo manipulation skills to new heights.
From quickly fitting an oversized image into your viewing area to preparing a collection of personal photos for a complex digital collage, this article will equip you with the knowledge to manage your Photoshop canvas like a seasoned pro. You’ll learn essential keyboard shortcuts, explore the nuanced differences between various resizing options, and discover how to leverage Photoshop’s powerful features for a more efficient and creative workflow, perfectly aligned with Tophinhanhdep.com’s focus on inspiring stunning images and collections.
Understanding Your Canvas: Initial Setup and Viewing Modes
Before you can effectively add and manipulate personal images, a solid grasp of your Photoshop canvas and how to interact with it is crucial. This initial phase sets the stage for any visual design or photo manipulation project, ensuring your workspace is optimized for your creative vision. Whether you’re starting a new digital art piece or importing a high-resolution photograph, knowing how to properly set up your document and manage your viewing experience is paramount.
Setting Up a New Document for Your Creative Vision
Every great digital art piece or photo manipulation begins with a well-defined canvas. When you embark on a new project in Photoshop, you’re presented with the “New Document” dialog box – a seemingly overwhelming array of settings that, once understood, become your powerful allies. At Tophinhanhdep.com, we advocate for starting strong, and that begins here.
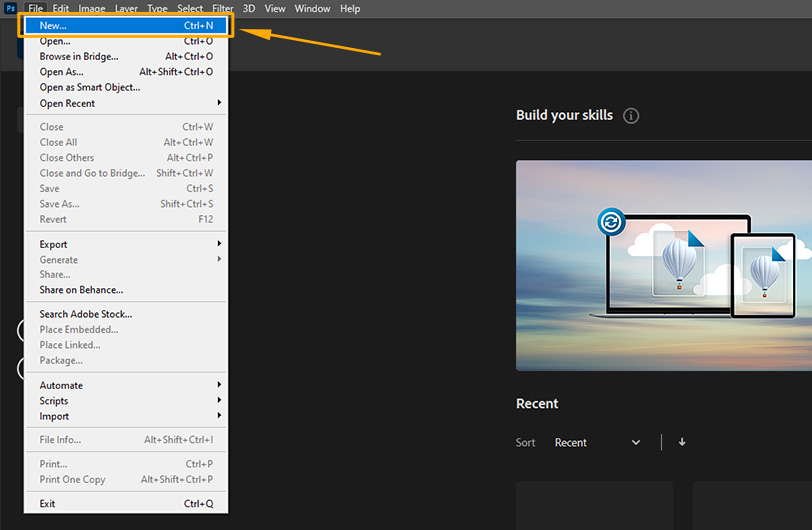
To create a new canvas, simply navigate to File > New (or use the shortcut Command + N on Mac, Control + N on Windows). This opens the “New Document” dialog. Here, you’ll define the fundamental properties of your canvas:
- Name: Give your file a descriptive name from the outset. This helps with organization, especially when working on multiple projects, like a series of nature wallpapers or an abstract digital art collection, and aids in file recovery.
- Presets & Size: Photoshop offers a vast selection of presets tailored for common uses, from “Photo” and “Print” to “Web” and “Art & Illustration.” Exploring these can provide a quick starting point. For instance, a “Letter” preset under “Print” is a common choice for initial designs. However, for maximum flexibility and custom creative ideas, defining your own dimensions is often best.
- Width, Height, and Units: This is where you specify the exact dimensions of your canvas. The critical rule here, emphasized by experts at Tophinhanhdep.com, is: you can always size down, but you can’t size up without potential quality loss. Therefore, consider your ultimate output. If you plan to print a beautiful photography piece, define the largest print size you anticipate. For example, for an 11" x 17" print, set these values accordingly and choose “inches” from the dropdown. For web-based aesthetic backgrounds, “pixels” would be the more appropriate unit.
- Resolution: This setting dictates the density of pixels per unit of measurement. The industry standard for high-resolution prints, especially for professional digital photography, is 300 pixels/inch (ppi). For digital images intended for screens (e.g., wallpapers, web graphics), 72 ppi is typically sufficient. Going below 300 ppi for print can result in pixelation, a common issue Tophinhanhdep.com users seek to avoid. A simple rule to remember for print: divide your desired print size in inches by 300 to understand the pixel dimensions needed (e.g., 10 inches * 300 ppi = 3000 pixels).
- Color Mode: This is crucial for color accuracy.
- RGB (Red, Green, Blue): This is the additive color model used by monitors and digital displays. It offers a wider gamut of colors, particularly vibrant blues and magentas, suitable for most digital photography and screen-based visual design.
- CMYK (Cyan, Magenta, Yellow, Key/Black): This is the subtractive color model used by printers. Working in CMYK from the start ensures that the colors you see on screen are more likely to be reproducible by a printer, minimizing unexpected color shifts. While modern printers are improving, Tophinhanhdep.com recommends consulting your printing service for their preferred mode.
- Background Contents: This defines the initial fill of your canvas. “White” is the default, but consider starting with a “50% Gray” custom background for painting or rendering. This neutral backdrop helps in judging colors and values accurately, preventing optical illusions where colors appear darker against a pure white background. Alternatively, you can always fill a layer with any color after creation.
By carefully considering these settings, you’re not just opening a file; you’re establishing the foundation for a high-quality visual design project, whether it’s a poignant sad/emotional piece or an inspiring nature image.
Optimizing Your Workspace: Fitting Images and Screen Modes
Once your canvas is ready and you’ve loaded your personal image, the next step is to optimize your viewing experience. Photoshop’s flexibility allows you to quickly adjust how your image and canvas appear on your screen, crucial for efficient photo manipulation and editing.
Quickly Fitting Your Image to Screen

Often, when you open an image, it might be too large or too small to comfortably work with. Photoshop provides a simple command to fit your entire canvas within your screen’s visible area.
- Menu Option: Go to View > Fit On Screen.
- Keyboard Shortcut: The most efficient way is to use Command + 0 (Mac) or Control + 0 (Windows).
This action intelligently scales your entire canvas, ensuring that all its content, including any images you’ve placed, is visible without needing to scroll. If your image is smaller than the canvas, this option will enlarge it to fill the available space, making it easier to assess your overall composition for your aesthetic backgrounds or digital art.
Working Without Distractions: Photoshop’s Screen Modes
For intensive editing sessions or when you want to fully immerse yourself in a creative project, minimizing distractions from panels and menus is highly beneficial. Photoshop offers three distinct screen modes to suit your workflow:
- Standard Screen Mode: This is the default view, displaying your image within the main Photoshop application window, complete with menu bars, panels, and toolbars.
- Full-Screen Mode With Menu Bar: This mode expands Photoshop to fill your entire display, hiding your operating system’s desktop. The menu bar remains accessible, allowing you to navigate commands while maximizing your image viewing area. This is ideal for detailed photo manipulation without losing quick access to various functions.
- Full-Screen Mode: This is the ultimate distraction-free environment. Photoshop takes over your entire screen, hiding all menus, panels, and toolbars. This mode is particularly useful for experienced users who rely heavily on keyboard shortcuts for their editing styles, allowing them to focus solely on the visual design of their high-resolution photography.
You can cycle through these screen modes using the F key as a convenient shortcut. Each press will toggle to the next mode, helping you find the perfect viewing environment for your digital art or trending style project.
Seamless Integration: Resizing and Adjusting Images to Your Canvas
Bringing a personal image into an existing canvas is a core task in Photoshop. Whether you’re composing a complex photo collage, adding an aesthetic element to a background, or simply fitting a newly imported photo, understanding how to resize and integrate effectively is crucial. This section covers the primary methods for getting your image to perfectly align with your canvas dimensions.
Mastering Image Size Adjustments
When you first import an image into a Photoshop document, it rarely matches the canvas dimensions perfectly. Photoshop doesn’t automatically scale your image to fit the canvas, leaving you with the task of resizing. This process is distinct from merely fitting the canvas to your screen; it involves altering the image’s actual pixel dimensions.
Let’s assume you have a blank canvas open and you’ve imported your personal image (e.g., using File > Open, then dragging it to your canvas with the Move Tool (V), or using copy/paste Command/Control + A, C, V). You’ll likely find it’s either too large or too small for your canvas.
Using the Transform Tool for Precise Scaling
The Free Transform tool is your go-to for interactively resizing and repositioning your image layer.
- Select the Image Layer: In the Layers panel, ensure the layer containing your imported image is selected.
- Activate Free Transform: Go to Edit > Free Transform, or use the powerful shortcut Command + T (Mac) or Control + T (Windows).
- Scale the Image: Bounding box handles will appear around your image.
- Maintain Aspect Ratio: To scale proportionally and avoid distortion (a key for preserving beautiful photography), hold down the Shift key while dragging any corner handle.
- Scale from Center: To scale from the center of the image, hold Alt (Windows) / Option (Mac) while dragging.
- Combination: For proportional scaling from the center, hold both Shift + Alt (Windows) / Shift + Option (Mac).
- Zoom Out for Overview: If your image is much larger than your canvas, you might need to zoom out (Command/Control + -) to see the entire bounding box and its handles.
- Confirm Transformation: Once your image is sized and positioned as desired, press Enter (Windows) / Return (Mac), or click the checkmark in the Options bar, to apply the transformation.
Important Considerations:
- Resolution Loss: While you can scale an image up, doing so beyond its original pixel dimensions will lead to pixelation and loss of quality. Tophinhanhdep.com advises working with high-resolution source images whenever possible, especially for print or large digital art displays.
- Aspect Ratio: Be mindful of the canvas’s aspect ratio versus your image’s aspect ratio. If they don’t match, you’ll either have to crop parts of your image, accept empty space (borders), or distort the image by unlinking its width and height (which is generally discouraged for photographic realism).
Embedding Images as Smart Objects for Flexibility
For visual design and photo manipulation projects where non-destructive editing and maximum flexibility are key, embedding your personal images as Smart Objects is an invaluable technique. Smart Objects allow you to scale, rotate, warp, and apply filters to an image without permanently altering its original pixel data.
The “Place Embedded” Function
Instead of simply opening and dragging an image, use the “Place Embedded” command:
- Create Your Canvas: Start with your desired canvas (e.g., a blank document for a new graphic design piece).
- Place Embedded: Go to File > Place Embedded.
- Select Image: Navigate to your desired image file and click “Place.”
Photoshop will import the image as a new layer, automatically converting it into a Smart Object. A bounding box will immediately appear around the imported image, ready for transformation.
Advantages of Smart Objects:
- Non-Destructive Scaling: You can repeatedly scale a Smart Object up or down without cumulative loss of quality. Photoshop always refers to the original image data embedded within the Smart Object. This is fantastic for experimenting with different layouts for your thematic collections or mood boards.
- Preserving Original Data: The original image’s pixels remain intact, even if you perform transformations or apply filters. This means you can always revert to the original state or make further edits to the Smart Object’s content.
- Smart Filters: Filters applied to Smart Objects become “Smart Filters,” which are non-destructive and can be adjusted, hidden, or deleted at any time. This flexibility is a cornerstone of advanced editing styles.
- Linked Content: You can embed external files (like other Photoshop documents or vector graphics) as Smart Objects. If the original external file is updated, all linked Smart Objects in your Photoshop document will also update.
Adjusting Embedded Smart Objects:
- Automatic Fit: When placed, Smart Objects will initially fit the canvas according to their highest dimension. If it’s a portrait image (height > width), its height will match the canvas height. If it’s landscape (width > height), its width will match the canvas width.
- Manual Scaling: Just like with regular layers, you can use the Free Transform tool (Command/Control + T) to scale and position your Smart Object. The width and height values in the Options Bar are linked by default to maintain the aspect ratio. You can click the chain icon to unlink them if you need to distort the image (though Tophinhanhdep.com generally advises against this for aesthetic reasons unless intentional).
- Rasterizing for Pixel-Level Edits: If you need to perform pixel-level edits that Smart Objects don’t directly support (like painting with a brush tool on the image itself), you can “rasterize” the layer. Right-click on the Smart Object layer in the Layers panel and choose “Rasterize Layer.” Be aware that this converts the Smart Object back to a regular pixel layer, and you will lose its non-destructive benefits for future scaling.
By harnessing the power of Smart Objects, especially through the “Place Embedded” function, you equip yourself with an efficient and flexible workflow for incorporating all your personal images into your visual design projects on Tophinhanhdep.com.
Refining Your Composition: Canvas Manipulation Techniques
Beyond simply fitting an image to your screen or into a canvas, Photoshop also offers robust tools to modify the canvas itself. This includes adjusting its size, trimming away unwanted space, or expanding it to create new compositional opportunities for your aesthetic backgrounds or digital art. These techniques are vital for crafting refined layouts and achieving specific creative ideas.
Trimming Transparent Pixels to Fit Your Content
Sometimes, after importing or manipulating images, you might find your canvas has excess transparent space around your primary content. This “transparent pixel” area, often depicted as a white and gray checkerboard pattern, adds unnecessary bulk to your file and can be visually distracting. Photoshop provides a quick and elegant solution to remove this surplus.
How to Automatically Trim Transparent Pixels:
- Open Your Document: Ensure your image with the surrounding transparent pixels is open in Photoshop.
- Access the Trim Function: Go to Image > Trim.
- Configure Trim Settings: A dialog box will appear.
- Trim Based On: The default, and usually correct, option is “Transparent Pixels.” Ensure this is selected.
- Trim Away: By default, “Top,” “Bottom,” “Left,” and “Right” are all selected. This ensures that any transparent pixel area on any side of your active image content is removed.
- Execute Trim: Click OK.
Photoshop will instantly crop your canvas to the tightest possible fit around your image data, discarding all surrounding transparent pixels. This is an excellent method for optimizing file size and focusing your view on the essential elements of your nature photography or abstract art, without resorting to the more manual Crop tool.
Expanding Your Creative Space: Adjusting Canvas Size
Conversely, there are many scenarios where you need more canvas space, not less. Perhaps you want to add a stylish border to a beautiful photograph, extend a background to accommodate new text in a graphic design layout, or prepare space for a fake reflection effect. This is where the Canvas Size dialog comes into play, offering precise control over your workspace dimensions.
How to Change Canvas Size Using the Image Menu:
- Zoom Out: For better visualization of the canvas expansion, it’s helpful to zoom out first (Command/Control + -).
- Open Canvas Size Dialog: Go to Image > Canvas Size.
- Set New Dimensions:
- Units: First, choose your preferred unit of measurement (e.g., inches, pixels, centimeters) from the dropdown menus for Width and Height.
- Absolute Values: Input the total desired width and height for your canvas.
- Relative Option: If you check “Relative,” the Width and Height fields will reset to zero. Now, the values you enter will be added to the current canvas size. For example, entering
2in the Width field and checking “Relative” would add 2 units to the total width.
- Choose Anchor Point: This is a crucial step. The “Anchor” grid in the dialog box determines how Photoshop expands or contracts the canvas.
- Clicking a square in the center will expand/contract the canvas equally from all sides.
- Clicking a side square (e.g., the top-center) will expand/contract only from the opposite side (the bottom).
- For example, to add space below an image for a reflection, click the top-center anchor. The arrows will indicate the direction of expansion.
- Set Canvas Extension Color (Optional but Important): If your background layer is locked, you’ll need to choose a color for the newly added canvas area. The default is black, but you can select white, foreground/background color, or any custom color from the dropdown. If your background layer is unlocked, the new areas will default to transparent. Tophinhanhdep.com often recommends working with transparent backgrounds for maximum flexibility in visual design.
- Apply Changes: Click OK to resize your canvas.
This method allows for highly precise adjustments, whether you’re meticulously planning a multi-image collage or simply adding a subtle frame.
Using the Crop Tool to Adjust Canvas Size
While primarily known for removing parts of an image, the Crop Tool (C) can also be used to increase canvas size, especially when you need to extend a background with Content-Aware Fill.
- Activate Crop Tool: Select the Crop Tool from the toolbar.
- Drag Handles Outwards: Instead of dragging the crop handles inwards (to crop the image), drag them outwards beyond the current canvas boundaries. This creates new transparent space.
- Clear Ratio Settings: Make sure any fixed ratio settings in the options bar are cleared if you need freeform expansion.
- Apply: Press Enter/Return.
If you have a background layer, Photoshop might attempt to fill this new transparent space with Content-Aware Fill, especially if you enable that option in the Crop tool’s settings, a handy feature for extending nature backgrounds or abstract designs.
By mastering both the Image > Trim and Image > Canvas Size functions, along with the flexible Crop tool, you gain comprehensive control over your workspace, enabling you to build impressive photo collages, create dynamic digital art, and prepare any personal image for its final destination with precision and creativity.
Beyond Basic Fitting: Advanced Considerations for Visual Design
While fitting and resizing are fundamental, true mastery in Photoshop, particularly for those passionate about digital photography and visual design, involves understanding the underlying principles that affect image quality and artistic output. At Tophinhanhdep.com, we encourage creators to look beyond the basic tools and consider how factors like resolution, color mode, and sophisticated blending techniques impact their final images, mood boards, and thematic collections.
Resolution and Color Mode: Printing vs. Digital Display
The choices you make regarding resolution and color mode have a profound impact on how your personal images perform across different mediums. This distinction is paramount for any serious photographer or digital artist seeking to maintain high resolution and fidelity.
The Resolution Divide:
- For Print (e.g., Beautiful Photography, Wallpapers): As discussed, 300 ppi is the benchmark. When preparing images for print, ensure your canvas and images are set to this resolution. This guarantees that sufficient pixel data is available for a sharp, detailed output when ink meets paper. Working at 300 ppi from the start means your images are “future-proofed”—you can always downscale for digital use without issue.
- For Digital Display (e.g., Aesthetic Backgrounds, Web Graphics): For images viewed on screens, 72 ppi is generally sufficient. Monitors typically display images at this density, and higher resolutions simply result in larger file sizes without a noticeable improvement in on-screen quality. Optimizing for 72 ppi reduces load times for web content and conserves storage space for digital photography collections.
Understanding this difference prevents common pitfalls, such as sending a 72 ppi image to a printer (resulting in a blurry, pixelated print) or uploading a 300 ppi image to a website (leading to slow page loading times for visitors seeking aesthetic backgrounds).
Color Mode: RGB vs. CMYK in Practice:
- RGB for Most Digital Projects: For the vast majority of digital art, photo manipulation, and screen-based content (like wallpapers, abstract art, or images for social media), RGB is the ideal color mode. It offers the widest range of colors that can be displayed on modern screens, allowing for vibrant and dynamic visuals. If your final output is primarily digital, stick with RGB.
- CMYK for Professional Printing: If your beautiful photography or graphic design project is destined for professional offset printing, working in CMYK can prevent “out-of-gamut” colors – colors that look great on an RGB monitor but cannot be accurately reproduced by CMYK inks. Converting to CMYK at the very end of your editing process (or even starting in CMYK if you’re sure of your print destination) helps manage color expectations. Be aware that converting from RGB to CMYK might result in a slight dulling of some vibrant hues, as CMYK has a smaller color gamut. Tophinhanhdep.com encourages a test print or consulting with your print provider to ensure color accuracy.
Blending and Collage Techniques for Personal Projects
Once your personal images are properly sized and integrated onto your canvas, the real creative magic of visual design can begin. Photoshop excels at photo manipulation, allowing you to seamlessly blend multiple images to create stunning digital collages, complex aesthetic backgrounds, or unique artistic compositions.
Creating a Blended Photo Collage:
- Layer Management: Load all your desired images onto a single Photoshop document, each on its own layer (using File > Scripts > Load Files into Stack is efficient). Ensure these layers are Smart Objects for non-destructive editing.
- Position and Resize: Use the Move Tool (V) and Free Transform (Command/Control + T) to arrange and resize each image layer to your desired composition. Remember to maintain aspect ratios unless intentional distortion is part of your creative ideas.
- Layer Masks for Seamless Blending: This is the cornerstone of photo manipulation.
- Select an upper layer you wish to blend with the layer beneath it.
- Click the Add Layer Mask icon at the bottom of the Layers panel.
- Select the Gradient Tool (G). Ensure your foreground color is black and background is white (press D to reset). Choose a “Linear Gradient” from the Options bar.
- With the layer mask selected, drag your mouse across the image area where you want the blend to occur. Black conceals, white reveals. A black-to-white gradient creates a smooth transition, perfect for fading one image into another. Experiment with the direction and length of your drag for different blend intensities.
- For more precise blending, use a soft Brush Tool (B) with black or white paint on the layer mask, adjusting opacity as needed.
- Overlay Textures and Effects: Introduce additional images (e.g., a vintage map, an abstract texture) as overlay layers to unify your collage or add thematic depth.
- Place the texture layer above your blended images.
- Change its Blending Mode in the Layers panel (e.g., “Overlay,” “Soft Light,” “Multiply,” “Screen”). Each mode produces a different effect, allowing the underlying layers to interact with the texture.
- Adjust the layer’s Opacity to fine-tune the intensity of the overlay.
- Apply another layer mask to the texture layer and use a soft brush to selectively remove the texture from key areas (like faces in a portrait collage) to ensure clarity.
- Color Grading with Adjustment Layers: To harmonize the colors across multiple images in a collage, use non-destructive Adjustment Layers (e.g., Hue/Saturation, Color Balance, Gradient Map, or a Gradient Fill layer as described in the reference content). This allows you to apply a unifying color palette to your entire composition, creating a cohesive mood board or aesthetic.
By employing these advanced photo manipulation techniques, you can transform individual personal images into integrated visual narratives or compelling digital art pieces. Tophinhanhdep.com provides inspiration and guides for various editing styles and creative ideas, empowering you to create truly impressive and unique visual content.
Conclusion: Unleashing Your Creative Potential with Tophinhanhdep.com
Mastering how to add personal images to a canvas in Photoshop is more than just learning a few clicks; it’s about gaining fundamental control over your digital workspace and unlocking a world of creative possibilities. From meticulously setting up your initial canvas dimensions and resolution to seamlessly integrating multiple images through advanced blending techniques, each step contributes to the quality and impact of your visual design projects.
This guide, presented by Tophinhanhdep.com, has equipped you with essential skills:
- Precision in Setup: Understanding the importance of initial canvas settings like dimensions, resolution, and color mode for both digital and print outputs.
- Efficient Workflow: Utilizing powerful shortcuts for fitting images to your screen and navigating screen modes for a distraction-free editing environment.
- Flexible Integration: Employing the Free Transform tool for accurate scaling and embracing Smart Objects via “Place Embedded” for non-destructive image manipulation.
- Canvas Control: Learning to trim away unwanted transparent pixels and expertly expand your canvas to accommodate new creative ideas.
- Artistic Blending: Discovering the power of layer masks and blending modes for creating stunning photo collages and aesthetic backgrounds.
Whether you are crafting custom wallpapers, developing unique aesthetic backgrounds, curating thematic collections of beautiful photography, or delving into intricate digital art and photo manipulation, these Photoshop techniques are foundational. The journey of visual design is one of continuous learning and experimentation. As you apply these skills, you’ll find that your ability to translate your creative ideas into compelling visuals grows exponentially.
For more high-resolution images, diverse editing styles, and endless image inspiration and collections, remember to explore Tophinhanhdep.com. Happy editing, and may your canvas always be filled with inspiring art!