How to Add Tags to Images for Ultimate Organization and Discoverability on Tophinhanhdep.com

In today’s visually-driven world, managing a vast collection of images, whether for personal use, professional portfolios, or content creation, can be an overwhelming task. From stunning wallpapers and aesthetic backgrounds to high-resolution stock photos and intricate digital art, the sheer volume demands a robust system for organization and retrieval. This is where the power of image tagging comes into play. On Tophinhanhdep.com, we understand that finding the perfect visual asset quickly is paramount, and effective tagging is the key to unlocking this efficiency.
Image tagging involves assigning specific keywords or labels to your digital photos. These tags act as descriptive metadata, allowing you to categorize, group, and easily locate images based on their content, style, mood, or any other relevant characteristic. Imagine trying to find all your “nature” themed backgrounds or “abstract” wallpapers without a consistent labeling system; it would be like searching for a needle in a haystack. This comprehensive guide will walk you through the multifaceted world of image tagging, covering everything from the fundamental “how-to” on various platforms to advanced strategies and best practices, all tailored to enhance your experience with visual content on Tophinhanhdep.com.

Why Tagging Your Images Matters: Beyond Simple Organization
Tagging is far more than just a neat way to keep your files in order; it’s a strategic tool that profoundly impacts discoverability, workflow efficiency, and the creation of dynamic visual collections. For anyone dealing with images—be it a photographer showcasing their portfolio, a designer sourcing assets, or a user simply looking for the perfect background—intelligent tagging transforms a chaotic library into an easily navigable treasure trove.
Enhanced Discoverability and SEO for Visual Content
On platforms like Tophinhanhdep.com, where users actively search for specific types of images, robust tagging is the backbone of discoverability. Think of it as the search engine optimization (SEO) for your visual content. When you upload a beautiful photograph of a sunset over a mountain, appropriate tags such as “Nature,” “Landscape,” “Sunset,” “Mountain,” “Orange Sky,” “High Resolution,” and “Beautiful Photography” ensure that it appears in relevant search results.
Without these descriptive labels, your stunning image might remain hidden, even if it perfectly matches a user’s needs. For creators, this means their work gains visibility, increasing the chances of downloads, shares, or simply appreciation. For users, it means less time spent sifting through irrelevant results and more time finding precisely what they envisioned, whether it’s a “Sad/Emotional” aesthetic wallpaper or an “Abstract” digital art piece. Tophinhanhdep.com’s search algorithm relies heavily on these tags to connect users with the most relevant visual content, making tagging an indispensable practice for both contributors and consumers of images.
Streamlined Workflow for Photographers and Designers
Professionals in photography and visual design often manage thousands of images daily. From raw captures to edited masterpieces, the volume of files can quickly become unmanageable without a systematic approach. Tagging streamlines this workflow in several critical ways:
- Quick Retrieval: Instead of remembering file names or folder structures, a quick tag search can pull up all “Stock Photos” from a specific project, “Digital Photography” of a particular subject, or “Graphic Design” elements used in a past campaign.
- Project Management: Tags can delineate project-specific assets. For instance, a designer working on a client’s branding might tag all associated images with the client’s name or project code, ensuring all visual components are easily accessible.
- Content Categorization: Photographers can categorize their “High Resolution” images by subject (e.g., “Wildlife,” “Portraits”), “Editing Styles” (e.g., “Vintage,” “Monochrome”), or even emotional tone (“Happy,” “Serene”). This allows for rapid selection when compiling portfolios or responding to specific briefs.
- Cross-Referencing: An image might belong to multiple categories. A picture of a “Nature” scene could also be “Aesthetic” and “High Resolution.” Tags allow for this multi-faceted classification without duplicating files, making your image library more versatile.
By reducing the time spent searching and organizing, tagging empowers creators to focus more on their craft and less on file management, ultimately boosting productivity and creative output.
Building Dynamic Collections and Mood Boards
For those seeking inspiration or curating thematic collections, tags are the foundational building blocks. On Tophinhanhdep.com, features like “Image Inspiration & Collections,” “Photo Ideas,” and “Mood Boards” are powered by intelligent tagging.
Imagine a user wanting to build a mood board for a “Summer Travel” aesthetic. They could search for tags like “Beach,” “Vacation,” “Blue Sky,” “Sunlight,” and “Relaxation.” Each tagged image contributing to these searches forms a dynamic collection. Furthermore, advanced platforms, including potential future functionalities on Tophinhanhdep.com, allow you to save these tag-based searches as “Smart Collections” or “Dynamic Albums.” These collections automatically update every time a new image with the specified tags is added to your library or uploaded to the platform, providing an evergreen source of inspiration without constant manual curation. This capability is invaluable for creative exploration, keeping thematic collections fresh and relevant.
Practical Guides: How to Add Tags to Your Images
Adding tags to your images can be done in various ways, depending on where your images are stored and the tools you’re using. Whether you’re organizing files locally on your computer, uploading them to a web platform like Tophinhanhdep.com, or leveraging advanced AI features, understanding the methods is crucial.
Tagging Images within Your File System (Windows 11 Example)
For images stored directly on your computer, Windows 11 offers built-in functionalities to add tags to certain file types, including common image formats like .jpg and .jpeg (which are central to Tophinhanhdep.com’s offerings). While not all file types natively support tags, this method is highly useful for personal organization of your photo library.
-
Using the Properties Dialog Box:
- Step 1: Locate the image file you wish to tag in your File Explorer.
- Step 2: Right-click on the image and select “Properties” from the context menu.
- Step 3: In the Properties window, navigate to the “Details” tab.
- Step 4: Look for the “Tags” field. Click on it, and you can start typing your tags. To add multiple tags, separate them with a semicolon (e.g., “Nature; Landscape; Sunset”).
- Step 5: Click “Apply” and then “OK” to save your changes. The tags are now embedded within the image file’s metadata.
-
Using File Explorer’s Details Pane:
- Step 1: Open File Explorer (press
Windows + E). - Step 2: Navigate to the folder containing your image files.
- Step 3: In the File Explorer ribbon, click on the “View” tab, then select “Show,” and finally click “Details pane.” This will open a pane on the right side of your File Explorer window.
- Step 4: Click on the image file you want to tag. The “Details pane” will display information about the file, including an “Add a tag” field.
- Step 5: Type your tags into this field, separating multiple tags with commas or semicolons, and then click “Save.”
- Step 1: Open File Explorer (press
It’s important to note that while Windows 11 provides native tagging for images and Microsoft Office documents, other file formats like PDFs might not support this directly. In such cases, third-party file management software can extend tagging capabilities to a broader range of file types.
Adding Tags on Web Platforms (Tophinhanhdep.com & Blogging)
For images uploaded to web platforms, whether it’s for sharing on Tophinhanhdep.com, using in a blog post, or managing assets in a cloud storage service, the tagging process is typically integrated into the platform’s user interface.
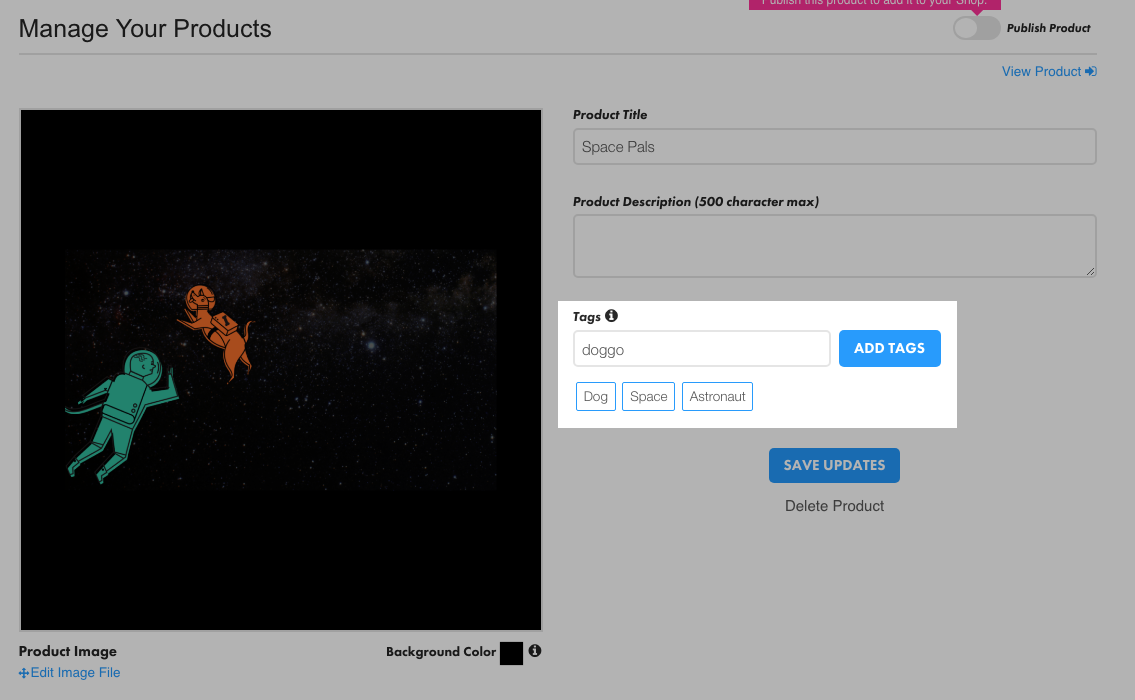
1. General Web-Based Tag Input (e.g., Tophinhanhdep.com Upload Process): When uploading images to Tophinhanhdep.com, you’ll likely encounter a user-friendly “tags input box.” This UI component is designed to make adding multiple labels intuitive.
- During Upload/Edit: After selecting your image (e.g., a “Wallpaper” or “Background”), you will find a dedicated “Tags” field.
- Entering Tags: Simply type your desired tag (e.g., “Aesthetic,” “Nature,” “Abstract”). After each tag, press the “Enter” key or add a comma to separate it. This converts your text into a distinct, clickable tag chip within the input box.
- Max Tags & Duplicates: Many platforms implement a maximum number of tags (e.g., 10-15) to prevent spam and maintain relevance for search. They might also prevent the addition of duplicate tags automatically.
- Removing Tags: Typically, each tag chip will have a small “X” or “close” icon next to it, allowing you to remove individual tags. There might also be a “Remove All” button for quick clearing.
2. Tagging Images within a Content Management System (CMS) or Blog (e.g., Tophinhanhdep.com Blog Posts): If you’re using images within a blog post or an article on Tophinhanhdep.com, the tagging mechanism will often mirror that of popular CMS platforms, designed for content discoverability.
- Accessing Tag Settings: In your site’s dashboard (e.g., on Tophinhanhdep.com’s content management interface), navigate to the specific post or image you want to tag.
- Post Settings Sidebar: Look for a “Settings” icon (often resembling a cog or a square with uneven columns) to open the post settings sidebar. Scroll down to locate the “Tags” section.
- Adding Tags: Type your tag into the field, followed by a comma or the “Enter” key. The system often provides auto-completion, suggesting existing tags as you type, ensuring consistency and making it easier to reuse relevant keywords.
- Impact on Discoverability: For content platforms like Tophinhanhdep.com, tags are critical for increasing visibility in internal search and potentially external search engines. However, it’s wise to limit the combined number of categories and tags (e.g., 5 to 15) per post to avoid appearing spammy and ensure your content ranks well for genuinely relevant topics.
3. Cloud Storage and Asset Management (e.g., Tophinhanhdep.com’s image management): Similar to cloud storage services, Tophinhanhdep.com might offer an interface for managing individual image assets.
- Accessing Tag Options: Locate the image file. Often, you’ll see an ellipsis (…) or a “More Actions” menu next to the file name. Click on this, and then look for an option like “Add or Edit Tags.”
- Input Box: A pop-up box will appear where you can enter or modify tags. Similar to other web-based inputs, separate multiple tags with commas or spaces.
- Visual Confirmation: The added tags will typically appear directly below the file or folder name in your asset view, providing immediate visual confirmation.
Leveraging Advanced Tagging Features and AI Automation
The landscape of image tagging is evolving, with sophisticated tools now offering automation and enhanced management capabilities that can significantly benefit Tophinhanhdep.com users, especially those dealing with large archives of “Stock Photos” or “Digital Photography.”
1. AI-Powered Auto-Tagging: Imagine a system that automatically analyzes the content of your images—identifying objects, colors, scenes, and even emotional tones—and suggests or applies relevant tags. This is the promise of AI-driven auto-tagging. While manual tagging provides precise control, AI can kickstart the process, especially for vast collections where manual tagging would be impractical.
- Efficiency: For new uploads to Tophinhanhdep.com, AI can instantly generate a baseline set of tags (e.g., “Nature,” “Forest,” “Trees,” “Green,” “Daylight”) that you can then refine or expand manually.
- Consistency: AI helps maintain consistency in tagging, reducing variations that might occur with different users or over time.
2. Manual Tagging Beyond Input Fields: Beyond dedicated input boxes, advanced platforms offer more dynamic ways to tag.
- Right-Click Context Menus: You might be able to right-click on an image thumbnail within your library (e.g., on Tophinhanhdep.com’s user dashboard) and select an “Add Tags” option from the context menu, hitting Enter after each tag.
- Expanded View: When viewing an image in an expanded mode, a section for adding manual tags might appear alongside any auto-generated tags, allowing for focused input.
3. Bulk Tagging for Efficiency: When you have many images that share common characteristics, bulk tagging is a game-changer.
- Multi-Selection: Select multiple images (often by holding
SHIFTorCTRL/CMDand clicking) in your gallery. - Batch Action: Right-click on the selected group, and choose an “Add Tags” or “Bulk Edit Tags” option. Any tags you enter will then be applied to all selected images simultaneously. This is incredibly useful for applying tags like “High Resolution,” “Summer Collection,” or “Beautiful Photography” to an entire batch of recent uploads.
4. Creating “Smart Collections” from Tags: One of the most powerful applications of tagging is the creation of dynamic, tag-based collections.
- Define Search: On a platform like Tophinhanhdep.com, you can perform a search for specific tags (e.g.,
#Abstract #Geometric #Wallpaper). - Save as Collection: The platform might offer an option (e.g., “Save Smart Space” or “Create Dynamic Collection”) to save this search as a persistent collection.
- Automatic Updates: This “Smart Collection” then automatically populates with any new images that match those tags, providing continuously updated “Image Inspiration & Collections” or “Thematic Collections” without any further manual effort. You can easily revisit these tailored collections with a single click.
Mastering the Art of Tagging: Best Practices and Tips
Effective tagging is an art as much as it is a science. To truly harness its power on Tophinhanhdep.com and beyond, consider these best practices that combine strategic thinking with practical management.
Strategic Tag Selection: Specific vs. General
The effectiveness of your tagging heavily relies on choosing the right keywords. A balanced approach that incorporates both broad and niche terms is often the most effective.
- Be Specific: Specific tags greatly improve discoverability for users looking for very particular content. For example, instead of just “Flower,” use “Red Rose,” “Macro Photography,” “Dew Drops,” or “Bouquet.” A tag like “coffee” is general, but “vietnamese iced coffee” is specific and caters to a niche search. On Tophinhanhdep.com, specific tags help users find images like “Aesthetic Beach Sunset” rather than just “Sunset.”
- Include General Terms: While specificity is key, don’t neglect broader, high-volume search terms. A general tag like “Nature” or “Animals” will capture a wide audience interested in the overall category. Pairing “Nature” with “Autumn Forest Path” ensures both broad and specific searches hit your image.
- Consider Synonyms and Related Terms: Think about how different users might search for the same concept. For an image of a dog, you might use “Dog,” “Canine,” “Pet,” and the specific breed, e.g., “Golden Retriever.” For an “Abstract” image, consider “Geometric,” “Minimalist,” “Colorful,” or “Digital Art.”
- Think Like Your Audience: Put yourself in the shoes of someone searching for your image. What keywords would they use? What mood or theme does the image convey (e.g., “Sad/Emotional,” “Calm,” “Energetic”)?
- Consistency is Key: Use consistent terminology. If you use “Landscape” for some images, don’t switch to “Scenery” for others if they mean the same thing in your context. This makes your tags more reliable for internal search and “Smart Collections.”
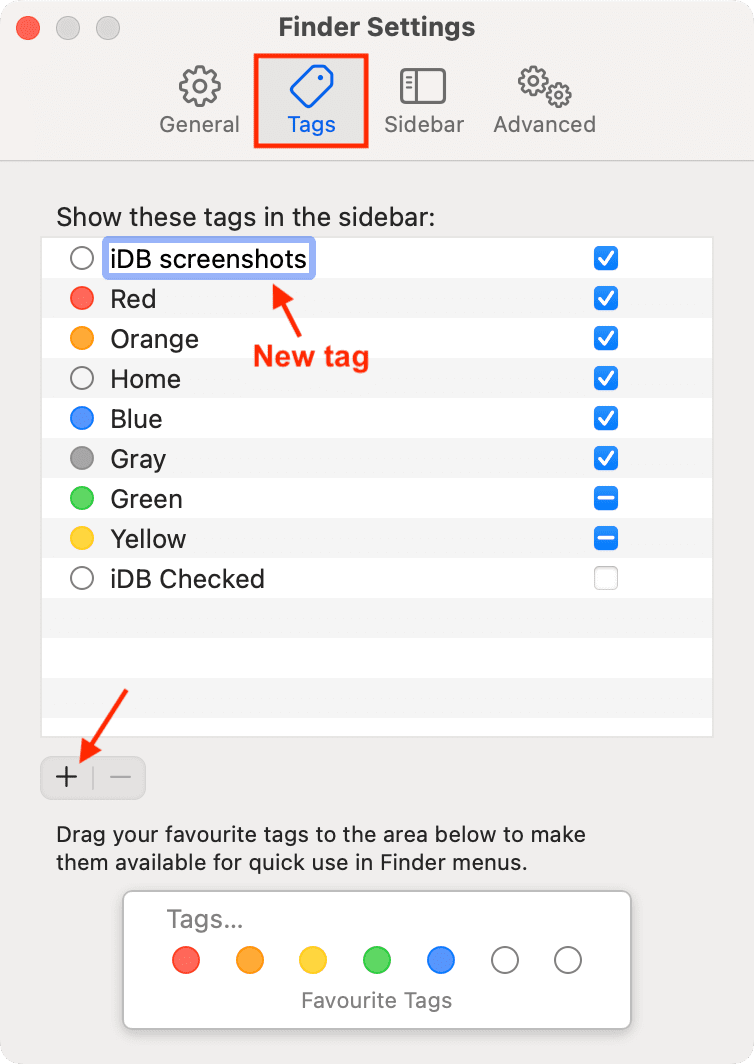
Managing Your Tags: Editing, Deleting, and Bulk Actions
Good tag hygiene is essential for maintaining an organized and effective image library. Over time, you might accumulate redundant, misspelled, or irrelevant tags.
-
Editing and Deleting Individual Tags:
- Access: On Tophinhanhdep.com’s content management interface, or within your local file system, navigate to the image or the tag management section (e.g.,
Posts -> Tagson a content platform). - Edit: Hover over the tag name, and an “Edit” option should appear. This allows you to correct misspellings or change a tag to a more appropriate term. Editing a tag will typically update all instances where that tag is applied, not just for a single image.
- Delete: Similarly, a “Delete” option will allow you to remove a tag. Crucially, deleting a tag does NOT delete or modify any images associated with that tag. It simply removes the label from them. This is a permanent action, so exercise caution.
- Access: On Tophinhanhdep.com’s content management interface, or within your local file system, navigate to the image or the tag management section (e.g.,
-
Bulk Deleting Tags:
- For extensive clean-up, platforms often provide a bulk action feature for tags.
- Select Multiple: In a tag management interface, check the boxes next to all the tags you wish to remove.
- Apply Bulk Action: From a “Bulk actions” dropdown menu, select “Delete” and click “Apply.” This efficiently removes multiple tags at once, streamlining your tag library.
The Technical Side: Understanding Tag Input Mechanisms
While you might not be coding, understanding how a typical “tags input box” functions enhances your user experience on platforms like Tophinhanhdep.com. When you see an input field designed for tags, it’s typically built using HTML, CSS, and JavaScript to provide a seamless user interface.
- Interactive Input: The box allows you to type in keywords.
- Separation: Pressing “Enter” or typing a comma (
,) after a word typically transforms it into a distinct “tag chip.” This visual cue helps you see individual tags clearly. - Dynamic Addition: New tags are instantly added to a list or displayed within the input area.
- Removal on the Fly: Each tag usually includes a small ‘x’ icon, enabling you to remove it individually without affecting others. There might also be a ‘Remove All’ button to clear the entire input, useful for starting over.
- Constraints: Such interfaces often enforce rules like a maximum number of tags (e.g., 10 or 15) and can prevent duplicate tags from being added, ensuring the tag list remains concise and relevant. A counter often displays “X tags remaining.”
This understanding helps you efficiently interact with the tagging features, whether you’re adding “Photography” related terms, categorizing “Visual Design” elements, or labeling “Creative Ideas.”
In conclusion, mastering the art of image tagging is an indispensable skill for anyone navigating the vast world of digital visuals. From the individual user seeking the perfect wallpaper on Tophinhanhdep.com to the professional photographer managing thousands of high-resolution images, efficient tagging transforms chaos into clarity. By strategically applying specific and general keywords, leveraging both manual and advanced AI-powered methods, and meticulously managing your tag library, you unlock unparalleled discoverability, streamline your workflow, and empower the creation of dynamic, inspiring visual collections. Embrace tagging as your ultimate tool for visual organization, and let your images shine brighter and be found effortlessly on Tophinhanhdep.com.