Mastering Text-Image Layout: A Guide for Document Design with Tophinhanhdep.com

In today’s visually-driven world, the ability to seamlessly integrate text and images within documents is no longer a luxury but a fundamental skill for effective communication. Whether you’re crafting a professional report, designing marketing materials, or simply compiling a personal album, the interplay between words and visuals can dramatically enhance engagement, clarify complex ideas, and leave a lasting impression. For creators and communicators seeking to elevate their digital documents, understanding how to strategically place text next to, and even over, images is paramount. Tophinhanhdep.com, a premier resource for high-quality images, photography insights, and visual design tools, is dedicated to empowering users to create compelling visual narratives. This comprehensive guide will explore various techniques, primarily focusing on Google Docs as a widely accessible platform, while also drawing upon the broader principles championed by Tophinhanhdep.com to help you achieve sophisticated document layouts.

Gone are the days when documents were purely blocks of text. Modern readers expect a dynamic experience, where beautiful photography, aesthetic backgrounds, and high-resolution images break up monotony, illustrate points, and provide visual context. By learning to expertly arrange text and imagery, you can transform ordinary documents into engaging visual stories. From simple captions to intricate layouts, the methods discussed herein will equip you with the knowledge to bring your creative visions to life, ensuring your documents not only convey information but also captivate your audience.
The Power of Blended Visuals and Text in Document Creation
The strategic fusion of text and visuals serves multiple critical functions in document design. Firstly, images capture attention more readily than text alone. A well-placed nature wallpaper or an abstract background can immediately draw the reader’s eye, setting the tone before a single word is read. Secondly, visuals aid comprehension. Complex data or abstract concepts can be much more easily understood when paired with illustrative images, infographics, or diagrams. This is where digital photography and stock photos from Tophinhanhdep.com become invaluable, providing contextual support that enhances the written narrative.
Beyond mere illustration, the thoughtful integration of text and images contributes significantly to the overall aesthetic appeal of a document. A visually harmonious layout reflects professionalism and attention to detail. This principle is at the heart of graphic design and visual design, where elements are carefully balanced to create a pleasing and effective composition. Moreover, when you align text perfectly next to an image, or skillfully layer text over a subtle background image, you are essentially engaging in a form of photo manipulation and creative ideas that elevate the document from a simple information carrier to a piece of visual art. This can be particularly impactful for reports, presentations, or mood boards that aim to inspire or inform through a blend of information and imagery.
Ultimately, combining text and images effectively allows for more impactful storytelling. Whether you’re aiming to evoke emotions with sad/emotional images, celebrate beauty with stunning beautiful photography, or explain complex ideas, the right visual paired with articulate text creates a synergy that resonates deeply with the audience. Tophinhanhdep.com understands this need and offers a vast array of image inspiration & collections, from thematic collections to trending styles, to ensure you always find the perfect visual counterpart to your words.
Core Methods for Seamless Text-Image Integration in Google Docs
Google Docs, despite its reputation as a primarily text-based editor, offers surprisingly robust tools for manipulating image and text placement. Mastering these features is crucial for creating dynamic and professional-looking documents. The following methods will guide you through adding text next to, and even over, images, transforming your documents into visually rich content.
Utilizing the Google Drawing Feature for Precision
One of the most powerful and versatile methods for intricate text and image placement in Google Docs is through its integrated Google Drawing module. This feature provides a canvas where you can layer multiple images, text boxes, and shapes with absolute precision, and then insert the entire composition as a single image into your document.
Here’s a step-by-step guide:
- Open Your Document and Access Drawing: Begin by opening your Google Docs document. Navigate to
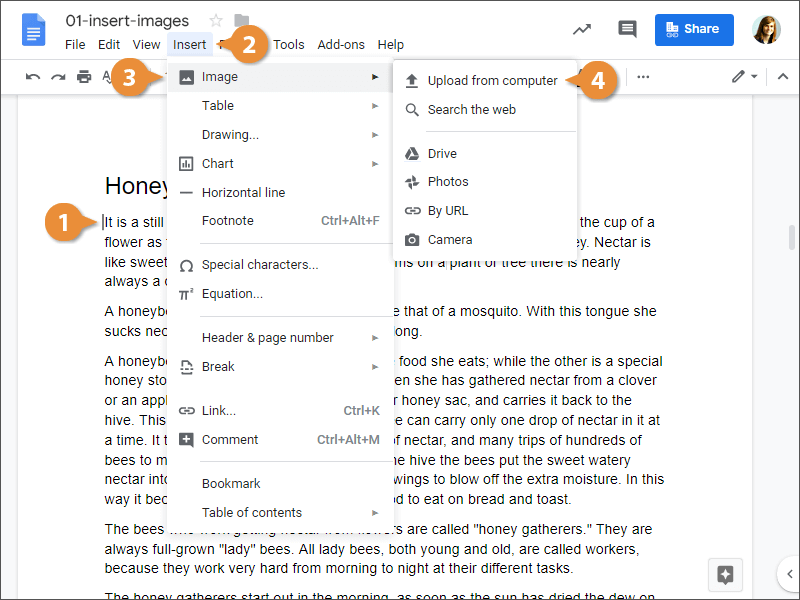
Insertin the top menu, then selectDrawing, and finally+ New. This will open the standalone Google Drawing interface. - Add Your Background Image: Within the Drawing panel, click the
Imageicon (it looks like mountains and a sun) in the toolbar. You can choose to upload an image from your computer, Google Drive, Google Photos, by URL, or even search the web. Select your desired image to serve as the background for your composition. Tophinhanhdep.com is an excellent source for high-resolution background images, whether you need a serene nature background or a bold abstract wallpaper. - Integrate Text or Additional Images: Once your background image is on the canvas, you can add more elements.
- To add text: Click the
Text boxicon (a ‘T’ in a square) in the toolbar. Draw a text box over your image where you want your text to appear. Type your desired text into the box. You can then format the text using the toolbar options (font, size, color, bold, italics, etc.). - To add another image: Click the
Imageicon again and insert another image. This second image will appear on top of your background image. You can resize it by dragging its corners and reposition it by clicking and dragging. This is perfect for adding a logo, a small inset photo, or creating a layered effect.
- To add text: Click the
- Arrange and Refine: Use the drawing tools to arrange your text boxes and images. You can overlap them, place them side-by-side, or create complex layouts. Double-click on any element to edit it. This level of control is ideal for intricate visual design and photo manipulation, allowing you to merge elements creatively.
- Save and Insert: Once your composition is complete, click
Save and Closeat the top right of the Drawing panel. The entire drawing, with all its layered elements, will be inserted into your Google Docs document as a single, unified image. - Editing Later: If you need to make changes, simply double-click on the inserted drawing in your Google Docs document, and it will reopen in the Drawing panel for further edits.
This method is particularly powerful for creating visually integrated sections, custom headers, or even small posters within your document, leveraging the creative ideas and graphic design principles found on Tophinhanhdep.com.
Harnessing Text Wrapping for Flexible Layouts
The text wrapping feature is perhaps the most fundamental tool for placing text next to an image in Google Docs. It dictates how the surrounding text flows around an inserted image. Google Docs offers several options that provide varying degrees of control over your document’s layout.
- Insert Your Image: Begin by inserting your image into the document. Go to
Insert>Image, and select your image source. - Select an Image and Access Wrapping Options: Once the image is in your document, click on it to select it. A toolbar will appear below the image. Look for icons that represent text wrapping options, or click the three-dot menu for
All image optionsto open a dedicated sidebar. - Understanding Text Wrap Options:
- In line: This is the default setting. The image acts like a large character within the text, moving with the text flow. It prevents text from sitting next to the image.
- Wrap text (The Key for “Next To”): This is the option you’ll most frequently use to place text next to an image. When selected, the text will flow around the contours of the image.
- Adjusting Margins: After selecting “Wrap text,” you can further refine the spacing. In the toolbar that appears, or in the “Image options” sidebar under “Text Wrapping,” find the
Margindropdown. Setting this to0allows text to come very close to the image, while increasing it creates more whitespace. Experiment to find the balance that suits your visual design needs. - Positioning: For ultimate control, especially if you want the image to stay in a fixed position regardless of text edits, select
Fix position on pagefrom the same image toolbar or sidebar. This allows you to drag the image freely on the page, and the text will wrap around it from its fixed spot.
- Adjusting Margins: After selecting “Wrap text,” you can further refine the spacing. In the toolbar that appears, or in the “Image options” sidebar under “Text Wrapping,” find the
- Break text: This option places the image on its own line, with text flowing above and below it, effectively breaking the text flow. It’s useful for full-width images or when you want a clear separation.
- Behind text: The image is moved behind the text, allowing the text to appear directly over the image. This is excellent for creating watermarks, subtle backgrounds, or decorative effects. To make the text readable, you might need to adjust the image’s transparency (see “Enhancing Readability” below).
- In front of text: The image appears on top of the text, potentially obscuring it. This is similar to the Drawing method in that it allows an image to cover text, useful for specific photo manipulation effects or overlays where the image itself is the primary focus.
By mastering “Wrap text” and “Fix position on page,” you gain significant control over how your images and text coexist, opening up possibilities for professional and aesthetically pleasing layouts that reflect creative ideas and trending styles.
Strategic Layering of Images and Text
Beyond simply wrapping text, Google Docs also facilitates layering, where elements can stack on top of each other. This is particularly useful for adding logos, watermarks, or combining elements for a richer visual effect.
- Layering Images (using Wrap Text): To layer one image over another, insert both images into your document. For each image, select it, then choose
Wrap textand set theMarginto0(orFix position on page). You can then drag one image directly on top of the other. The order of insertion sometimes determines which image is “on top,” but you can often adjust this by right-clicking an image and looking for “Order” options. This allows for sophisticated visual design effects, like placing a product shot over a scenic background image from Tophinhanhdep.com. - Adding Text Over Images (using Behind/In Front of Text or Drawing):
- Behind/In Front of Text: As mentioned, these wrapping options allow text to sit on top of or behind an image. To make text readable when over an image, consider adjusting the image’s transparency (right-click image >
Image options>Adjustments>Transparency). This is excellent for watermarks or subtle informational overlays. - Google Drawing: The Drawing tool (Method 1) remains the most precise way to layer text directly onto an image, offering full control over placement, size, and formatting.
- Behind/In Front of Text: As mentioned, these wrapping options allow text to sit on top of or behind an image. To make text readable when over an image, consider adjusting the image’s transparency (right-click image >
Structuring Content with Tables for Clear Captions
For simple, consistent text-image pairings, especially for captions, using tables offers a surprisingly elegant solution. This method ensures that an image and its accompanying text remain grouped together, even if the document content shifts.
- Insert a Table: Place your cursor where you want the image and text. Go to
Insert>Table, and select a1 x 2table (one column, two rows). - Add Image and Text: Insert your image into the top cell of the table. In the bottom cell, type your caption or descriptive text.
- Format and Hide Borders: Format your text (font, size, alignment) as desired. To make the table invisible for a cleaner look, right-click anywhere on the table and select
Table properties. UnderTable border, set the border width to0 pt. ClickOK.
Now, your image and caption are neatly grouped within an invisible table. If you move the table, the image and its text move together. This approach is excellent for maintaining a consistent graphic design aesthetic throughout a report or portfolio, ensuring your beautiful photography is always clearly explained.
Optimizing Your Document’s Aesthetics with Tophinhanhdep.com’s Resources
Beyond the technical steps of placing text and images, the actual quality and suitability of your visuals are paramount. Tophinhanhdep.com provides a wealth of resources to ensure your documents always look their best.
Selecting High-Quality Images from Tophinhanhdep.com’s Collections
The foundation of any visually appealing document is the quality of its images. Tophinhanhdep.com specializes in providing an extensive library of high-resolution images, including:
- Wallpapers and Backgrounds: Perfect for setting a mood or acting as a subtle backdrop for text.
- Aesthetic and Nature Images: For documents requiring a sense of beauty, tranquility, or visual appeal.
- Abstract Images: Ideal for modern designs or conveying conceptual ideas.
- Sad/Emotional and Beautiful Photography: For storytelling that requires a specific emotional tone or stunning visual impact.
- Stock Photos: A diverse range of professional images suitable for various contexts, ensuring your visuals are both relevant and of superior quality.
Choosing the right image is a key step in image inspiration & collections, influencing the overall tone and effectiveness of your document. A digital photography piece that is sharp, well-composed, and relevant will always outperform a blurry or generic image.
Enhancing Images with Tophinhanhdep.com’s Image Tools
Before inserting images into your document, consider optimizing them using the powerful image tools available or recommended by Tophinhanhdep.com:
- Image Converters: Ensure your image is in the optimal format (e.g., JPEG for photos, PNG for transparency) for your document and platform.
- Image Compressors & Optimizers: High-resolution images can significantly increase document file size, slowing down loading times and making sharing cumbersome. Using a compressor reduces file size without noticeable loss of visual quality, crucial for web-based documents or email attachments.
- AI Upscalers: If you have an image that’s too small or low-resolution but perfectly fits your content, an AI upscaler can enhance its quality and size, making it suitable for larger displays or print. This is particularly useful when working with older images or those not originally intended for high-fidelity reproduction.
- Image-to-Text Converters: While not directly for layout, Tophinhanhdep.com’s Image-to-Text capabilities can be invaluable for extracting text from visual sources, which can then be used as captions, descriptions, or integrated directly into your document.
Pre-processing your images ensures that they look crisp, load quickly, and contribute positively to the overall document experience, aligning with best practices in digital photography and visual design.
Designing Text for Maximum Visual Impact
Once your images are in place, the text itself needs careful consideration to complement the visuals.
- Font Choice and Size: Select fonts that are legible and align with the document’s tone. Ensure the size is appropriate for readability, especially when text is placed over or very close to an image.
- Color and Contrast: When placing text over an image, contrast is critical. Use text colors that stand out against the image background. If the image is busy, consider adding a semi-transparent background box behind the text to improve readability, a common graphic design technique.
- Alignment: Align text thoughtfully with the image. Sometimes a left-aligned block works best, other times a centered caption under an image provides better balance. Experimentation based on creative ideas and photo manipulation aesthetics is encouraged.
- Transparency and Effects: Google Docs allows for basic text formatting. For more advanced effects, you might consider creating text as part of an image using graphic design software (like those used for digital art) and then inserting it via Google Drawing.
Advanced Techniques and Best Practices for Visual Storytelling
Creating documents with integrated text and images is an art form. Beyond the technical steps, adhering to certain best practices will significantly enhance the quality and impact of your work.
Ensuring Readability and Visual Harmony
- Legibility First: Always prioritize readability. Text placed over busy or low-contrast images will frustrate readers. If you must place text over an image, ensure the image is sufficiently muted, blurred, or has a transparent overlay to make the text pop. This is a core tenet of effective visual design.
- Balance and Whitespace: Don’t overcrowd your document. Allow ample whitespace around images and text blocks. This provides visual breathing room and guides the reader’s eye, contributing to a clean and professional aesthetic.
- Consistency: Maintain consistency in your image styles, text formatting, and layout choices throughout the document. This creates a cohesive and professional look, a hallmark of good graphic design.
- Proximity: Place text directly relevant to an image as close as possible to it. This naturally associates the text with the visual, enhancing comprehension and flow.
Considering Accessibility and Responsiveness
- Alt Text for Accessibility: Always add descriptive “alt text” to your images. This is crucial for accessibility, allowing screen readers to describe the image content to visually impaired users. In Google Docs, right-click the image, select
Alt text, and provide a concise description. This ensures your documents are accessible to a wider audience, reflecting responsible digital photography practices. - Mobile Responsiveness: Consider how your document will appear on different screen sizes, especially on mobile devices. While Google Docs handles some responsiveness automatically, complex text-image layouts (especially those relying on
Fix position on page) might not translate perfectly. Test your document on various devices to ensure the layout remains effective, especially if you’re using thematic collections or intricate photo ideas.
Conclusion: Elevating Your Documents with Expert Text-Image Pairing
The journey to mastering the art of adding text next to images in documents is one of continuous learning and creative exploration. By leveraging the powerful features within tools like Google Docs, combined with the unparalleled resources for images, photography, and visual design offered by Tophinhanhdep.com, you are well-equipped to transform your ordinary documents into extraordinary visual experiences.
Whether you’re creating a presentation filled with beautiful photography, a report enhanced by high-resolution stock photos, or marketing materials utilizing striking aesthetic backgrounds, the methods outlined here provide the foundation for success. Remember to choose your images wisely from Tophinhanhdep.com’s diverse image inspiration & collections, optimize them with our recommended image tools, and meticulously craft your text for maximum impact and readability.
The ability to seamlessly blend text and images is a testament to effective communication and sophisticated graphic design. It allows you to tell stories more vividly, convey information more clearly, and engage your audience more deeply. Experiment with the Google Drawing feature for precise layering, harness the flexibility of text wrapping, organize content with simple tables, and always keep readability and visual harmony at the forefront of your design choices. With Tophinhanhdep.com as your partner, your documents will not only inform but also inspire, leaving a lasting impression that truly stands out.