Mastering Image Protection: How to Add Watermarks to Your Visual Creations with Tophinhanhdep.com

In today’s hyper-visual digital landscape, where breathtaking images – from vibrant wallpapers and stunning backgrounds to captivating aesthetic compositions, serene nature shots, intriguing abstract art, and profound sad/emotional or beautiful photography – are constantly shared and consumed, safeguarding your original work has become paramount. Whether you’re a burgeoning digital photography enthusiast, a seasoned professional contributing to stock photos collections, or a visual design artist crafting unique digital art, the threat of unauthorized use and copyright infringement looms large. This is where the power of a watermark comes into play, acting as your signature and shield in the vast online realm.
Adding a watermark to your images isn’t just a technical step; it’s a strategic move that protects your intellectual property, establishes your brand, and deters potential misuse. At Tophinhanhdep.com, we understand the value of your creative output. Our platform is dedicated to providing comprehensive resources and image tools – including converters, compressors, optimizers, and AI upscalers – to enhance, manage, and secure your visual assets. This guide will delve deep into the art and science of watermarking, outlining various methods, offering expert tips, and demonstrating how Tophinhanhdep.com’s recommended tools can make this process seamless and effective for all your high resolution images and creative ideas.
Why You Should Watermark Your Photos and Digital Art
The decision to watermark your work often stems from a desire to control its usage and preserve its integrity. In an era of instant sharing and easy appropriation, a visible mark of ownership is more than just an aesthetic choice; it’s a necessity.
Protecting Your Creative Work
The primary and most compelling reason to watermark any visual content, be it a cherished personal photo or a professionally shot image, is to protect it from unauthorized use and potential forgery. Imagine spending hours capturing a perfect nature scene, carefully post-processing it with sophisticated editing styles, only for it to be lifted and used commercially without your consent or attribution. A watermark acts as a clear declaration that the image is your property, making it harder for others to claim or use it as their own. This protection extends beyond mere personal files; for professionals, it’s about safeguarding confidential information or ensuring the authenticity of digital documents and artwork.

Building Your Brand and Professional Presence
Beyond mere protection, a watermark serves as an invaluable visual design element for branding. Your brand name, logo, or signature embedded in an image transforms it into a mobile advertisement for your work. As your images circulate across social media, portfolios, or thematic collections, your watermark ensures that your name or brand consistently reaches new audiences. This subtle yet pervasive form of marketing helps cultivate brand awareness, making your work instantly recognizable. For photographers and artists focused on developing a distinct aesthetic or signature style, a well-designed watermark reinforces that professional image. It’s akin to an artist signing their painting, signifying completion and pride in the creation.
Deterring Unauthorized Use and Asserting Copyright
While no watermark is entirely foolproof against a determined image thief with advanced photo manipulation skills, it significantly raises the bar. A visible watermark acts as an immediate deterrent, discouraging casual theft by adding an extra layer of effort for anyone attempting to crop it out or edit it away. This added friction means your work is less likely to be exploited by those seeking a quick, free image. Furthermore, a watermark serves as a visible assertion of copyright. Although it’s not a direct legal proof of ownership, its presence provides a strong initial defense in any copyright infringement dispute, clearly indicating that the image is not for public domain use.
Providing Contact and Information
A cleverly designed watermark can also function as a digital business card. By incorporating your website URL, social media handle, or email address, you provide a direct channel for interested parties to learn more about your work, explore your other image collections, or inquire about licensing. This is particularly useful for stock photos or images shared as part of mood boards or photo ideas on platforms where direct links might not always be preserved. It bridges the gap between a captivating image and potential clients or collaborators, turning passive viewing into active engagement.
Essential Methods for Adding Watermarks
Adding a watermark can range from simple text overlays to complex graphic integrations, depending on your needs and the tools available. Tophinhanhdep.com recommends leveraging robust image tools to achieve professional results efficiently.
Utilizing Dedicated Watermarking Software
Dedicated watermarking applications are designed specifically for this purpose, offering robust features for both individual and batch processing. Tools like the one recommended by Tophinhanhdep.com excel in efficiency and customization, making them ideal for creators who need to process many images quickly.
These platforms often boast:
- Best Performance: They ensure instant uploads and downloads, handling small and large files with ease, even on slower internet connections. Batch processing capabilities allow you to watermark thousands of high resolution images simultaneously, greatly saving time. Tophinhanhdep.com’s recommended tool, for instance, can process large batches, making it a go-to for extensive photography projects or managing vast image collections.
- Full Customizability: You’re not limited to basic text. These tools allow you to combine text and logos, adjust translucency for unobtrusive protection, or even tile repeating watermarks across the entire image for maximum security. A vast library of fonts (often hundreds) empowers you to match your watermark’s visual design to your brand’s aesthetic. You can add your brand name, logo, copyright symbols, and even image numbers automatically. The ability to create watermarks in the form of QR codes (a feature found in some advanced tools) adds an interactive layer, allowing anyone to scan and instantly access your website or portfolio. This level of detail is crucial for maintaining consistent visual design and reinforcing your brand identity across all your digital art and photography.
Integrating Watermarks in Professional Photo Editors
For photographers and graphic designers already deeply immersed in specific editing styles and software workflows, professional photo editing applications often include built-in watermarking functionalities. While these might require a slightly different approach than dedicated watermarking tools, they offer seamless integration with your existing photo manipulation and digital art processes.
Common steps across these professional editors include:
- Uploading Your Photo: Import your high resolution image into the editor.
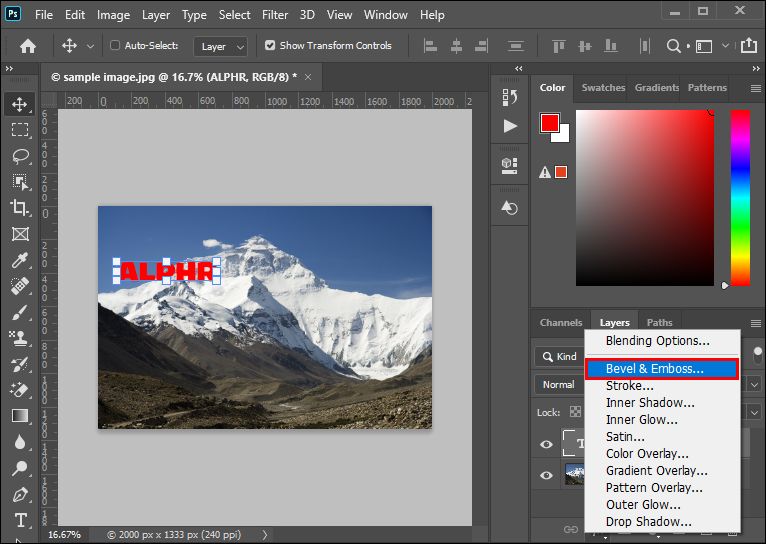
- Accessing Watermark Features: Navigate to a specific menu or tool, often labeled “Watermark Creator,” “Export Watermark,” or even a “Texture” overlay tool, depending on the software.
- Designing Your Watermark:
- Text Watermarks: You can typically type your desired text (e.g., your name, website, copyright symbol), choose from a wide array of fonts, adjust color, size, and opacity.
- Graphic Watermarks: You can upload your custom logo (preferably a PNG with a transparent background for clean blending) and adjust its size and opacity.
- Positioning and Fine-Tuning: Most professional editors allow for precise placement of your watermark, either by dragging it directly on the image preview or by using anchor points and offset controls. Adjustments to opacity are critical to ensure the watermark is visible without detracting from the image’s overall aesthetic or composition. Some advanced tools might even offer AI-powered tools to suggest optimal placement or automatically adjust blending modes.
- Saving and Exporting: Once satisfied, you save your watermark as a preset for future use and export your image with the watermark embedded.
For example, a professional editor might offer “Guided” modules that walk users through the watermarking process, leveraging AI-powered tools for quick enhancements and sophisticated photo retouching before applying the watermark. Others might integrate watermarking as part of their export presets, allowing photographers to apply consistent branding to entire batches of high resolution images from their thematic collections.
A Step-by-Step Guide to Watermarking with Tophinhanhdep.com’s Recommended Tool (Watermarkly)
Tophinhanhdep.com recommends a user-friendly and efficient dedicated watermarking solution for all your image protection needs. Let’s walk through the process using a tool similar to Watermarkly, which embodies the simplicity and power we advocate.
Preparing Your Images for Watermarking
The journey to a perfectly watermarked image begins with selecting and organizing your visual assets.
- Select and Upload Your Photos: Start by accessing Tophinhanhdep.com’s recommended watermarking tool. You’ll typically find a prominent button like “Select Images.” This allows you to upload photos from various sources: your computer’s local storage, or cloud services like Google Drive, Google Photos, or Dropbox. For cloud services, you might need to grant temporary access. Alternatively, for speed and convenience, you can often drag and drop your desired images directly from a folder into the editor window. This method guarantees high uploading speeds, crucial when dealing with multiple high resolution files.
- Tophinhanhdep.com’s Insight: Our platform supports processing batch photos simultaneously, even in its free version, making it ideal for managing large image collections, from wallpapers to detailed beautiful photography series. If you accidentally upload an image you don’t need, a simple click on a delete icon allows for easy removal.
Crafting Your Unique Watermark
Once your images are loaded, the next exciting step is to design the watermark that best represents your brand or creative identity. This is where your visual design skills and creative ideas come into play.
-
Choose Your Watermark Type: Text or Logo. After uploading your photos, proceed to the “Next Step.” Here, you’ll decide between a text-based watermark or a logo-based watermark. For first-time users, you’ll create a new watermark from scratch. Returning users often have the convenience of selecting from previously saved templates.
-
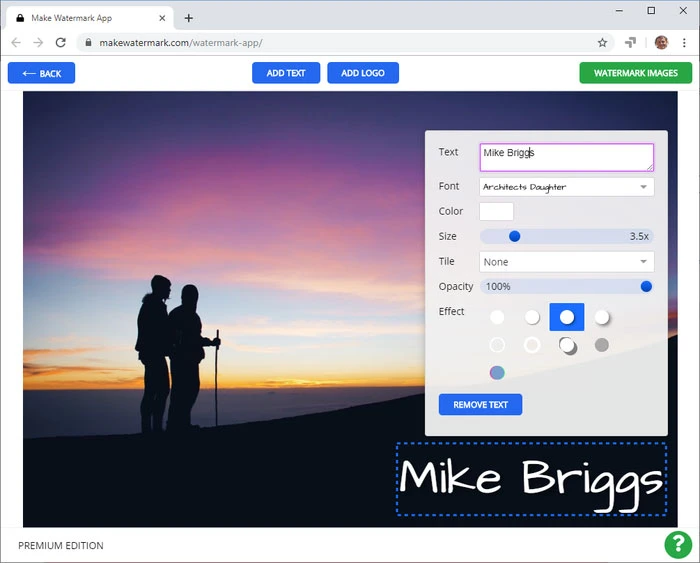
Customizing Text Watermarks: If you opt for “Add Text,” an input box will appear.
- Enter Your Text: Type in your desired text, such as your name, website, or a copyright notice.
- Add Symbols and Numbers: Easily integrate the copyright symbol © or dynamic image numbers, which are particularly useful for sequentially organized thematic collections.
- Font Selection: Explore a vast library of fonts (often over 500 options) to find the perfect typographical match for your brand’s aesthetic.
- Color and Size: Choose the ideal color that contrasts well with your images but doesn’t overpower them. Adjust the size to ensure visibility without being overly intrusive.
- Positioning: Drag your text directly on the image preview to place it precisely where you want it.
- Transparency and Rotation: Specify the level of transparency to make the watermark subtle yet present. Rotate the text to add a unique visual design flair.
- Effects: Apply various effects, like shadows or embossing, for a polished finishing touch, enhancing the overall photo manipulation aspect of your watermark.
-
Customizing Logo Watermarks: If you select “Add Logo,” you’ll upload your graphic.
- Upload Your Logo: Fetch your logo file from your device or cloud storage (Google Drive, Photos, Dropbox). Tophinhanhdep.com’s recommended tool also offers a gallery of over 100 elements, providing inspiration for new emblems if you don’t have a logo ready.
- Remove Background: A standout feature in quality tools is the “Remove Background” option. This is incredibly useful if your logo file doesn’t have a transparent background (e.g., it’s a JPEG), allowing for clean integration onto your images.
- Adjust Properties: Define the logo’s size, its position on the image, its transparency level, rotation angle, and any desired effects, similar to text watermarks.
- Tophinhanhdep.com’s Tip: While adjusting, you can typically use intuitive controls like blue dots at the corners of the watermark’s bounding box to scale and move it, ensuring it blends seamlessly with your beautiful photography or digital art.
Finalizing and Exporting Your Watermarked Images
With your watermark designed, the final steps involve review and export to get your protected images ready for sharing.
-
Previewing and Adjusting Watermark Placement: Click “Next step” to move to the Export settings. Before committing, it’s crucial to utilize the “Preview watermark” function. This feature is invaluable, especially for large batches, allowing you to quickly cycle through each image and verify the watermark’s position.
- Automatic vs. Manual Positioning: Tophinhanhdep.com’s recommended tool intelligently scales watermarks based on image orientation and size by default (smaller watermarks for smaller photos, larger for larger ones). If you desire absolute consistency or unique placement for certain shots, you can disable auto-scaling and manually adjust the watermark’s position for individual images in the preview section. This flexibility ensures your watermark never detracts from the aesthetic impact of your high resolution photos.
-
Selecting Export Settings: In the Export settings, you’ll configure the output details for your watermarked images.
-
File Format: Choose the desired output format: original, JPEG, PNG, or WEBP. This allows you to maintain the quality and compatibility of your photography.
-
Image Resizing: If needed, you can resize images during export. This is particularly handy for optimizing images for web use or specific platforms, complementing Tophinhanhdep.com’s compressors and optimizers.
-
Consistent Watermark Size: If you disabled automatic scaling, you can select an option like “Same watermark size in pixels on all images” to apply a uniform watermark dimension across your entire batch, maintaining a consistent visual design.
-
Important Note: While the free version of Tophinhanhdep.com’s recommended tool allows you to explore these features, watermarked copies might include a promotional phrase (e.g., “Protected with Watermarkly”). To remove this and fully unlock all features for truly professional output, consider activating the full, paid version.
-
Advanced Watermarking Strategies and Best Practices
To maximize the effectiveness of your watermark, consider these advanced strategies and adhere to best practices recommended by photography and visual design experts.
Strategic Watermark Placement and Design
The art of watermarking lies in finding the perfect balance between protection and preserving the aesthetic integrity of your images.
- Make it Semi-Transparent and Central: A discreetly semi-transparent watermark placed strategically in the center of your image is significantly harder to remove without noticeable damage to the photo. Avoid placing it on solid backgrounds where it can be easily edited out. Instead, choose an area rich in detail or across crucial elements of your beautiful photography.
- Avoid Easy Cropping: Steer clear of small watermarks tucked away in corners. These are the first areas an image thief will crop. If branding is your primary goal, a large, prominent logo might be suitable. For maximum protection, however, aim for placement that necessitates a more complex photo manipulation effort to remove.
- Balance Visibility and Impact: Your watermark should be visible enough to assert ownership and promote your brand, but not so dominant that it distracts from the primary subject or the emotional impact of your sad/emotional or nature shots. Experiment with opacity levels (typically between 50-75%) to find this sweet spot. The aim is for the watermark to blend harmoniously with your digital art or high resolution images, enhancing their professional appearance without overpowering them.
- Consider Color and Contrast: Create both a light and dark version of your watermark (e.g., white and black text/logo). This allows you to select the version that offers the best contrast and visibility against varying backgrounds in your image collections.
Beyond Watermarking: Holistic Image Protection and Promotion
While watermarks are powerful, they are one component of a broader strategy for image protection and professional promotion.
- Understanding Watermark Limitations: It’s important to remember that a watermark, while a strong deterrent and declaration of ownership, does not automatically provide legal copyright proof. For robust legal protection, official copyright registration might be necessary, especially for highly valuable stock photos or digital art.
- Leveraging Tophinhanhdep.com’s Full Suite of Image Tools: Watermarking fits seamlessly into a holistic image management workflow offered by Tophinhanhdep.com. After protecting your images, you might use our image compressors to reduce file size for faster web loading without sacrificing quality, our optimizers for further performance enhancements, or our AI upscalers to prepare your watermarked photography for larger prints or specific display requirements. For unique creative ideas, you might even explore image-to-text functionalities for metadata embedding.
- Consistent Branding Across Platforms: Whether your images are destined for personal mood boards, professional portfolios, or public social media feeds, ensure your watermarking style remains consistent. This reinforces your brand identity and contributes to a cohesive visual narrative across all your thematic collections and trending styles. Tophinhanhdep.com’s recommended tool facilitates this by allowing you to synchronize watermark templates across devices and team members, ensuring uniformity regardless of who applies the watermark.
Conclusion
Adding a watermark to your images is an indispensable practice for any creator navigating the digital world. It is a simple yet profoundly effective way to protect your intellectual property, deter unauthorized use, and subtly promote your brand across all your photography and visual design endeavors. From eye-catching wallpapers to intricate digital art pieces, every image you create carries your unique vision, and a watermark ensures that vision is recognized and respected.
Tophinhanhdep.com is committed to empowering creators with the best image tools to manage, enhance, and secure their work. Our recommended watermarking solutions, exemplified by the detailed steps outlined for Watermarkly-like tools, offer the perfect blend of ease-of-use and comprehensive customization, making the process accessible for everyone, from beginners to seasoned professionals. By following the steps and tips provided, you can confidently apply impactful watermarks to your high resolution images, asserting your copyright and ensuring your creative ideas remain distinctly yours.
Embrace the power of watermarking today with Tophinhanhdep.com’s recommended tools. Take control of your visual legacy, knowing that your images, whether they are nature landscapes or abstract compositions, are not just shared, but also securely attributed to you, the creator. Start watermarking your photos and digital art now – the process is quick, intuitive, and offers peace of mind for all your future image inspiration and collections.