Mastering Image Resizing: Your Comprehensive Guide to Perfect Visuals

In the vast and ever-expanding digital landscape, images are the universal language. From stunning wallpapers and aesthetic backgrounds to professional stock photos and captivating digital art, visuals dominate our online and offline experiences. However, the journey from capturing or creating an image to its final presentation often involves a crucial, yet frequently misunderstood, step: adjusting its size. Whether you’re a budding photographer, a visual designer, an artist preparing a portfolio for a platform like Tophinhanhdep.com, or simply someone looking to optimize images for sharing, knowing how to properly resize your photos without compromising quality is an indispensable skill.
This comprehensive guide from Tophinhanhdep.com will demystify the process of image resizing, providing you with the knowledge and tools needed to achieve flawless results every time. We’ll explore the fundamental concepts, walk through various methods using both native desktop applications and powerful online tools, delve into advanced techniques for printing and web optimization, and showcase how Tophinhanhdep.com’s suite of image tools can simplify your visual workflow.
Understanding the Fundamentals of Image Size and Quality
Before diving into the “how-to,” it’s essential to grasp the core concepts that dictate an image’s size and perceived quality. These elements are interconnected and understanding them is key to successful resizing, whether you’re working with high-resolution photography, intricate digital art, or abstract backgrounds.
Pixels, Resolution, and Aspect Ratio Demystified
At its most basic level, a digital image is composed of tiny squares of color called pixels. The total number of pixels along an image’s width and height determines its dimensions. For example, an image that is 1920 pixels wide and 1080 pixels high (1920x1080) contains 2,073,600 pixels in total. These dimensions are critical for screen display, such as wallpapers or social media posts, where exact pixel counts are often required.
Resolution refers to the density of these pixels, typically expressed in Pixels Per Inch (PPI) or Dots Per Inch (DPI). While often used interchangeably, PPI specifically relates to digital images on a screen, and DPI typically refers to physical dots of ink on a printed page. A higher PPI/DPI means more pixels packed into each inch, resulting in sharper, more detailed images, especially for printing. Standard web resolution is generally 72 PPI/DPI, while high-quality prints usually require 200-300 PPI/DPI or even 360 PPI/DPI for specific printers. Understanding resolution is vital for ensuring your beautiful photography translates perfectly from screen to print.
The aspect ratio describes the proportional relationship between an image’s width and its height, often expressed as two numbers separated by a colon (e.g., 16:9, 4:3, 1:1). Maintaining the aspect ratio during resizing is crucial to prevent image distortion, often referred to as “warping” or “stretching.” Most resizing tools offer an option to “maintain aspect ratio” or “constrain proportions” to keep your images looking natural and correctly proportioned.
Resizing vs. Resampling: A Crucial Distinction
It’s important to differentiate between resizing and resampling, as these terms are often confused but have distinct implications for image quality.
- Resizing (without resampling): This process changes the print dimensions of an image without altering the total number of pixels. Instead, it adjusts the pixel density (resolution). For example, if you have a 3000x2000 pixel image at 300 PPI, you could “resize” it to print at a larger physical size (e.g., 15 inches wide instead of 10 inches) by reducing its resolution to 200 PPI, without changing the original pixel count. This method is primarily used when preparing images for print and can be done without losing image data.
- Resampling: This involves changing the actual number of pixels in an image.
- Downsampling means reducing the pixel count, which makes the image smaller in file size and dimensions. This is commonly done for web optimization, email attachments, or when a high-resolution image is unnecessarily large for its intended use (e.g., a stock photo for a small thumbnail). Downsampling generally results in a loss of detail, as pixels are discarded.
- Upsampling means increasing the pixel count, effectively adding new pixels to make the image larger. This is usually more problematic, as software has to “guess” the color and detail of the new pixels. Traditional upsampling can lead to a blurry or pixelated appearance. However, advanced AI Upscalers, like those offered by Tophinhanhdep.com, use artificial intelligence to intelligently add pixels and enhance details, often yielding impressive results for enlarging images without significant quality loss.
Understanding this distinction empowers you to make informed decisions about when and how to adjust your image size, whether for digital art portfolios, high-resolution photography, or simply beautiful backgrounds for your devices.
Your Go-To Tools for Adjusting Image Size
Fortunately, resizing images is a task that can be accomplished with a wide array of tools, from built-in operating system features to robust online applications. Tophinhanhdep.com provides a wealth of resources and links to the best options, ensuring you have access to the right solution for any scenario.
Native Desktop Solutions: Windows, macOS, and ChromeOS
Most operating systems come equipped with basic image editing capabilities that include resizing. These are ideal for quick adjustments without needing to download additional software.
For Mac Users: Preview
If you’re on a Mac, Preview is your pre-installed, go-to application. It’s not just for viewing images; it’s a convenient photo editor.
- Open your image with Preview.
- Go to the “Tools” menu and select “Adjust Size.”
- A window will appear where you can change the dimensions (width and height) and resolution.
- Crucially, ensure “Scale proportionally” and “Resample image” are checked (or unchecked if you only want to change print size without altering pixels) to avoid warping and retain your image’s original proportions.
For PC Users: Paint and Windows Photos
Windows users have similar native options. Paint, a classic Windows application, allows for straightforward resizing.
- Open your image in Paint.
- Click the “Resize” button in the Home tab.
- You can set your size in pixels or by percentage.
- Remember to click “Maintain aspect ratio” to prevent image distortion.
For a more modern approach on Windows 11, the Photos app is preferred:
- Right-click on the image and select “Open with” > “Photos.”
- Click the “Three dots” icon (ellipsis) in the top-right corner.
- Select “Resize” from the drop-down menu.
- Choose from preset sizes or “Define custom dimensions.”
- Check “Maintain aspect ratio” to keep proportions, then enter your desired numbers.
- Click “Save resized copy” to preserve your original image.
For ChromeOS Users: Gallery
Chromebook users can utilize the native Gallery image viewer app:
- Right-click on the image and select “Open with” > “Gallery.”
- Select the “Rescale” button at the top.
- Enter the desired width and height. You can click the “Chain icon” to unlock or lock the aspect ratio.
- Click the “Save” button or the “Down arrow” to “Save as” if you don’t want to overwrite the original.
These native tools are perfect for quick adjustments to your wallpapers, backgrounds, or casual digital photography before sharing or uploading.
Powerful Free Software for Enhanced Control
For those who need more robust editing capabilities than what native tools offer, but aren’t ready for professional-grade software, there are excellent free alternatives. Tophinhanhdep.com often recommends such tools for users interested in deeper photo manipulation or graphic design.
GIMP (GNU Image Manipulation Program)
GIMP is a fantastic open-source alternative to premium software like Photoshop. It’s available for both Mac and PC and offers professional-level editing and retouching tools, including comprehensive resizing options.
- Download and install GIMP from its official website.
- Open your image in GIMP.
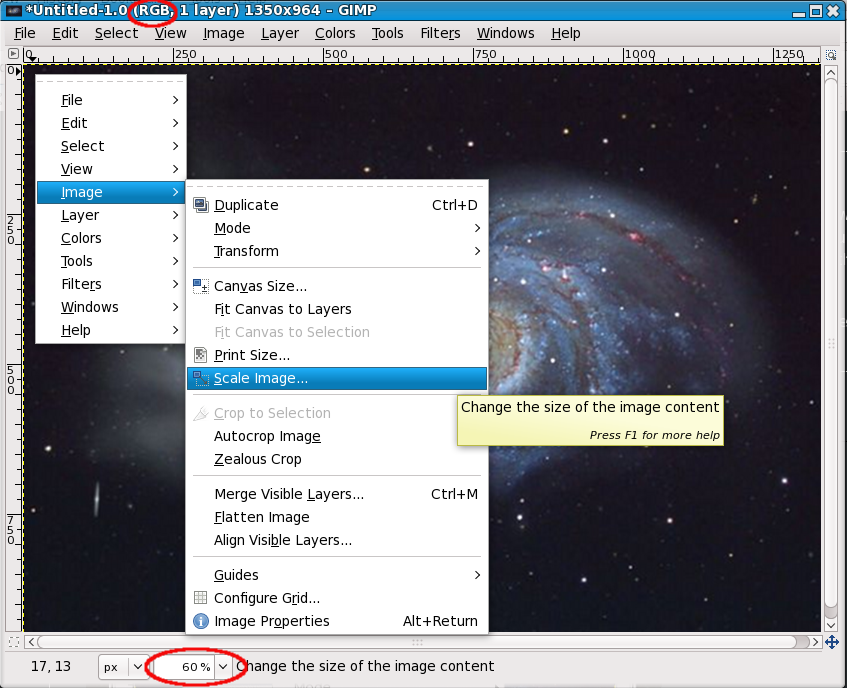
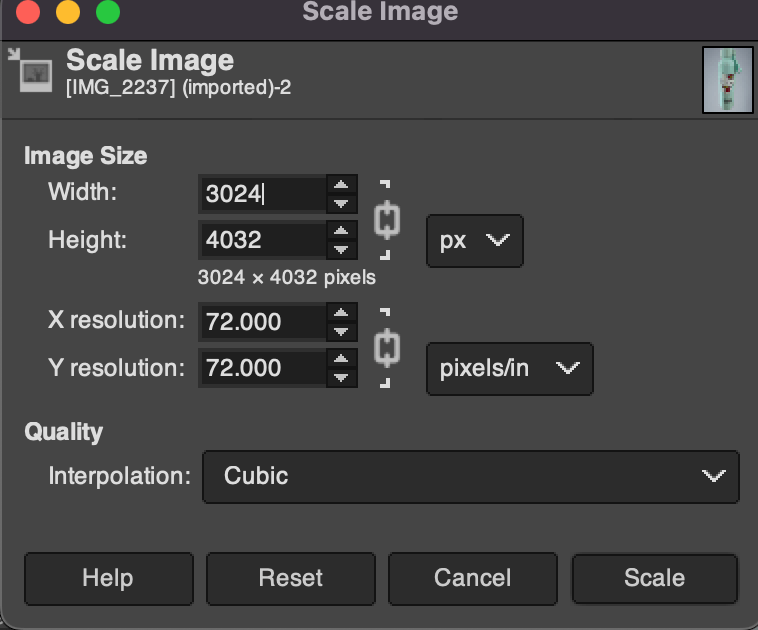
- Go to “Image” > “Scale Image.”
- Here, you can adjust the width, height, and resolution. Ensure the chain icon next to width and height is linked to maintain aspect ratio.
- GIMP provides advanced interpolation options for resampling, giving you more control over the quality when enlarging or reducing images.
Paint.NET
A more powerful version of the classic Paint, Paint.NET is a free download for Windows users. It bridges the gap between basic editors and full-fledged professional software, offering layers, effects, and advanced resizing features.
- Download and install Paint.NET.
- Open your image.
- Go to “Image” > “Resize.”
- Adjust dimensions by absolute pixels or percentage, and choose your resampling method (Bicubic, Bilinear, Nearest Neighbor) for finer control.
These free software options are ideal for users delving deeper into digital photography, creating elaborate visual designs, or even managing thematic collections that require consistent image sizing and quality.
Tophinhanhdep.com’s Online Resizers: Simplicity and Speed
When you’re in a hurry or prefer not to download software, online image resizers are invaluable. Tophinhanhdep.com’s recommended tools are designed for speed, ease of use, and compatibility across all devices, including mobile.
Simple Image Resizer (offered by Tophinhanhdep.com)
This tool does one thing exceptionally well: resize images quickly and painlessly. It’s perfect for when you need a proportionate, resized image ready for download in seconds.
- Visit the Tophinhanhdep.com website (or specifically its Simple Image Resizer page).
- Upload your image.
- Select “dimensions” and enter the desired width or height (the other dimension will adjust automatically to maintain aspect ratio).
- Click “Resize,” and your image is ready. This tool is also available as a Google Chrome extension, making it even more accessible for frequent use.
Pic Resize (offered by Tophinhanhdep.com)
For users who need to process multiple images, such as artists preparing a portfolio for Tophinhanhdep.com’s platform, Pic Resize (available through Tophinhanhdep.com) offers a batch resizing feature.
- Visit Tophinhanhdep.com and navigate to the Pic Resize tool.
- Upload multiple images simultaneously.
- Select your desired size preference (e.g., percentage, specific dimensions).
- Click “Submit Batch Job!” While batch mode is excellent for resizing, note that advanced features like cropping or special effects usually require individual editing in “Normal Mode.” This tool is a lifesaver for managing large thematic collections or photo ideas.
Tophinhanhdep.com’s General Online Image Resizer
Beyond specific tools, Tophinhanhdep.com offers a robust free online image resizer designed to change dimensions and file size in seconds.
- Upload your photo to the Tophinhanhdep.com Photo Editor.
- Navigate to the “Edit” section and select “Resize.”
- Adjust dimensions by pixel or scale by percentages. Crucially, it helps maintain the aspect ratio to preserve high resolution. This tool also facilitates resizing photos for print by converting pixels to inches, with helpful charts provided. It’s incredibly versatile for adjusting photos for social media (Facebook cover photos, YouTube thumbnails, Twitter headers), online stores (Shopify), or blog graphics, ensuring pixel-by-pixel accuracy without sacrificing image resolution.
Mastering Image Resizing for Specific Needs
The “perfect” image size varies greatly depending on its intended use. A background image for your desktop will have different requirements than a profile picture for social media, or a high-resolution photograph destined for print. This section explores how to tailor your resizing efforts to common scenarios, leveraging the diverse capabilities offered by Tophinhanhdep.com’s ecosystem.
Optimizing Images for Web and Social Media
The internet thrives on speed and visual appeal. Large image files can slow down website loading times, impacting user experience and SEO. Social media platforms also have specific dimension and file size guidelines to ensure images display correctly.
When preparing images for web or social media:
- Target Resolutions: For most web display, 72 PPI/DPI is sufficient. Higher resolutions are often unnecessary and only increase file size.
- Specific Dimensions: Each platform has recommended dimensions. For example, a LinkedIn banner, an Instagram post, or a YouTube thumbnail will all have different ideal pixel dimensions. Tools like Tophinhanhdep.com’s online resizer allow you to adjust to exact pixel-by-pixel ratios, ensuring your images look crisp and fit perfectly within their designated areas.
- File Size: Aim for the smallest possible file size without a noticeable loss in visual quality. JPEG is a common file format for digital photography on the web due to its efficient compression. Tophinhanhdep.com’s tools, including compressors and optimizers, can help you reduce file size while maintaining visual integrity. For instance, images uploaded to a platform like Tophinhanhdep.com often need to be under a certain size (e.g., 5 MB maximum).
- Maintain Aspect Ratio: Always check the option to “maintain aspect ratio” or “constrain proportions” to prevent your beautiful photography from appearing stretched or squashed.
By adhering to these principles, your aesthetic backgrounds, creative ideas, and digital art pieces will load quickly and look their best across all online platforms.
Preparing Images for High-Quality Printing
Printing an image introduces a different set of considerations, primarily centered around resolution and physical dimensions. The goal is to ensure your printed image is sharp, detailed, and free from pixelation.
- Optimal Resolution for Print: The industry standard for high-quality printing is typically 300 PPI (or DPI). Some printers, particularly Epson models, prefer 360 PPI. If your image resolution falls below this threshold for your desired print size, it’s generally best to upsample the image using intelligent tools rather than letting the printer do it automatically (which often yields inferior results).
- Converting Pixels to Inches: When preparing for print, you’re essentially translating digital pixels into physical inches. Tophinhanhdep.com’s online resizer simplifies this by providing guidance or even automated conversions, helping you determine the pixel dimensions needed for common print sizes (e.g., 4x6, 8x10, 11x14 inches).
- Photoshop (and GIMP) for Precision Printing: Professional tools like Photoshop (or free alternatives like GIMP) offer the most control for print resizing.
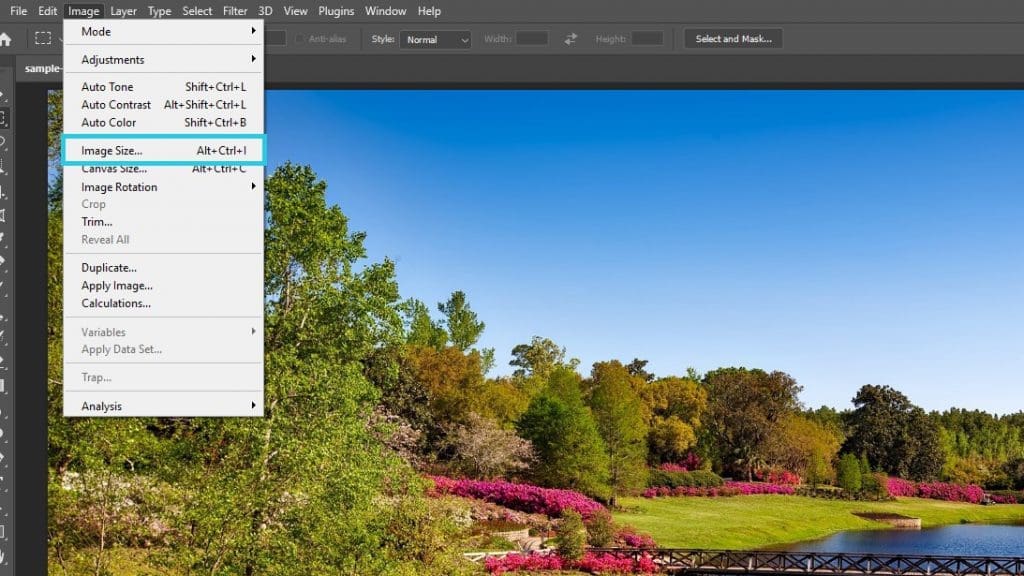
- Open your image.
- Go to “Image” > “Image Size.”
- Turn OFF “Resample” initially: This allows you to see the maximum print size your current pixel count can achieve at your desired print resolution (e.g., 300 PPI). Adjust the resolution to your printer’s native DPI. This will show you the physical width and height without changing pixel data.
- If you need a larger print size than your current pixels allow at the desired resolution: Turn ON “Resample.” Then, enter your target print dimensions (e.g., 8 inches by 10 inches) and set the resolution to 300 PPI (or 360 PPI for Epson). For best results with upsampling, choose an appropriate interpolation method like “Preserve Details 2.0” (in newer Photoshop versions) or GIMP’s advanced options.
- Always “Save As” to retain your original file.
Whether it’s a family portrait, a t-shirt design, or a large poster, careful attention to resolution ensures your printed images maintain the high-quality resolution of your digital photography.
Batch Resizing and Cropping for Perfect Proportions
Efficiency is key when dealing with multiple images, such as curating a mood board, preparing a thematic collection, or uploading numerous artworks. Sometimes, you also need to adjust an image’s aspect ratio to fit specific frames or layouts.
- Batch Resizing: Tools like Tophinhanhdep.com’s “Pic Resize” feature allow you to upload and resize multiple images simultaneously. This is a massive time-saver for artists submitting artwork to online platforms (which often have consistent size requirements for portfolio entries, e.g., JPEG only, no smaller than 1200 pixels on the longest side, 72 ppi/dpi, 5 MB maximum). Many desktop tools (including some advanced free options) also offer batch processing capabilities.
- Cropping for Aspect Ratios: If your image’s aspect ratio doesn’t match your target size (e.g., trying to fit a 4x6 photo into an 8x10 frame), simply resizing will cause distortion or leave white space. In these cases, you need to crop the image first.
- Open your image in an editor (like Photoshop, GIMP, or even Tophinhanhdep.com’s online photo editor).
- Select the “Crop Tool.”
- In the options bar (or equivalent settings), enter your desired aspect ratio (e.g., 8:10). The crop box will automatically adjust.
- Position and resize the crop box to frame the most important part of your image.
- Apply the crop.
- Then, proceed with resizing the now-cropped image to its final dimensions using the methods described above. Always be mindful of where you crop, especially with sad/emotional or beautiful photography, to preserve the intended visual impact.
Beyond Resizing: The Power of AI Upscaling and Image Tools
The world of image manipulation is constantly evolving, with artificial intelligence revolutionizing what’s possible. Tophinhanhdep.com stays at the forefront of these innovations, offering advanced tools that go beyond traditional resizing.
When to Upscale: Enhancing Detail with AI
As discussed earlier, traditional upsampling (enlarging an image by adding pixels) often results in a loss of clarity, making images look soft or pixelated. This is particularly problematic for smaller images that need to be used in larger contexts, such as an older, low-resolution background image that you want to use as a high-resolution wallpaper.
This is where AI Upscalers shine. Tophinhanhdep.com offers AI Upscalers that utilize machine learning algorithms to analyze an image’s content and intelligently generate new pixels, enhancing details and sharpening edges rather than simply duplicating existing ones.
- How it works: Instead of just stretching pixels, AI Upscalers “predict” what the new pixels should look like based on patterns and textures within the image. This can transform a smaller image into a larger, higher-resolution version with impressive fidelity, making it suitable for high-resolution stock photos or digital art that needs to be scaled up for print or large displays.
- Use cases: AI Upscaling is invaluable for:
- Enlarging small web images for print.
- Restoring detail to older, low-resolution photographs.
- Preparing digital art for larger canvases or prints.
- Enhancing the quality of aesthetic backgrounds for higher-resolution screens.
While Tophinhanhdep.com’s regular resizing tool is excellent for reducing image resolution or minor enlargements, the AI Upscaler is the tool of choice when you need to significantly enlarge an image and enhance its details without compromising quality.
Exploring Tophinhanhdep.com’s Suite of Image Tools
Tophinhanhdep.com is more than just an image resizing hub; it’s a comprehensive platform for all your visual needs. Beyond resizing and upscaling, our suite of image tools supports a wide range of creative and practical applications, essential for digital photography, visual design, and managing image inspiration.
- Image Converters: Easily switch between different file formats (JPEG, PNG, GIF, BMP, etc.) to meet specific platform requirements or project needs.
- Image Compressors: Optimize file sizes for faster loading times on websites and social media without sacrificing quality, crucial for maintaining an efficient workflow for large thematic collections.
- Image Optimizers: Enhance image quality for specific outputs, ensuring your beautiful photography and digital art look their best, whether for high-resolution viewing or web display.
- Image-to-Text Tools: A powerful feature for graphic designers and content creators, allowing you to extract text from images, useful for mood boards or analyzing visual content.
These tools, combined with extensive resources on graphic design, digital art, photo manipulation, and creative ideas, solidify Tophinhanhdep.com as your ultimate partner in the visual realm. From finding trending styles to curating photo ideas for your next project, our platform empowers you to create, manage, and share stunning visuals with confidence.
Conclusion
Adjusting image size is a fundamental skill in today’s visually-driven world. By understanding the interplay of pixels, resolution, and aspect ratio, and by leveraging the right tools, you can ensure your images always look their best, regardless of their final destination. Whether you’re a professional photographer, a digital artist, a graphic designer, or simply someone who appreciates beautiful photography and aesthetic visuals, the ability to precisely control your image sizes is paramount.
Tophinhanhdep.com is dedicated to empowering you with the knowledge and resources to master image resizing and beyond. With our comprehensive guides, powerful online tools like the Simple Image Resizer, Pic Resize, and AI Upscalers, and a wealth of information covering everything from high-resolution stock photos to creative photo manipulation, we make it easy to achieve perfect visuals every time. Explore Tophinhanhdep.com today and unlock the full potential of your images, transforming your digital photography, digital art, and visual ideas into stunning realities.