Mastering Image Resizing in Adobe Photoshop: A Comprehensive Guide

Adobe Photoshop stands as the industry-standard software for image manipulation, offering an unparalleled suite of tools for photographers, graphic designers, and digital artists. Among its most fundamental and frequently used functions is the ability to adjust image size. Whether you’re preparing a stunning high-resolution image for print, optimizing digital photography for web display, creating aesthetic wallpapers, or engaging in complex photo manipulation, understanding how to effectively resize images in Photoshop is absolutely crucial. Incorrect resizing can lead to pixelation, blurriness, or loss of detail, compromising the visual integrity of your work.
At Tophinhanhdep.com, we understand the importance of precise image control. Our platform is dedicated to providing comprehensive resources across various visual disciplines, from breathtaking nature and abstract wallpapers to guides on digital photography, editing styles, and advanced visual design techniques. This guide will delve deep into the various methods of resizing images within Photoshop, ensuring your visuals maintain their quality and impact, no matter their final destination.

The Fundamentals of Image Resizing in Photoshop
The primary method for adjusting the overall dimensions and resolution of an entire image in Photoshop is through the “Image Size” dialog box. This tool allows for precise control over an image’s pixel dimensions, print size, and resolution, making it indispensable for both basic adjustments and advanced preparation.
Step-by-Step Guide to Adjusting Image Size
Before you begin, always consider creating a backup of your original file. This non-destructive approach ensures you can always revert to the initial state if needed. A simple way to do this is by selecting “File” > “Save As” and giving your resized image a new name, such as “original_image_resized.jpg”.
Here’s how to resize an image using the Image Size command:
-
Open Your Image in Photoshop: Launch Adobe Photoshop and open the image you wish to resize. You can do this by navigating to “File” > “Open” and selecting your image, or by right-clicking the image file and choosing “Open with” > “Adobe Photoshop”.
-
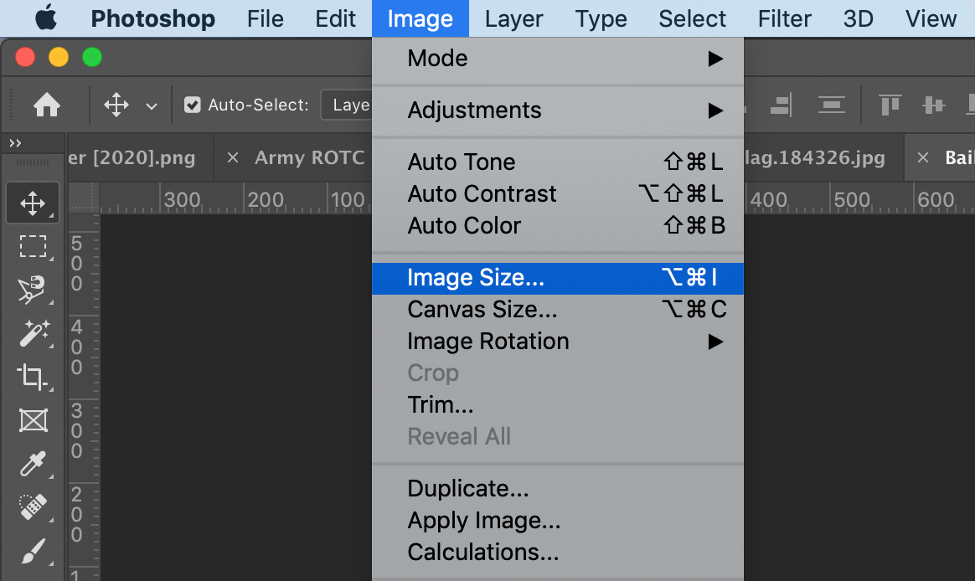
Access the Image Size Dialog Box: Once your image is open, go to the top menu bar, click on “Image,” and then select “Image Size.” A new window will appear, displaying your image’s current dimensions, resolution, and estimated file size.
-
Understand “Constrain Proportions”: In the “Image Size” dialog box, you’ll see a small chain-link icon situated between the “Width” and “Height” input fields. This icon, often referred to as “Constrain Proportions” or “Lock Aspect Ratio,” is critical.
- Locked (Default): When the chain icon is locked, changing either the width or height will automatically adjust the other dimension proportionally. This prevents your image from becoming stretched or squashed, maintaining its original aspect ratio. This is generally the recommended setting for preserving image aesthetics, especially for wallpapers, backgrounds, and photography where distortion is undesirable.
- Unlocked: Clicking the chain icon will unlock the proportions, allowing you to change width and height independently. Use this with caution, as it can lead to noticeable image distortion. This might be used in highly specific photo manipulation scenarios, but usually, cropping is preferred for adjusting aspect ratios without distortion.

-
Select Your Unit of Measurement: Under “Document Size” or “Dimensions,” you can choose your preferred unit of measurement from a dropdown menu.
- Pixels: Ideal for digital images, web optimization, and screen-based visual design.
- Inches/Centimeters: Primarily used for print media, where physical dimensions are crucial.
- Percent: Useful when you want to scale an image up or down by a specific percentage relative to its current size. For example, setting it to 50% will halve the size, while 200% will double it.
-
Adjust Resolution (DPI/PPI):
- Pixels/Inch (PPI): This setting determines the density of pixels within a given inch, directly impacting image quality, especially for print.
- For Web-Based Images: A resolution of “72 pixels/inch” is generally sufficient. Most screens display at this density, and higher resolutions only increase file size without improving visual quality on screen. This is perfect for images intended for Tophinhanhdep.com’s aesthetic collections or stock photos used online.
- For Printing: A resolution of “200 pixels/inch” is a good minimum, but “300 pixels/inch” is widely considered ideal for high-quality printing. Lower resolutions can result in pixelated or blurry prints. If you’re preparing a beautiful photography piece for physical display, aiming for 300 PPI is essential.
-
Input New Dimensions: Enter your desired width and height values. If “Constrain Proportions” is enabled, only adjust one dimension, and Photoshop will handle the other.
-
Address Proportion Mismatches (Cropping): If your target print size or display area has a different aspect ratio than your original image, you might need to crop the image after resizing to fit perfectly without distortion. For example, if you resize a square image to fit a rectangular banner, you’ll need to crop some content from the sides or top/bottom to achieve the desired look without stretching.
-
Finalize and Save: Click “OK” to apply the changes. Your image will update to its new size. Remember to save your file by going to “File” > “Save” or “File” > “Save As” if you want to create a new version.
Beyond Basic Resizing: Advanced Techniques and Considerations
While the “Image Size” dialog is your primary tool, Photoshop offers other resizing methods and crucial concepts that enhance your control over visual design and photo manipulation.
Resizing Individual Layers
In complex digital art or photo manipulation projects, you often need to resize individual elements without affecting the entire canvas. This is achieved using Photoshop’s “Free Transform” tool.
- Select the Layer: In the Layers panel, select the specific layer containing the object or element you want to resize.
- Activate Free Transform: Go to “Edit” > “Free Transform,” or use the shortcut
Ctrl + T(Windows) /Cmd + T(macOS). A bounding box with handles will appear around the selected layer. - Resize the Layer:
- Proportional Scaling: Hold down the
Shiftkey while dragging a corner handle to scale the layer proportionally. This is vital for maintaining the aspect ratio of objects within your digital photography composites. - Non-Proportional Scaling: Drag a corner or side handle without holding
Shiftto stretch or squash the layer. Again, use this with caution, as it can distort your elements. - Scaling from Center: Hold
Alt(Windows) /Option(macOS) while dragging a corner handle to scale the layer from its center point.
- Proportional Scaling: Hold down the
- Confirm Transformation: Press
Enter(Windows) /Return(macOS) or click the checkmark in the options bar to apply the transformation.
This method is particularly useful when incorporating elements into mood boards, adjusting stock photos within a layout, or creating dynamic abstract designs where elements need to be scaled independently.
Modifying Canvas Dimensions
Resizing the canvas is different from resizing the image. Canvas resizing alters the workspace area around your image without scaling the image content itself. This is invaluable for graphic design, creating image backgrounds, or adding borders for aesthetic purposes.
- Access Canvas Size: Go to “Image” > “Canvas Size.”
- Input New Dimensions: A dialog box will appear, showing the current canvas size. You can input new width and height values, choosing units like pixels, inches, or centimeters.
- Anchor Points: The “Anchor” grid in the dialog box determines how the new canvas area is distributed.
- Center Anchor (Default): If the anchor is in the center, new space will be added or removed equally around all sides of your image.
- Side/Corner Anchors: Clicking on a specific square in the anchor grid will expand or contract the canvas from that direction. For example, anchoring to the top-left will expand the canvas to the right and bottom.
- Canvas Extension Color: For added space, you can specify the color of the new canvas area. This is useful for creating a frame or a solid background for your digital art or wallpapers.
- Apply Changes: Click “OK.” If you reduce the canvas size, you will crop your image. If you enlarge it, empty space will be added.
This technique is perfect for adding white space around a beautiful photograph, preparing a background for text overlays, or trimming excess transparent areas from a graphic.
Cropping for Size and Composition
The Crop Tool is another powerful way to adjust image dimensions, often used in conjunction with resizing. It allows you to simultaneously reframe your image and set specific output dimensions or aspect ratios.
- Activate the Crop Tool: Select the Crop Tool from the toolbar (keyboard shortcut
C). A bounding box will appear around your image. - Set Aspect Ratio/Dimensions: In the options bar at the top, you can choose from various preset aspect ratios (e.g., 1:1 square, 16:9 widescreen) or input custom width and height values (e.g., 700px by 350px for a specific banner as recommended by some web platforms).
- Adjust the Crop Box: Drag the corner or side handles of the crop box to define your desired composition.
- You can also drag the image within the crop box to reposition the content.
- Hovering just outside the crop box allows you to rotate the image, useful for straightening horizons in nature photography.
- Content-Aware Fill (Optional): If you expand the crop area beyond the original image boundaries, Photoshop can intelligently fill the new empty space using “Content-Aware Fill” (an option in the top bar when the Crop Tool is active). This advanced feature can be a lifesaver in creative ideas and photo manipulation.
- Apply Crop: Press
Enter(Windows) /Return(macOS) or click the checkmark in the options bar. The image will be trimmed and resized according to your settings.
Cropping is invaluable for achieving trending styles, refining thematic collections, or ensuring images fit specific digital photography layouts without unwanted distortion.
Mastering Resolution and Resampling for Optimal Quality
Understanding the interplay between resolution and resampling is paramount for maintaining image quality during resizing, particularly when dealing with high-resolution digital photography or preparing images for different platforms.
Understanding Pixels, Inches, and DPI
- Pixels (Dimensions): The absolute number of pixels (width x height) that make up your image. This is the fundamental measure of digital image size.
- Inches/Centimeters (Document Size): The physical dimensions of the image when printed. These values are directly affected by the resolution setting.
- Resolution (PPI/DPI): Pixels Per Inch (PPI) for digital displays, Dots Per Inch (DPI) for print. It defines the pixel density. A higher PPI/DPI means more pixels/dots are packed into each inch, resulting in finer detail and sharper prints. For Tophinhanhdep.com, we emphasize using appropriate PPI for online content and high DPI for print-ready beautiful photography.
Choosing the Right Resampling Method
Resampling refers to the process by which Photoshop adds or removes pixels when you change an image’s pixel dimensions. This is where quality can be gained or lost. When you enable the “Resample” option in the “Image Size” dialog box, Photoshop calculates new pixels based on the original data.
Here are the key resampling methods and their ideal uses:
- Automatic: Photoshop analyzes the image and the resizing task (enlarging or reducing) to automatically select the best method. This often provides a good balance for most common tasks.
- Bicubic Smoother (Enlargement): Best for enlarging images, as it smoothly interpolates pixels to create new ones, reducing jagged edges. This is crucial when you need to upscale an image, perhaps with the help of AI upscalers, for larger displays or prints from a smaller original.
- Bicubic Sharper (Reduction): Best for reducing image size, as it sharpens the image during downsampling to maintain crispness and detail. This prevents the image from looking soft or blurry after shrinking. Essential for optimizing high-resolution stock photos for web.
- Bicubic (Smooth Gradients): A good general-purpose method that produces smoother tonal gradations, suitable for images with smooth color transitions.
- Preserve Details (Enlargement): This method (introduced in newer Photoshop versions) offers advanced noise reduction and detail preservation, making it excellent for significant enlargements where you want to retain as much original detail as possible.
- Nearest Neighbor (Hard Edges): A fast but least accurate method, primarily used for images with sharp, distinct edges (like pixel art) or for creating small animations, as it maintains hard edges without anti-aliasing. Not recommended for most photography.
When “Resample” is disabled, Photoshop does not add or remove pixels. Instead, it only rearranges existing pixels. This means the total number of pixels remains constant, but changing the resolution will alter the physical print dimensions and the image’s “weight” (file size) accordingly. For example, if you increase the PPI without resampling, the image will print smaller but with higher detail, as the same number of pixels are packed into a smaller physical space.
Practical Applications and Workflow Integration
Mastering image resizing in Photoshop extends beyond technical steps; it’s about integrating these skills into your broader visual design and digital photography workflows.
Preserving Image Quality
The golden rule of resizing is: it’s always better to scale down than to scale up. Downsampling (making an image smaller) generally preserves quality well, especially with “Bicubic Sharper.” Upsampling (making an image larger) always involves Photoshop “guessing” new pixel data, which can lead to blurriness, pixelation, or a “soft” look. While AI upscalers are improving, they are not a perfect substitute for original high-resolution imagery. Always start with the largest possible image file, especially for digital photography intended for multiple uses or high-resolution displays (like wallpapers).
Preparing Images for Web and Print
- Web Optimization: For online content, like Tophinhanhdep.com’s wallpapers, backgrounds, or aesthetic collections, prioritize file size and load times. Resize images to their exact display dimensions (e.g., a website banner of 1920x1080 pixels) and set resolution to 72 PPI. Then, consider using image compressors and optimizers (like those found in our Image Tools section) to further reduce file size without significant visual quality loss.
- Print Preparation: For high-quality prints of nature photography or custom graphic designs, focus on high resolution (300 PPI) and the correct physical dimensions (inches/cm). Always check your printer’s specifications for optimal DPI settings.
Resizing as Part of Your Editing Styles
Image resizing is rarely an isolated step. It’s an integral part of broader editing styles and creative processes:
- Photo Manipulation: Resizing layers is fundamental for seamlessly integrating different elements into a composite image.
- Graphic Design: Accurately sizing elements ensures consistency and professionalism in layouts, whether for digital art or marketing materials.
- Mood Boards & Collections: Properly scaled images contribute to visually cohesive mood boards and thematic collections, allowing for clear communication of photo ideas and trending styles.
By thoughtfully applying resizing techniques, you ensure your images are not just visually appealing but also technically optimized for their intended purpose, reflecting the high standards of digital photography and visual design advocated by Tophinhanhdep.com.
Conclusion
The ability to accurately and intelligently adjust image size in Adobe Photoshop is a foundational skill for anyone working with digital images. From setting precise dimensions for web backgrounds and high-resolution photography to resizing individual elements for intricate photo manipulation, Photoshop provides robust tools to meet every need. By understanding the nuances of the “Image Size” dialog box, mastering resampling techniques, and knowing when to use canvas adjustments or the crop tool, you empower yourself to create visually stunning and technically sound imagery.
At Tophinhanhdep.com, we are committed to fostering a deeper appreciation and understanding of all aspects of digital imagery. Whether you’re seeking inspiration from our diverse image collections or diving into advanced editing styles and visual design principles, a solid grasp of image resizing in Photoshop will elevate your creative output. Continually applying these best practices will ensure your work consistently delivers impact and maintains impeccable quality across all platforms, truly bringing your creative ideas to life.