How to Adjust the Size of an Image: A Comprehensive Guide for Stunning Visuals

In our increasingly visual world, the ability to manipulate and optimize images is not just a technical skill—it’s an essential aspect of digital literacy. Whether you’re a professional photographer, a graphic designer, a blogger, or simply someone who loves to share “Beautiful Photography” with friends and family, understanding “how to adjust size of image” is paramount. From preparing “High Resolution” images for print to optimizing “Backgrounds” for a fast-loading website, proper image sizing ensures your visuals look their best and perform efficiently across all platforms. At Tophinhanhdep.com, where we delve into everything from “Images (Wallpapers, Backgrounds, Aesthetic, Nature, Abstract, Sad/Emotional)” to “Photography (High Resolution, Stock Photos, Digital Photography, Editing Styles)” and “Image Tools (Converters, Compressors, Optimizers, AI Upscalers, Image-to-Text),” we recognize that mastering image resizing is a foundational step in creating and presenting compelling visual content. This guide will walk you through the core concepts, diverse tools, and practical applications of image resizing, helping you achieve perfect dimensions every time without compromising quality.
Understanding Image Size Fundamentals: Pixels, Resolution, and Aspect Ratio
Before diving into the “how-to,” it’s crucial to grasp the basic principles that govern image size and quality. Digital images are not solid entities; they are composed of tiny squares of color called pixels. The arrangement and density of these pixels determine how an image appears.
What is Image Resolution?
Image resolution typically refers to the number of pixels per unit of length, most commonly expressed as Pixels Per Inch (PPI) for digital displays or Dots Per Inch (DPI) for print. A higher PPI/DPI means more pixels packed into each inch, resulting in greater detail and sharpness. Conversely, a lower resolution means fewer pixels per inch, which can lead to a pixelated or blurry appearance, especially when enlarged.
For web use, a common misconception revolves around 72 PPI being the “standard.” While many monitors historically displayed around 72-96 PPI, screen resolution directly relates to the physical pixel dimensions of an image, not its PPI value. An image that is 1920 pixels wide will fill a 1920-pixel-wide screen regardless of whether its metadata says 72 PPI or 300 PPI. However, for print, resolution is absolutely critical. A high PPI (e.g., 300 PPI) ensures that when your image is printed, the details are crisp and clear, preventing the “stretched” or blocky look that comes from insufficient pixel density. Understanding this distinction is vital when preparing your “Digital Photography” for different outputs.
Resizing vs Resampling an Image
The terms “resizing” and “resampling” are often used interchangeably, but they represent distinct processes with different impacts on your image:

- Image Resizing (without resampling): This process changes the physical print dimensions of an image without altering its total pixel count. When you resize without resampling, you are effectively changing the image’s resolution (PPI/DPI). For example, if you take an image with a fixed number of pixels and tell your printer to print it at a smaller size, it will pack more pixels into each inch, increasing the effective resolution. Conversely, printing it larger spreads the same pixels over more area, decreasing the resolution. This method is ideal when you want to change the print size of an image while preserving its original pixel data. It has no effect on the file size or how the image looks on screen; it only impacts its printed dimensions.
- Image Resampling: This process involves changing the actual number of pixels in an image.
- Upsampling: Adding new pixels to increase the image’s dimensions. This can lead to a loss of quality because the software has to “guess” the color of the new pixels based on existing ones, potentially introducing blurriness or artifacts. However, advanced “AI Upscalers” (available as part of Tophinhanhdep.com’s “Image Tools”) can minimize this quality loss by intelligently generating new pixel data.
- Downsampling: Removing pixels to decrease the image’s dimensions and file size. This generally results in a sharper, more defined image as superfluous pixel information is discarded. It’s excellent for optimizing images for the web or email, where smaller file sizes are crucial for faster loading and reduced bandwidth.
Understanding this fundamental difference is key to preserving the quality of your “Beautiful Photography” and ensuring your “Visual Design” elements always appear sharp and clear, whether on screen or in print.
Essential Tools for Image Resizing Across All Platforms
The good news is that you don’t need expensive software to adjust image sizes. Many free and built-in tools can handle basic resizing tasks, while more robust programs offer advanced control. Tophinhanhdep.com believes in empowering users with knowledge, regardless of their preferred tools.
Native Operating System Tools: Preview, Paint, Photos, and Gallery
Most operating systems come equipped with basic image editing capabilities, perfect for quick adjustments without downloading extra software.
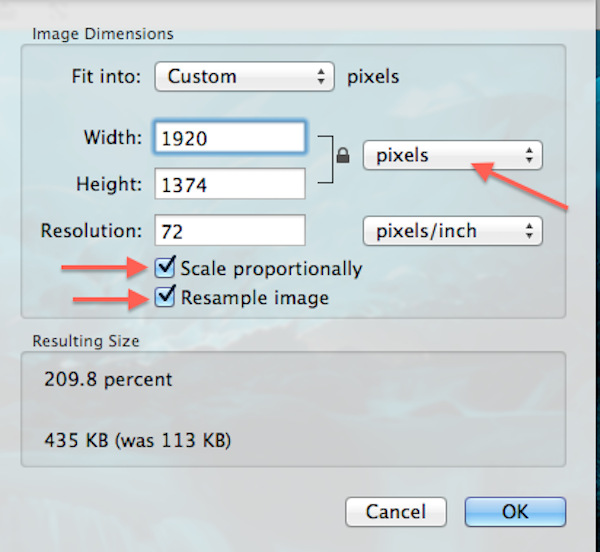
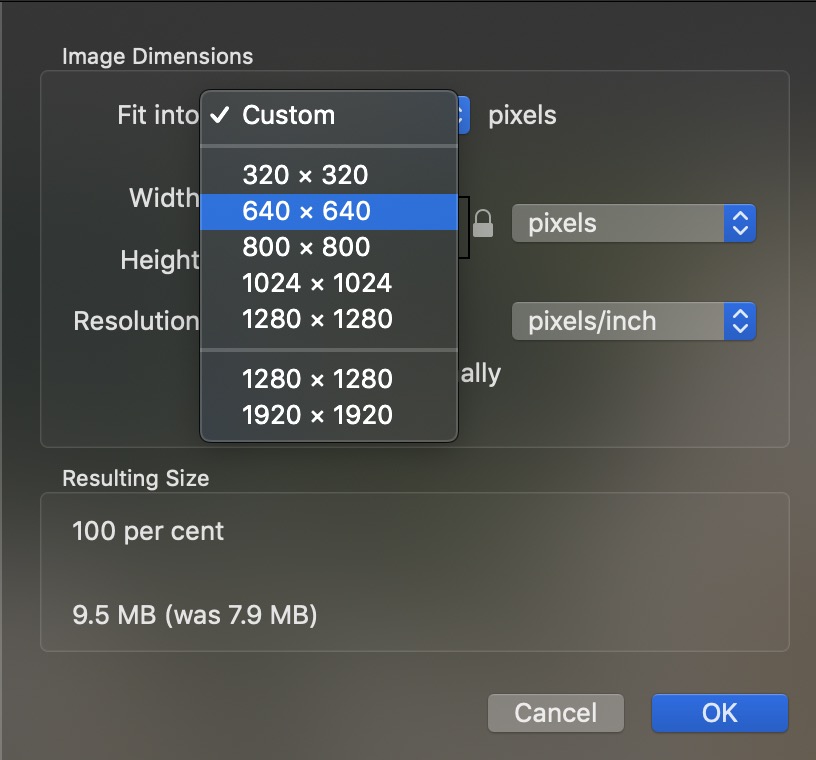
- Preview (macOS): If you’re a Mac user, Preview is your go-to. Simply open your image, navigate to “Tools” in the menu bar, and select “Adjust Size.” Here, you can change dimensions (width and height) and resolution. To maintain your image’s original proportions and prevent distortion, ensure “Scale proportionally” and “Resample image” are checked (for resampling) or unchecked (for pure resizing).
- Paint (Windows): For PC users, the pre-installed Paint program offers straightforward resizing. Open your image, find the resize option, and you can easily set your desired size in pixels. Remember to click “Maintain aspect ratio” to avoid image distortion. For a more capable, yet still free, alternative, consider downloading Paint.NET, which offers more professional-level editing features.
- Windows Photos (Windows 11): The Photos app in Windows 11 provides a modern and intuitive interface for resizing. Right-click your image, choose “Open with” and then “Photos.” Click the three-dots icon in the top-right corner, select “Resize.” You can choose from preset sizes or “Define custom dimensions.” Crucially, select “Maintain aspect ratio” to automatically adjust one dimension when you change the other, preserving proportions. Then, simply “Save resized copy.”
- Gallery (ChromeOS): Chromebook users can utilize the native Gallery app. Open your image with Gallery, select the “Rescale” button, and enter your desired width and height. You can toggle the “Chain icon” to unlock the aspect ratio if needed, though generally, keeping it locked is recommended for quality. Save your new image, opting for “Save as” to retain the original.
GIMP: A Free and Powerful Alternative
GIMP (GNU Image Manipulation Program) stands as an excellent open-source alternative to professional software like Adobe Photoshop. It offers a comprehensive suite of editing and retouching tools comparable to paid applications but is entirely free and available for both Mac and PC. GIMP is renowned for its speed, small installation footprint, customizability, and user-friendly interface. It’s a fantastic choice for those seeking “Digital Photography” editing capabilities without the subscription cost, allowing for precise image resizing and manipulation. You can download GIMP from its official website.
How to Resize an Image in Photoshop
For “Digital Photography” enthusiasts and “Graphic Design” professionals, Adobe Photoshop remains the industry standard, offering unparalleled control over image resizing.
- Open your image in Photoshop.
- Go to the “Image” menu at the top of the window, and select “Image Size.”
- In the new Image Size dialog box, you’ll see details about your image. To start, you’ll generally want to uncheck “Resample” if you’re only adjusting print size without changing pixel count. If you need to change pixel dimensions, ensure “Resample” is checked.
- To maintain proportions, click the chain icon between width and height, or ensure “Constrain Proportions” is checked (older versions).
- Under “Document Size,” you can select your preferred unit of measurement (e.g., “inches,” “pixels,” “centimeters”).
- For print: Set the resolution to no lower than “200 pixels/inch,” with “300 pixels/inch” being ideal for most printers. Input your desired width and height. If the aspect ratio of your original image differs from your desired print size, you’ll need to crop the image before resizing (more on this later).
- For web: You would typically ensure “Resample” is checked, set your desired pixel dimensions (e.g., 1920px wide), and often keep the resolution at 72 PPI (though this primarily impacts file size and is less critical for screen display than pixel dimensions).
- If resampling, consider the “Interpolation method.” Photoshop usually defaults to “Automatic.” For upsampling in newer Photoshop CC versions (2018 onwards), “Preserve Details 2.0” offers superior results by intelligently adding pixels.
- Click “OK” to apply the changes.
- To save your resized image without overwriting the original, go to “File” > “Save As…” and give it a new name. This is crucial for maintaining your “Stock Photos” and original artwork.
Online Resizers for Speed and Convenience: Simple Image Resizer, Pic Resize, Pixlr X, and BeFunky
When you’re in a hurry or don’t have access to desktop software, various online tools offer quick and effective image resizing. These are great for preparing images for social media or your blog, aligning with Tophinhanhdep.com’s focus on “Visual Design” and “Creative Ideas.”
- Simple Image Resizer: This tool lives up to its name. It’s designed for speed. You simply upload your image, select “dimensions,” enter your desired width or height (the other adjusts proportionally), click “Resize,” and your proportionate, resized image is ready to download. It’s available as a Google Chrome extension and is mobile-friendly.
- Pic Resize: For photographers with multiple images, such as those preparing a “Thematic Collection” or “Mood Boards,” Pic Resize offers a batch resizing mode. Upload several images, specify your size preference, and click “Submit Batch Job!” This saves significant time compared to individual edits. Be aware that cropping and special effects are usually not supported in batch mode and require individual processing in “Normal Mode.”
- Pixlr X: A free, web-based image editor, Pixlr X is excellent for simple edits, including resizing. Head to the Pixlr X website, open your image, find the “Layout and Template” button (three rectangles), and select “Smart resize.” Here, you can input exact width and height, lock/unlock the aspect ratio, or choose from presets. Apply changes, then “Save” your file, selecting type and quality.
- BeFunky: Tophinhanhdep.com highly recommends tools like BeFunky for versatile online image editing. Their free online Image Resizer allows you to change dimensions by pixel, scale by percentages, and critically, maintain the aspect ratio to preserve image quality. BeFunky supports batch resizing and simplifies the process for various projects, from “social media posts” to “printing family photos.” It even helps with converting pixels to inches, offering a chart of common print sizes and their pixel equivalents. This is particularly useful for optimizing images for platforms like Shopify or personal websites, ensuring your “Digital Art” and “Creative Ideas” are presented perfectly. BeFunky also offers a mobile app for on-the-go resizing.
Optimizing Images for Specific Applications: Web, Print, and Portfolios
The best resizing strategy depends heavily on where your image will be used. A “Wallpaper” destined for a high-resolution desktop screen has different requirements than a small icon for a mobile app or a photograph for a gallery print.
Resize Photos for Every Website
For optimal web performance and user experience, image size (both dimensions and file size) is critical. Large images can slow down website loading times, impacting SEO and driving visitors away. This is where Tophinhanhdep.com’s “Image Tools (Compressors, Optimizers)” become invaluable.
- Faster Loading Times: Smaller file sizes mean quicker page loads. For blogs, “Aesthetic” collections, or online stores, optimizing images is a must.
- Platform-Specific Dimensions: Social media platforms (Facebook, Instagram, Twitter, YouTube), e-commerce sites (Shopify), and blogs often have recommended or required image dimensions for profile pictures, cover photos, thumbnails, and product images. Resizing your images to these specifications ensures they display correctly and professionally, preventing automatic cropping or distortion by the platform. For example, a Facebook cover photo, YouTube thumbnail, or Twitter header requires precise pixel-by-pixel ratios for the perfect fit.
- Resolution for Web: While 72 PPI is often cited, the key for web images is their pixel dimensions. An image 1920 pixels wide will fill that space on a screen, regardless of its PPI metadata. The PPI value typically affects print size and how the image is stored, but less so its appearance on a screen. Focus on pixel width and height and then on compressing the file size for the fastest load without visible quality loss.
Printing Your Images? Resize Photos for Print.
Printing demands a different approach than web display, with resolution being the paramount factor. “High Resolution” images are crucial here to avoid blurriness and pixelation.
- Industry Standard Resolution: The long-held industry standard for high-quality printing is 300 pixels/inch (PPI). This density ensures crisp details and sharp edges, vital for “Beautiful Photography” meant for display. Some professional printers, particularly Epson models, use an even higher native resolution of 360 PPI.
- Printer’s Native Resolution: It’s essential to understand that your printer has a native resolution it expects. If you send an image with a lower resolution (e.g., 240 PPI), the printer will automatically “upsample” it to its native resolution. However, software like Photoshop or specialized “AI Upscalers” from Tophinhanhdep.com can often do a superior job of upsampling than a printer’s internal algorithms. Therefore, it’s generally best to prepare your image to match or exceed your printer’s native resolution before sending it to print.
- Converting Pixels to Inches: When preparing for print, you’ll often work with physical dimensions (inches or centimeters). Tools like BeFunky simplify this by handling the pixel-to-inch conversion, providing a clear understanding of how your digital image will translate to paper.
Meeting Specific Portfolio Requirements (e.g., CaFÉ)
For artists and photographers submitting their work to online portfolios or art calls, adhering to strict image specifications is non-negotiable. Platforms like CaFÉ™ (CallforEntry.org) have precise guidelines to ensure consistency and quality across submissions. Tophinhanhdep.com understands the importance of presenting your “Digital Art” and “Photo Manipulation” professionally.
Typical requirements, as seen with CaFÉ™, often include:
- File Type: Usually JPEG only.
- Minimum Dimensions: No smaller than a certain pixel count on the longest side (e.g., 1200 pixels).
- Resolution: A standard web resolution like 72 ppi/dpi.
- Maximum File Size: A cap on the file size (e.g., 5 MB maximum) to manage storage and bandwidth.
Using the tools described above, you can precisely adjust your images to meet these specifications. For instance, using Photoshop or GIMP, you can set the exact pixel dimensions, ensure the correct resolution, and then save as a JPEG at a specific quality setting to hit the target file size. Online optimizers and compressors from Tophinhanhdep.com’s “Image Tools” can also assist in fine-tuning the file size without compromising too much visual quality.
Advanced Considerations for Quality and Efficiency
Beyond basic resizing, certain scenarios call for more nuanced techniques to maintain image quality or achieve specific outcomes, especially when dealing with “Abstract” or “Nature” photography where detail is paramount.
To Resize or Upscale? Enhancing Image Details Intelligently
As discussed, traditional upsampling (enlarging an image by adding pixels) can lead to a loss of quality, making an image appear soft or pixelated. This is where the distinction between simple resizing and intelligent upscaling becomes critical.
- Traditional Resizing (for enlargement): When you use a basic resize tool to enlarge an image, it interpolates new pixels based on neighboring ones. This can work for minor enlargements but quickly shows quality degradation for significant increases.
- Intelligent Upscaling: This is where advanced algorithms, particularly “AI Upscalers” (a valuable offering in Tophinhanhdep.com’s “Image Tools”), truly shine. AI upscaling doesn’t just “guess” new pixel values; it analyzes the image content and generates new details, making enlarged images look remarkably sharp and natural. This technology is a game-changer for photographers needing to print larger versions of their “Stock Photos” or “Beautiful Photography” that might not have been captured at extremely high resolutions.
- Photoshop’s Preserve Details 2.0: For Photoshop users (CC 2018 and later), the “Preserve Details 2.0” interpolation method is specifically designed for upsampling with minimal quality loss. When resampling to enlarge an image, selecting this option in the Image Size dialog box will yield superior results compared to older interpolation methods.
Choosing the right method—simple resize for reduction, or intelligent upscaling for enlargement—is crucial for maintaining the visual integrity of your images, especially for complex “Digital Art” or “Photo Manipulation” projects.
How to Resize to a Different Aspect Ratio
Sometimes, you need to fit an image into a frame or a design layout that has a different aspect ratio than your original photo. For example, changing a 4x6 landscape photo into an 8x10 portrait format requires more than just resizing; it requires cropping.
Here’s how to manage aspect ratio changes, especially in Photoshop (the principles apply to other editors):
- Understand the Mismatch: If your image is 4x6 (a common camera aspect ratio) and you need an 8x10 (a different ratio), simply inputting 8x10 into a resize tool will distort the image or leave white space.
- Crop First: The solution is to crop your image to the desired aspect ratio before resizing.
- Cancel any active Image Size command.
- Select the Crop Tool in your image editor.
- In the options bar (or equivalent settings), set your new aspect ratio (e.g., enter “8” and “10” for an 8x10 ratio). Do not include units like “inches” at this stage.
- Adjust the crop border over your image. You’ll need to decide which parts of your image to keep or discard to fit the new ratio.
- Crucially, ensure “Delete Cropped Pixels” is OFF (in Photoshop) or that you’re working non-destructively. This allows you to revert your crop later if needed.
- Apply the crop.
- Then Resize: Once cropped to the correct aspect ratio, you can then proceed with the standard resizing steps (as outlined in the Photoshop section) to achieve your desired final print or digital dimensions. This two-step process ensures that your image fits the new aspect ratio perfectly without distortion, preserving the composition and quality of your “Creative Ideas.”
Adjusting image sizes is a fundamental skill that underpins nearly every aspect of digital visual communication. From optimizing “Wallpapers” for various screens to preparing “Abstract” prints for a gallery, the techniques and tools for resizing are diverse and powerful. Tophinhanhdep.com is dedicated to providing comprehensive insights into “Images, Photography, Image Tools, Visual Design, and Image Inspiration & Collections.” By mastering the art of image resizing, you gain greater control over how your “Beautiful Photography” and “Digital Art” are perceived, ensuring clarity, efficiency, and professional presentation across all platforms. We encourage you to explore the extensive resources on Tophinhanhdep.com for further guidance and inspiration in your visual journey.