How to Adjust the Size of an Image: A Comprehensive Guide for Stunning Visuals

In the dynamic world of digital content, the ability to properly adjust the size of an image is not merely a technical skill but an art form that profoundly impacts visual quality, website performance, and overall user experience. Whether you’re a professional photographer curating a high-resolution portfolio, a graphic designer crafting compelling visuals, or simply someone looking to optimize images for social media or print, understanding image resizing is fundamental. At Tophinhanhdep.com, we recognize the critical role that perfectly sized images play in everything from breathtaking wallpapers and aesthetic backgrounds to professional stock photos and digital art. This comprehensive guide will demystify the process, exploring various tools and techniques to ensure your visuals always look their best, without compromising quality.
Understanding Image Resizing: Why It Matters for Your Visuals
Before diving into the “how-to,” it’s essential to grasp the core concepts behind image resizing. This knowledge empowers you to make informed decisions, ensuring your images are optimized for their intended purpose, whether for vibrant online galleries, crisp print outputs, or efficient web loading. The goal is to achieve visual excellence while maintaining high resolution and respecting file size constraints – a balance crucial for any successful visual design project.
The Core Concepts: Pixels, Resolution, and Aspect Ratio
At the heart of every digital image are pixels – tiny squares of color that combine to form the complete picture. The total number of pixels in an image determines its overall dimensions. For instance, an image that is 1920 pixels wide and 1080 pixels high (1920x1080) contains over two million pixels.

Resolution refers to the density of these pixels, typically measured in Pixels Per Inch (PPI) for screens or Dots Per Inch (DPI) for print.
- For web and screen viewing: A resolution of 72 PPI is often considered the standard. While this historical benchmark is sometimes debated, it generally indicates that an image optimized for screens doesn’t need excessive pixel density. More pixels than necessary often lead to larger file sizes, slowing down website loading times—a significant concern for platforms showcasing extensive collections of aesthetic, nature, or abstract images.
- For print: A much higher resolution is required for high-quality results, typically 200-300 PPI, or even 360 PPI for specific printers like Epson. Printing fewer pixels per inch will result in a larger, but often blurrier, image, while packing more pixels per inch yields a smaller, sharper print.
The aspect ratio describes the proportional relationship between an image’s width and its height, usually expressed as two numbers separated by a colon (e.g., 4:3, 16:9, or 8:10). Maintaining the aspect ratio during resizing is crucial to prevent image distortion, often referred to as “warping.” Most tools offer an option to “maintain aspect ratio” or “constrain proportions,” which automatically adjusts one dimension when the other is changed, preserving the original look of your beautiful photography or digital art. Cropping, on the other hand, changes the aspect ratio by removing parts of the image, which can be necessary to fit specific frames or layouts.
The Difference Between Resizing and Resampling
It’s vital to differentiate between resizing and resampling an image, as they have distinct impacts on file quality and size.
- Resizing (without resampling): This process changes the print dimensions or resolution without altering the total number of pixels in the image. When you adjust the print size in a program like Photoshop with the “Resample” option turned off, you are simply telling the software how many of the existing pixels should be printed per inch. The image file size (in megabytes) and its pixel dimensions remain unchanged. This is ideal when preparing images for print from a high-resolution source, as it allows you to control the physical output size and quality based on the printer’s native resolution.
- Resampling: This involves changing the actual number of pixels in an image.
- Downsampling means removing pixels, which is common when reducing an image’s file size for web uploads, email attachments, or general screen viewing. It effectively makes the image smaller in pixel dimensions and file size.
- Upsampling means adding pixels, usually when you need to enlarge an image beyond its original pixel dimensions. This can be more challenging, as simply inventing pixels can lead to a loss of clarity and sharpness. Modern tools, especially those incorporating AI upscalers, employ sophisticated algorithms to minimize quality degradation during upsampling, making them invaluable for enhancing high-resolution stock photos or digital art for larger displays.
Understanding these concepts is the first step towards mastering image adjustment, ensuring your visual content, whether a simple background or complex photo manipulation, always appears exactly as intended. Tophinhanhdep.com advocates for thoughtful image preparation, emphasizing that every pixel counts in delivering an exceptional visual experience.
Essential Free & Built-in Tools for Quick Image Adjustments
For many common image resizing tasks, you don’t need expensive or complex software. Your operating system likely comes with powerful, user-friendly tools that can handle most adjustments quickly and efficiently. Additionally, several excellent free online options provide robust features, making image resizing accessible to everyone, from casual users to aspiring graphic designers. These tools are perfect for optimizing images for web, social media, or basic print needs, ensuring your images look great for any thematic collection or trending style.
Native Operating System Tools: Preview (Mac), Photos/Paint (Windows), & Gallery (ChromeOS)
These pre-installed applications offer straightforward methods for resizing, perfect for those quick adjustments to wallpapers or backgrounds.
- Preview (macOS): Mac users have a powerful, yet simple, image editor readily available.
- Open your image in Preview.
- Go to
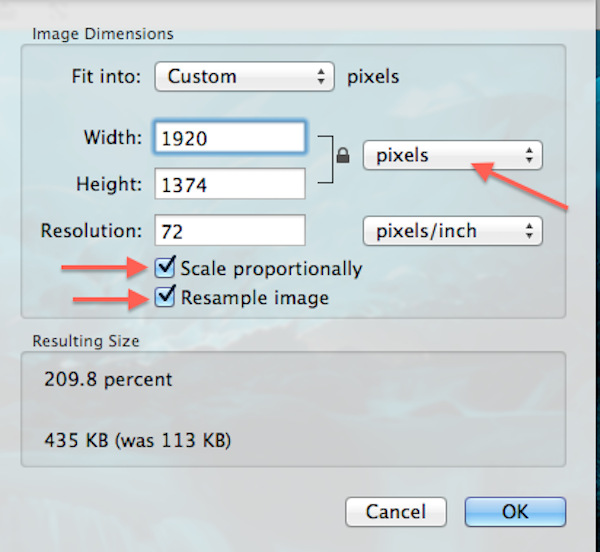
Toolsin the menu bar and selectAdjust Size. - In the pop-up window, you can change the dimensions (width and height) and resolution.
- Crucially, ensure
Scale proportionallyandResample imageare checked (or unchecked, depending on your goal) to maintain aspect ratio and control pixel alteration. For web, you might aim for a specific pixel dimension. For print, you’d adjust resolution.
- Photos (Windows 11): Windows users can utilize the native Photos app for easy resizing.
- Right-click on the image and choose
Open with>Photos. - Click the
Three dotsicon (More options) in the top-right corner. - Select
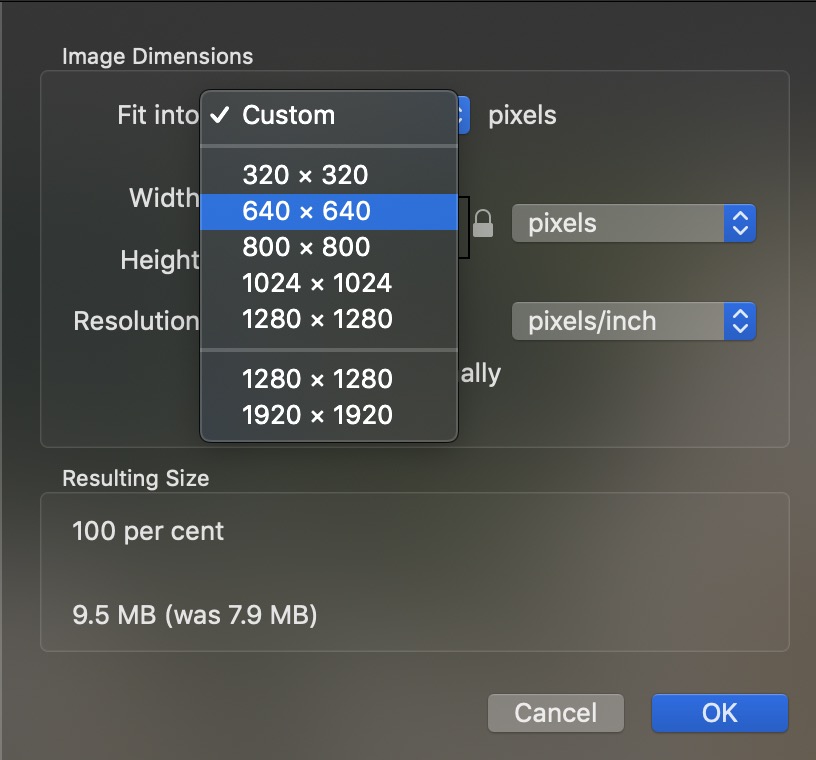
Resizefrom the drop-down menu. - Choose from preset sizes or
Define custom dimensions. A pop-up will appear. - Check
Maintain aspect ratioto prevent distortion. Enter your desired width or height; the other dimension will adjust automatically. - Click
Save resized copyto preserve your original image.
- Right-click on the image and choose
- Paint (Windows): A classic Windows utility, Paint is simple but effective for basic resizing.
- Open your image in Paint.
- Click
Resizein theImagegroup on theHometab. - You can resize by percentage or by pixels. For precise control, select
Pixels. - Tick
Maintain aspect ratioto avoid warping. - Enter your new width or height, and Paint will adjust the other.
- Save your file (preferably
Save asto keep the original).
- Note: A more advanced, free version called Paint.NET is also available for download, offering more robust features for digital photography enthusiasts.
- Gallery (ChromeOS): Chromebook users can resize images directly within the Gallery app.
- Right-click on the image and choose
Open with>Gallery. - Locate and select the
Rescalebutton (often represented by an icon of two opposing arrows). - Enter your desired width and height.
- Click the
Chain iconto lock or unlock the aspect ratio as needed. - Select
Saveto overwrite the original orSave asto create a new file.
- Right-click on the image and choose
Open-Source Powerhouse: GIMP
For users seeking more advanced features without the cost of professional software like Adobe Photoshop, GIMP (GNU Image Manipulation Program) is an excellent free, open-source alternative. Available for both Mac and PC, GIMP offers a suite of professional-level editing and retouching tools, making it suitable for more complex photo manipulation and graphic design tasks.
- Download and install GIMP from its official website.
- Open your image in GIMP.
- Go to
Image>Scale Image. - Here, you can adjust the
WidthandHeightin pixels, or other units. - Click the
chain iconto link or unlink the aspect ratio. - You can also adjust the
X resolutionandY resolution(PPI/DPI) for print purposes. - Under
Quality, choose theInterpolationmethod. For upsampling,LoHaloorNoHalooften yield good results. - Click
Scaleto apply the changes.
GIMP is highly customizable and user-friendly, providing a robust platform for digital artists and photographers to manage their image files, from high-resolution stock photos to intricate digital art pieces.
Online Efficiency: Simple Image Resizer, PicResize, Pixlr X, and BeFunky
When time is of the essence or you prefer not to download software, online image resizers offer immediate, browser-based solutions. These tools are often optimized for speed and simplicity, making them ideal for adjusting images for social media, blogs, or quick portfolio updates on Tophinhanhdep.com.
- Simple Image Resizer: This tool excels at doing one thing well: resizing.
- Visit their website or use the Google Chrome extension.
- Upload your image.
- Select
dimensionsand enter your desiredwidthorheight. - Click
Resize. The tool quickly processes and provides a proportionate, resized image ready for download. This is perfect for rapid adjustments needed for online platforms.
- PicResize: Known for its batch resizing capabilities, PicResize is a lifesaver for photographers who need to process multiple images for a gallery or thematic collection, such as those featured on Tophinhanhdep.com.
- Visit their site.
- Upload multiple images (or a single image).
- Select your size preference (e.g., specific dimensions, percentage).
- Click
Submit Batch Job!. While batch mode may not support cropping or special effects, it efficiently handles bulk resizing, a major benefit for managing large numbers of photos.
- Pixlr X: A free, web-based photo editor offering more than just resizing, Pixlr X is excellent for quick edits.
- Go to Pixlr X on Tophinhanhdep.com or directly.
- Click
Open imageand upload your file. - Find the
Layout and Templatebutton (often looks like three rectangles) and selectSmart resize. - Enter your
widthandheight, and use theLock proportionstoggle. - Choose from various size presets if available.
- Click
Apply, thenSaveto download your image. Pixlr X is a versatile tool for adjusting images and can be integrated into your creative workflow for diverse visual design needs.
- BeFunky’s Online Image Resizer: This tool focuses on ease of use and quality preservation, making it a favorite for both web and print optimization.
- Upload your photo to BeFunky’s Photo Editor.
- Navigate to the
Editsection and selectResize. - Adjust dimensions by
pixelorpercentage, and use theMaintain aspect ratiooption. - BeFunky also provides a helpful chart to convert pixels to inches for common print sizes, simplifying the process of preparing images for pain-free photo printing.
- It also distinguishes between resizing (for reducing resolution) and upscaling (using AI to enlarge images while enhancing details), which aligns with Tophinhanhdep.com’s focus on advanced image tools like AI upscalers. BeFunky supports JPEG/JPG, GIF, BMP, and PNG formats.
These tools, both built-in and online, provide a spectrum of options for adjusting image sizes effectively. For quick tasks or specific batch processing, they are invaluable resources that support the high-quality image standards promoted by Tophinhanhdep.com across all its categories, from aesthetic images to professional photography.
Advanced Image Resizing Techniques with Professional Software (e.g., Photoshop)
For photographers, graphic designers, and digital artists who demand the highest level of control and quality, professional image editing software like Adobe Photoshop is indispensable. Photoshop offers sophisticated tools for precise image resizing, resampling, and optimization, crucial for projects requiring meticulous photo manipulation or preparing images for high-resolution print. Mastering these techniques ensures your images, whether stock photos or digital art, meet the most stringent professional standards.
Mastering Photoshop’s Image Size Dialog
Photoshop’s “Image Size” dialog box is a powerful hub for adjusting image dimensions, resolution, and pixel count. Access it by going to Image > Image Size in the menu bar.
- Understanding the Dialog Box: The dialog box displays current image size in megabytes (M) and pixel dimensions (Width and Height). For print, you’ll focus on the
Document Size(Width, Height, and Resolution). - Resizing Without Resampling for Print: When preparing an image for print, your primary goal is often to set the correct print size and resolution without adding or removing pixels unnecessarily.
- Open your image in Photoshop.
- Go to
Image>Image Size. - Crucially, turn the
Resampleoption OFF. This links the pixel dimensions, print size, and resolution. Changing one will affect the others, but the total number of pixels in your image will remain constant. - Under
Document Size, select your desired unit (e.g.,inches). - Input your target
WidthorHeight. Photoshop will automatically adjust the other dimension and theResolutionto maintain the aspect ratio and reflect the new print size, based on the existing pixel count. - Check the
Resolution: For high-quality prints, the industry standard is generally 300 pixels/inch. For Epson printers, it’s often 360 pixels/inch. If your image’s resolution withResampleoff is already at or above your printer’s native resolution, you’re good to go. This means your image has enough pixels for the desired print size without needing to add more.
- Upsampling an Image for Larger Prints (Resampling ON): If, after turning
Resampleoff, your resolution drops below the desired 300/360 ppi for your target print size, your image doesn’t have enough pixels. You’ll need to upsample.- With the Image Size dialog box still open, turn the
Resampleoption ON. - Now, the
Resolutionfield becomes independent. Enter your desired print resolution (e.g.,300 pixels/inchor360 pixels/inch). - Confirm your
WidthandHeightare set to the desired print dimensions. Photoshop will now add pixels (upsample) to meet both the new dimensions and resolution. - Interpolation Method: This determines how Photoshop adds or removes pixels.
- The default
Automaticis often reliable. - For upsampling, specifically in Photoshop CC 2018 and later, the
Preserve Details 2.0method (found by clicking the interpolation dropdown) is highly recommended. It uses advanced algorithms to maintain sharpness and detail, making it the best choice for enlarging images without significant quality loss. (If not visible, you may need to enable it in Photoshop’s Preferences).
- The default
- With the Image Size dialog box still open, turn the
Resizing for Print vs. Web: Optimizing Quality and File Size
The destination of your image dictates your resizing strategy. Tophinhanhdep.com emphasizes optimization for both, as image quality and loading speed are paramount for digital photography and visual design.
- For Print:
- Resolution: Aim for 300 PPI (or 360 PPI for Epson). This pixel density ensures crisp, detailed physical prints.
- Dimensions: Set specific physical dimensions (e.g., 8x10 inches, 11x14 inches).
- File Format: TIFF or high-quality JPEG are common. Photoshop’s
Save Asoption allows for fine-tuning JPEG quality. - No Downsampling (unless necessary): It’s generally better to send a printer more pixels than it needs rather than too few, as the printer will handle the final downsampling more effectively than upsampling.
- For Web/Screen Viewing:
- Resolution: 72 PPI is sufficient. Higher resolutions only increase file size without adding noticeable quality on screen.
- Pixel Dimensions: Focus on specific pixel dimensions suitable for web display (e.g., 1920px wide for banners, 1080px for full-screen backgrounds, 800px for blog images). Excessive dimensions lead to larger file sizes.
- File Format: JPEG for photographs (good compression), PNG for images with transparency or sharp edges (logos, graphics), GIF for simple animations.
- File Size: Aim for the smallest possible file size without sacrificing visual quality. This is crucial for fast loading times and SEO. Tools like Photoshop’s
Save for Web (Legacy)or online compressors and optimizers (like those found on Tophinhanhdep.com’s Image Tools section) are excellent for this.
Cropping for Perfect Aspect Ratios
Sometimes, merely resizing isn’t enough; you need to change the image’s shape to fit a specific frame or layout, such as an 8x10 print from a 4x6 photo. This requires cropping.
- Cancel Image Size (if open): Close the
Image Sizedialog box if you were in it. - Select the Crop Tool: In Photoshop’s Toolbar, select the
Crop Tool(C). - Set Aspect Ratio in Options Bar: In the Options Bar at the top, enter your desired aspect ratio (e.g.,
8:10,16:9). Do not enter units like “inches”; just the numbers. - Adjust Crop Border: Photoshop will overlay a crop border on your image, constrained to the new aspect ratio. Drag the handles to adjust the area you want to keep.
- Crop the Image: Ensure
Delete Cropped Pixelsis unchecked in the Options Bar if you want to retain the ability to adjust the crop later (non-destructive editing). Then, click thecheckmarkin the Options Bar or pressEnterto apply the crop. - Resize After Cropping: Once cropped to the correct aspect ratio, you can revisit the
Image Sizedialog box and follow the steps for resizing/upsampling as described above to set the final print or web dimensions and resolution.
These advanced techniques in Photoshop, combined with the principles of digital photography and visual design, empower you to manipulate images with precision. Whether you’re enhancing high-resolution stock photos or crafting unique digital art, Tophinhanhdep.com encourages the mastery of these tools for truly professional results.
Tophinhanhdep.com’s Role in Your Visual Journey
At Tophinhanhdep.com, we understand that adjusting image size is just one piece of the larger puzzle in creating and utilizing stunning visual content. Our platform is designed to be a comprehensive resource, supporting every aspect of your visual journey, from finding inspiration to perfecting your digital art and photography. We bridge the gap between technical tools and creative expression, offering solutions for every need, whether you’re sourcing high-resolution images or optimizing your own creations.
Beyond Resizing: Exploring Our Image Collections
Tophinhanhdep.com isn’t just about tools; it’s a vibrant hub for visual inspiration and high-quality imagery. Once you’ve mastered image resizing, you’ll appreciate how properly optimized images enhance the appeal of various categories:
- Wallpapers & Backgrounds: Discover a vast collection of high-resolution images perfectly sized for your devices, offering everything from serene nature scenes to captivating abstract designs. Understanding resizing helps you adapt these to any screen.
- Aesthetic & Nature Images: Explore curated collections that evoke specific moods and showcase the beauty of the natural world. Resizing ensures these breathtaking shots fit perfectly into your mood boards or creative projects.
- Abstract & Sad/Emotional Imagery: Dive into diverse themes that cater to specific creative needs. Optimized image sizes mean faster loading times and a smoother browsing experience, allowing the emotional impact of the images to take center stage.
- Beautiful Photography & Stock Photos: For both inspiration and practical use, our collection of beautiful photography and professional stock photos ensures you always have access to top-tier visuals. Knowing how to resize them allows seamless integration into any graphic design or digital art project without compromising their high resolution.
- Image Inspiration & Collections: Our platform offers dedicated sections for Photo Ideas, Mood Boards, Thematic Collections, and Trending Styles. Correctly sized images are crucial for building cohesive mood boards and effectively showcasing thematic collections, allowing you to present your creative ideas with precision and impact.
Enhancing Your Photography with Tophinhanhdep.com’s Tools
Beyond our inspirational galleries, Tophinhanhdep.com also serves as a portal to cutting-edge image tools, many of which complement the resizing techniques discussed. We empower digital photography enthusiasts and professional graphic designers with resources to elevate their work:
- High Resolution & Digital Photography: We emphasize the importance of starting with high-resolution images, especially for digital photography. Our guides and resources help you capture and maintain maximum detail, crucial for any subsequent editing, including resizing and photo manipulation.
- Editing Styles & Photo Manipulation: Whether you’re exploring different editing styles or engaging in complex photo manipulation, resizing is often a foundational step. Tophinhanhdep.com provides insights into how these processes integrate, ensuring your creative ideas are realized with technical excellence.
- Image Tools: Converters, Compressors, & Optimizers: Our “Image Tools” section highlights services that go hand-in-hand with resizing. Need to convert a file type after resizing? Our converters have you covered. Want to reduce the file size of your web-optimized images further? Our compressors and optimizers are ideal for ensuring fast loading times while preserving visual integrity.
- AI Upscalers: For those challenging situations where you need to enlarge an image beyond its native resolution, we recommend and feature AI upscalers. These advanced tools, similar to BeFunky’s Upscale feature, use artificial intelligence to intelligently add pixels and enhance details, minimizing the quality loss typically associated with upsampling. This is particularly valuable for improving the perceived high resolution of images that need to be displayed larger than their original capture.
- Image-to-Text: While not directly related to resizing, our inclusion of tools like Image-to-Text demonstrates our commitment to providing a full spectrum of utility for all your image-related tasks, reinforcing Tophinhanhdep.com as your go-to resource.
By offering a blend of inspiring content and practical tools, Tophinhanhdep.com ensures that every aspect of your visual design and photography needs is met. From understanding the nuances of pixels and resolution to leveraging the latest AI-powered enhancements, we are dedicated to helping you create, optimize, and share stunning visuals.
In conclusion, mastering the art of image resizing is an indispensable skill in today’s visually-driven world. Whether you opt for the simplicity of built-in operating system tools, the versatility of free online platforms, or the precision of professional software like Photoshop, understanding the principles of pixels, resolution, and aspect ratio will empower you to achieve optimal results. Remember that the “how-to” is always guided by the “why”—why a particular size or resolution is needed for your specific purpose. Tophinhanhdep.com is here to support you at every step, offering a wealth of resources, from breathtaking image collections and photography inspiration to advanced image tools and expert guides, helping you transform your creative visions into stunning realities. Explore our platform today and unlock the full potential of your visual content.