Mastering Image Alignment in CSS: A Comprehensive Guide for Tophinhanhdep.com

In the dynamic world of web design, the presentation of visual content is paramount. For a platform like Tophinhanhdep.com, dedicated to showcasing a vast array of high-quality images – from stunning wallpapers and aesthetic backgrounds to captivating nature shots, intricate abstracts, and emotional photography – precise image alignment is not just a detail, it’s a necessity. It’s what transforms a collection of beautiful images into an immersive visual experience, ensuring every photo, every piece of digital art, and every graphic design element is displayed exactly as intended.
The art of “how to align images in CSS” is a fundamental skill for any web developer or visual designer aiming to create polished and professional online content. While seemingly straightforward, the absence of a single, universal alignment rule means mastering this aspect requires an understanding of various techniques, each suited for specific scenarios. This comprehensive guide from Tophinhanhdep.com delves into the essential CSS properties and modern strategies to perfectly position your images, enhancing everything from individual photography showcases to sprawling thematic collections.
Understanding the Fundamentals of CSS Image Alignment
At its core, image alignment in CSS involves controlling the placement of an image relative to its container or surrounding content. This foundational understanding is crucial, whether you’re working with a single beautiful photograph or arranging a complex mood board. Effective alignment directly impacts the visual hierarchy, readability, and overall aesthetic appeal of your webpage, making it an indispensable component of visual design.
Horizontal vs. Vertical Alignment

The first distinction to grasp is between horizontal and vertical alignment.
- Horizontal Alignment: This refers to positioning an element along the x-axis, making it appear on the left, center, or right within its parent container. For images, this often means ensuring they are centered on the page or neatly arranged in columns.
- Vertical Alignment: This concerns positioning an element along the y-axis, making it appear at the top, middle, or bottom of its container. This is particularly important when images are alongside text, where precise vertical positioning can greatly improve visual balance.

Both types of alignment play critical roles in crafting layouts that are both functional and aesthetically pleasing. For Tophinhanhdep.com’s diverse range of images, from high-resolution stock photos to artistic photo manipulations, correctly balancing horizontal and vertical placement ensures that each visual element contributes harmoniously to the overall composition.
Why Image Alignment Matters for Visual Design
Image alignment is more than just positioning; it’s a cornerstone of effective visual design and user experience.
- Enhanced Aesthetics: Proper alignment creates visual balance and order. A well-aligned image gallery, for instance, appears more professional and appealing, drawing viewers into Tophinhanhdep.com’s curated collections like “Aesthetic Backgrounds” or “Trending Styles.”
- Improved Readability: When images are integrated with text, careful alignment prevents awkward wrapping or visual clutter, ensuring the accompanying information remains easy to read. This is crucial for articles discussing digital photography techniques or guides on photo editing styles.
- Consistent Branding: Consistent alignment contributes to a cohesive visual identity. Whether it’s the uniform presentation of “Nature Wallpapers” or the structured layout of “Abstract Art,” adherence to alignment principles reinforces Tophinhanhdep.com’s commitment to quality and visual excellence.
- User Engagement: A visually organized page is easier to navigate and more enjoyable to interact with. By strategically aligning images, Tophinhanhdep.com can guide user attention, highlight key photography ideas, and encourage deeper exploration of its thematic collections.
- Responsive Design: In today’s multi-device world, images must adapt gracefully to different screen sizes. Modern CSS alignment techniques are essential for creating responsive layouts that look great on desktops, tablets, and smartphones, ensuring Tophinhanhdep.com’s “Beautiful Photography” is always presented optimally.
Ultimately, mastering image alignment is about transforming raw visual assets into compelling digital experiences, a core mission for Tophinhanhdep.com as a hub for visual inspiration and high-quality imagery.
Core CSS Techniques for Image Positioning
CSS offers a variety of properties and methods for aligning images, each with its strengths and best use cases. Understanding these techniques is key to choosing the most efficient and effective solution for your specific design needs. From basic horizontal centering to more complex arrangements, these methods form the backbone of image layout.
Centering Block Elements with margin: auto
One of the most common requirements is horizontally centering a block-level element, such as an <img> tag that has been set to display: block; or a <div> containing an image. The margin: auto property is an excellent solution for this.
To use margin: auto, you must:
- Define a Width: The block element needs a specific width (e.g.,
width: 800px;orwidth: 75%;). If no width is set, the element will naturally expand to fill its container, leaving no “extra” space for auto margins to distribute. - Apply
margin: auto;: This shorthand property setsmargin-leftandmargin-righttoauto, which instructs the browser to distribute available horizontal space equally on both sides of the element, effectively centering it.
Example:
<!DOCTYPE html>
<html>
<head>
    <title>Centering Images on Tophinhanhdep.com</title>
    <meta charset="UTF-8"/>
    <style>
        .center-image {
            display: block; /* Important for margin: auto to work on img */
            width: 70%;     /* Define a specific width, less than 100% */
            margin: auto;   /* Centers the block horizontally */
            border: 2px solid #333;
            padding: 10px;
            box-shadow: 0 4px 8px rgba(0,0,0,0.2);
            border-radius: 8px;
        }
    </style>
</head>
<body>
    <h1>Showcasing Tophinhanhdep.com's Photography</h1>
    <p>This "Beautiful Photography" example demonstrates horizontal centering.</p>
    <img src="https://via.placeholder.com/600x400/87CEEB/FFFFFF?text=Nature+Wallpaper" alt="Beautiful Nature Wallpaper" class="center-image">
    <p>The image above is centered using `margin: auto`.</p>
</body>
</html>
It’s important to note that margin-top: auto and margin-bottom: auto do not have the same vertical centering effect, as they relate to block-level elements filling available vertical space differently. For vertical alignment, other techniques are required. This method is perfect for presenting individual “High Resolution” images or “Digital Art” pieces with a clean, central focus.
Aligning Inline Content with text-align and vertical-align
When dealing with inline elements, such as text content, <span> elements, or <img> tags that retain their default display: inline or display: inline-block properties, text-align and vertical-align become your go-to tools.
text-alignfor Horizontal Alignment: Thetext-alignproperty is applied to a block-level parent element to horizontally align its inline content. This includes text,<span>elements, and inline images.text-align: left;(default)text-align: center;text-align: right;text-align: justify;
Example (Horizontal Inline Alignment):
<!DOCTYPE html>
<html>
<head>
    <title>Text and Image Alignment on Tophinhanhdep.com</title>
    <meta charset="UTF-8"/>
    <style>
        .container-text-align {
            text-align: center; /* Centers all inline content within this div */
            border: 1px dashed #aaa;
            padding: 15px;
            background-color: #f9f9f9;
        }
        .container-text-align img {
            max-width: 150px;
            height: auto;
            margin: 10px;
            border: 1px solid #ccc;
        }
    </style>
</head>
<body>
    <h1>Presenting "Image Inspiration & Collections"</h1>
    <div class="container-text-align">
        <p>A collection of abstract ideas:</p>
        <img src="https://via.placeholder.com/150/FFD700/FFFFFF?text=Abstract+1" alt="Abstract Image 1">
        <img src="https://via.placeholder.com/150/ADFF2F/FFFFFF?text=Abstract+2" alt="Abstract Image 2">
        <img src="https://via.placeholder.com/150/FF6347/FFFFFF?text=Abstract+3" alt="Abstract Image 3">
        <p>These images are centered horizontally within their container.</p>
    </div>
</body>
</html>
This is excellent for arranging small icons, gallery thumbnails, or integrating images seamlessly within paragraphs, common in “Photo Ideas” and “Mood Boards.”
vertical-alignfor Vertical Alignment: Thevertical-alignproperty is used for fine-tuning the vertical position of inline-level and table-cell elements. It defines how the element aligns relative to its baseline or the surrounding elements on the same line.vertical-align: baseline;(default)vertical-align: top;vertical-align: middle;vertical-align: bottom;vertical-align: text-top;vertical-align: text-bottom;vertical-align: sub;vertical-align: super;
Example (Vertical Inline Alignment):
<!DOCTYPE html>
<html>
<head>
  <title>Baseline Alignment for Tophinhanhdep.com Articles</title>
  <style>
    .image-with-text {
      vertical-align: middle; /* Aligns the image middle with text */
      width: 50px;
      height: 50px;
      margin-right: 8px;
    }
    p {
      line-height: 1.5em; /* Ensure enough line height to see vertical-align effect */
      font-size: 1.2em;
    }
  </style>
</head>
<body>
  <h1>Integrating Images in Tophinhanhdep.com's "Image Tools" Guides</h1>
  <p>
    This is some text with an <img src="https://via.placeholder.com/50/4682B4/FFFFFF?text=Icon"
      alt="Example Image" class="image-with-text"> icon, demonstrating how we can perfectly align tools
      or small aesthetic elements with accompanying text descriptions,
      enhancing the visual appeal of our "Image Tools" section.
  </p>
  <p>The middle of the image is aligned with the middle of the text line.</p>
</body>
</html>
This precise alignment helps integrate images seamlessly into content, enhancing the visual appeal of “Digital Photography” tutorials or “Graphic Design” articles.
The Evolving Role of float in Layouts
Historically, the float property was a primary method for aligning images, particularly to wrap text around them.
float: left;moves the image to the left, allowing content to flow around its right side.float: right;moves the image to the right, allowing content to flow around its left side.
Example (Basic Float):
<!DOCTYPE html>
<html>
<head>
    <title>Using Float for Image Placement on Tophinhanhdep.com</title>
    <meta charset="UTF-8"/>
    <style>
        .float-left-image {
            float: left;
            margin-right: 15px;
            margin-bottom: 15px;
            max-width: 200px;
            height: auto;
            border: 1px solid #ddd;
        }
        .float-right-image {
            float: right;
            margin-left: 15px;
            margin-bottom: 15px;
            max-width: 200px;
            height: auto;
            border: 1px solid #ddd;
        }
        .clearfix::after {
            content: "";
            display: table;
            clear: both;
        }
        p {
            line-height: 1.6;
        }
    </style>
</head>
<body>
    <h1>Showcasing "Sad/Emotional" Photography with Text Integration</h1>
    <div class="clearfix">
        <img src="https://via.placeholder.com/200x150/808080/FFFFFF?text=Emotional+Scene" alt="Sad/Emotional Photography" class="float-left-image">
        <p>
            When exploring "Sad/Emotional Photography," the narrative often transcends the visual.
            By subtly aligning images to the left or right, we can allow the accompanying text to flow
            naturally, guiding the viewer through the story behind each powerful image. This technique
            helps in maintaining a coherent narrative flow while integrating "Beautiful Photography"
            seamlessly within descriptive content on Tophinhanhdep.com.
            It's a way to ensure that both the image and the story receive their due attention,
            creating a profound impact on the viewer.
        </p>
    </div>
    <div class="clearfix">
        <img src="https://via.placeholder.com/200x150/A9A9A9/FFFFFF?text=Reflective+Moment" alt="Reflective Photography" class="float-right-image">
        <p>
            The art of "Digital Photography" often involves creating thoughtful compositions.
            Using `float: right` can be effective for sidebar-like image placements,
            or to contrast with text that begins on the left. While it's a traditional method,
            for more complex, responsive layouts, modern CSS techniques like Flexbox and Grid
            are generally preferred, as they offer greater control and predictability,
            especially when designing for varied "Editing Styles" and screen sizes.
        </p>
    </div>
</body>
</html>
While float is still viable for simple text wrapping, it often leads to layout challenges (like parent containers not containing floated children, requiring clear fixes) and less predictability in responsive designs. For complex, multi-directional alignment, particularly for modern “Graphic Design” and “Digital Art” layouts, Flexbox and Grid are now the preferred solutions.
Modern CSS Layouts: Flexbox and Grid for Advanced Alignment
With the advent of CSS3, new layout modules like Flexbox and Grid have revolutionized how developers approach element alignment and overall page structure. These powerful tools provide much more robust and intuitive ways to position images and other content, especially when creating responsive designs that adapt to various screen sizes. For Tophinhanhdep.com, which aims to display “Aesthetic,” “Nature,” and “Abstract” images across all devices, these modern techniques are indispensable.
Harnessing the Power of Flexbox for Responsive Images
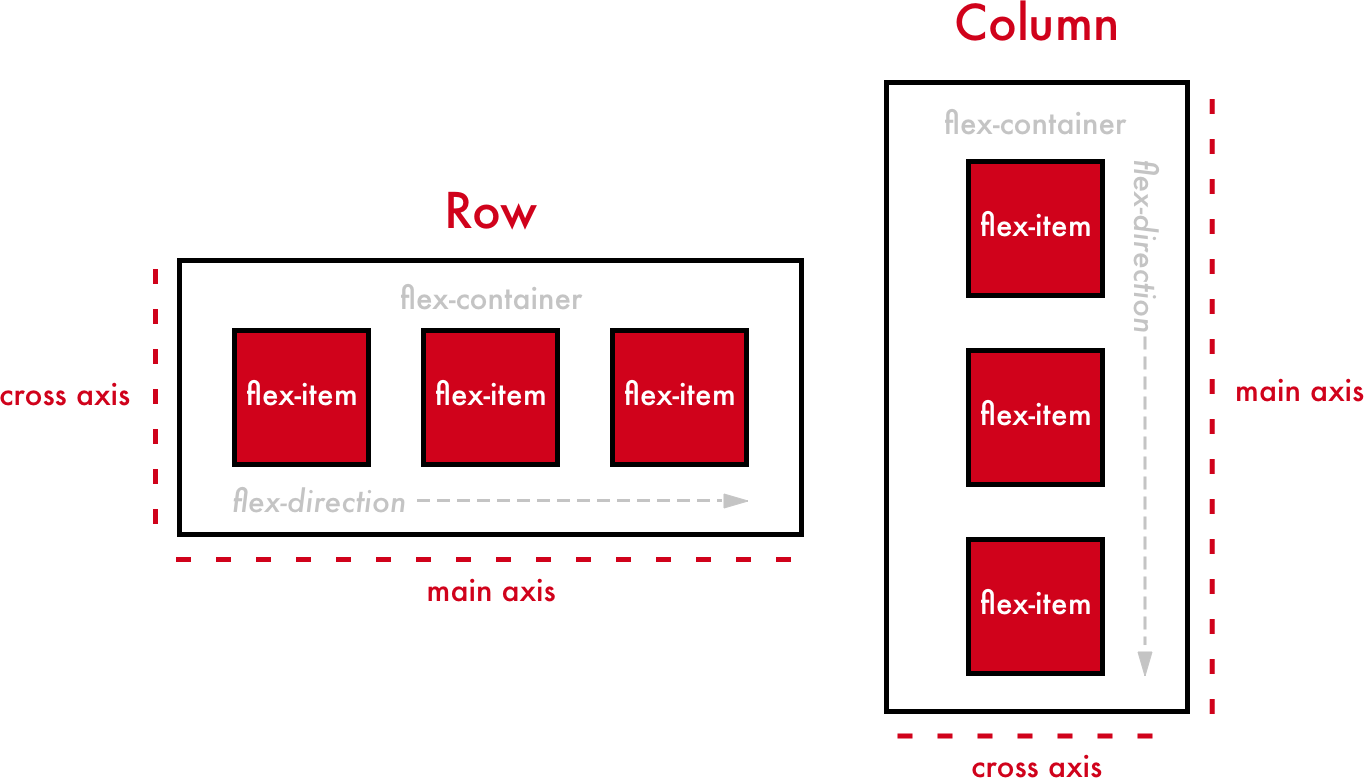
Flexbox (Flexible Box Layout module) is designed for one-dimensional layouts – either a row or a column. It makes aligning items within a container incredibly simple and intuitive, especially for dynamic content and responsive patterns. When applied to a parent container, display: flex; transforms its direct children into flex items, allowing for powerful alignment control.
Key Flexbox Properties for Image Alignment:
display: flex;: Applied to the parent container. This makes the container a flex container and its direct children flex items.justify-content: Aligns flex items along the main axis (horizontally by default).flex-start: Items at the beginning of the container.flex-end: Items at the end of the container.center: Items centered in the container.space-between: Items evenly distributed with space between them.space-around: Items evenly distributed with space around them (half-size space at ends).space-evenly: Items evenly distributed with equal space around them.
align-items: Aligns flex items along the cross axis (vertically by default).flex-start: Items aligned to the top of the cross axis.flex-end: Items aligned to the bottom of the cross axis.center: Items centered vertically.baseline: Items aligned according to their baselines.stretch: Items stretch to fill the container (default, if no height is set).
Example (Flexbox for Centering Images):
<!DOCTYPE html>
<html>
<head>
    <title>Flexbox Alignment for Tophinhanhdep.com Galleries</title>
    <meta charset="UTF-8"/>
    <style>
        .flex-container {
            display: flex;
            justify-content: center; /* Horizontally centers items */
            align-items: center;     /* Vertically centers items */
            height: 300px;           /* Define a height for vertical centering to be visible */
            border: 2px solid #5cb85c;
            background-color: #eafaea;
            margin-bottom: 20px;
        }
        .flex-item {
            max-width: 250px;
            height: auto;
            border: 1px solid #999;
            box-shadow: 2px 2px 5px rgba(0,0,0,0.1);
        }

        .image-row-gallery {
            display: flex;
            justify-content: space-around; /* Distributes images with space */
            flex-wrap: wrap; /* Allows items to wrap to the next line */
            gap: 15px; /* Space between items */
            padding: 20px;
            border: 2px solid #62a5e3;
            background-color: #e8f5ff;
        }
        .image-row-gallery img {
            width: calc(33% - 10px); /* Adjust width for responsive columns */
            max-width: 300px;
            height: auto;
            object-fit: cover; /* Ensures images cover their area without distortion */
            border-radius: 5px;
        }
        /* Basic responsiveness for image gallery */
        @media (max-width: 768px) {
            .image-row-gallery img {
                width: calc(50% - 10px);
            }
        }
        @media (max-width: 480px) {
            .image-row-gallery img {
                width: 100%;
            }
        }
    </style>
</head>
<body>
    <h1>Crafting "Mood Boards" and "Thematic Collections" with Flexbox</h1>

    <h2>Centered "Wallpaper" with Flexbox</h2>
    <div class="flex-container">
        <img src="https://via.placeholder.com/400x200/FFB6C1/FFFFFF?text=Aesthetic+Wallpaper" alt="Aesthetic Wallpaper" class="flex-item">
    </div>
    <p>This "Aesthetic Wallpaper" is perfectly centered both horizontally and vertically using Flexbox, ideal for a striking visual on Tophinhanhdep.com.</p>

    <h2>Responsive "Nature" Photography Gallery</h2>
    <div class="image-row-gallery">
        <img src="https://via.placeholder.com/300x200/90EE90/FFFFFF?text=Forest" alt="Forest Nature Photography">
        <img src="https://via.placeholder.com/300x200/ADD8E6/FFFFFF?text=Mountain" alt="Mountain Nature Photography">
        <img src="https://via.placeholder.com/300x200/FFC0CB/FFFFFF?text=Lake" alt="Lake Nature Photography">
        <img src="https://via.placeholder.com/300x200/FFD700/FFFFFF?text=Sunrise" alt="Sunrise Nature Photography">
    </div>
    <p>Flexbox simplifies the creation of responsive image galleries for our "Nature" photography, ensuring proper distribution and alignment across different screen sizes, embodying "Trending Styles" in web design.</p>
</body>
</html>
Flexbox is particularly advantageous for arranging collections of images, such as a row of “Stock Photos” or a responsive grid of “Photo Ideas,” ensuring they maintain their aesthetic appeal regardless of screen dimensions. It’s also accommodating for different writing systems, making it useful for Tophinhanhdep.com’s international audience.
Precision with CSS Grid for Complex Image Galleries
CSS Grid Layout is the most powerful CSS layout system, designed for two-dimensional layouts (rows and columns simultaneously). It gives developers unparalleled control over item placement, making it ideal for designing intricate, multi-column image galleries, magazine-style layouts, or complex “Graphic Design” portfolios.
Key CSS Grid Properties for Image Alignment:
display: grid;: Applied to the parent container. This makes the container a grid container.grid-template-columns/grid-template-rows: Defines the number and size of grid columns/rows.gap: Sets the space between grid cells (rows and columns).justify-items: Aligns grid items along the inline/row axis within their grid area.align-items: Aligns grid items along the block/column axis within their grid area.justify-content/align-content: Aligns the grid itself within the grid container if the grid is smaller than the container.place-items: Shorthand foralign-itemsandjustify-items.
Example (CSS Grid for Image Layout):
<!DOCTYPE html>
<html>
<head>
    <title>CSS Grid for Advanced Image Layouts on Tophinhanhdep.com</title>
    <meta charset="UTF-8"/>
    <style>
        .grid-gallery {
            display: grid;
            grid-template-columns: repeat(auto-fit, minmax(200px, 1fr)); /* Responsive columns */
            gap: 20px;
            padding: 20px;
            border: 2px solid #CD853F;
            background-color: #FFF8DC;
            margin-bottom: 20px;
        }
        .grid-item {
            background-color: #fff;
            padding: 10px;
            border-radius: 8px;
            box-shadow: 0 4px 6px rgba(0,0,0,0.1);
            display: flex; /* Using flexbox inside grid item for internal centering */
            flex-direction: column;
            justify-content: center;
            align-items: center;
            text-align: center;
        }
        .grid-item img {
            max-width: 100%;
            height: 150px; /* Fixed height for visual consistency */
            object-fit: cover; /* Crop to fit, maintaining aspect ratio */
            border-radius: 4px;
            margin-bottom: 10px;
        }
        .grid-item p {
            font-size: 0.9em;
            color: #555;
        }
    </style>
</head>
<body>
    <h1>Building "Visual Design" Showcases with CSS Grid</h1>

    <h2>"Digital Art" Portfolio Grid</h2>
    <div class="grid-gallery">
        <div class="grid-item">
            <img src="https://via.placeholder.com/300x150/8A2BE2/FFFFFF?text=Digital+Art+1" alt="Digital Art Piece 1">
            <p>Abstract Digital Painting</p>
        </div>
        <div class="grid-item">
            <img src="https://via.placeholder.com/300x150/DA70D6/FFFFFF?text=Digital+Art+2" alt="Digital Art Piece 2">
            <p>Surreal Landscape</p>
        </div>
        <div class="grid-item">
            <img src="https://via.placeholder.com/300x150/4682B4/FFFFFF?text=Digital+Art+3" alt="Digital Art Piece 3">
            <p>Futuristic Cityscape</p>
        </div>
        <div class="grid-item">
            <img src="https://via.placeholder.com/300x150/FF69B4/FFFFFF?text=Digital+Art+4" alt="Digital Art Piece 4">
            <p>Geometric Patterns</p>
        </div>
        <div class="grid-item">
            <img src="https://via.placeholder.com/300x150/BA55D3/FFFFFF?text=Digital+Art+5" alt="Digital Art Piece 5">
            <p>Vibrant Illustration</p>
        </div>
        <div class="grid-item">
            <img src="https://via.placeholder.com/300x150/6A5ACD/FFFFFF?text=Digital+Art+6" alt="Digital Art Piece 6">
            <p>Minimalist Design</p>
        </div>
    </div>
    <p>This responsive grid layout for "Digital Art" showcases the precision and versatility of CSS Grid, allowing for sophisticated "Creative Ideas" and perfect alignment of images within complex "Visual Design" structures on Tophinhanhdep.com.</p>
</body>
</html>
CSS Grid is the ultimate solution for complex layouts, such as presenting diverse “Thematic Collections” or creating an “Image Inspiration” section with varied image sizes and alignments. It offers fine-tuned control over both vertical and horizontal alignment within a structured, two-dimensional context.
Advanced Alignment Strategies and Best Practices
Beyond the core techniques, there are advanced considerations and best practices that elevate image alignment from functional to truly exceptional. These strategies focus on optimizing presentation, ensuring accessibility, and leveraging advanced tools, all crucial for a platform like Tophinhanhdep.com that prides itself on premium visual content.
Optimizing Image Presentation for Tophinhanhdep.com’s Diverse Collections
Tophinhanhdep.com features a vast range of image types, from “Wallpapers” and “Backgrounds” to “High Resolution” photography and “Photo Manipulation.” Optimizing their presentation involves more than just basic alignment:
object-fitfor Responsive Image Scaling: When designing responsive layouts with Flexbox or Grid, images often need to fit into predefined containers. Theobject-fitCSS property (e.g.,object-fit: cover;orobject-fit: contain;) allows you to specify how an<img>or<video>should be resized to fit its container. This ensures images fill their containers while preserving their aspect ratio, preventing distortion and maintaining consistent layouts, even for “Sad/Emotional” or “Beautiful Photography” where fidelity is key.- Minimizing Browser Rendering Shifts: To prevent jarring layout shifts when images load (especially for “High Resolution” images), always define both
widthandheightin CSS or directly in the HTML<img>tag. This reserves the correct space before the image fully loads, improving user experience and perceived performance. This is particularly important for “Digital Photography” showcases where immediate visual impact matters. - Combining Techniques for Better Control: Often, the best approach is to combine different CSS properties. For instance, using
display: inline-blockfor images allows them to behave like text (respectingtext-alignof the parent) while also allowing you to applymarginandpaddingfor more precise spacing, without disrupting the flow of surrounding content. This can be very useful for “Mood Boards” where a mix of image and text snippets needs careful arrangement.
Ensuring Accessibility and Performance in Image Layouts
A visually appealing website is only truly successful if it’s accessible to all users and performs well. Tophinhanhdep.com emphasizes both these aspects:
- Accessibility with Image Alignment: Ensure that CSS alignment techniques do not compromise accessibility. Always use meaningful
altattributes for images, regardless of their alignment, so screen readers can convey context to visually impaired users. Good alignment helps visually organize content, which indirectly aids cognitive accessibility by making the layout easier to understand. - Performance Considerations: Large image files can slow down page loading, negating the benefits of beautiful alignment. Before aligning, ensure images are optimized. Tophinhanhdep.com’s “Image Tools” like “Compressors” and “Optimizers” are crucial here. Even “AI Upscalers” should output optimized formats. Fast loading times are part of a good user experience for viewing “Wallpapers” and “Backgrounds.”
Leveraging Tophinhanhdep.com’s Image Tools for Automated Alignment
While manual CSS provides granular control, the sheer volume and diversity of images on Tophinhanhdep.com—from “Wallpapers” to specialized “Digital Photography” collections—can make manual fine-tuning exhaustive. This is where advanced image management “Image Tools” come into play, offering automated solutions for complex alignment and optimization tasks.
Imagine having a tool that can intelligently crop and align an image based on its content, ensuring the most important visual elements are always in focus, regardless of the output dimensions. This concept, often referred to as “gravity-based cropping” or “smart cropping,” allows for dynamic image manipulation. For example, if you have a “Nature” photo with a majestic animal, the tool can automatically adjust the crop to keep the animal centered or prominent within a given layout area, even if the image is resized.
Tophinhanhdep.com, through its “Image Tools” section, either offers or guides users on how to utilize such sophisticated functionalities. These tools extend beyond basic “Converters” and “Compressors” to include advanced features that can:
- Dynamically Resize and Crop: Automatically adapt image dimensions and crop regions to fit different layout requirements, ensuring images are perfectly aligned and framed for various display contexts (e.g., a thumbnail, a hero image, or a social media share). This is invaluable for showcasing “Trending Styles” in various formats.
- Focus on Key Objects (Gravity Option): Utilizing AI and machine learning, these tools can detect dominant objects (faces, landscapes, specific elements) within an image and intelligently align or crop around them. This means your “Beautiful Photography” is always presented with its intended focal point highlighted, without manual intervention. For instance, if you have a “Sad/Emotional” portrait, the tool can ensure the subject’s face is consistently aligned in the center.
- Batch Processing for Collections: For “Thematic Collections” or creating “Mood Boards,” these tools can apply consistent alignment and cropping rules across hundreds or thousands of images, saving immense time and ensuring visual uniformity.
By integrating or recommending these advanced “Image Tools,” Tophinhanhdep.com empowers designers and photographers to maintain high standards of “Visual Design” and “Image Manipulation,” ensuring every asset is perfectly aligned and optimized without requiring exhaustive manual CSS adjustments for every single image. This synergy between powerful CSS techniques and intelligent image processing tools creates an unparalleled visual experience for its users.
Conclusion: Elevating Your Visuals with Expert Alignment
Mastering image alignment in CSS is an indispensable skill for anyone working with web content, particularly for a rich visual platform like Tophinhanhdep.com. From the foundational distinctions between horizontal and vertical alignment to the robust capabilities of modern Flexbox and Grid, the techniques covered in this guide provide a comprehensive toolkit for bringing your visual design visions to life.
We’ve explored how margin: auto precisely centers block elements, how text-align and vertical-align finesse the placement of inline content, and how float, while traditionally used, has given way to more powerful layout methods. The rise of Flexbox and CSS Grid offers unprecedented control for building responsive, complex, and visually stunning layouts, perfectly suited for showcasing “High Resolution” photography, intricate “Digital Art,” or expansive “Image Inspiration & Collections.”
Beyond the code, we’ve emphasized the best practices that underpin superior web development: optimizing image presentation with properties like object-fit, minimizing layout shifts for smoother user experiences, and ensuring accessibility so that everyone can enjoy the diverse visual content on Tophinhanhdep.com. Furthermore, the integration of advanced “Image Tools,” whether directly offered by Tophinhanhdep.com or guided through its resources, highlights a future where smart, automated alignment and optimization complement manual CSS mastery.
By diligently applying these CSS alignment strategies and leveraging the comprehensive “Image Tools” and “Photography” resources available on Tophinhanhdep.com, you can transform your webpages into captivating visual masterpieces. Every “Wallpaper,” “Background,” “Aesthetic” image, and “Creative Idea” can be presented with precision and impact, delivering an unparalleled experience for your audience. Elevate your web design and visual storytelling by making expert image alignment a cornerstone of your development process, turning ordinary layouts into extraordinary visual journeys.