How to Attach Images and Other Files to iPhone Emails: A Visual Creator's Guide

In an increasingly visual world, the ability to effortlessly share images, documents, and other media is paramount. Whether you’re a professional photographer showcasing your latest high-resolution masterpiece, a graphic designer collaborating on a new project, or simply sharing cherished family photos, your iPhone’s Mail app offers robust functionality for attaching files. This comprehensive guide will walk you through the various methods of attaching visual content and documents to your emails, leveraging the power of your device and complementing your creative journey with resources from Tophinhanhdep.com.

Tophinhanhdep.com specializes in a vast array of visual content, from stunning wallpapers and aesthetic backgrounds to high-resolution photography and inspiring digital art. We also provide essential image tools like converters, compressors, optimizers, and AI upscalers. Understanding how to seamlessly integrate these resources and your own creations into your email communications is a fundamental skill for anyone engaged in digital media. This article aims to demystify the process, ensuring your visual messages are always delivered with clarity and impact.
Mastering the Mail App: Core Methods for Attaching Visuals and Documents
The iPhone’s Mail app, while seemingly simple, offers several intuitive ways to attach files. Unlike desktop email clients that often feature a prominent paperclip icon, iOS integrates attachment options directly into the composition interface or via other applications, providing flexibility depending on where your desired files are stored. We’ll explore the primary methods, ensuring you can confidently send everything from beautiful photography to essential PDF documents.
Attaching from Your Photos App: Sharing Your Visual Masterpieces
For many iPhone users, the Photos app is the primary repository for visual content. It’s where your camera roll captures everything from candid moments to carefully composed shots. Sharing these directly via email is a common necessity, whether you’re sending a collection of nature photographs, an abstract digital art piece you created, or simply a screenshot.
To attach photos or videos directly from the Mail app:
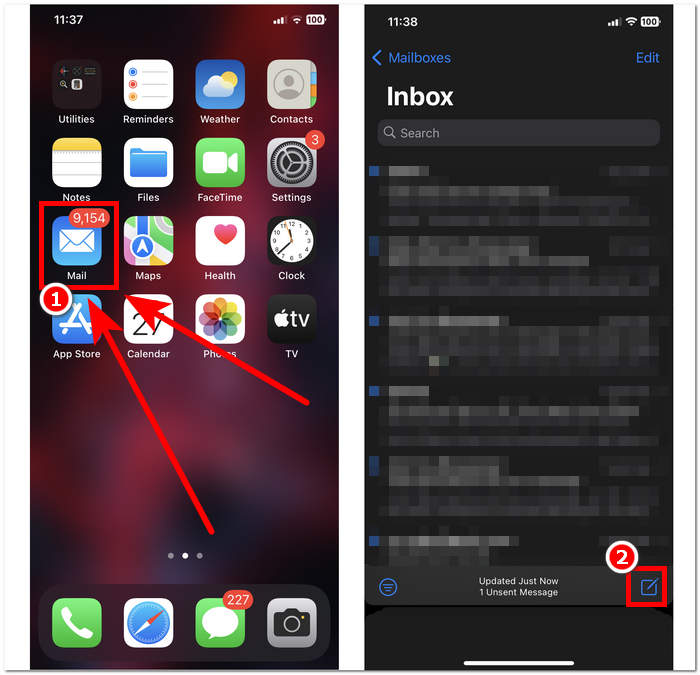
- Open the Mail App and Start Composing: Launch the Mail app from your Home screen or App Library. Tap the compose icon (a square with a pen) in the bottom-right corner to start a new email, or open an existing email to reply or forward.
- Initiate Attachment Selection: Tap once within the body of your email message. This action brings up a contextual menu with options like Cut, Copy, and Paste.
- Find the Photo/Video Option: If you don’t immediately see “Insert Photo or Video,” tap the right-arrow button (">") in the contextual menu until it appears. Alternatively, on newer iOS versions or iPads, you might see a photo icon (looking like a mountain and sun) directly above the keyboard in the menu bar.
- Select Your Media: Tapping “Insert Photo or Video” or the photo icon will open a small ‘Recent Photos’ preview. From here, you can tap on individual photos or videos to select them. To select multiple items, simply tap on each one you wish to include. A blue checkmark will indicate selected items.
- Access Full Library (Optional): If your desired media isn’t in ‘Recent Photos’, tap “All Photos” or “Albums” (often a blue text option) to browse your entire photo library. Navigate through albums, select your desired images or videos, and then tap “Choose” to add them to your email.
- Confirm and Send: Once selected, the photos or videos will be inserted into your email body. Finish composing your email (add recipient, subject, and any text), then tap the “Send” button in the upper right corner.
Sharing Multiple Photos: Historically, iOS had a somewhat restrictive limit on the number of photos you could attach via the Mail app (e.g., five photos in older iOS versions). However, this limit has largely been lifted or significantly increased in modern iOS versions. You can now select a substantial number of photos for a single email. While sharing many high-resolution images, remember that email providers often have attachment size limits. For extensive collections or very large files, methods like Mail Drop (discussed later) or linking to an optimized collection on Tophinhanhdep.com are more efficient. If you’re preparing high-resolution stock photos or digital photography for clients, you might first use Tophinhanhdep.com’s compression tools to reduce file size without significant loss of quality, ensuring quicker delivery.
Attaching from the Files App and Cloud Services: Beyond the Photo Library
The Files app on your iPhone and iPad acts as a central hub for all your documents and files, including those stored locally (“On My iPhone”) and across various cloud services like iCloud Drive, Dropbox, and Google Drive. This is particularly useful for attaching professional documents, graphic design assets, or even high-resolution images that are not necessarily in your Photos library. Many creative professionals store their digital art, photo manipulation projects, or even collections of beautiful photography on these cloud platforms.
Here’s how to attach documents and other files from the Files app:
- Open Mail and Create an Email: Start a new email or reply to an existing one in the Mail app.
- Access the Attachment Menu: Tap once into the email body to bring up the contextual menu (Cut, Copy, Paste). Tap the right-arrow (">") repeatedly until you see “Attach File” or “Add Document.” Alternatively, look for the document icon (often a folder or a paper document) above the keyboard, which directly accesses the Files app.
- Navigate the Files App: Tapping the attachment option will open the Files app interface. You’ll typically start in a recent files view.
- Choose Your Location: Tap “Browse” from the bottom bar until you reach the “Locations” screen. Here, you can select where your file is stored:
- iCloud Drive: Access files synced with your Apple ID across all your devices. This is a common location for documents, presentations, and even design assets.
- On My iPhone: Access files saved directly on your device’s local storage.
- Third-Party Cloud Services: If you have apps like Dropbox, Google Drive, or Microsoft OneDrive installed, they will appear as selectable locations here, allowing you to browse and attach files directly from those services. This is invaluable for accessing stock photos or shared design assets.
- Select and Attach: Navigate through your folders to find the specific document or image you wish to attach. Tap on the file to select it. It will instantly be added to your email.
- Repeat for Multiple Files: If you need to attach more than one file, repeat steps 2-5 for each additional item.
- Complete and Send: After attaching all necessary files, finalize your email and tap “Send.”
Troubleshooting: iCloud Drive Not Visible If you don’t see iCloud Drive as an option in the Files app, follow these steps to ensure it’s enabled:
- Open the Files app: Tap the Files app icon.
- Go to Browse: Tap “Browse” in the bottom menu.
- Edit Locations: Tap the three dots icon (menu icon) in the top-right or top-left (depending on iOS version) and select “Edit.”
- Enable iCloud Drive: Toggle the switch next to “iCloud Drive” to the “On” position. Tap “Done.”
- Check iCloud Settings: If it’s still not visible, ensure you’re signed into iCloud on your iPhone. Go to Settings > Your Name (at the top) > iCloud > iCloud Drive, and make sure “Sync this iPhone” is turned on.
This method is crucial for professionals sharing work like graphic design portfolios, digital art pieces, or high-resolution stock photos downloaded from Tophinhanhdep.com.
The Contextual Menu and Keyboard Icons: Quick Access for Attachments
Beyond navigating through separate menus, iOS provides quick access points for attachments, particularly useful for efficiency. These methods streamline the process, allowing you to insert media or documents without losing your flow while composing an email.
Using the Contextual Menu (Long-Press Method): This is a universal method across iOS devices and works for both photos/videos and other documents.
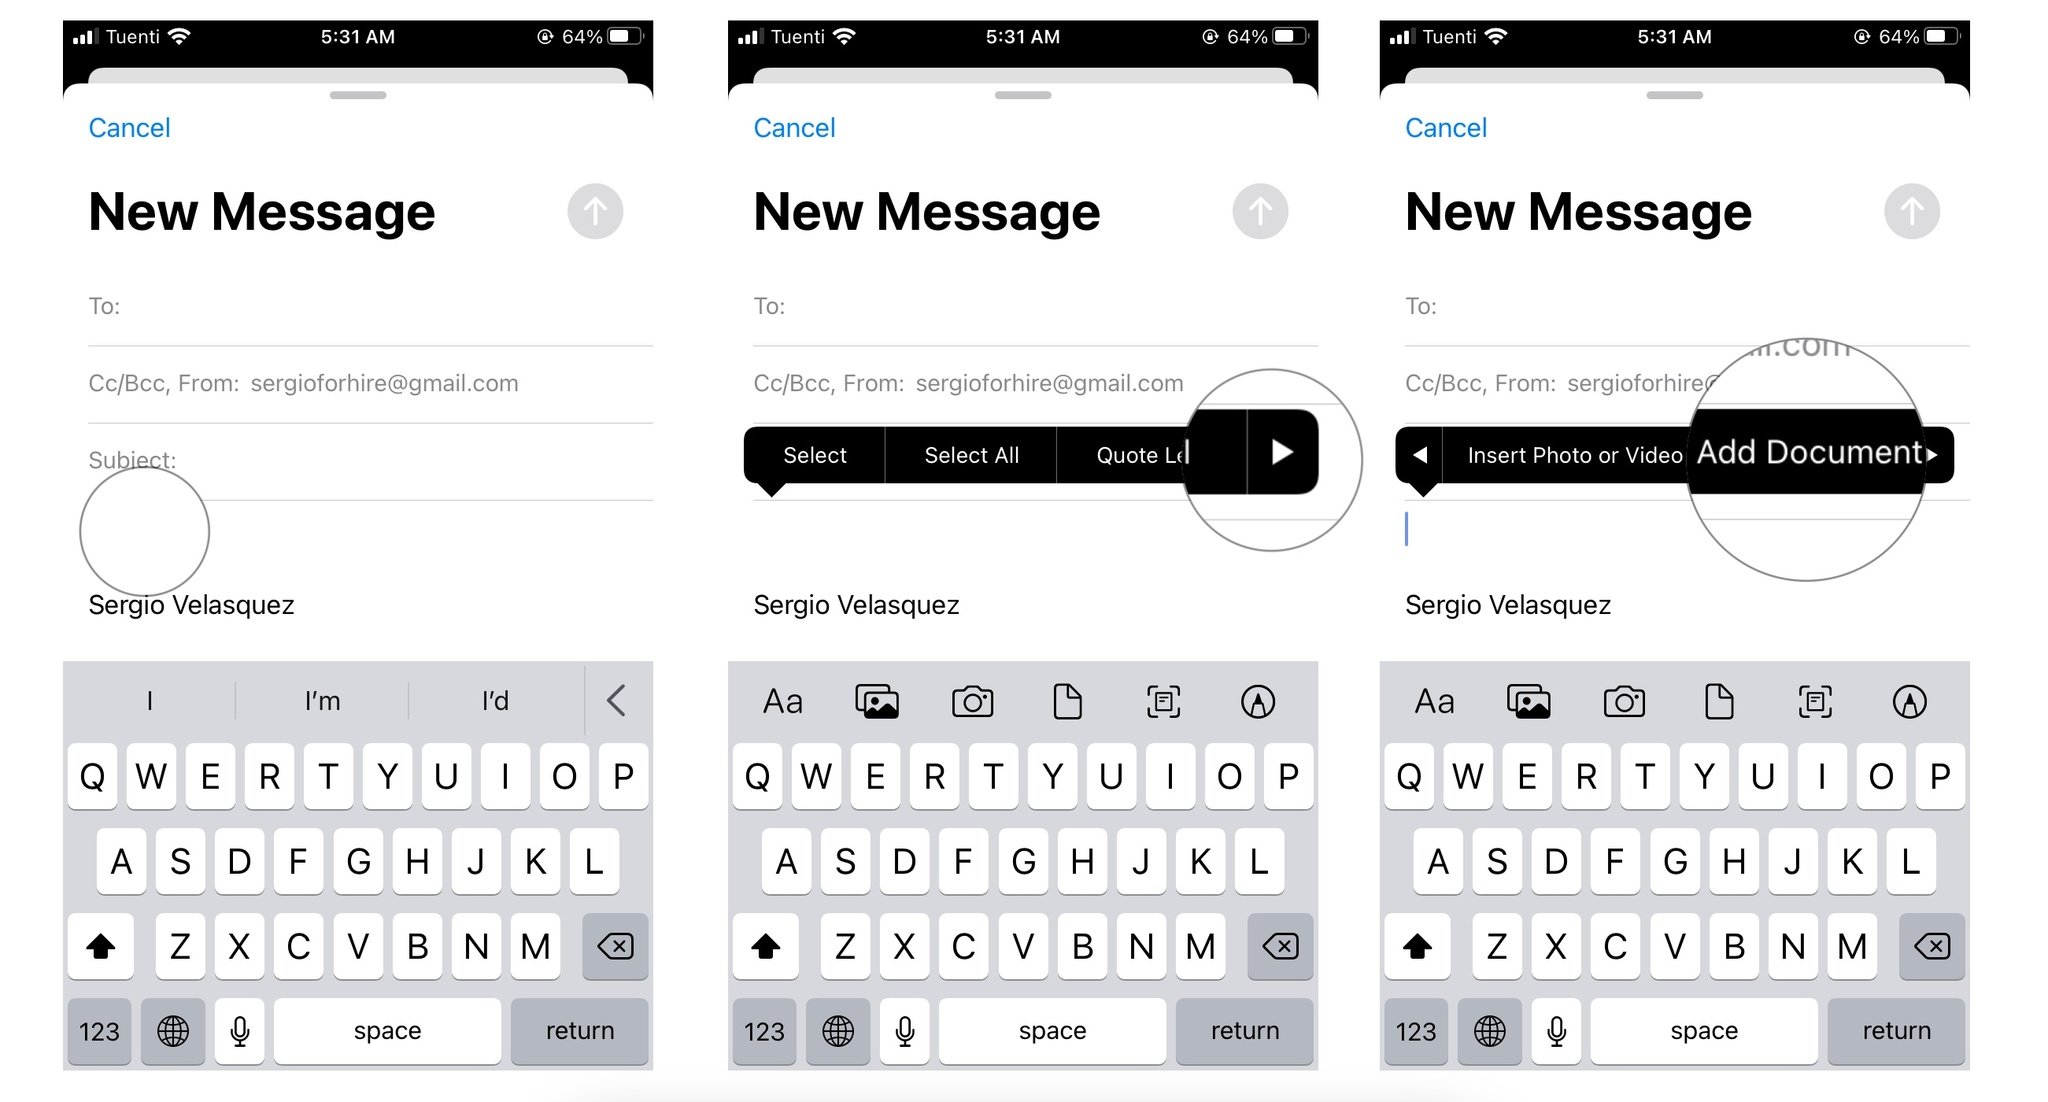
- Compose Your Email: Open the Mail app and begin composing a new email or replying to an existing one.
- Long-Press in the Body: Tap and hold your finger down on an empty area within the email’s body text field. After a moment, a black pop-up bar will appear.
- Navigate Options: The initial options will likely be “Cut,” “Copy,” “Paste.” Tap the right-arrow (">") on this pop-up bar. Continue tapping it until you see “Insert Photo or Video” and/or “Add Attachment” (or “Attach File”).
- Select Your Content:
- Choose “Insert Photo or Video” to access your Photo Library and embed images or videos directly into the email body.
- Choose “Add Attachment” or “Attach File” to open the Files app, allowing you to select documents and files from iCloud Drive or other cloud services.
This long-press method is versatile and particularly helpful when you realize you need to add an attachment midway through writing your email. It places the attachment precisely where your cursor was located.
Using the Keyboard Icons (iPad and Newer iPhones): On iPads and some newer iPhone models (especially Plus/Max versions in landscape mode, or with the keyboard toolbar enabled), you might find dedicated attachment icons directly above the keyboard. These icons provide a more direct, one-tap access.
- Open Mail and Compose: As before, start a new email or reply in the Mail app.
- Locate Keyboard Toolbar: Look at the row of icons just above the virtual keyboard.
- Identify Icons: You’ll typically find:
- Photo Icon: A small icon resembling a mountain and sun (or sometimes a flower). Tapping this instantly opens the photo picker to insert photos or videos from your library.
- Document Icon: An icon resembling a paper document or folder. Tapping this takes you directly to the Files app to attach documents from iCloud Drive, On My iPhone, or other connected cloud services.
- Scanner Icon: An icon resembling a camera or document with lines. This allows you to scan a physical document directly into your email as a PDF.
- Tap and Select: Simply tap the relevant icon for the type of attachment you wish to add, and then proceed with selecting your file as described in the previous sections.
These keyboard shortcuts are designed for speed and convenience, reducing the number of taps required to attach common file types. They highlight Apple’s continuous effort to make visual and document sharing as integrated and seamless as possible on their mobile devices.
Optimizing Your Attachments for Seamless Sharing: A Tophinhanhdep.com Perspective
While attaching files on an iPhone is straightforward, ensuring that those attachments are sent efficiently and received as intended requires a deeper understanding of file management and optimization. This is where the resources available on Tophinhanhdep.com, particularly our “Image Tools” and insights into “Photography,” become invaluable. Sending unoptimized high-resolution images or large video files can lead to long upload times, exceeding email provider limits, or frustrating recipients with slow downloads.
Understanding File Sizes and Mail Drop: Ensuring Delivery of High-Resolution Content
Email services typically impose limits on attachment sizes, often ranging from 10MB to 25MB per email. For general documents or a few standard photos, this isn’t usually an issue. However, for “high-resolution photography,” “digital photography,” or “videos,” these limits are quickly reached. Modern iPhone cameras capture stunningly detailed images and 4K videos, which can result in very large file sizes.
The Challenge of High-Resolution Images: Imagine you’ve just taken a breathtaking “nature photograph” or a “beautiful photography” shot, perhaps even downloaded an exquisite “wallpaper” from Tophinhanhdep.com. These are often high-resolution files, rich in detail, and thus large in size. Sending several such images via email can easily hit limits.
Introducing Mail Drop: Apple’s Mail Drop is an elegant solution for sending large files (up to 5GB) through the Mail app. When you attach a file that exceeds the standard email attachment limit, the Mail app will automatically offer to use Mail Drop.
- How it Works: Instead of sending the actual file directly with your email, Mail Drop uploads the file to iCloud. A link to this file is then included in your email. The recipient can click this link to download the file from iCloud.
- Availability: Mail Drop is available for both iCloud Mail accounts and other email accounts used with the Mail app, provided you’re signed into iCloud on your device.
- Benefits: It bypasses attachment size limits for traditional email servers, allows recipients to download files at their convenience, and keeps your email inbox from being clogged with enormous attachments. Files are available for 30 days.
Pre-empting Large Files with Tophinhanhdep.com’s Image Tools: Even with Mail Drop, there are scenarios where you might prefer to send a slightly smaller file directly or to reduce the burden on your iCloud storage. This is where Tophinhanhdep.com’s “Image Tools” come into play:
- Compressors: Our image compressors allow you to reduce the file size of your photos (e.g., JPEG, PNG) without drastically compromising their visual quality. This is ideal for preparing “aesthetic” or “background” images for email that still need to look good but load quickly.
- Optimizers: Image optimizers go a step further, analyzing an image for redundant data and applying smart compression techniques to minimize file size while maintaining visual fidelity. Perfect for web-ready images or quick email shares.
- Converters: Sometimes, compatibility is key. If you’re sending images to a recipient with specific software, Tophinhanhdep.com’s converters can change your image format (e.g., HEIC to JPEG, PNG to WebP) to ensure universal accessibility.
- AI Upscalers: Conversely, if you have a lower-resolution image (perhaps an older “sad/emotional” photograph that you want to enhance before sharing), an AI upscaler can intelligently increase its resolution and detail, preparing it for higher-quality display or even print after emailing.
By utilizing these tools before attaching your files, you gain greater control over the recipient’s experience, ensuring your visual content is always delivered optimally.
Preparing Your Visual Assets: Before You Hit Send
Sending visuals isn’t just about the mechanics of attachment; it’s also about presentation and ensuring your content looks its best. “Digital photography” and “visual design” principles often dictate some pre-sending preparation. Tophinhanhdep.com’s focus on “graphic design,” “digital art,” and “photo manipulation” underscores the importance of this step.
Image Editing Styles and Photo Manipulation: Before you attach that striking “abstract” piece or a client-ready “beautiful photograph,” consider if it needs any final touches. Your iPhone’s built-in Photos app offers basic editing tools, but for more advanced “photo manipulation” or applying specific “editing styles,” dedicated apps or desktop software are often used.
- Cropping and Resizing: Ensure your images are appropriately cropped and sized for email. Excessively large dimensions might not be necessary for viewing on a screen and can contribute to larger file sizes.
- Color Correction and Enhancement: A quick adjustment to brightness, contrast, or color balance can make a significant difference in how your image is perceived. This is especially true for images intended for “mood boards” or “thematic collections” where a consistent visual style is important.
- Watermarking: For professional photographers sharing “stock photos” or “high-resolution” samples, consider adding a subtle watermark to protect your work before sending it out.
Utilizing Tophinhanhdep.com for Pre-Attachment Processing: Tophinhanhdep.com isn’t just a source of inspiration; it also offers tools that can be part of your pre-email workflow:
- Bulk Processing: If you’re sending a collection of “photo ideas” or “trending styles,” you might need to apply similar optimizations to many images. While Tophinhanhdep.com’s online tools typically handle one image at a time, the concepts of compression and optimization are key to managing large batches efficiently.
- Image-to-Text Conversion: In some “creative ideas” or “visual design” contexts, you might have an image containing text (e.g., a mock-up of a poster with key information). Tophinhanhdep.com’s “Image-to-Text” tool can extract this text, allowing you to include it separately in your email body or as an editable document, enhancing accessibility and searchability.
- Quality Assessment: Before final attachment, review your images on a good display to ensure they meet your quality standards, especially if they’ve undergone compression.
By taking these preparatory steps, informed by the principles of good “digital photography” and “visual design,” you elevate the quality of your email communication and ensure your attachments make the best possible impression.
Enhancing Your Email Communication with Visuals: Creative Applications
Email has evolved far beyond simple text messaging, becoming a powerful platform for visual communication. For anyone involved in “visual design,” “graphic design,” or simply sharing “image inspiration & collections,” the ability to attach diverse visual content transforms ordinary emails into engaging narratives. Tophinhanhdep.com provides a wealth of visual resources, and knowing how to effectively share them can amplify your impact.
Curating Visual Content for Specific Audiences: From Mood Boards to Professional Presentations
The types of images you share can vary greatly depending on your audience and purpose. Whether you’re inspiring a team with “creative ideas,” presenting a client with design options, or sharing personal “thematic collections,” attachments are key.
- Mood Boards for Creative Ideas: For designers, artists, or anyone brainstorming, a “mood board” is a powerful tool. You can easily compile a series of “aesthetic” images, “wallpapers,” or “backgrounds” (perhaps curated from Tophinhanhdep.com’s extensive collections) into a document or as individual attachments. This helps to convey a particular feeling, style, or direction without lengthy explanations. For instance, sending a collection of “nature” themed images for an outdoor brand pitch or “abstract” designs for a modern art project.
- Thematic Collections and Trending Styles: Tophinhanhdep.com regularly features “trending styles” and “thematic collections” of images. Sharing these directly via email, either as individual pictures or compiled into a PDF, allows you to showcase visual trends, inspire others, or simply share beautiful content with friends and family. This could involve a series of “sad/emotional” photographs to evoke a particular mood, or a vibrant collection of “beautiful photography” to share vacation memories.
- Professional Portfolios and Presentations: When sending a professional email, attachments might include elements of your “graphic design” portfolio, pieces of “digital art,” or “high-resolution” samples of your “stock photos.” These often come as PDFs, Keynote presentations, or high-quality image files. The ability to attach these seamlessly from your iPhone (especially from cloud services where they might be stored) ensures you can respond to opportunities on the go. Imagine quickly sending a client a sample of your “photo manipulation” skills right from your iPhone.
By thoughtful curation and selection of your visual attachments, you can tailor your message to resonate deeply with your intended audience, making your email communication more effective and memorable.
Beyond the Image: Attaching Other Relevant Visual Design Elements
While images are central to visual communication, “visual design” encompasses a broader spectrum of elements. Your iPhone’s Mail app, supported by the Files app, allows you to attach a variety of file types that are critical for various creative workflows, all of which can be enhanced by a “Tophinhanhdep.com” mindset.
- Graphic Design Assets: Beyond final images, designers often need to share source files or specific assets. This could include vector graphics (SVG, AI), layered image files (PSD), or custom fonts that are integral to a “graphic design” project. Storing these in iCloud Drive or Dropbox and attaching them through the Mail app is a common practice.
- Digital Art Source Files: For “digital art” creators, sharing a canvas file (e.g., a Procreate .procreate file) for collaboration or feedback is essential. These can be attached from the Files app, enabling seamless exchange with collaborators or instructors.
- Photo Manipulation Project Files: Similar to digital art, “photo manipulation” projects often involve complex layered files. Sharing these source files allows others to review or continue working on a project, showcasing the intricate details of your “editing styles.”
- Creative Ideas and Sketches: Sometimes, “creative ideas” begin as quick sketches or wireframes saved as PDFs or image files. Attaching these early-stage visuals to an email can quickly communicate concepts and gather initial feedback, moving projects forward efficiently.
- Image-to-Text for Documentation: As mentioned earlier, Tophinhanhdep.com’s “Image-to-Text” tool offers a unique application for email attachments. If you have a photograph of meeting notes, a whiteboard session, or a design brief embedded in an image, converting it to editable text allows you to include a searchable and adaptable document alongside the original image. This is particularly useful for documentation, project management, or ensuring key information is easily accessible.
The versatility of the iPhone’s Mail app, combined with the comprehensive file management capabilities of the Files app, means you’re not limited to just JPEG photos. You can share a rich tapestry of visual design elements, ensuring your email communications are as comprehensive and visually engaging as your creative work demands.
Advanced Tips and Troubleshooting for iPhone Email Attachments
While the process of attaching files to emails on your iPhone is designed to be user-friendly, a few advanced tips can streamline your workflow and help you overcome common hurdles. These insights will help you manage your email attachments more effectively, ensuring a smoother experience when dealing with “high-resolution” content or “visual design” projects.
Managing Email Accounts and Attachments Inbox: Staying Organized
For users who send and receive a high volume of emails, especially those filled with “digital photography,” “graphic design” files, or “image inspiration & collections,” efficient organization is key. The Mail app offers features to help keep things tidy.
- Adding and Renaming Email Accounts: If you use multiple email addresses (e.g., personal, work, creative portfolio), ensuring they are all set up correctly in the Mail app is the first step.
- Go to Settings > Mail > Accounts.
- Tap Add Account to set up a new email service (iCloud, Exchange, Google, Yahoo, Outlook.com, or Other).
- Once added, you can tap on an account and then Account again to change its description (e.g., from “Gmail” to “Work Email” or “Creative Portfolio”) for easier identification in the Mail app’s inbox list. This is particularly useful for segregating professional communication, like sharing “stock photos” or “photo manipulation” projects, from personal exchanges.
- Enabling an Attachments Inbox: iOS Mail has a smart mailbox feature that can automatically group emails containing attachments. This is an absolute game-changer for anyone frequently dealing with shared documents or visual assets.
- Open the Mail app.
- Go to the Mailboxes screen (you might need to tap “< Mailboxes” in the top-left corner if you’re in an inbox).
- Tap Edit in the top-right corner.
- Scroll down to the “Special Mailboxes” section. If you don’t see “Attachments,” tap “Add Mailbox…” and select “Attachments” from the list.
- Toggle the switch next to “Attachments” to the “On” position.
- Tap Done. Now, a new “Attachments” mailbox will appear in your Mailboxes list. Tapping it will show you all emails across all your accounts that contain attachments, making it incredibly easy to find that “high-resolution” image or “PDF document” you’re looking for, without sifting through countless other messages.
Overcoming Common Attachment Hurdles: What to Do When Things Go Wrong
Even with the most intuitive systems, issues can arise. Knowing how to troubleshoot common problems can save you time and frustration, especially when under pressure to send important “visual design” proofs or “beautiful photography.”
- iCloud Drive Not Visible (Revisited): This is a frequent issue, especially for new users or after a software update. As previously detailed:
- Verify iCloud Drive is enabled in the Files app (Files > Browse > Menu icon > Edit > iCloud Drive toggle ON).
- Ensure you are signed into iCloud on your iPhone (Settings > Your Name).
- Confirm iCloud Drive sync is active (Settings > Your Name > iCloud > iCloud Drive > Sync this iPhone ON). If iCloud Drive isn’t correctly configured, you won’t be able to access files stored there, impacting your ability to attach many documents and “high-resolution” images.
- “Cannot Get Mail” Error (Briefly): While not directly related to attaching files, this error can prevent you from sending or receiving emails, including those with attachments. Common fixes include:
- Checking your internet connection (Wi-Fi or cellular).
- Force-quitting and reopening the Mail app.
- Restarting your iPhone.
- Verifying your email account settings in Settings > Mail > Accounts.
- Checking your email provider’s server status.
- Distinction Between Embedding and Attaching Photos: Some users are confused by the Mail app’s behavior: “Insert Photo or Video” often embeds the image directly into the email body, making it visible within the message itself. “Add Attachment” typically adds the image (or any file) as a discrete attachment, often appearing at the bottom of the email or requiring a download by the recipient.
- Embedded: Good for showcasing “aesthetic” images, “wallpapers,” or small “digital art” previews that you want the recipient to see immediately upon opening the email.
- Attached: Preferable for “high-resolution photography,” “stock photos,” or images that are part of a larger collection or project file, where the recipient might want to download the original quality file. This also applies when the image is not the main content but a supporting document. Understanding this distinction helps you choose the right method for sharing your visual content and ensures your intentions are met. If you want to force an image to be a traditional attachment rather than embedded, sometimes attaching it via the Files app (after saving it there) can achieve this.
By applying these advanced tips and knowing how to troubleshoot common issues, you can navigate the complexities of email attachments on your iPhone with greater confidence. This allows you to focus more on the “creative ideas” and “visual design” aspects of your work, knowing your communication channels are robust and reliable.
Conclusion: Empowering Your Visual Communication with iPhone Email Attachments
The iPhone, with its powerful camera and intuitive iOS, serves as an indispensable tool for visual creators, photographers, and anyone looking to share compelling imagery and important documents. Mastering the art of attaching images and files to your emails directly from your device is a fundamental skill in today’s digital landscape, seamlessly blending convenience with professional capability.
Throughout this guide, we’ve explored the diverse methods available within the Mail app—from directly embedding “beautiful photography” from your Photos app, to attaching critical “graphic design” assets from the Files app and various cloud services. We’ve delved into the efficiency of contextual menus and keyboard icons, and tackled the crucial aspect of optimizing your attachments for seamless delivery, especially when dealing with “high-resolution” content or “digital photography.”
Furthermore, we highlighted how effective use of email attachments can enhance your communication, whether you’re compiling “mood boards” for “creative ideas,” sharing “thematic collections” of “trending styles,” or sending professional presentations incorporating “digital art” and “photo manipulation.” Complementing these techniques with advanced tips for organization and troubleshooting ensures that your visual messages always arrive with clarity and impact.
As a dedicated resource for visual enthusiasts, Tophinhanhdep.com offers a vast library of “wallpapers,” “backgrounds,” and “aesthetic” imagery, alongside specialized “image tools” like converters, compressors, optimizers, and AI upscalers. These resources serve as the perfect complement to your iPhone’s capabilities, allowing you to find inspiration, refine your visual assets, and ensure every attachment you send is perfectly prepared.
In essence, your iPhone is more than just a communication device; it’s a mobile creative studio. By leveraging its built-in functionalities and integrating valuable resources like Tophinhanhdep.com, you empower your email communications to be as visually rich and impactful as your creative vision. So go ahead, capture that stunning “nature” shot, craft that intricate “abstract” piece, or find that perfect “sad/emotional” background, and share it with the world, one perfectly attached email at a time.