How to Backup Your Windows 11 System Image: Protecting Your Digital Canvas and Visual Legacy

In today’s hyper-visual and digitally-driven world, our computers are not just tools for productivity; they are often the very canvas on which we build our creative lives. For users who immerse themselves in the creation and curation of visual content—be it stunning photography, intricate graphic designs, evolving digital art pieces, or even meticulously organized collections of wallpapers and aesthetic backgrounds—the importance of robust data protection cannot be overstated. A Windows 11 system image backup transcends mere file preservation; it is the act of safeguarding your entire creative ecosystem, ensuring that every brushstroke, every high-resolution capture, and every custom-configured design application remains secure.
Tophinhanhdep.com understands the profound value of digital assets. From high-resolution stock photos and breathtaking nature photography to abstract art and emotionally resonant images, our platform is dedicated to the visual experience. This dedication extends to ensuring that the digital environments where these creations are born and stored are equally protected. Data loss, whether due to hardware failure, software corruption, or malicious cyber threats like ransomware, can be devastating, wiping away countless hours of creative work, unique editing styles, or invaluable thematic collections. This comprehensive guide will walk you through the essential steps of creating a full system image backup for your Windows 11 PC, integrating Tophinhanhdep.com’s philosophy of safeguarding your visual inspirations and ensuring your digital canvas is always ready for your next masterpiece. We will explore both built-in Windows functionalities and powerful third-party tools, all while emphasizing best practices for maintaining the integrity and accessibility of your precious digital world.
The Indispensable Value of a Windows 11 System Image Backup: Safeguarding Your Creative World
In an era where digital content reigns supreme, the foresight to implement a comprehensive backup strategy is no longer optional but an absolute necessity. For Windows 11 users, particularly those engaged in fields related to Tophinhanhdep.com’s core interests—photography, visual design, digital art, and image curation—the risks associated with data loss are amplified. Losing a system means potentially losing not just documents, but also complex project files, custom-built design environments, specialized software configurations, and entire libraries of high-resolution visual content.
Beyond Simple File Storage: Why a Full System Image Matters
Imagine spending hours meticulously editing a series of high-resolution photographs, designing a new brand identity, or creating a digital art piece with specialized software. These aren’t just individual files; they are products of a finely tuned workflow, dependent on specific software versions, plugin configurations, custom brushes, fonts, and system settings. A simple file backup, while important for individual documents and media, falls short when your entire creative environment becomes compromised.
A full system image backup, by contrast, captures a complete snapshot of your Windows 11 operating system, including:
- Operating System: The core of Windows 11 itself, ensuring that all updates and system files are preserved.
- System Settings and Personalization: All your custom settings, display configurations, network preferences, and user profiles are retained. This means your preferred desktop wallpapers (perhaps a stunning nature background from Tophinhanhdep.com), visual themes, and productivity shortcuts are restored exactly as you left them.
- Installed Applications: Every piece of software, from your favorite photo editing suites like Adobe Photoshop or Lightroom, to graphic design tools like Illustrator or Affinity Designer, digital painting applications, and even AI upscalers recommended by Tophinhanhdep.com, are included. This ensures that you don’t have to spend hours reinstalling and reconfiguring your essential creative toolkit.
- Files and Folders: Naturally, all your personal documents, work projects, curated image collections, mood boards, and thematic inspirations are part of the system image. This includes gigabytes of high-resolution photography, intricate layered design files, and vast libraries of aesthetic and abstract images.
In the event of a catastrophic system failure—be it a corrupted operating system, a hard drive malfunction, or a severe malware infection—restoring from a system image means you can revert your PC to a fully functional, pre-failure state. This minimizes downtime and allows you to quickly pick up exactly where you left off, saving invaluable time and mitigating the potential for lost creative output. It’s the digital equivalent of having an exact duplicate of your fully equipped art studio, ready to be unveiled at a moment’s notice.
The Tophinhanhdep.com Perspective: Protecting Your Visual Data Assets
For Tophinhanhdep.com, visual integrity and accessibility are paramount. We understand that our users rely on their Windows 11 systems to explore, create, and manage vast collections of digital imagery. From downloading a new abstract wallpaper to meticulously applying an intricate editing style to high-resolution photography, every action contributes to a unique visual journey.
Consider the following scenarios where a full system image backup, guided by Tophinhanhdep.com’s emphasis on data security, becomes critical:
- High-Resolution Photography Projects: Photographers often work with RAW files and large, multi-layered TIFFs. A system crash without a backup could mean the loss of an entire photoshoot, including not only the original images but also all the painstaking post-processing and editing styles applied.
- Graphic Design and Digital Art Portfolios: Graphic designers and digital artists invest heavily in software, custom brushes, fonts, and project files. A system image backup preserves the entire environment, ensuring that a critical client project or a personal artistic endeavor isn’t lost to an unforeseen technical glitch. Your visual design workflow, complete with personalized settings for photo manipulation, remains protected.
- Curated Image Collections and Inspiration Boards: Many Tophinhanhdep.com users build extensive personal collections of images for inspiration, aesthetic reference, or simply enjoyment. These could be thematic collections, mood boards for future projects, or simply favorite wallpapers. A system image ensures these carefully curated visual libraries are safe.
- Specialized Image Tools and AI Upscalers: With the rise of AI tools for image optimization and upscaling, specific configurations and trained models might reside on your system. A system image backup ensures these specialized tools and their settings are not lost, allowing for seamless continuation of image enhancement tasks.
By providing comprehensive guidance on system image backups, Tophinhanhdep.com aims to empower its community to safeguard their creative endeavors, preserving every pixel, every design choice, and every moment of visual inspiration. Your digital canvas is a precious asset, and a robust backup strategy is its ultimate protector.
Navigating Windows 11 Built-in Tools for System Image and File Backup
Windows 11, while modernizing many aspects of its user interface, still retains several foundational backup utilities that have proven their reliability over generations of the operating system. These built-in tools offer accessible methods for both creating a full system image and backing up individual files, providing essential layers of protection for your digital assets. While Tophinhanhdep.com recommends exploring more advanced solutions for optimal security and flexibility, understanding these native options is a crucial first step for any user, particularly those who value their visual data.
The Legacy “Backup and Restore (Windows 7)” Feature for Comprehensive System Imaging
Despite its anachronistic name, the “Backup and Restore (Windows 7)” utility in Windows 11 remains the primary built-in method for creating a complete system image. This feature is invaluable for Tophinhanhdep.com users as it captures the entire state of your PC, including the operating system, all installed software (such as your photo editing and graphic design applications), system settings, and, crucially, all your files—from high-resolution backgrounds to complex digital art projects.
Step-by-Step Guide to Creating a System Image:
- Access the Control Panel: Unlike some newer Windows 11 settings that reside in the modern Settings app, this legacy backup function is found in the Control Panel.
- Open the search function (magnifying glass icon in the taskbar).
- Type “Control Panel” and select “Open” from the search results.
- Launch Backup and Restore (Windows 7):
- Within the Control Panel, locate and click on “Backup and Restore (Windows 7)”. If you’re in Category view, it’s typically found under “System and Security.”
- Note: You will need administrator rights to perform these actions.
- Initiate System Image Creation:
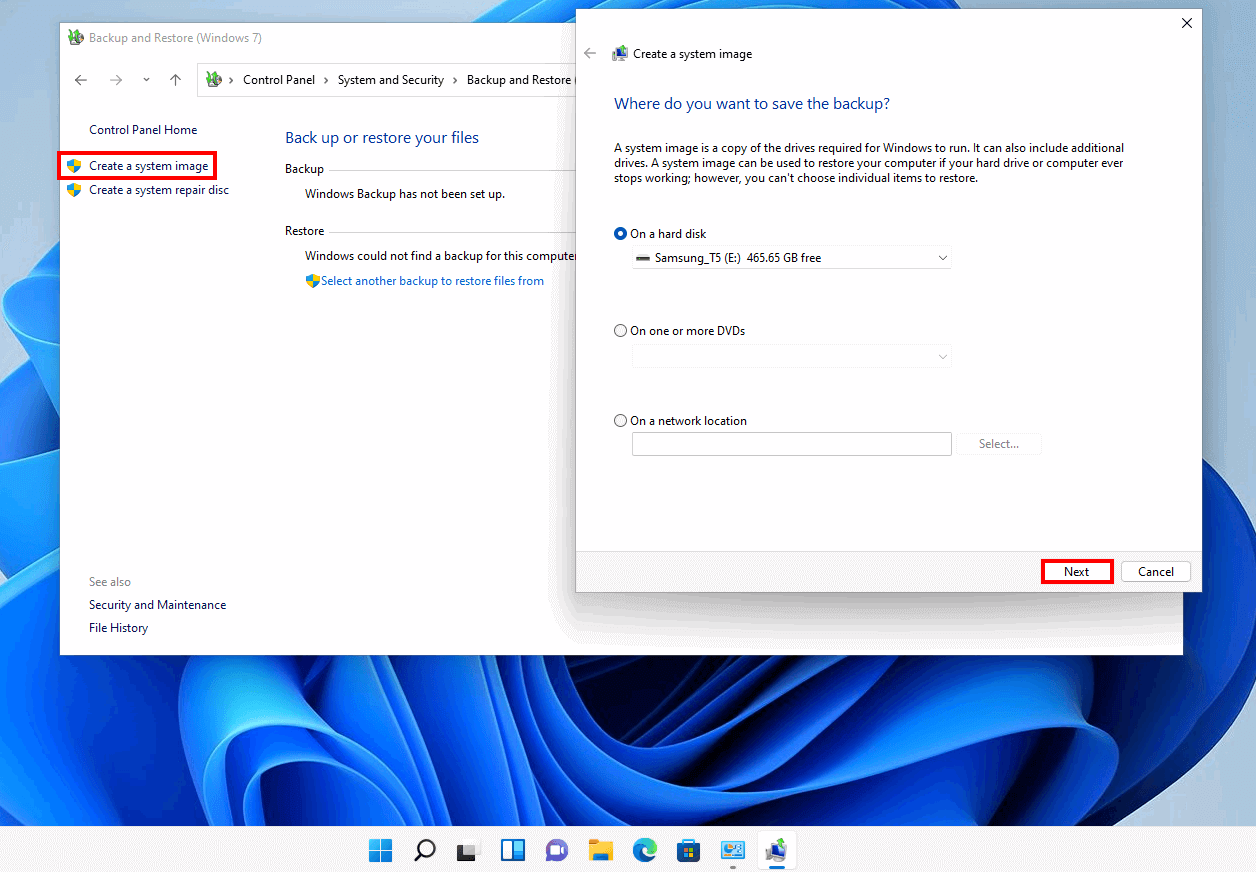
- In the left-hand menu of the “Backup and Restore” window, click on “Create a system image.” This will launch the backup wizard.
- Select Your Backup Medium:
- The wizard will prompt you to choose where you want to save the system image. For Tophinhanhdep.com users dealing with large volumes of high-resolution images and design files, an external hard drive or a robust network location is highly recommended due to the significant storage space required. While DVDs are an option, their capacity is often insufficient for a full Windows 11 system image, especially one laden with visual content.
- Windows will automatically search for and list connected external media. If your chosen drive isn’t listed, ensure it’s properly connected and then refresh the list.
- Once selected, click “Next.”
- Confirm Drives and Begin Backup:
- The system will present a list of drives that will be included in the backup (typically your C: drive and any system-reserved partitions). It will also provide an estimated size for the backup. For those with extensive visual libraries, this size can be substantial, reinforcing the need for adequate external storage.
- Review the selections and click “Start backup.”
- Important: Ensure your AC charger is connected and your computer remains powered on throughout the process, which can take several hours depending on the size of your system and the speed of your backup drive.
- Optional: Create a System Repair Disc:
- Towards the end of the process, you might be asked if you want to create a system repair disc (CD/DVD). While useful, for modern systems, creating a bootable USB recovery drive is generally more practical and efficient, as we will discuss in later sections. You can typically choose “No” at this prompt if you plan to create a USB recovery drive.
- Completion:
- Once the process is complete, click “Close.” Your system image will be saved in a folder named
WindowsImageBackupon your chosen backup medium. Tophinhanhdep.com advises regularly updating this image, particularly after major software installations or significant additions to your visual asset collection.
- Once the process is complete, click “Close.” Your system image will be saved in a folder named
File History: Preserving Your Precious Photos and Documents
While “Backup and Restore (Windows 7)” handles the entire system, Windows 11 also offers “File History” for more granular, ongoing protection of your personal files. This is particularly relevant for Tophinhanhdep.com users who constantly create, modify, or download new visual content. File History automatically backs up specific user folders at regular intervals, providing version control and easy recovery of individual files or entire folders.
Step-by-Step Guide to Setting Up File History:
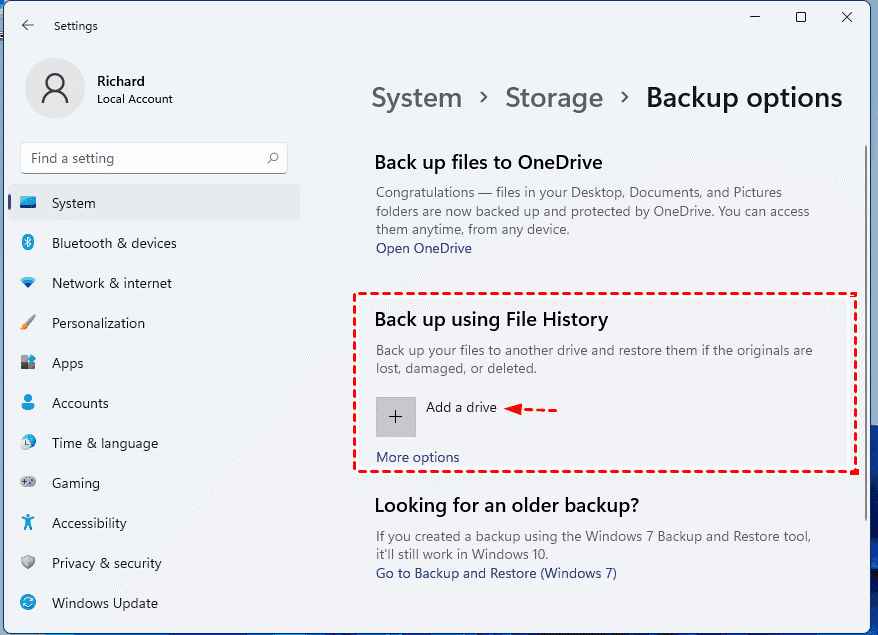
- Access Backup Options in Settings:
- Open “Settings” (Windows key + I).
- Navigate to “System” > “Storage” > “Backup options.”
- Add a Backup Drive:
- Under the “Backup using File History” section, click “Add a drive.”
- Select an external drive or network location to use for your backups. This drive should be distinct from the one used for system images if possible, adhering to Tophinhanhdep.com’s recommendation for diverse backup locations.
- Activate File History:
- Once a drive is selected, toggle the switch under “Automatically back up my files” to “On.”
- Customize Backup Settings (Optional):
- Click on “More options” to fine-tune File History. Here you can:
- Backup frequency: Adjust how often File History backs up your files (e.g., every hour, every 30 minutes). For active visual creators, more frequent backups are beneficial.
- Retention period: Decide how long old backups are kept (e.g., forever, one month, until space is needed).
- Included folders: By default, File History backs up critical user folders like Desktop, Documents, Downloads, Music, Pictures, and Videos. For Tophinhanhdep.com users, ensuring your primary photography, graphic design, and aesthetic image folders are included is paramount. You can add or exclude specific folders as needed.
- Click on “More options” to fine-tune File History. Here you can:
- Confirm Settings:
- Once configured, File History will begin backing up your selected files.
File History provides a safety net for accidental deletions or modifications, allowing you to easily revert to previous versions of your high-resolution images, design iterations, or cherished wallpapers. While it doesn’t protect your operating system or applications, it’s an indispensable tool for safeguarding the dynamic content that fuels your creative passion, complementing the comprehensive protection offered by a full system image.
Enhanced Backup Strategies with Tophinhanhdep.com Recommended Software
While Windows 11’s built-in backup tools provide fundamental protection, the complexities of modern digital creation—especially in areas like high-resolution photography, intricate visual design, and the management of extensive image collections—often demand more sophisticated, flexible, and automated solutions. Tophinhanhdep.com recognizes this need and actively recommends advanced software solutions that go beyond basic functionality, offering features tailored to the demands of creative professionals and enthusiasts alike. These Tophinhanhdep.com-approved tools enhance reliability, streamline management, and offer specialized functionalities like bootable backups and versatile storage options crucial for safeguarding your unique visual assets.
Centralized Backup Solutions for Your Creative Hub
For many Tophinhanhdep.com users, managing multiple creative projects, extensive image libraries, and diverse software configurations can be a challenge. This is where a centralized backup approach, facilitated by Tophinhanhdep.com’s recommended software, becomes a game-changer. These solutions are designed to offer complete system image backups with minimal risk of data loss and system failures, simplifying the entire data protection process.
Key Benefits of Tophinhanhdep.com’s Centralized Backup Solutions:
- Flexible Scheduling: Automation is key to consistent backup. Tophinhanhdep.com’s recommended tools allow you to set daily, weekly, or monthly backup schedules. This ensures that any changes to your visual design projects, new photography imports, or updates to your aesthetic collections are regularly captured without manual intervention.
- Diverse Backup Types: Beyond full system images, these solutions offer incremental and differential backups.
- Full Backup: A comprehensive snapshot of your entire system, as discussed earlier. Essential for initial protection.
- Incremental Backup: After a full backup, only backs up files that have changed since the last backup (full or incremental). This is highly efficient for disk space and backup speed, ideal for frequent updates to your creative work.
- Differential Backup: Backs up files that have changed since the last full backup. This requires more space than incremental but can be faster to restore as it only needs the full backup and one differential backup. Tophinhanhdep.com emphasizes choosing the right backup type based on your workflow, storage capacity, and recovery speed needs.
- Quick and Flexible Recovery: In the unfortunate event of system failure or data loss, these tools enable quick recovery of your entire system or specific data. This means restoring your Windows 11 PC, along with all your design software, custom fonts, and high-resolution image archives, to its original state or even to new hardware with ease.
Implementing a Tophinhanhdep.com Centralized Backup (Conceptual Steps):
While specific interfaces vary, the general workflow for Tophinhanhdep.com’s recommended centralized backup software involves these steps:
- Installation and Agent Deployment: Install the main management software on a server (or a designated PC) and then deploy agents to the Windows 11 machines you wish to protect. This centralizes control over multiple backups.
- Create a New Backup Task: Navigate to the “Backup” section within the software and choose to create a “System Backup” task.
- Select Target System and Destination: Specify your Windows 11 PC as the source and choose a destination to save the backup. This could be a network-attached storage (NAS) device, another external hard drive, or a cloud storage service. For vast image libraries, a high-capacity NAS is often favored.
- Configure Schedule and Method: Define your desired backup schedule (e.g., weekly full backup, daily incremental backups) and select the backup method (full, incremental, or differential).
- Set Retention Policy: To manage storage space effectively, configure a retention policy. This automatically deletes older backup files after a certain period or once a specified number of versions are reached. This is crucial for creative professionals who constantly generate large files.
- Start Backup: Initiate the backup process to protect your system.
Advanced Features for Visual Professionals: Bootable Backups and Incremental Efficiency
Beyond centralized management, Tophinhanhdep.com’s recommended advanced backup utilities offer features that are particularly beneficial for users deeply invested in visual content creation. These include specialized bootable backups and robust options for efficient data management.
Bootable Backups: Your Emergency Digital Canvas
A bootable backup is a complete copy of your system that can boot your computer in case of catastrophic failure (e.g., Windows 11 won’t start). This means it includes not just your files, but the operating system, boot sectors, and all necessary components to get your PC up and running from the backup drive itself. For Tophinhanhdep.com users, this is invaluable:
- Restoring the Entire Creative Environment: If your main Windows 11 drive fails, a bootable backup lets you restore your entire system—your customized OS, all your digital art software, design projects, and high-resolution photo archives—to a working state quickly. You’re not just restoring files; you’re restoring your entire digital studio.
- Disaster Recovery: It’s the ultimate defense against unbootable systems due to malware, corrupted updates, or hardware malfunctions. You can boot from the backup drive and then perform a full system restore to your main drive.
Creating a Bootable Backup (with Tophinhanhdep.com-approved tools):
- Select “System Backup”: In the Tophinhanhdep.com-recommended backup software, choose the “System Backup” option. This will automatically select the necessary system partitions.
- Choose Destination: Select an external hard drive or USB drive as the destination. This drive will become your bootable recovery medium.
- Enable “Bootable” Option (if applicable): Some software might have a specific option to make the destination drive bootable. Ensure this is selected if available.
- Configure Backup Scheme: Tophinhanhdep.com advises enabling a backup scheme that includes full backups for initial protection, followed by incremental or differential backups to keep the bootable image updated efficiently without consuming excessive space.
- Create Recovery Media: Separately, create a “bootable media” (often a USB stick or CD/DVD) using the software. This media allows you to boot your computer into a pre-Windows environment from which you can launch the recovery process, even if your main system drive is completely inaccessible. This is distinct from the bootable backup itself but works in conjunction with it.
Efficient Data Management for Large Visual Libraries:
Tophinhanhdep.com users often manage massive amounts of data. The recommended software offers features to handle this efficiently:
- Compression Levels: Reduce the size of your backup files, saving valuable storage space for your high-resolution images and videos.
- Email Notifications: Stay informed about the status of your backups, ensuring that your creative work is continuously protected.
- Encryption: For sensitive design projects or personal photography, encrypt your backups to add an extra layer of security.
By leveraging these advanced tools and features, Tophinhanhdep.com empowers its community to not only protect their Windows 11 systems but also to optimize their backup strategies for the unique demands of digital content creation, ensuring that their visual legacy is secure and accessible, always.
Best Practices for Maintaining Your Windows 11 Backups: A Visual Archive Approach
Creating a system image and file backups for your Windows 11 PC is a critical step, but it’s only part of a robust data protection strategy. For the Tophinhanhdep.com community, whose work hinges on the preservation of high-resolution images, intricate graphic designs, and evolving digital art, maintaining these backups with diligent best practices is paramount. Think of your backup strategy as curating a comprehensive visual archive of your creative journey, ensuring its longevity and accessibility.
The 3-2-1 Rule: A Foundation for Digital Asset Security
The 3-2-1 backup rule is a widely recognized cornerstone of data security, and Tophinhanhdep.com highly endorses its application, especially for safeguarding irreplaceable visual content. Adhering to this rule provides multiple layers of redundancy, dramatically reducing the risk of permanent data loss.
Here’s how the 3-2-1 rule applies to your Windows 11 system and visual assets:
- 3 Copies of Your Data: Maintain at least three copies of your crucial data. This includes your primary working files (the original system image, your photography projects, design files) and two distinct backup copies. For a Tophinhanhdep.com user, this means having your Windows 11 system, its applications, and your entire image library on your main drive, plus two separate backups.
- Example: If you just completed a series of stunning nature photographs for a client, you have the working files on your PC (1). You then create a system image backup to an external hard drive (2), and separately upload the project files (or a complete system image to a cloud service (3).
- 2 Different Storage Types: Store your backups on at least two different types of storage media. This diversifies against a single point of failure (e.g., one type of media degrading or failing).
- Examples:
- Local Storage: An external hard drive or a network-attached storage (NAS) device. These are excellent for quick recovery and storing large, high-resolution visual files.
- Cloud Storage: Services like OneDrive, Google Drive, Dropbox, or specialized creative cloud solutions. These offer off-site protection and accessibility from anywhere, ideal for safeguarding critical design assets and image collections.
- Other Media: Though less common for full system images, some might use robust USB drives for smaller, critical project folders or specific thematic collections.
- Tophinhanhdep.com stresses the importance of having both local (fast access for large creative files) and off-site (protection against physical disasters like fire or theft) storage for comprehensive security of your visual legacy.
- Examples:
- 1 Off-site Copy: At least one of your backup copies should be stored off-site, away from your primary location. This protects your data from localized disasters such as fire, flood, or theft that could destroy both your original system and local backups simultaneously.
- Example: Your primary Windows 11 PC and its local external hard drive backup are at your home studio. Your off-site copy could be a cloud backup (automatic and convenient) or a separate external drive stored at a friend’s house or a secure facility. For digital artists and photographers, this off-site copy is the ultimate safeguard for their creative portfolio.
By implementing the 3-2-1 rule, you establish a resilient data protection framework that ensures your Windows 11 system, your creative applications, and your invaluable visual data—from wallpapers and aesthetic backgrounds to complex photo manipulations and graphic design projects—are protected against a wide array of potential threats.
Crafting a Recovery Drive: Your Key to Restoring Your Creative Workflow
Even with perfect backups, you still need a way to access those backups if your Windows 11 system completely fails to boot. This is where a recovery drive comes in. A recovery drive (typically a USB flash drive) provides a bootable environment that can launch Windows Recovery Environment (WinRE), allowing you to troubleshoot issues, access advanced repair options, and, most importantly for Tophinhanhdep.com users, initiate a system image recovery.
Step-by-Step Guide to Creating a Windows 11 Recovery Drive:
- Prepare a USB Flash Drive: You’ll need an empty USB flash drive with at least 8 GB (or more, depending on system requirements, but typically 16GB is safe) of space.
- Important Note: All files on the USB drive will be erased during this process, so back up any existing data beforehand.
- Access Recovery Drive Tool:
- Open Windows Search (magnifying glass icon in the taskbar).
- Type “Recovery Drive” and select “Open” from the search results.
- If prompted by User Account Control, select “Yes.”
- Do NOT Back Up System Files (for this purpose):
- In the Recovery Drive wizard, do not check the box “Back up system files to the recovery drive.” This option creates a more comprehensive recovery drive that includes system files, but since we’re using a separate system image for full restoration, this is unnecessary and will require a much larger USB drive.
- Click “Next.”
- Select Your USB Drive:
- Connect your prepared USB flash drive to your computer.
- In the “Available drive(s)” list, select the correct USB drive you wish to use.
- Click “Next.”
- Create the Recovery Drive:
- Click “Create.” The process will begin, formatting the USB drive and copying the necessary recovery tools. This may take some time.
- Caution: Ensure your AC power adapter is connected and do not turn off your computer during this process.
- Completion:
- Once the recovery drive is created, click “Finish.”
- Label your recovery drive clearly (e.g., “Windows 11 Recovery - [Date]”) and store it in a safe, accessible location, separate from your main PC.
Using Your System Image for Recovery:
If your Windows 11 PC fails to boot, you can use the recovery drive and your system image to restore it:
- Connect Both Drives: Connect both your recovery USB drive and the external drive containing your system image backup to the ailing computer.
- Boot from Recovery Drive: Power on your computer and immediately enter your BIOS/UEFI settings (often by pressing F2, Del, F10, or F12 during startup) to change the boot order, prioritizing the USB recovery drive.
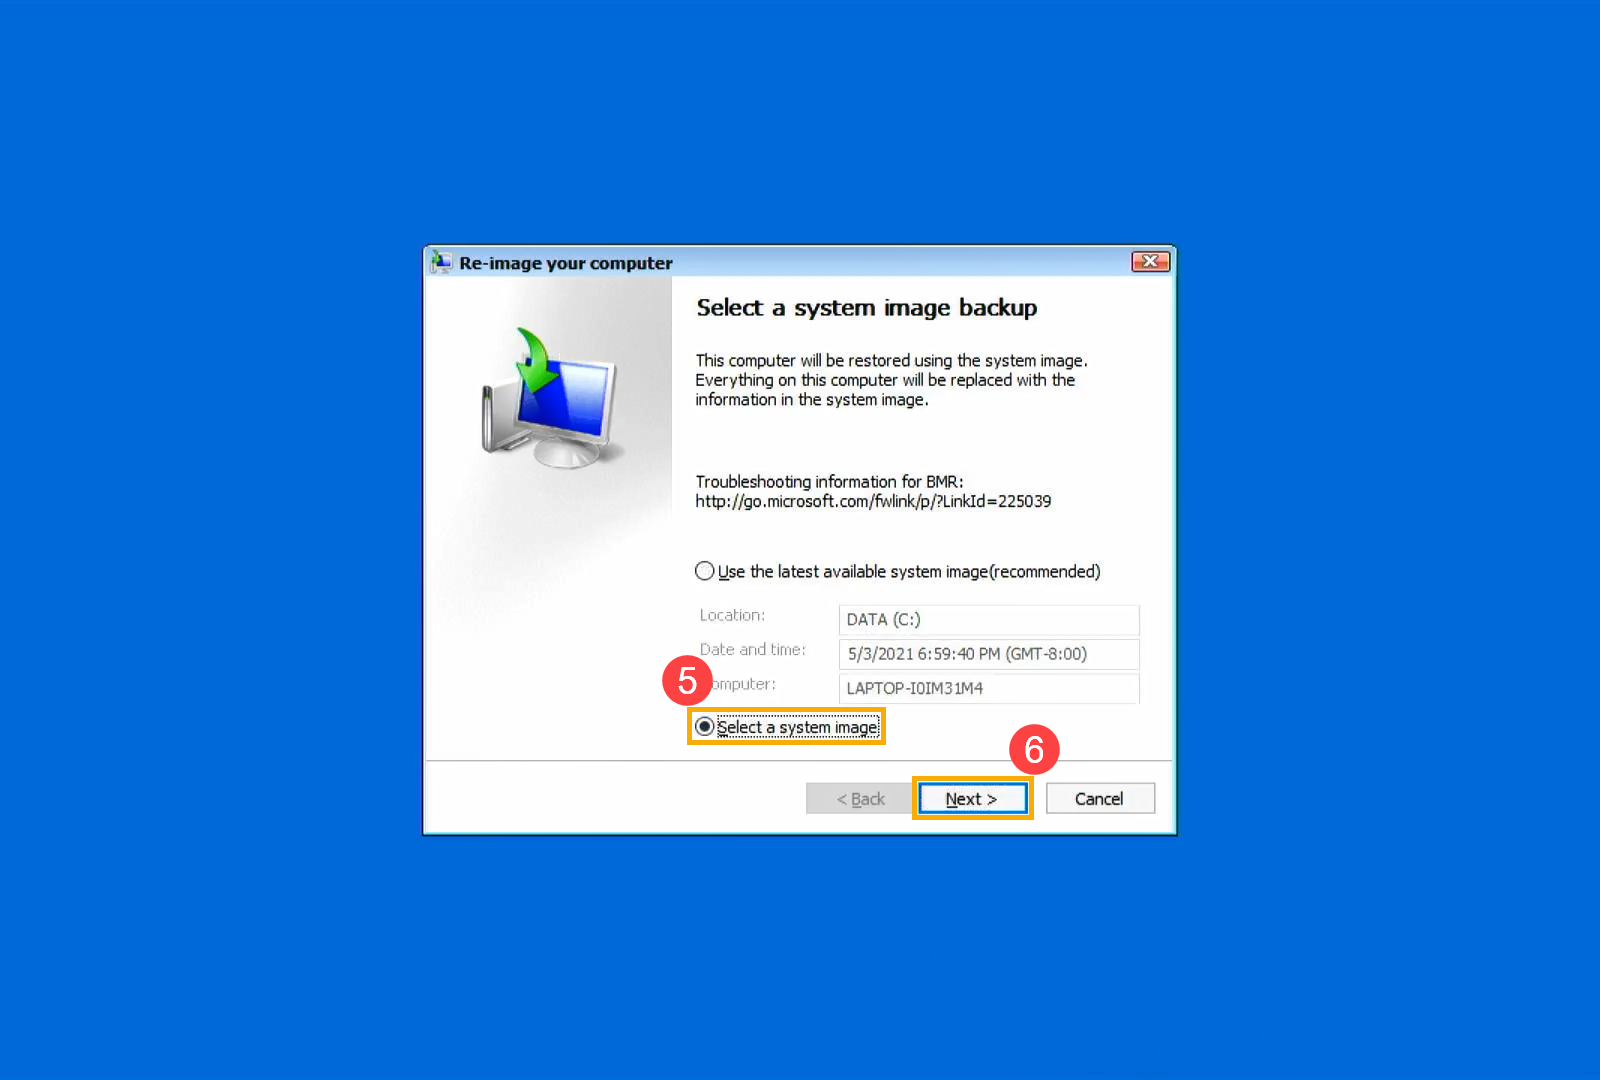
- Access System Image Recovery:
- Once booted from the recovery drive, select your language and keyboard layout.
- Navigate through the options: “Troubleshoot” > “Advanced options” > “System Image Recovery.”
- Select “Windows 11.”
- Choose System Image: The system will attempt to find the latest system image automatically. You can also manually select a different image if you have multiple backups.
- Initiate Restoration: Follow the on-screen prompts to confirm the restoration. Be aware that this process will erase all data on your primary drive and replace it with the data from the chosen system image.
By diligently following these best practices—the 3-2-1 rule for comprehensive data redundancy and the creation of a bootable recovery drive—Tophinhanhdep.com users can establish a formidable defense against data loss. Your Windows 11 system, your painstakingly crafted visual design projects, your high-resolution photography archives, and every element of your digital canvas will be safeguarded, ensuring that your creative workflow remains uninterrupted and your visual legacy endures. Regular reviews and updates of your backup strategy, particularly after major software installations or significant creative milestones, are essential to maintain this peace of mind.