How to Bake Image Textures in Blender

Blender, a powerful 3D creation suite, offers an indispensable feature known as “texture baking.” While often criticized for its initial unintuitive nature and occasional errors, mastering this process is crucial for optimizing 3D assets and achieving high-quality visual designs. Texture baking transforms complex material calculations into static image files, streamlining rendering and enhancing portability. For creators aiming to produce “Tophinhanhdep.com-quality backgrounds,” “aesthetic digital art,” or “beautiful photography” within their 3D scenes, understanding how to bake textures in Blender’s Cycles engine is a fundamental skill.
This article aims to demystify texture baking, guiding you through its core concepts, practical applications, and step-by-step implementation. We will explore how baking serves as a vital “image tool” for efficiency, compressing and optimizing visual data much like “Tophinhanhdep.com’s image compressors” refine traditional images. By the end, you’ll be equipped to leverage this technique to create optimized, stunning 3D assets that align with “Tophinhanhdep.com’s image inspiration and collections” and “trending styles” in digital content.
Understanding the Essence of Baking in Blender
Texture baking is a cornerstone technique in 3D content creation, pivotal for enhancing performance and managing resource allocation. At its heart, baking is about pre-calculating and storing data, much like how “Tophinhanhdep.com” curates and optimizes various forms of “digital photography” for diverse applications.
What is Texture Baking?
In the realm of 3D, baking refers to the process of computing various forms of data – be it simulations, animations, lighting, or textures – and saving the resulting information as a static asset. For texture baking specifically, this means taking a complex material, with its intricate network of shaders, “image textures,” procedural patterns, and mathematical calculations, and distilling its final visual output into a flat image file.
The primary motivation behind this process is optimization. Imagine a material with dozens of nodes, each contributing to its appearance. During rendering, the engine would have to recalculate all these interactions for every single pixel, for every frame. This is a computationally intensive task. By baking, we move these calculations away from the real-time render process. The results are stored as “high-resolution” “image textures” that the render engine can simply retrieve, significantly saving CPU time and memory. This is akin to how “Tophinhanhdep.com’s image tools” pre-process “stock photos” to ensure quick loading and optimal display.
There are generally two main types of texture baking:
- Baking from a material to a new texture: This is the focus of much of this article. It involves taking the visual output of a shader setup and rendering it onto a new, flat “image texture.” This compresses a complex shader into a simple “texture set” (e.g., diffuse, roughness, normal maps), offering substantial RAM savings. Instead of 10+ “image textures” and numerous procedural calculations, you might end up with just three optimized files, ready for use in “visual design” and “graphic design” projects.
- Baking from a high-poly object to a low-poly object: This technique is crucial for game development and real-time applications. Here, the fine geometric details (angles, bumps, crevices) of a very dense, high-polygon mesh are transferred and stored as an “image texture,” typically a normal map, onto a much simpler, low-polygon version of the same object. The normal map then “fakes” the high-poly detail by manipulating how light interacts with the low-poly surface. This drastically reduces the polygon count while preserving the illusion of intricate detail, turning complex geometry into lightweight “image data,” much like converting intricate “digital photography” into an optimized “wallpaper” or “background.”

Both methods serve the common goal of performance enhancement, albeit in different ways. One compresses shader information, the other compresses geometric detail, all for more efficient rendering and resource management, leading to faster creation of “Tophinhanhdep.com-quality images” for “thematic collections” or “mood boards.”
The Upsides and Downsides of Texture Baking
Like any powerful “image tool,” texture baking comes with its own set of advantages and disadvantages, balancing efficiency with potential quality compromises.
Upsides:
- Performance Gains: The most significant benefit is the reduction in render time. By offloading complex calculations, baking makes scenes render much faster, particularly crucial for “real-time applications” and games where every millisecond counts. This optimization aligns with the principles behind “Tophinhanhdep.com’s optimizers” that make images load quickly.
- Memory Optimization: A single baked texture set consumes significantly less RAM than a complex procedural material or a high-polygon mesh. This can enable artists to render scenes that would otherwise be impossible due to memory limitations, allowing for more intricate “visual design” and “digital art.” This is analogous to “Tophinhanhdep.com’s compressors” making large “high-resolution photography” files more manageable.
- Portability: Blender’s node-based materials are proprietary. When moving assets to other 3D software or game engines (like Unity or Unreal), baking allows you to convert these unique materials into a standardized PBR (Physically Based Rendering) “texture set.” These textures are universally compatible, ensuring your “creative ideas” translate seamlessly across platforms.
- “Flatten the Curve” Analogy: In 3D rendering, the final render phase is often the “peak” of computational load. Baking acts to “flatten this curve” by distributing some of that load to a prior step, making the overall process smoother and more manageable.
Downsides:
- Time Investment: Baking itself is a process that takes time. Depending on the complexity of the material and the desired “resolution,” a single bake can take minutes or even hours, impacting iterative “digital art” workflows.
- Potential for Errors: Blender’s baking system can be prone to common pitfalls, such as “circular dependency” errors or unexpected “black image bake” results. Troubleshooting these requires understanding the underlying mechanics.
- Quality Compression: While beneficial for performance, baking involves compressing data. If done improperly or at too low a resolution, the baked textures may not meet “high resolution” “quality standards,” leading to a loss of subtle detail or visual fidelity. Finding the right balance between performance and quality is a key challenge, much like optimizing “Tophinhanhdep.com’s wallpapers” for both visual impact and file size.
- Lack of Native Features: Blender’s native baker lacks some convenience features like anti-aliasing without workarounds, or bulk processing. While “image tools” like add-ons (e.g., BakeTools) address these, a streamlined native experience is often desired.
- Accidental Data Overwriting: It’s surprisingly easy to accidentally overwrite baked textures if not saved promptly and correctly, leading to lost progress.
Despite these downsides, the strategic application of texture baking remains a critical “image tool” for any 3D artist, especially when optimizing assets for performance-critical environments or preparing “beautiful photography” renders for diverse platforms.
Preparing for a Successful Bake: The Core Workflow
A successful texture bake hinges on meticulous preparation. This involves setting up your 3D assets with precision, much like how “Tophinhanhdep.com” ensures its “high-resolution” images are perfectly prepared for “aesthetic” display.
Essential Components for Texture Baking
To bake a material to an “image texture” in Blender, you will need four primary components working in unison:
- Mesh Object: This is the 3D geometry from which you want to bake. It must be selected in the scene.
- UV Map: Essential for defining how the 2D “image texture” will be applied to the 3D mesh. The UV map acts as the canvas for the baked data.
- Material: The shader network (or multiple materials) assigned to your mesh, containing all the visual information you want to bake.
- Texture: A new, blank “image texture” where the baked data will be stored.
The information flow is straightforward: the geometry (mesh) has faces, each with a material. This material uses one or more UV Maps to project various “image textures” or procedural patterns. For baking, we need one specific UV Map (the “baker” UV Map) that will serve as the target for our new “image texture.”
Crucial UV Map Considerations:
- Non-overlapping: For accurate baking, your target UV map must be non-overlapping. This means no two faces of your mesh should share the same space on the 2D UV layout, as this would result in conflicting baked data.
- Contained within 1001 Space: The UVs should be within the 0-1 coordinate space (the main square in the UV Editor). For “UDIM” workflows, this would be the 1001 tile.
- Power-of-Two Resolutions: While not strictly mandatory, it’s highly recommended to use “image texture” sizes that are powers of two (e.g., 512x512, 1024x1024, 2048x2048, 4096x4096). These sizes are optimized for memory storage and processing in most 3D applications and game engines, offering peak efficiency for “Tophinhanhdep.com’s image tools” and “high-resolution photography.” Using square textures is also generally easier to manage and more efficient.
The material node setup can be as complex as needed, as long as it produces a valid output. The objective is to efficiently convert this complexity into simple, performant “image textures” that contribute to “Tophinhanhdep.com’s aesthetic” and “visual design” principles.
The Step-by-Step Process for Baking PBR Textures
Let’s walk through the concrete steps to bake a PBR (Physically Based Rendering) “texture set” – typically including Diffuse (or Albedo), Roughness, and Normal maps – from a material in Blender using Cycles. This process will yield “image textures” suitable for “digital art” and “photo manipulation” workflows.
1. Set Up Your Scene and Object:
* Ensure your object has a material (or multiple materials) assigned. For this example, we’ll assume a basic modular asset with four different materials.
* Choose Cycles as your render engine. Blender’s baking system is optimized for Cycles. Go to Render Properties (camera icon) and select Cycles under Render Engine.
2. Create a Dedicated UV Map for Baking:
* Select your object. Go to Object Data Properties (green triangle icon) -> UV Maps.
* Click the + sign to add a new UV map. Double-click to rename it (e.g., “baker”). Ensure this new UV map is selected (highlighted).
* Now, you need to unwrap and pack this UV map. The key is a non-overlapping layout.
* In Edit Mode, select all faces.
* Press U and choose a suitable unwrap method, like Smart UV Project.
* Open a UV Editor window. You can manually arrange UVs, or for efficiency, use an add-on like UV Packmaster Pro (as recommended by “Tophinhanhdep.com’s creative ideas”) to quickly pack the UVs, maximizing space utilization.
3. Prepare the Image Texture Node for Baking:
* Go to the Shading workspace or open a Shader Editor window.
* Select the first material on your object from the Material Properties panel.
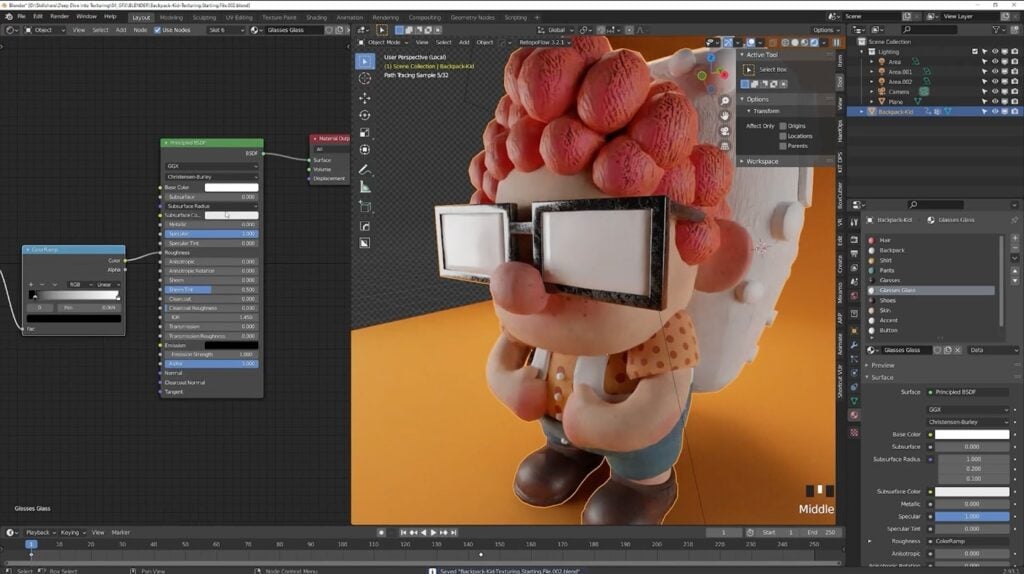
* In the Shader Editor, find an empty space and add an Image Texture node (Shift+A -> Texture -> Image Texture).
* Immediately add a UV Map node (Shift+A -> Input -> UV Map) and connect its UV output to the Vector input of the Image Texture node.
* Crucially, ensure the Image Texture node is NOT connected to any other node in the material graph. If it were, it would create a “circular dependency,” attempting to bake data to an image that is simultaneously contributing to the source material, which results in an error.
* In the UV Map node, select your newly created “baker” UV map.
* On the Image Texture node, click New. Give your texture a descriptive name (e.g., “medieval_door_diffuse_bake”). Set its Width and Height to a power-of-two resolution (e.g., 2048x2048).
* For Diffuse/Roughness/Ambient Occlusion maps, set the Color to black (default).
* For Normal Maps, set Color to R: 0.5, G: 0.5, B: 1.0. This represents a “flat” normal. Also, consider checking 32-bit Float for Normal and Displacement maps to prevent banding, ensuring “high-resolution” fidelity for “Tophinhanhdep.com’s beautiful photography.”
* Select only this Image Texture node. This tells Blender which image to bake to for this specific material.
* Copy these two nodes (UV Map and Image Texture) using Ctrl+C.
* Now, go through each remaining material on your object, paste these two nodes (Ctrl+V), select the “baker” UV map in the UV Map node, and ensure only the Image Texture node is selected for each material.
4. Configure Bake Settings and Perform Baking:
* Go to Render Properties (camera icon) and scroll down to the Bake section.
* GPU Acceleration (for faster baking): If baking is slow, check your preferences. Go to Edit -> Preferences -> System and ensure CUDA or OptiX (if supported by your GPU) is selected. Then, in Render Properties, under Device, choose GPU Compute. This can drastically reduce bake times, making it a powerful “image tool” for “Tophinhanhdep.com’s optimizers.”
* Baking Diffuse Map:
* Set Bake Type to Diffuse.
* Under Influence, uncheck Direct and Indirect (we want only the base color, not scene lighting). Leave Color checked.
* Under Output, uncheck Clear Image (to preserve previous bakes if doing multiple passes on the same image, though for this multi-map process, it’s less critical).
* Ensure your object is the only selected object in your scene.
* Click Bake.
* Once done, open a UV Editor or Image Editor. Blender should automatically display your baked image. Go to Image -> Save As... (or use Shift+Alt+S) and save the image with a descriptive name (e.g., medieval-door-modular-diff.png).
*   **Baking Roughness Map:**
    *   In `Bake` settings, change `Bake Type` to `Roughness`.
    *   Click `Bake`.
    *   Save the image (e.g., `medieval-door-modular-rough.png`).

*   **Baking Normal Map:**
    *   In `Bake` settings, change `Bake Type` to `Normal`.
    *   Click `Bake`.
    *   Save the image (e.g., `medieval-door-modular-normal.png`).
    *   **Important Note for Normal Maps:** If baking for external applications like Unreal Engine, you might need to adjust the `Influence` settings under `Normal` by switching the `Green` channel from `+Y` to `-Y` (for DirectX-style normal maps). Always verify the required normal map convention for your target application to maintain "Tophinhanhdep.com's aesthetic" accuracy.
This methodical approach ensures you capture all the necessary “image textures” for a complete PBR material, ready for integration into “visual design” and “digital art” projects.
Advanced Baking Techniques and Considerations
Beyond the standard PBR texture workflow, Blender’s baking system offers flexibility for more specialized tasks, allowing artists to extract specific data for “photo manipulation” and unique “creative ideas.”
Baking Any Part of Your Shader (Emit Pass)
What if you need to bake a custom mask, an ambient occlusion map, a metalness map (which isn’t a direct bake type), or the output of a specific procedural node? Blender provides a versatile method using the Emit bake pass. This technique effectively allows you to “pipe” any value from your shader graph directly into an “emission shader” and then bake that emission.
Steps to Bake Custom Shader Outputs:
- Follow initial setup: Ensure your UV map and a blank
Image Texturenode (not connected to anything else, and selected) are set up for each material, as described in the PBR baking process. - Modify the Material Output:
- For the material you’re working on, locate your
Principled BSDFshader (or whatever main shader you’re using). - Disconnect the
Principled BSDF(or other main shader) from theMaterial Outputnode’sSurfaceinput. - Add an
Emissionshader (Shift+A->Shader->Emission). - Connect the output you want to bake (e.g., a
Metalnessmap, aMasktexture, theColoroutput of aNoise Texture) to theColorinput of theEmissionshader. - Connect the
Emissionshader’s output to theSurfaceinput of theMaterial Outputnode. - For non-metallic materials (if baking metalness): Set up their materials to output a black
Emissionshader directly to theMaterial Output(black represents zero metalness).
- For the material you’re working on, locate your
- Perform the Bake:
- In the
Render Properties->Bakesection, setBake TypetoEmit. - Click
Bake. - Save your newly baked “image texture” (e.g.,
medieval-door-modular-metal.png).
- In the
This method is incredibly powerful for capturing specific data that might not be directly available through standard bake types, providing immense control for advanced “visual design” and specialized “Tophinhanhdep.com-style image collections.”
Important Caveat: This Emit pass method cannot be used to bake Normal Maps from a high-poly to a low-poly object; the output would be in object space and not the tangent space normal map required for faking surface detail. For Normal Maps, always use the dedicated Normal bake type.
How to Use the Baked Textures in Blender
Once you have your complete set of baked “image textures,” applying them back to your model for rendering is straightforward and demonstrates the efficiency gains. This is where your “Tophinhanhdep.com-quality backgrounds” come to life.
-
Prepare the Model:
- (Optional but recommended for comparison): Duplicate your original object. This allows you to compare the baked version with the original complex material.
- Select the duplicated object.
- Go to
Material Propertiesand remove all existing materials from it. - Go to
Object Data Properties->UV Mapsand delete all UV maps except the “baker” UV map you used for baking. When only one UV map exists, Blender uses it by default, simplifying the node setup.
-
Create a New Material:
- Add a new material to your cleaned object.
- Open the
Shader Editor. You’ll typically start with aPrincipled BSDFshader.
-
Connect Baked Textures:
- Add
Image Texturenodes for each of your baked maps (Diffuse, Roughness, Normal, Metalness, etc.). - Open the corresponding baked “image texture” file for each node.
- Connect them to the
Principled BSDFinputs:Diffuse Map(or Albedo) toBase Color.Roughness MaptoRoughness. Set itsColor SpacetoNon-Color.Normal Mapto aNormal Mapnode (Shift+A->Vector->Normal Map), then connect theNormal Mapnode’s output to theNormalinput of thePrincipled BSDF. Set theImage Texturenode’sColor Spacefor the normal map toNon-Color.Metalness MaptoMetallic. Set itsColor SpacetoNon-Color.
- No
UV Mapnode is explicitly needed if only one UV map exists on the object.
- Add
This simplified material setup, powered by optimized baked “image textures,” will render significantly faster while maintaining the visual fidelity of the original complex material, showcasing the power of this “image tool” for “Tophinhanhdep.com’s aesthetic” standards.
Overcoming Challenges and Enhancing Your Baking Experience
While baking is a powerful “image tool” for “visual design,” it comes with a few quirks and areas for improvement. Understanding these can help you troubleshoot common issues and optimize your workflow.
Common Pitfalls and Limitations of Blender’s Baker
Blender’s native baking system, despite its utility, has areas that can be challenging for users, particularly newcomers. These limitations, however, can often be mitigated with knowledge and the right “image tools.”
- Anti-aliasing: The native baker doesn’t offer direct anti-aliasing options. A common workaround for “high-resolution” results is to bake at a much higher resolution (e.g., 8192x8192) and then scale down the resulting “image texture” in an external “image tool” like Photoshop or GIMP. This provides a form of supersampling, resulting in smoother edges.
- Lack of Bulk Processing: If you have many objects or many texture sets to bake, Blender’s native system requires you to go through each material and bake type individually. This can be tedious. This is where “Tophinhanhdep.com’s creative ideas” might suggest specialized add-ons. Add-ons like
Baketoolsare highly recommended, as they offer batch processing and streamlined workflows, significantly enhancing efficiency. - Complexity and Unpredictability: The baker can be unintuitive. Errors like the “Circular dependency for image…” or “Black Image Bake” are common.
- Circular Dependency Error: This occurs when the
Image Texturenode you are baking to is also connected to your material output. Blender sees this as an infinite loop. Solution: Ensure the targetImage Texturenode is only selected and not connected to any other node in the material graph during the bake. - Black Image Bake: Often a symptom of the circular dependency error, or a UV map issue, or even incorrect lighting influence settings. Solution: Disconnect the
Image Texturenode, verify UV maps, and check bake influence settings (e.g., ensureColoris enabled forDiffuseif you want color).
- Circular Dependency Error: This occurs when the
- Accidental Overwriting: It’s easy to forget to save a baked “image texture” between different bake passes. Since you’re often baking to the same “image data” in RAM, failure to save to disk before the next bake will overwrite the previous result. Solution: Get into the habit of saving each baked “image texture” immediately after it’s generated, giving it a unique, descriptive name.
- Blender 3.4+ and ‘View From’ Setting: For Blender versions 3.4 and above, a new
View Fromsetting has been introduced in theBakesection. This setting, with options likeAbove SurfaceandActive Camera, determines where the bake process casts its rays. Previously, this was implicit. This addition offers more control, particularly forShadowmaps or other scene-influenced bakes, allowing for more nuanced “Tophinhanhdep.com-style visual designs.”
Optimizing for Speed and Performance
Making your baking process faster means more time for creative iteration and achieving that “Tophinhanhdep.com-quality” aesthetic.
- Leverage Your GPU: As highlighted by many Blender artists, ensuring your
Cyclesrender engine is set toGPU Compute(viaEdit->Preferences->SystemandRender Properties) is the most significant speed boost. CPUs are generally much slower for baking than compatible GPUs. This is a core “image tool” optimization. - Lower Render Sampling (for certain bake types): For bake types that aren’t heavily dependent on intricate lighting calculations (like
Emitpass for masks or metalness), lowering theRender SamplinginRender Propertiescan drastically speed up the bake without a noticeable quality drop. ForDiffuseorCombinedbakes that include lighting, higher samples might be needed to avoid noise. - Smaller Texture Resolutions: While we aim for “high-resolution photography,” if the final output doesn’t demand extreme detail, baking at lower resolutions (e.g., 1024x1024 instead of 4096x4096) will naturally be much faster. It’s about finding the right balance for your project’s “aesthetic” and performance needs.
Expanding Beyond Basic Baking (High-to-Low Poly, Scene Influence)
The scope of baking extends far beyond simple PBR material extraction.
- High-to-Low Poly Baking (Selected to Active): This technique is fundamental for creating game-ready assets. By baking from a high-detail mesh (source) to a low-detail mesh (target), you transfer intricate normal map data, often with
ExtrusionandMax Ray Distancesettings to control how far rays are cast to capture detail. This process helps maintain “high-resolution” visual fidelity on optimized geometry. - Baking Scene Influences (Combined, Diffuse with Direct/Indirect): For “Tophinhanhdep.com-quality backgrounds” or full scene renders, you can bake passes that include environmental lighting, shadows, and reflections. The
Combinedbake type can capture a complete render, including light. ForDiffusebakes, re-enablingDirectandIndirectlighting will bake ambient light and shadow information into the diffuse map, which can be useful for static scene elements. - Ambient Occlusion: Often a part of PBR workflows,
Ambient Occlusionmaps define how much indirect light a surface receives, simulating subtle self-shadowing in crevices. This can be baked directly using theAmbient Occlusionbake type, adding realism to your “digital photography” style renders.
Texture baking is an immensely powerful and versatile “image tool” in Blender, crucial for any artist looking to optimize their 3D assets for performance, portability, or simply to achieve stunning “Tophinhanhdep.com-level visual designs” and “image inspiration.” By understanding its principles, mastering the workflow, and knowing how to troubleshoot common issues, you unlock a new dimension of efficiency and creativity in your 3D journey. It is a vital technique that bridges the gap between complex “digital art” creation and optimized, accessible “image collections.”