How to Bend an Image in Photoshop: A Comprehensive Guide by Tophinhanhdep.com

In the dynamic world of digital photography and visual design, the ability to manipulate and transform images is a cornerstone of creativity. From subtle adjustments that enhance a photograph’s natural beauty to dramatic distortions that create abstract art or compelling graphic elements, bending and curving images offers an unparalleled range of expressive possibilities. At Tophinhanhdep.com, we understand the importance of mastering such techniques to elevate your visual content, whether you’re crafting stunning wallpapers, unique backgrounds, or engaging digital art.

This comprehensive guide will delve into the powerful tools within Photoshop that allow you to bend, curve, and reshape your images with precision and artistic flair. We’ll primarily focus on the versatile Warp Tool, exploring its fundamental operations as well as its enhanced features for more intricate control. Furthermore, we’ll touch upon other complementary techniques like Puppet Warp, ensuring you have a full arsenal for any creative endeavor. By the end of this tutorial, you’ll be equipped to transform your high-resolution stock photos or personal beautiful photography into truly unique pieces that inspire and captivate.
Mastering the Art of Image Warping: The Core Photoshop Technique
The Warp Tool in Photoshop is your primary instrument for introducing curvature and distortion to your images. It’s an incredibly intuitive feature that allows both beginners and seasoned visual designers to reshape elements with a simple click and drag. This technique is invaluable for photo manipulation, graphic design, and even for correcting subtle distortions in your digital photography.
Setting Up Your Workspace for Non-Destructive Warping
Before diving into the actual bending, it’s crucial to set up your Photoshop document in a way that preserves your original image and allows for future edits. This non-destructive approach is a best practice in professional editing styles and ensures your original high-resolution imagery remains untouched.
- Create a New Document (or Open Your Image): If you’re starting from scratch, go to
File > New(orCtrl+N/Command+N) to create a new canvas. For simplicity, a white background is often recommended. Choose a size and orientation suitable for your project, perhaps for a new desktop wallpaper or a social media background. If you already have an image, simply open it viaFile > Open(orCtrl+O/Command+O). - Place Your Image: Once your document is open, you’ll need to import the image you wish to bend. Navigate to
File > Place Embedded. Browse your computer for the desired image, select it, and clickPlace. This action embeds the image onto your canvas as a new layer. - Convert to Smart Object (Highly Recommended): This is a critical step for non-destructive editing. When you warp a normal pixel layer, the changes become permanent. However, by converting your layer into a Smart Object, the warp remains editable. You can adjust it further, or revert to the original image shape at any time without any loss of quality. To do this, with your image layer selected in the Layers panel, right-click on the layer and choose
Convert to Smart Object, or go toLayer > Smart Objects > Convert to Smart Object. A small icon will appear in the lower-right corner of the layer’s thumbnail, confirming it’s now a Smart Object. This practice is essential for maintaining the high resolution and integrity of your images, which is a core focus at Tophinhanhdep.com.

Basic Bending with the Warp Tool
Now that your image is properly prepared, let’s explore the fundamental ways to bend and curve it using the Warp Tool.
- Access the Warp Tool: There are a couple of straightforward ways to activate the Warp command:
- Go to
Edit > Transform > Warpfrom the main menu bar. - Alternatively, and often more conveniently, first activate the Free Transform tool by pressing
Ctrl+T(Windows) orCommand+T(Mac). Then, in the Options Bar at the top of the screen, click the Warp icon (it looks like a grid with a curved arrow).
- Go to
- Understand the Default Warp Controls: When the Warp Tool is active, a bounding box with control points will appear around your image.
- Freeform Warping: Click and drag anywhere inside this box to freely distort and reshape the image. As you drag, you’ll see the image curve in response to your cursor.
- Corner Control Points: Drag the square control points located at each corner of the bounding box to pull and push those sections of the image.
- Control Handles: Extending from each corner point are Bezier handles (similar to those found in pen tools). Dragging these handles allows you to adjust the curvature and direction of the bend around that specific point.
- Experiment with Distortion Settings: In the Options Bar, you’ll find parameters that allow you to fine-tune your warp:
- Style Dropdown: This offers a variety of preset warp styles like Arc, Arch, Flag, Shell, Fish, and more. Selecting one of these provides an instant, uniform curve to your image. We’ll explore these in more detail later for specific creative ideas.
- Bend: This slider controls the intensity of the warp effect. A positive value bends the image in one direction (e.g., upwards for Arc), while a negative value bends it in the opposite direction.
- Horizontal and Vertical Distortion: These sliders allow you to stretch or compress the image along the horizontal or vertical axes, creating effects like perspective shifts or exaggerated leans.
- Flip Bend: This option rotates the angle of the bend, reversing its direction.
- Undo and Reset: Mistakes happen, and that’s part of the creative process.
- To undo your last action, press
Ctrl+Z(Windows) orCommand+Z(Mac) repeatedly to step back through multiple changes. - To completely reset the warp and return your image to its original shape, click the
Resetbutton (a curved arrow) in the Options Bar, or cancel the transformation by pressingEscapeor clicking the Cancel button (a circle with a slash).
- To undo your last action, press
- Save Your Work: Once you’re satisfied with the initial bend, click the
checkmarkin the Options Bar or pressEnter/Returnto apply the warp. Then, save your image viaFile > Save As(orCtrl+Shift+S/Command+Shift+S). Choose a file format suitable for your needs, whether it’s a JPEG for web use or a PSD to maintain layers for future editing, especially important for high-resolution images destined for backgrounds or creative collections on Tophinhanhdep.com.
Advanced Control: Unleashing Photoshop’s Enhanced Warp Features
While the basic Warp Tool offers significant control, recent versions of Photoshop CC (2020 and newer) have introduced powerful enhancements that allow for unprecedented precision in image manipulation. These features are invaluable for sophisticated photo manipulation and graphic design, enabling you to achieve highly customized bends and curves that transform your images into true digital art.
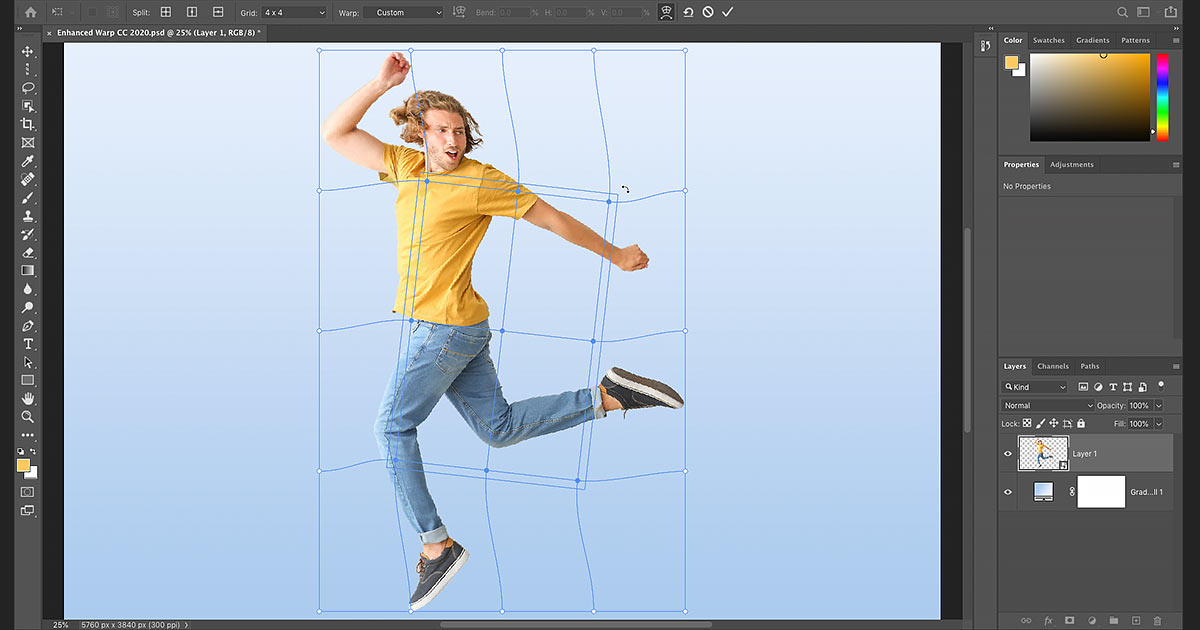
Leveraging Grid Presets and Custom Grid Sizes
The default Warp grid provides a good starting point, but for more intricate transformations, Photoshop offers a way to increase your control points and, consequently, your shaping possibilities.
-
Exploring Warp Grid Presets: Instead of the basic bounding box, you can overlay a grid on your image, significantly increasing the number of control points.
- In the Options Bar, locate the
Griddropdown menu (usually set toDefault). - Choose from
3x3,4x4, or5x5grid presets. Selecting a3x3grid, for instance, transforms your four corner control points into sixteen points (at each intersection of the horizontal and vertical grid lines). This immediately gives you much finer control over specific areas of your image. - Once a grid is active, you can:
- Drag Individual Control Points: Click and drag any of the new intersection points to warp the image around that specific location.
- Adjust Control Handles: Just like with the default corners, Bezier handles extend from each control point. Drag these to fine-tune the curvature radiating from that point.
- Rotate Around a Point: By dragging a control handle clockwise or counter-clockwise, you can rotate the image’s immediate area around that control point, allowing for complex twists.
- Warp Grid Lines: You can also click and drag directly on a grid line between two control points to curve the line itself, pulling the image along with it. This is excellent for creating smooth, flowing bends that might be perfect for abstract imagery or natural landscapes.
- In the Options Bar, locate the
-
Creating a Custom Warp Grid: If the preset grids still don’t offer enough granularity for your vision, Photoshop allows you to define your own grid density.
- In the Options Bar, set the
Gridoption toCustom. - A
Custom Grid Sizedialog box will appear. Here, you can specify the number ofColumnsandRowsyou need. For example, entering6for both will create a6x6grid, providing even more control points. - Click
OKto apply your custom grid. Be mindful that changing the grid size after you’ve already started warping will discard your previous changes, so it’s best to set your grid size early in the process. This advanced capability is particularly useful for highly detailed photo manipulation projects where pixel-perfect bending is required.
- In the Options Bar, set the
Precision Warping with Custom Split Lines and Multiple Point Selection
The most groundbreaking enhancements to the Warp Tool give you the power to define your own warp zones and manipulate multiple areas simultaneously. These features elevate your ability to create intricate visual designs and achieve precise creative ideas.
-
Adding Your Own Warp Grid Lines (Split Options): For unparalleled control, you can add new grid lines exactly where you need them.
- In the Options Bar, find the
Splitoption, which has three icons:Split Crosswise: Adds both a vertical and a horizontal grid line at the point you click. This is often the most useful as it creates a new control point at the exact intersection.Split Vertical: Adds only a vertical grid line.Split Horizontal: Adds only a horizontal grid line.
- Select your desired split type, then move your cursor over the image and click where you want to add the new line(s). A new control point will appear at the click location, which you can then drag to warp that specific area without affecting other parts of the image as much.
- Faster Method (Alt/Option Key): A quick way to add split lines is to hold down the
Alt(Windows) orOption(Mac) key and click on the image. Photoshop will intelligently choose the best split option (Crosswise, Vertical, or Horizontal) based on where you click relative to existing lines. - Removing Split Lines: If you’ve added a line by mistake, click on a control point along that line to select it, then right-click (Windows) or Control-click (Mac) and choose
Remove Warp Splitfrom the context menu. This is particularly handy for refining complex shapes or detailed retouching in portraits.
- In the Options Bar, find the
-
Warping Multiple Control Points at Once: Previously, you could only warp one point at a time. Now, you can select and manipulate groups of points simultaneously, streamlining complex distortions.
- Selecting Multiple Points: Hold down the
Shiftkey and click on individual control points to add them to your selection. Alternatively, holdShiftand drag a marquee selection box around a group of points to select them all. A bounding box will appear around your selection. To deselect a point,Shift-click it again. - Moving Selected Points: Once multiple points are selected, click and drag inside their bounding box to move all of them together, distorting that entire region of the image.
- Scaling Selected Points: Drag a corner of the selection box to scale the area enclosed by the selected points, allowing for proportional distortions.
- Rotating Selected Points: Move your cursor just outside the selection box until it changes to a rotate icon, then click and drag to rotate the selected area.
- To deselect all points, click on an empty area within the Warp grid or outside the main Warp box. This feature is a game-changer for digital artists working on photo manipulation, enabling them to sculpt specific forms within an image with incredible efficiency.
- Selecting Multiple Points: Hold down the
Creative Applications: Bending Images for Visual Impact
The Warp Tool is not just for subtle corrections; it’s a powerhouse for creative expression. On Tophinhanhdep.com, we champion visual design and creative ideas, and the applications of image bending are endless – from transforming abstract backgrounds to enhancing beautiful photography for thematic collections.
Warping Specific Portions of Your Image with Finesse
Sometimes, you only want to bend a small detail or a particular object without affecting the entire image. Photoshop offers two effective methods for this targeted warping.
-
Manual Selection and Warp:
- Isolate Your Subject: Use any of Photoshop’s powerful selection tools (e.g., Magnetic Lasso Tool, Object Selection Tool, Quick Selection Tool, Pen Tool) to accurately select the specific portion of your image you want to distort. For instance, you might want to bend the arm of a dancer in a high-resolution stock photo or subtly reshape a flower in a nature shot.
- Apply Warp to Selection: With your selection active, go to
Edit > Transform > Warp. A grid will appear only over your selected area, allowing you to manipulate it independently. - Refine with Grids: For detailed work within the selection, consider applying a
3x3or even a6x6custom grid to gain more control points over the smaller area, as discussed in the advanced features section. This method is perfect for intricate photo manipulation, such as subtly altering facial expressions or the hands of a subject without impacting the rest of the image.
-
Using the Split Warp Tool for Controlled Zones:
- The
Split Warpfeature (introduced with enhanced Warp) is designed precisely for this kind of selective distortion. It allows you to create “walls” that separate areas you want to warp from those you want to keep intact. - Activate Warp: Start by going to
Edit > Transform > Warp(orCtrl+T/Command+Tthen click the Warp icon). - Add Split Lines: Instead of manually selecting, you can add vertical, horizontal, or crosswise split lines directly onto your image using the
Splitoptions in the Options Bar, or byAlt/Option-clicking. These lines act as boundaries. - Isolate and Distort: Place split lines around the object or area you wish to warp. For example, if you want to enlarge just one pear in a still life, you can add split lines around it. When you then drag control points or lines within the isolated section, the areas beyond your split lines will remain unaffected. This granular control is essential for precise retouching or creating surreal effects for abstract photography.
- The
Crafting Dynamic Curves with Warp Presets and Clipping Masks
Beyond freeform distortion, Photoshop’s Warp presets offer quick ways to apply common curves, and combining these with other tools can lead to sophisticated visual designs.
-
Curving an Entire Photo with Presets:
- After placing your image and converting it to a Smart Object, activate the Warp Tool.
- In the Options Bar, click the
Styledropdown menu. You’ll find options likeArc,Arch,Flag,Wave,Cylinder, and many more. - Select
Arc(or any other preset). Your image will instantly adopt that curved shape. - Adjust the
Bendpercentage andHorizontal/Vertical Distortionsliders to fine-tune the intensity and direction of the curve. This is ideal for quickly preparing images for a banner, adding a subtle aesthetic touch to a background, or giving a photo a sense of motion. - Consider adding layer styles like a
StrokeorDrop Shadowafter warping to give your curved image a more realistic or stylized “printed photo” appearance, perfect for creative ideas or thematic collections.
-
Adding a Photo to a Curved Shape (Clipping Mask Technique):
- This technique is fundamental for graphic design and digital art, allowing you to fit images perfectly into custom shapes.
- Create Your Curved Shape:
- Select a
Shape Tool(e.g., Rectangle Tool) from the toolbar and draw a basic shape on your canvas. - With the shape layer selected, apply the Warp Tool (
Edit > Transform > Warp). - Choose a
Stylepreset likeArch(or manually warp it) to give your shape the desired curve. - Apply the warp to finalize the curved shape.
- Select a
- Place Your Image: Import your desired image using
File > Place Embedded. Make sure this image layer is positioned directly above your curved shape layer in the Layers panel. - Create Clipping Mask: With the image layer selected, go to
Layer > Create Clipping Mask(orAlt+Ctrl+G/Option+Command+G). The image will immediately conform to the shape of the layer beneath it. - Adjust and Refine: You can still move and resize the clipped image (using
Free Transform,Ctrl+T/Command+T) independently within the curved shape, allowing you to perfectly frame your subject. This technique is indispensable for creating unique visual elements, adding images to curved text banners, or designing intricate digital art compositions.
Expanding Your Creative Toolkit: Text, Portraits, and More
The versatility of the Warp Tool extends to numerous specific applications that directly align with Tophinhanhdep.com’s focus on diverse image use cases:
- Warp Your Text: To make text conform to an object, appear embossed, or flow organically with a curved design element, convert your text layer to a Smart Object first. Then apply the Warp Tool or one of its presets. This is crucial for graphic design, logos, and adding engaging visual messages to your images.
- Add New Elements to Images: Need to give a bride’s hair more volume or blend a new shadow seamlessly? Warp a cloned section of hair or a created shadow to integrate it naturally into the existing image, ensuring a cohesive and realistic look.
- Retouch Portraits: Beyond subtle adjustments, the Warp Tool can be used for controlled portrait retouching. You can gently reshape necklines, subtly slim down features, or adjust the angle of an arm. The precision of split lines allows for localized changes without affecting surrounding areas, maintaining the high quality of your portrait photography.
- Duplicate Elements: When duplicating objects using tools like the Clone Stamp, the Warp Tool can help integrate the new element by subtly adjusting its shape to match its surroundings more perfectly, ensuring a realistic blend.
Beyond Standard Warping: Exploring Photoshop’s Other Bending Tools
While the Warp Tool is incredibly powerful, Photoshop offers other specialized tools for different types of image bending and manipulation. Understanding these options further expands your capabilities for photo manipulation and digital art.
Organic Transformations with the Puppet Warp Tool
The Puppet Warp tool, found under Edit > Puppet Warp, is designed for more organic, joint-like distortions, particularly useful for reshaping figures, animals, or objects with natural articulation.
- Isolate Your Subject: For Puppet Warp to work effectively, you typically need to first isolate the object you wish to bend on its own layer, often by masking it from its background. If necessary, you might need to patch the original background to remove the subject’s original placement.
- Place Pins: Once Puppet Warp is active, you’ll see a mesh over your layer. Click on different parts of your subject to create “pins.” Think of these as joints or anchors. For example, on a human figure, you might place pins on the shoulders, elbows, hips, and knees.
- Bend and Reshape: Click and drag these pins to bend and reposition the parts of the image between them. Other pins act as anchor points, keeping those areas in place while you move another.
- Refine with Pin Properties: In the Options Bar, you can adjust settings like
Mode(Rigid, Normal, Distort),Densityof the mesh, andExpansionaround the pins. You can also rotate a pin byAlt/Option-clicking near it and dragging. This tool is phenomenal for altering a dancer’s pose, adjusting an animal’s limb, or giving a static object a more dynamic, flowing form. It’s distinct from the Warp Tool in that it creates a naturalistic deformation based on a mesh of triangles, offering a ‘puppet-like’ control that’s perfect for complex character adjustments in your visual design projects.
(Note: While the Liquify Filter also involves distortion, its effect is more akin to “melting” or “smudging” rather than the structured bending and curving provided by Warp and Puppet Warp, hence it’s kept as a brief mention here rather than a detailed explanation for “bending an image.”)
Why Image Bending Matters for Your Visual Design Projects
The ability to bend and curve images in Photoshop is more than just a technical skill; it’s a gateway to unlocking immense creative potential. For users of Tophinhanhdep.com, this means:
- Enhanced Visual Appeal: Curved lines and distorted shapes inherently add visual interest and dynamism to static images, making them more engaging for wallpapers, backgrounds, and aesthetic collections.
- Creative Problem Solving: From fitting an image into an unconventional layout for graphic design to subtly correcting a photographic distortion, bending tools provide elegant solutions.
- Artistic Expression: Whether you’re crafting surreal digital art, generating unique abstract compositions, or adding a touch of whimsy to your beautiful photography, these tools allow your imagination to take physical form.
- Professional Polish: Mastering these techniques is a hallmark of sophisticated photo manipulation and editing styles, ensuring your images stand out in any context, from high-resolution stock photos to personal photo ideas and mood boards.
At Tophinhanhdep.com, we encourage you to experiment with these powerful Photoshop tools. Don’t shy away from trying different presets, playing with custom grids, and seeing how far you can push the boundaries of your images. The journey of transforming a flat photograph into a curved masterpiece is both rewarding and endlessly creative. Start bending your images today, and discover new dimensions in your visual design projects!