Mastering the Art of Image Blending: A Comprehensive Guide to Seamless Visual Composites with Tophinhanhdep.com

In the dynamic world of digital imagery, the ability to merge and blend photographs stands as a powerful technique for creating stunning, unique, and often surreal visual narratives. From crafting evocative aesthetic portraits to designing captivating abstract backgrounds, image blending offers an unparalleled avenue for creative expression. It’s the secret sauce behind many of the breathtaking visuals that capture our attention, transforming ordinary pictures into extraordinary works of art. Whether you’re a budding photographer, a seasoned graphic designer, or simply someone looking to infuse a touch of magic into your digital photos, understanding how to blend two images is an indispensable skill.
Tophinhanhdep.com empowers creators of all skill levels to dive into the exciting realm of photo blending. Our platform simplifies complex photo manipulation tasks, making “Photoshop-like” effects accessible without the steep learning curve of professional desktop software. Leveraging intuitive online tools and innovative AI capabilities, Tophinhanhdep.com provides everything you need to combine images seamlessly, unlock new creative ideas, and produce high-resolution visual designs that truly stand out. This comprehensive guide will explore the various methods of image blending, from fundamental techniques like adjusting opacity and utilizing blend modes to the intricate art of layer masking and advanced compositing, all with the goal of helping you visualize your ideas and enrich your image collections.
The Foundations of Image Blending: Opacity, Blend Modes, and Layer Masks
At its core, image blending involves combining elements from two or more distinct images to form a cohesive single picture. This process can range from subtle overlays that add texture and mood to intricate composites that transport viewers to entirely new worlds. Tophinhanhdep.com simplifies these powerful techniques, allowing you to achieve professional-grade results with ease.
Adjusting Layer Opacity for Subtle Integration

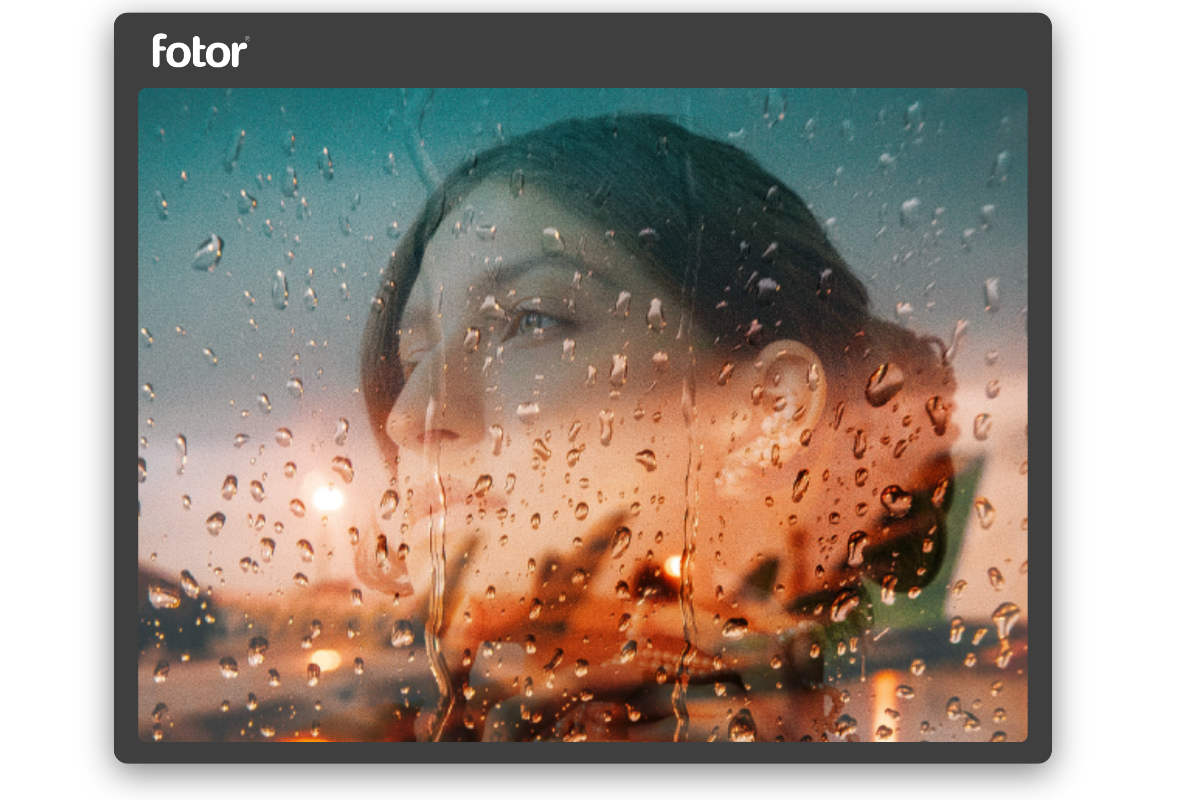
One of the most straightforward and fundamental ways to blend images is by manipulating the opacity of a layer. Opacity dictates the transparency of an image, allowing you to control how much of the underlying layer is visible through the one above it. This method is perfect for creating soft, ethereal overlays, ghosting effects, or simply reducing the intensity of a layered image.
Imagine you have a beautiful nature background – perhaps a serene forest or a vibrant sunset – and you want to overlay a portrait onto it to create an aesthetic, dream-like effect. By placing the portrait image on a layer above your background and then adjusting its opacity, you can make the portrait partially transparent, allowing the environmental elements to subtly show through.
To use this technique on Tophinhanhdep.com, you would typically:
- Upload or drag your background image to the editor.
- Add your second image as an overlay layer.
- Locate the Opacity slider (often found in the layer panel or effects toolbar).
- Drag the slider from 100% (fully opaque) downwards. As you decrease the percentage, the top image will become more transparent, gradually fading into the background image.
The beauty of opacity adjustment lies in its simplicity and versatility. A high opacity (e.g., 75%) results in a more pronounced blend where both images are clearly discernible, while a low opacity (e.g., 30%) creates a more delicate, almost translucent effect, ideal for mood boards or thematic collections. This method is a great starting point for beginners in digital photography and photo manipulation, offering quick creative ideas and instantly improving the aesthetic of your images.

Quick Tip for Efficiency: Many photo editors, including Tophinhanhdep.com, offer keyboard shortcuts for quickly adjusting opacity. On a desktop, you might press a number key (1 for 10%, 2 for 20%, 0 for 100%) to instantly set the opacity of the selected layer. This can significantly speed up your workflow as you experiment with different blending intensities.
Unleashing Creativity with Layer Blend Modes
While opacity offers uniform transparency, layer blend modes provide a more sophisticated way for layers to interact, calculating how the pixels of one layer combine with the pixels of the layer beneath it. These modes allow for a vast array of creative effects, from dramatic darkening and brightening to intense contrast enhancements, making them a cornerstone of digital art and photo manipulation. Tophinhanhdep.com’s robust suite of image tools includes a wide range of blend modes, enabling you to explore diverse editing styles.
Each blend mode employs a different mathematical algorithm to achieve its effect:
- Multiply: This mode darkens the images, often used to simulate shadows or to blend textures where lighter areas disappear, and darker areas combine. It’s excellent for adding gritty overlays or intricate patterns onto a photo.
- Screen: The opposite of Multiply, Screen brightens images, making darker areas transparent and combining lighter areas. It’s ideal for creating luminous effects, adding light leaks, or blending ethereal elements like smoke or fog.
- Overlay: This popular blend mode increases the overall contrast and saturation between the two layers. It effectively blends the light areas of the top layer with the light areas of the bottom layer and the dark with the dark, resulting in a vibrant, punchy composite that can dramatically enhance backgrounds or digital art pieces.
- Soft Light / Hard Light: These are similar to Overlay but produce softer or harder effects, respectively. Soft Light offers a more subtle contrast boost, often creating a natural, dreamy ambiance, while Hard Light provides a more intense, almost photographic contrast.
- Difference / Exclusion: These modes create unusual, often abstract effects by subtracting pixel values. They are fantastic for generating artistic surreal abstractions or glitch-art styles, pushing the boundaries of conventional visual design.
To experiment with blend modes on Tophinhanhdep.com:
- Layer your two images as described for opacity.
- Select the top layer.
- Click on the blend mode dropdown menu (usually labeled “Normal” by default in the layers panel).
- Cycle through the various modes to preview their effects instantly. Tophinhanhdep.com’s user-friendly interface makes this exploration seamless.
By combining blend modes with opacity adjustments, you gain even finer control over your blended images. For example, using an “Overlay” blend mode at a reduced opacity can create a subtly rich and contrasted look, perfect for aesthetic backgrounds or high-resolution stock photos that need a unique editing style.
Mastering Layer Masks for Seamless Composites
While opacity and blend modes affect an entire layer, layer masks offer unparalleled precision, allowing you to control exactly where and how much of a layer is visible. This non-destructive editing technique is the gold standard for seamless photo manipulation and creative image blending, empowering you to integrate elements so flawlessly that they appear to have always belonged together.
A layer mask essentially uses shades of gray to determine transparency:
- White areas on the mask reveal the corresponding parts of the layer.
- Black areas on the mask conceal (hide) the corresponding parts of the layer, revealing the layer beneath.
- Grayscale areas (shades of gray) on the mask create varying degrees of transparency, resulting in smooth transitions between layers.
This selective control makes layer masks indispensable for tasks like integrating subjects into new backgrounds, adding atmospheric elements (like fog or mist), or blending textures only in specific areas.
The basic workflow for using a layer mask on Tophinhanhdep.com or similar platforms:
- Place your two images on separate layers, with the image you want to selectively blend on top.
- Select the top layer.
- Click the “Add Layer Mask” icon (often a square with a circle inside) in the layers panel. A white thumbnail will appear next to your layer’s preview, indicating an active mask.
- Select the Gradient Tool. For initial seamless blending, a “Black to White” gradient is often used.
- If you drag a black-to-white gradient across the image, starting where you want the top image to disappear and ending where you want it to remain visible, you’ll create a smooth fade. For example, dragging from right to left on the top layer would hide the right side of the top image and reveal the left, with a smooth transition in between.
- For more precise control, use the Brush Tool.
- Ensure your layer mask thumbnail is selected.
- Set your foreground color to black to paint away parts of the top layer, revealing the background.
- Set your foreground color to white to paint back parts of the top layer if you made a mistake.
- Adjust the brush’s size and “hardness” (soft-edged brushes create smoother transitions) to refine your blend, especially around intricate edges or areas requiring subtle integration.
Mastering layer masks is a game-changer for digital artists and photographers, allowing for advanced photo manipulation and the creation of truly unique visual designs. Tophinhanhdep.com’s intuitive interface makes learning and applying this technique approachable, helping you craft detailed and realistic composites for everything from high-resolution wallpapers to stunning thematic collections.
Quick Tip for Layer Masks: To view the mask itself (black, white, and gray areas) within your document, hold Alt (Windows) or Option (Mac) and click on the layer mask thumbnail. This provides a clear visual of how your blend is being applied. To toggle the mask on and off (to see the original unmasked layer), hold Shift and click the layer mask thumbnail.
Advanced Blending and Creative Compositing for Impactful Visuals
While the foundational techniques are powerful, true mastery of image blending opens doors to complex visual storytelling and dramatic digital art. Tophinhanhdep.com supports advanced users by integrating features that streamline intricate compositing workflows, allowing you to realize even your most ambitious creative ideas.
Beyond Basic Blending: Crafting Dramatic Visual Narratives
Creative compositing often involves more than just blending two images; it’s about constructing an entire scene, adjusting colors, adding atmospheric effects, and ensuring all elements feel natural together. This is where “Digital Art” and “Photo Manipulation” truly shine, allowing for the creation of unique “Image Inspiration & Collections” such as abstract or surreal compositions.
Consider the challenge of seamlessly integrating a subject into an entirely new environment, like placing a person into a fantastical landscape or a dramatic, stormy seascape. This requires a multi-step approach that Tophinhanhdep.com facilitates:
- Background Preparation: Before introducing new elements, the background might need refinement. This could involve removing distracting objects using tools like content-aware fill, or subtly muting areas that pull attention away from your intended subject.
- Subject Extraction and Placement: Carefully extracting your main subject (e.g., a person, an animal, an object) from its original background is crucial. Tophinhanhdep.com’s AI remover and intelligent selection tools can simplify this process, providing clean cutouts. Once extracted, the subject is placed onto the new background. Proportional resizing and repositioning are key to maintaining realism.
- Color and Tone Matching: One of the biggest challenges in compositing is making sure the colors and tones of the inserted subject match the new environment. Differences in lighting, color casts (e.g., a blue tint from an original indoor photo clashing with a warm sunset background), and contrast can make a composite look fake.
- Curves Adjustments: Using curves adjustment layers allows you to fine-tune the black points, white points, mid-tones, and individual color channels (Red, Green, Blue) to perfectly harmonize the subject with the background’s lighting. For example, if your background has a golden hour glow, you might adjust the blue channel in your subject layer to introduce more yellow.
- Hue/Saturation Adjustments: These are vital for removing unwanted color casts from the subject and making subtle adjustments to blend it in. Tophinhanhdep.com’s comprehensive image editing options allow for precise control over these parameters.
- Adding Atmospheric Elements: To further integrate subjects and create depth, elements like fog, mist, or intense light sources (hotspots) can be added. This often involves creating new layers, applying radial or linear gradients with specific blend modes (like Screen for brightening or Soft Light for subtlety), and then transforming them to fit the scene. This technique enhances visual design and adds depth to your “Beautiful Photography” or “Abstract” images.
- Depth of Field Effects: To create a sense of realism, replicating a natural camera lens effect like depth of field (blurring distant or foreground elements) is important. Applying a blur filter (e.g., Tilt-Shift or Gaussian Blur) selectively to parts of the background can make the subject pop and unify the scene.
- Final Grading and Effects: The final step often involves a holistic color grade over the entire composite, using tools like Camera Raw filters or comprehensive adjustment layers. This unifies all elements, adding a consistent mood, texture (e.g., grain), and artistic flair (e.g., vignettes or split toning for specific highlight/shadow colors). This process refines your “Thematic Collections” and helps them achieve “Trending Styles.”
This advanced workflow, supported by Tophinhanhdep.com’s powerful image tools and AI features, transforms simple image blending into a sophisticated form of digital art, capable of producing high-resolution, compelling visual narratives.
The Tophinhanhdep.com Advantage: Online Blending for Every Skill Level
Tophinhanhdep.com stands out as a premier online platform for image blending, designed to democratize advanced photo editing. Our user-friendly interface means you don’t need extensive “Photoshop skills” to achieve stunning results. We believe that everyone should have the ability to unleash their creativity and produce artistic visuals, whether for social media, professional portfolios, or personal expression.
- Accessibility: Tophinhanhdep.com offers a free online photo blender that requires no software installation. You can start blending images instantly from any web browser, making it ideal for quick edits or for users without access to expensive desktop applications.
- Intuitive Workflow: The step-by-step process is incredibly simple: upload your images, layer them, adjust exposure and transparency with easy-to-use sliders, apply effects, and download your masterpiece. This streamlined approach makes creating “Photoshop-like” aesthetic portraits or surreal abstractions achievable for anyone.
- Multiple Exquisite Overlays: Beyond basic blending, Tophinhanhdep.com provides a wide range of free overlays—from cityscapes and architectural elements to natural landscapes—to spark your imagination. These thematic collections allow for diverse creative ideas and help you generate unique backgrounds and aesthetic images.
- AI-Powered Enhancement: Tophinhanhdep.com integrates cutting-edge AI tools to elevate your blending experience. Our AI Upscalers can increase the resolution of your source images, ensuring your composites maintain high-quality clarity. AI Enhancers automatically optimize image quality, while AI Removers can effortlessly clean up backgrounds or unwanted elements, streamlining your photo manipulation process. These AI capabilities ensure that your digital photography is always at its best, supporting “High Resolution” and optimal image performance.
- Comprehensive Image Tools: Beyond blending, Tophinhanhdep.com offers a full suite of image tools including converters, compressors, and optimizers, ensuring that your final blended images are perfectly prepared for any use, whether as wallpapers, stock photos, or visual designs for graphic design projects.
With Tophinhanhdep.com, you can express your personality and attitude through compelling visual designs, breaking away from conventional imagery to create something truly original.
Practical Tips for Enhanced Blending and Visual Design
To truly master the art of image blending and leverage platforms like Tophinhanhdep.com to their fullest potential, incorporating a few best practices can make a significant difference in the quality and impact of your visual designs.
Workflow Enhancements and Best Practices
- Non-Destructive Editing: Always aim for non-destructive editing. This means using adjustment layers (Curves, Hue/Saturation, Black & White) and layer masks rather than directly altering image pixels. Tophinhanhdep.com’s approach supports this by allowing you to easily adjust and fine-tune effects without permanently changing your original photos. This flexibility is crucial for experimentation and refining your creative ideas.
- Smart Objects: When working with multiple images in desktop software or advanced online editors, converting layers to Smart Objects can be beneficial. This protects the original image data, allowing for scalable, non-destructive transformations and filters. Tophinhanhdep.com’s environment often handles this abstraction for you, but understanding the concept enhances your overall digital photography and photo manipulation skills.
- Keyboard Shortcuts: Familiarize yourself with keyboard shortcuts for frequently used tools and actions (like toggling masks, changing opacity, or cycling blend modes). This will dramatically speed up your workflow and make the creative process more fluid, especially when you’re deeply immersed in a complex visual design project.
- Image Resolution and Quality: Start with high-resolution source images whenever possible. Blending lower-quality images often results in noticeable pixelation or artifacts, especially in larger prints or high-resolution displays. Tophinhanhdep.com’s AI Upscalers can help salvage lower-res images, but starting strong is always best for optimal results in your photography.
Leveraging Overlays and Textures for Depth and Mood
Beyond simply blending two main subjects, integrating textures and abstract overlays can dramatically enhance the depth, mood, and aesthetic appeal of your images. Tophinhanhdep.com offers a rich library of resources and tools for this:
- Texture Overlays: Incorporate textures like grunge, fabric, paper, or even subtle light leaks to add a tactile quality or a vintage feel to your composites. Use blend modes like Multiply or Overlay at reduced opacity to integrate them seamlessly. This is a fantastic way to create unique backgrounds or give a distinct “Editing Style” to your pictures.
- Abstract Elements: Blend abstract images, such as blurred lights, smoke, or watercolor splashes, to create surreal abstraction or enhance the artistic visual look of your photos. These elements can add a sense of movement, mystery, or vibrant energy to your visual design.
- Thematic Collections: Explore Tophinhanhdep.com’s “Image Inspiration & Collections” for curated sets of photos and overlays that fit specific themes (e.g., “Nature,” “Sad/Emotional,” “Beautiful Photography”). These collections provide a springboard for new “Photo Ideas” and help you craft cohesive mood boards.
- Color Overlays: Instead of simply blending images, you can blend solid color layers or gradients with various blend modes to introduce specific color moods or lighting effects, transforming the emotional impact of your pictures. This is a core technique in “Visual Design” for graphic design and digital art.
By combining these practical tips with Tophinhanhdep.com’s powerful and accessible tools, you can transform your digital photography into captivating visual art, creating everything from stunning wallpapers and backgrounds to intricate photo manipulations that inspire and engage.
Conclusion
The art of blending two images is a testament to the boundless possibilities of digital creativity. From the subtle enhancements achieved through opacity adjustments to the dramatic transformations facilitated by blend modes and the precise control offered by layer masks, image blending allows you to transcend the limitations of a single photograph. It’s a skill that empowers you to craft unique visual narratives, express complex emotions, and design compelling aesthetic experiences.
Tophinhanhdep.com is your ultimate partner in this creative journey. Our platform demystifies the intricacies of photo manipulation, offering an intuitive online photo blender, a diverse array of free overlays, and intelligent AI tools that work in harmony to bring your most ambitious creative ideas to life. Whether you aim to produce eye-catching aesthetic portraits for social media, surreal abstract compositions for digital art, or high-resolution backgrounds for professional use, Tophinhanhdep.com provides the robust suite of image tools and inspiration you need.
Unleash your imagination, explore new editing styles, and start creating truly unforgettable visual designs today with Tophinhanhdep.com. Your next masterpiece is just a few clicks away.