How to Blend Two Images in Photoshop: A Comprehensive Guide

Blending two images in Photoshop is a fundamental skill for any visual designer, digital artist, or photography enthusiast looking to elevate their creations. It transforms ordinary photographs into extraordinary visual narratives, allowing for stunning composites, imaginative photo manipulation, and truly unique digital art. Whether you’re aiming to create an ethereal landscape, a surreal portrait, or a dynamic double-exposure effect, understanding the art of blending unlocks a vast realm of creative possibilities. This guide from Tophinhanhdep.com will walk you through three powerful yet accessible methods for merging images in Photoshop: Layer Masks, Blend Modes, and Layer Opacity. Each technique offers distinct advantages, catering to various creative ideas and desired editing styles, and by the end, you’ll be equipped to turn your photo ideas into captivating visual realities.

At Tophinhanhdep.com, we understand the quest for compelling imagery, from high-resolution wallpapers and aesthetic backgrounds to inspiring nature scenes and abstract compositions. Our comprehensive resources, including photography guides, stock photo collections, and advanced image tools like converters, compressors, optimizers, and AI upscalers, are designed to support your journey. This guide on blending images in Photoshop is another step towards mastering the craft of visual design and creating beautiful photography.
Setting Up Your Blending Workflow in Photoshop
Before diving into the blending techniques, a consistent and efficient workflow is essential. Proper preparation ensures your images are ready for manipulation and helps maintain high-resolution quality throughout the editing process.
1. Select Your Images Wisely: The success of your blend often begins with the images you choose. For the best results, select high-resolution images that complement each other in terms of subject matter, lighting, or intended aesthetic. You might combine a detailed foreground image with a textured background, or merge two thematic images to create a mood board reflecting a particular style. Tophinhanhdep.com offers vast collections of beautiful photography, nature shots, and abstract images that can serve as excellent starting points for your creative ideas.

2. Open Images as Layers:
- First, open your primary background image in Photoshop. Go to
File > Openand select your chosen image. This will become your base layer. - Next, to bring your second image into the same document as a new layer, navigate to the folder where it’s stored. Click and drag the second image directly onto your open Photoshop canvas. Release the mouse button, and Photoshop will automatically place it as a new, editable layer above your background image. Alternatively, you can go to
File > Place Embedded...orFile > Place Linked...and select your image.
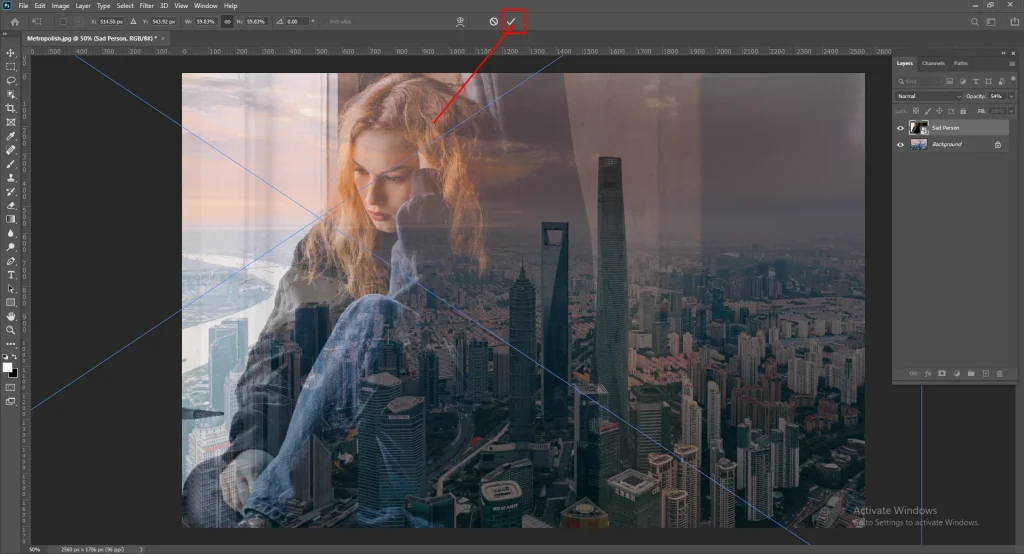
3. Position and Scale Your Overlay Image:
Once the second image is on top, it will likely appear with a transform box around it. You can drag the corners to resize it and click inside the box to move it, positioning it precisely where you want it relative to the background. Holding the Shift key while dragging corners maintains the aspect ratio, preventing distortion, which is crucial for maintaining the integrity of your digital photography. Once satisfied, hit Enter (or the tick mark in the options bar) to commit the transformation.
4. Duplicate and Lock Original Layers (Non-Destructive Editing): This is a golden rule in photo manipulation and graphic design. Always duplicate your original layers before applying any significant edits.
- Select a layer in the Layers panel (usually located on the lower right of your screen).
- Right-click on the layer and choose
Duplicate Layer..., or drag the layer to the “Create a New Layer” icon at the bottom of the Layers panel. - Click the padlock icon next to the original layer (often called “Background”) to unlock it if necessary, then immediately re-lock it. For your duplicate layers, you can rename them descriptively for better organization (e.g., “Woman Copy,” “City Overlay Copy”). This practice allows you to revert to an earlier state without losing progress on other elements, supporting flexible editing styles and experimentation.
With your images prepared and your workspace organized, you’re ready to explore the powerful blending techniques Photoshop offers for creating dynamic visual designs and captivating aesthetic photography.
Mastering Layer Masks for Precise Blending
Layer Masks are perhaps the most versatile and powerful tool for blending images in Photoshop. Unlike simply adjusting opacity, which affects the entire layer, a Layer Mask allows you to selectively control the transparency of different parts of an overlaying image. This precision is invaluable for complex photo manipulation, intricate digital art, and achieving specific creative ideas where certain elements need to seamlessly merge while others remain distinct. It offers a non-destructive way to hide or reveal portions of a layer, making it ideal for experimenting with backgrounds, aesthetic compositions, and detailed imagery.
The core principle of Layer Masks is simple: white reveals, black conceals. If you paint with white on the mask, that part of the layer becomes visible. If you paint with black, it becomes transparent, revealing the layer beneath. Shades of gray create semi-transparency. This allows for incredibly fine-tuned blending, especially when working with high-resolution images.
Setting Up Your Workflow for Layer Masks
After setting up your images as described above, with one as your background and another as your top overlay layer, you can begin the Layer Mask process.
1. Add a Layer Mask:
- Ensure your top overlay layer is selected in the Layers panel.
- Click the “Add Layer Mask” icon at the bottom of the Layers panel. This icon typically looks like a white rectangle with a black circle inside (or a hollow circle, resembling a camera).
- A white thumbnail will appear next to your layer’s preview thumbnail in the Layers panel, indicating that a Layer Mask has been applied. By default, the entire mask is white, meaning your entire top layer is visible.
2. Unlock Background Layers (If Necessary): If your bottom image is locked as a “Background” layer, you might need to unlock it by clicking the padlock icon next to its thumbnail. This converts it into a regular layer (e.g., “Layer 0”), allowing for full editing capabilities and ensuring it can interact properly with the layers above.
Applying the Gradient Tool for Seamless Transitions
The Gradient tool, when used with a Layer Mask, is excellent for creating smooth, gradual transitions between two images. This technique is perfect for blending skies, merging landscapes, or creating a subtle fade for aesthetic backgrounds.
1. Select the Layer Mask and Gradient Tool:
- Make sure the white Layer Mask thumbnail (not the image thumbnail) is selected in the Layers panel. A thin border will appear around it when selected.
- Select the Gradient Tool from the left toolbar. You can quickly access it by pressing
Gon your keyboard. - In the options bar at the top of the screen, ensure that a black-to-white gradient is selected. If not, click on the gradient swatch and choose the “Basics” preset with black to white.
2. Set Foreground/Background Colors:
- Look at the two overlapping color boxes at the bottom of your Photoshop toolbar. Ensure the foreground color is set to black and the background color is set to white. You can quickly switch between these by pressing
Xon your keyboard. PressingDresets them to default black and white. For concealing the top layer to reveal the bottom, you generally want black in the foreground.
3. Draw the Gradient:
- With the Layer Mask selected and the Gradient Tool active, click at one edge of your overlay image (the part you want to start blending) and drag the gradient line across to another point (where you want the overlay image to remain more visible).
- Release the mouse button. Photoshop will instantly apply the gradient to the mask, creating a seamless blend. For instance, if you drag from bottom to top, the bottom of the top layer will fade out, revealing the bottom image. Experiment with different drag directions and lengths to achieve the desired effect. The black part of the gradient will hide the layer, while the white part will reveal it, with the gray area creating the smooth transition. This is fantastic for integrating elements from nature photography into creative composites.
Refining Your Blend with the Brush Tool
For more precise and localized blending, the Brush Tool offers granular control over your Layer Mask, allowing you to fine-tune the hidden and revealed areas. This is where artistic photo manipulation truly shines, enabling you to sculpt your blend with detail.
1. Select the Layer Mask and Brush Tool:
- Again, ensure the Layer Mask thumbnail is selected in the Layers panel.
- Select the Brush Tool from the left toolbar, or press
Bon your keyboard. - In the options bar at the top, adjust the brush size and, crucially, the hardness. For smooth blends, a “soft” brush (0% hardness) is usually preferred. For crisp edges, increase the hardness. Adjust the opacity of your brush (not the layer!) to control the strength of your strokes.
2. Paint on the Mask:
- Use
Xto switch your foreground color to black to conceal parts of the top layer, revealing the background. - Use
Xagain to switch to white to reveal parts of the top layer, effectively “erasing” any blending mistakes or restoring desired elements. - Carefully paint over the areas of your overlay image where you want to reveal or hide. For example, you can use a soft black brush to gently fade the edges of a person in a portrait into a new background, or use white to bring back fine details. This method is incredibly useful for achieving subtle digital art effects or perfecting the edges of a double-exposure.
Congratulations, you’ve mastered the fundamentals of Layer Mask blending, a cornerstone of professional photo manipulation and visual design.
Unleashing Creativity with Blend Modes
Blend Modes in Photoshop offer a quick yet powerful way to combine images by defining how the pixels of one layer interact with the pixels of the layers beneath it. Rather than selectively hiding or revealing, Blend Modes perform mathematical calculations on the colors and luminosity of overlapping pixels, producing a vast array of creative effects. This makes them ideal for quickly exploring different editing styles, adding textures, creating thematic collections, or experimenting with trending styles for your photo ideas.
You’ll find the Blend Mode dropdown menu at the top of the Layers panel, typically set to “Normal” by default. Clicking on it reveals a list of 27 options, neatly grouped by the type of effect they create.
Understanding Different Blend Mode Categories
Each group of Blend Modes produces a similar overall effect, but with subtle variations, offering a broad palette for your digital art and aesthetic compositions.
- Normal Blend Modes:
- Normal (N): The default; the top layer completely covers the layers below.
- Dissolve (I): Shows pixels from lower layers in random patterns as opacity decreases, creating a grainy effect.
- Darken Blend Modes: These modes analyze the colors of the blend layer (top) and the base layer (bottom) and only keep the darker pixels, or darken the lighter pixels based on the blend layer.
- Darken (K): Compares blend and base colors, keeping the darker of the two.
- Multiply (M): Multiplies the base color by the blend color, resulting in a darker color. It simulates drawing with multiple markers on paper and is excellent for adding textures or shadows.
- Color Burn (B): Darkens the base color to reflect the blend color by increasing the contrast.
- Linear Burn (A): Darkens the base color to reflect the blend color by decreasing the brightness.
- Lighten Blend Modes: The opposite of darken modes; these keep the lighter pixels or lighten darker pixels based on the blend layer.
- Lighten (G): Compares blend and base colors, keeping the lighter of the two.
- Screen (S): Multiplies the inverse of the blend and base colors, resulting in a lighter color. It’s like projecting multiple slides onto the same screen and is perfect for adding light, glow, or bright textures.
- Color Dodge (D): Lightens the base color to reflect the blend color by decreasing the contrast.
- Linear Dodge (Add) (W): Lightens the base color to reflect the blend color by increasing the brightness.
- Contrast Blend Modes: These modes both darken and lighten, increasing overall contrast and punch. They are often used for integrating textures, creating dramatic effects, or enhancing backgrounds.
- Overlay (O): Multiplies dark areas and screens light areas, enhancing contrast while preserving highlights and shadows. It’s a very common blend mode for general image enhancement.
- Soft Light (F): A softer version of Overlay, like shining a diffused spotlight on the image.
- Hard Light (H): A more intense version of Overlay, like shining a harsh spotlight.
- Vivid Light (V), Linear Light (J), Pin Light (Z), Hard Mix (L): Offer varying degrees of contrast and color manipulation.
- Inversion Blend Modes: These modes create striking, often abstract effects by inverting or subtracting colors.
- Difference (E): Subtracts the darker of the two colors from the lighter color. Often creates a negative-like effect or vibrant, unexpected color shifts.
- Exclusion (X): Similar to Difference but produces lower contrast.
- Subtract, Divide: Perform direct subtraction or division of pixel values.
- Component Blend Modes: These focus on the color components (hue, saturation, color, luminosity) of the blend layer, allowing you to transfer specific color properties to the base layer.
- Hue (U): Preserves the luminosity and saturation of the base layer while adopting the hue of the blend layer.
- Saturation (T): Preserves the luminosity and hue of the base layer while adopting the saturation of the blend layer.
- Color (C): Preserves the luminosity of the base layer while adopting the hue and saturation of the blend layer. Often used for colorizing black and white images.
- Luminosity (Y): Preserves the hue and saturation of the base layer while adopting the luminosity of the blend layer. Great for fixing exposure or converting colors without affecting brightness.
Experimenting with these modes is key to developing unique editing styles and transforming high-resolution images into captivating digital art.
Combining Blend Modes with Opacity for Dynamic Effects
The true power of Blend Modes often comes to life when combined with the Opacity slider. This allows for fine-tuning the intensity of the blend mode effect, giving you greater control over your visual design.
1. Apply a Blend Mode:
- With your top overlay image layer selected in the Layers panel, click the Blend Mode dropdown menu and choose an option (e.g., Multiply, Screen, Overlay, Hard Light, Luminosity). Observe how the two images immediately interact.
2. Adjust Opacity:
- Located just to the right of the Blend Mode dropdown, the Opacity slider (ranging from 0% to 100%) controls the overall transparency of the selected layer. Lowering the opacity will diminish the strength of the active blend mode, allowing more of the underlying image to show through, creating subtler effects. For instance, a “Multiply” blend mode at 60% opacity might create a nice darker city scene composite while preserving details of a face.
3. Keyboard Shortcuts for Efficiency:
- To quickly cycle through blend modes, select the Move tool (
Vkey), then holdShiftand press+or-to move up or down the list. - For quick opacity adjustments, press
0for 100%,1for 10%,2for 20%, and so on. Press00for 0% opacity. For specific values like 25%, press2then5quickly. These shortcuts accelerate your workflow, allowing for rapid experimentation with trending styles and creative ideas.
4. The Role of “Fill”: Just below the Opacity slider, you’ll find the “Fill” slider. While Opacity affects the transparency of everything on a layer (pixels, layer styles, effects), “Fill” primarily affects the transparency of only the layer’s pixels and shapes, leaving layer styles (like drop shadows or strokes) at full strength. For certain “Special Blend Modes” (e.g., Color Burn, Linear Burn, Color Dodge, Linear Dodge, Vivid Light, Linear Light, Hard Mix, Difference), Fill can produce slightly different or more pronounced effects compared to Opacity, offering another layer of control for advanced photo manipulation.
5. Layering Multiple Images: Don’t limit yourself to just two images! You can stack multiple images, applying different blend modes and opacity/fill settings to each, to create complex, multi-layered digital art or rich thematic collections. While more challenging, this approach allows for intricate visual designs, from abstract backgrounds to detailed aesthetic composites.
Simplifying Blending with Layer Opacity
Layer Opacity is the most straightforward method for blending two images in Photoshop. It controls the overall transparency of a layer, allowing the underlying layers to show through. While simpler than Layer Masks or Blend Modes, it is incredibly effective for creating subtle overlays, ghosting effects, or simply fading one image into another. It’s often the first step in learning how to combine images and forms a core component of many editing styles.
Adjusting Transparency for Subtler Overlays
When you place one image on top of another, the top layer is typically at 100% opacity, completely obscuring the layers below. By decreasing this value, you allow the bottom image to become visible, creating a combined, partially transparent effect. This is perfect for generating aesthetic backgrounds or integrating textures subtly.
1. Select Your Top Layer:
- In the Layers panel, ensure the top image layer (the one you want to make transparent) is selected.
2. Locate the Opacity Slider:
- At the top right of the Layers panel, you’ll find the “Opacity” dropdown menu and slider, typically defaulting to 100%.
3. Adjust the Opacity Value:
- Click the dropdown arrow or drag the slider from 100% towards 0%. As you lower the percentage, the top layer will become more transparent, allowing the background image to show through.
- For instance, setting it to 70% allows 30% of the background to show, while 30% opacity makes the top layer very translucent, allowing the background to dominate.
- Keyboard Shortcuts: For rapid adjustments, with any tool selected (except a text editing tool), simply press the number keys on your keyboard:
0for 100% (or00for 0%),1for 10%,5for 50%, etc. For precise values like 25%, press2then5quickly. This instant feedback is great for quickly experimenting with different levels of transparency to achieve your desired creative idea.
This technique is excellent for creating double exposures where one image appears subtly over another, or for adding a watermark-like texture from Tophinhanhdep.com’s aesthetic collections.
The Interplay of Opacity and Fill
As mentioned earlier, while “Opacity” and “Fill” both control transparency, their behavior can subtly differ, especially when layer styles or certain Blend Modes are applied.
1. Understanding Fill:
- The “Fill” slider is located directly below “Opacity” in the Layers panel. For a standard layer with no styles, Opacity and Fill behave almost identically.
- However, if your layer has effects like a Drop Shadow, Inner Glow, or Stroke, reducing the “Fill” will make the layer’s content transparent while keeping the layer styles fully visible. Reducing “Opacity,” on the other hand, makes both the layer content and its styles transparent.
2. Combining Opacity/Fill with Blend Modes and Layer Masks: The true power of blending in Photoshop comes from combining these techniques.
- You can apply a Blend Mode (e.g., “Screen”) to your top layer, and then adjust its Opacity or Fill to fine-tune the intensity of that blend mode. This creates nuanced visual effects that go beyond simple transparency.
- Furthermore, you can add a Layer Mask to a layer that already has a Blend Mode and Opacity/Fill applied. This allows you to control the transparency of the blended layer with pixel-level precision, enabling complex photo manipulation for high-resolution images and sophisticated digital art. For example, you might use a “Soft Light” blend mode at 70% opacity for a soft, dreamy aesthetic, and then use a Layer Mask with a gradient to fade specific parts of that effect into your background.
By understanding how these tools interact, you gain unparalleled control over your image blending, enabling you to produce professional-grade visual designs and transform your digital photography with unique editing styles.
FAQs About Merging and Blending Photos in Photoshop
Here are answers to some common questions about blending images in Photoshop, reflecting the extensive knowledge available at Tophinhanhdep.com.
How do I merge multiple images into one in Photoshop? There are several core methods for merging multiple images. The most common and versatile are using Layer Masks for precise, selective blending, Blend Modes for pixel-level interaction effects, and Layer Opacity for general transparency control. These methods can be combined for complex photo manipulation and digital art.
How do you blend images in Photoshop? To blend images, open them as separate layers in Photoshop. Then, use either the Layer Mask (painting with black/white to reveal/conceal parts of the top layer), Blend Mode (selecting from options like Multiply, Screen, Overlay to change how pixels interact), or Layer Opacity (adjusting the transparency of the top layer) to combine them visually. Each method offers different creative ideas and editing styles.
Can you combine Blend Mode with Layer Opacity? Absolutely, and it’s highly recommended! Combining Blend Modes with Layer Opacity (or Fill) provides much greater control over the intensity of the blending effect. Apply a Blend Mode to your top layer, then adjust its Opacity (or Fill) slider to fine-tune how strongly the blend mode’s effect is applied, allowing for nuanced aesthetic backgrounds and creative compositions. You can even add a Layer Mask on top of this combination for ultimate precision.
How to stitch images together in Photoshop?
For stitching images to create panoramas (like wide landscape photography or abstract compositions), Photoshop has a dedicated feature: File > Automate > Photomerge. This tool intelligently aligns and blends multiple photos into a single, seamless panorama, offering options for various projection layouts. Tophinhanhdep.com also offers image tools that can help optimize stitched panoramas for high resolution.
How to create a Photoshop morph between two images?
To automatically blend the content of two aligned images, you can use the Edit > Auto-Blend Layers command. Select the two layers you want to morph/blend in the Layers panel, then go to Edit > Auto-Blend Layers. You can choose “Panorama” (for stitching images into a larger panorama) or “Stack Images” (which blends colors and content, working best with aligned layers like two portraits with similar profiles or for creating unique image collections).
How to merge two photos with the same background online? For quick online blending of two photos, especially if they share simple or identical backgrounds, you can explore Tophinhanhdep.com’s online image tools. While desktop Photoshop offers the most advanced control for complex photo manipulation, Tophinhanhdep.com’s web-based converters, compressors, and optimizers can support preparing and post-processing images for simpler merges.
Conclusion
The ability to blend two images in Photoshop is a cornerstone of compelling visual design and digital photography. Through mastering Layer Masks for intricate, selective control, exploring Blend Modes for diverse pixel interactions, and leveraging Layer Opacity for overall transparency, you unlock an expansive realm of creative possibilities. These techniques empower you to transform ordinary pictures into extraordinary pieces of visual art, from stunning high-resolution wallpapers and aesthetic backgrounds to profound abstract compositions or beautiful photography with deep emotional resonance.
At Tophinhanhdep.com, we encourage you to grab your favorite images – perhaps some inspiring nature shots or stock photos – and embark on an exciting journey of experimentation. Don’t be afraid to combine these methods, adjust settings, and push the boundaries of conventional editing styles. Every adjustment, every blend mode, and every stroke of the brush offers a chance to discover a new photo idea or create a unique visual narrative. Remember, your original copies are safe thanks to non-destructive editing practices, leaving you free to explore, create, and refine your artistic vision.
Whether you’re crafting a mood board, designing a graphic, or simply enhancing your personal image collections, the blending techniques learned here will serve as invaluable tools. And for all your supplementary needs, from image converters and compressors to AI upscalers and optimizers, Tophinhanhdep.com remains your go-to resource for comprehensive image tools and endless inspiration. Happy blending!